
我們今天要來實作個人檔案頁面。在實作之前,我們先來看看在 iOS 中的設定畫面風格。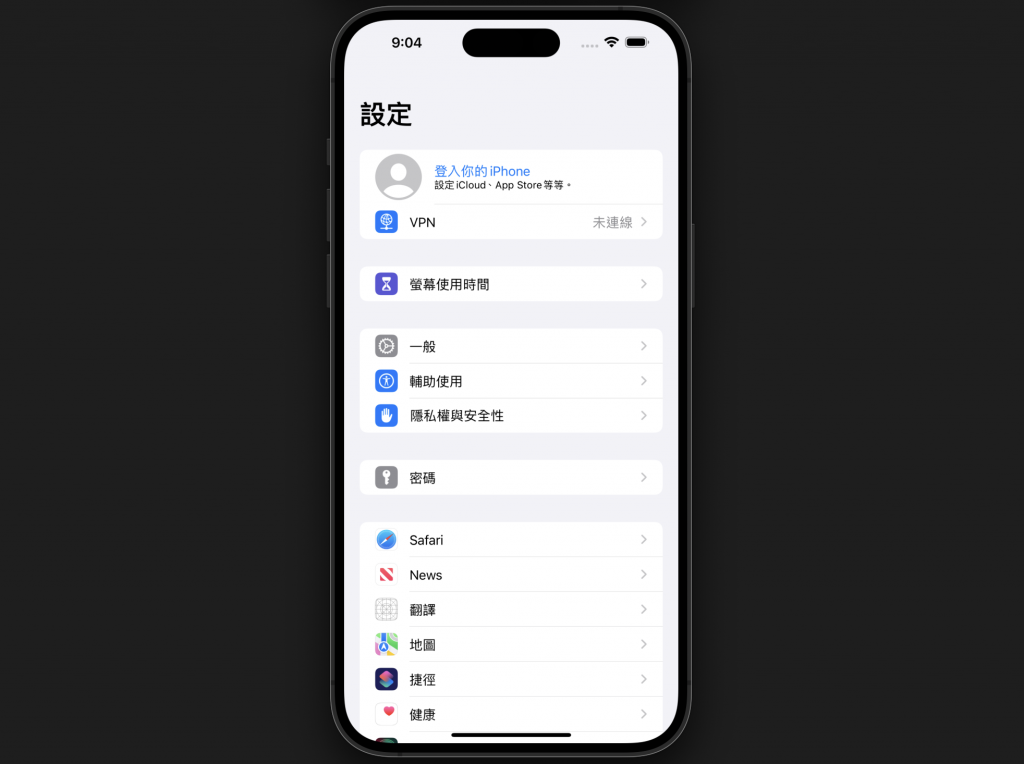
我們觀察到:
CupertinoColors.systemGroupedBackground
CupertinoListSection
CupertinoListTile
因此藉由本章介紹的小組件,我們便能打造出相同顯示風格的個人檔案頁面拉。今天的目標如下: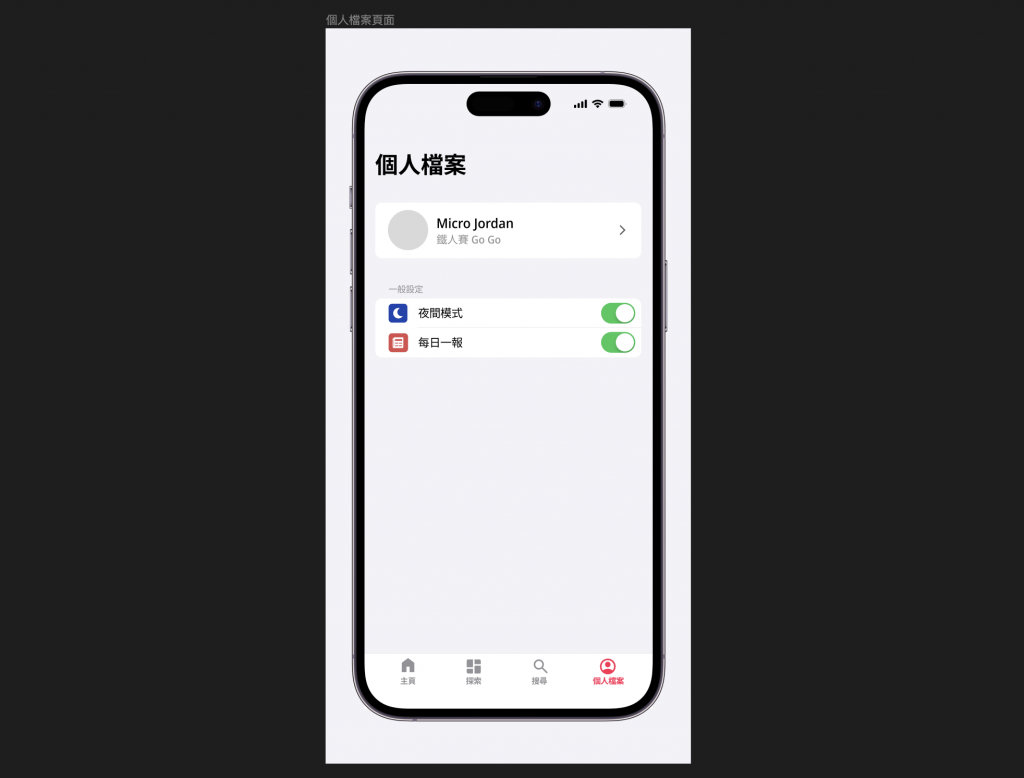
讓我們開始吧!
此部件我們在 Day17 的文章中就已經介紹過。ListTile 是可用於填充 ListView 的 widget,可容納一至三行的文字,並前置與後置 widget 搭配使用,在 Cupertino 中的則為 CupertinoListTile 。提供了兩種建構方式,不過差異並不大:
CupertinoListTile - 基本款用於顯示列表項目CupertinolistTile.notched - 僅增加列表項目與邊框間距,更貼近 iOS 應用中「筆記」與「提醒事項」中列表項目的顯示風格CupertinoListSection 用於顯示群組的列表,通常搭配 CupertinoListTile 一起使用,可設定 header 與 footer 針對群組項目進行標示。提供了兩種建構方式:
CupertinoListSection - 用於建構從邊緣至邊緣 (edge-to-edge) 的列表風格,如下: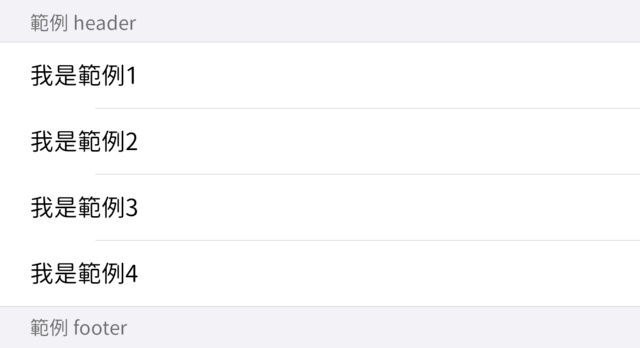
CupertinoListSection.insetGrouped - 建構的項目會使用圓角包裹,距離左右兩側也有預設 padding,如下: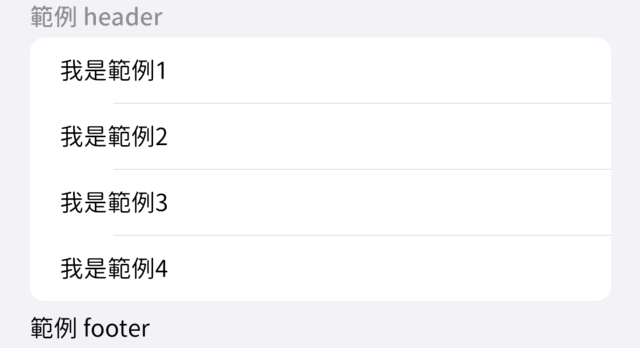
我們將使用第 2 種來建構我們的畫面。
首先請先開啟 profile_screen.dart 檔案,並請參考下面程式碼:
@override
Widget build(BuildContext context) {
  return const CupertinoPageScaffold(
    // 設為與設定頁面相同顏色
    backgroundColor: CupertinoColors.systemGroupedBackground,
    child: CustomScrollView(slivers: [
      CupertinoSliverNavigationBar(
        largeTitle: Text(
          '個人資料',
        ),
        // 一樣改成與設定頁面相同顏色
        backgroundColor: CupertinoColors.systemGroupedBackground,
        // 關閉原先頂端導覽列底部的邊框
        border: null,
      ),
      SliverToBoxAdapter(child: Text('Profile Screen'))
    ]));
}
我們要先製作用於顯示個人資訊的 profile card,請於 widgets 資料夾底下建立 profile_card.dart ,並請參考下方程式碼:
Widget build(BuildContext context) {
  return CupertinoListSection.insetGrouped(
    children: [
      CupertinoListTile(
          title: const Text('使用者名稱',
              style: TextStyle(fontSize: 20, height: 1.2)),
          subtitle: const Text('個人簽名'),
          padding: const EdgeInsets.symmetric(vertical: 12, horizontal: 16),
          leadingSize: 60,
          leading: Container(
            width: 50,
            height: 50,
            decoration: const BoxDecoration(
                shape: BoxShape.circle, color: CupertinoColors.systemGrey4),
          ),
          trailing: const Icon(CupertinoIcons.right_chevron,
              size: 20, color: CupertinoColors.systemGrey),
          onTap: () async {}),
    ],
  );
}
此部分我們皆尚未與 firbase 提供的 user 資訊進行串接,因此使用者名稱、個人簽名內容與頭貼皆先暫時寫死資料,之後會再回來介紹此部分較正統的作法。
現在要來製作顯示「夜間模式」、「每日一報」的群組列表,從設計稿可以看到兩個項目末端皆提供一個開關可進行切換。這部分是使用 CupertinoSwitch 組件來實現的,讓我們先來看看其類別定義:
const CupertinoSwitch({
  super.key,
  required this.value,      // 為 bool 型態,表示當前狀態
  required this.onChanged,  // 當狀態改變時觸發的事件
  this.activeColor,
  this.trackColor,
  this.thumbColor,
  this.applyTheme,
  this.focusColor,
  this.dragStartBehavior = DragStartBehavior.start,
});
由於需要維護狀態來分別紀錄代表夜間模式與每日一報的開關狀態,因此首先須先將 ProfileScreen 更改為 stateful widget,並分別宣告兩個狀態的變數。舉其中一個為例:
// 表示夜間模式 switch 的狀態
bool _isDarkMode = false;

// 夜間模式 list tile 範例
CupertinoListTile.notched(
    title: const Text('夜間模式'),
    // 開頭的顯示圖標
    leading: DecoratedBox(
        decoration: BoxDecoration(
            borderRadius: BorderRadius.circular(6),
            color: CupertinoColors.systemIndigo),
        child: const Padding(
          padding: EdgeInsets.all(4),
          child: Icon(CupertinoIcons.moon_fill,
              color: CupertinoColors.white, size: 20),
        )),
    // 尾端的 switch
    trailing: CupertinoSwitch(
        value: _isDarkMode,        // 初始化當前狀態
        onChanged: (bool? value) { // 當狀態發生改變時,牽動改變 switch 狀態
          setState(() {
            _isDarkMode = value!;
          });
})),
剩下的「每日一報」的 ListTile 就交由各位自行練習創建拉,參考程式碼會置於文末。
目前為止我們的四個分頁都已經有畫面拉,不過我們一直還沒有將探索頁面中的「新聞分類」與「新聞來源」按鈕導向至正確的搜尋結果頁面,現在是時候把它完成了!
API 接口 - http://localhost:3000/posts?category=[新聞分類]&source.name=[新聞來源]
請打開 NewsPostRepository 檔案,我們可以直接針對 getPosts 進行改寫。
Future<List<NewsPost>> getPosts(
      {String query = '',
      String source = '',
      String category = '',
      int page = 1,
      int limit = 20}) async {
  try {
    String url = 'http://localhost:3000/posts?q=$query&_page=$page&_limit=$limit';
    // 若新聞來源不為空字串時則加入 querystring
    if (source.isNotEmpty) {
      url += '&source.name=$source';
    }
    if (category.isNotEmpty) {
      url += '&category=$category';
    }
    final response = await http.get(Uri.parse(url));
    if (response.statusCode == 200) {
      final List<dynamic> posts = jsonDecode(response.body);
      return posts.map((post) => NewsPost.fromJson(post)).toList();
    }
    throw Exception('取得失敗');
  } catch (e) {
    return Future.error('連線錯誤');
  }
}
接下來,由於搜尋結果頁面目前僅支援搜尋字串功能。我們可以再支援搜尋新聞分類或新聞來源功能,雖然當然可以額外寫頁面來達成效果,但我個人認為兩者做的事情都是搜尋,因此毋需額外再新增頁面。
請開啟 result_screen.dart 檔案,我們需要進行些許的修改好讓其可以兼容其他兩個的搜尋。請參考下列程式碼
class ResultScreen extends StatefulWidget {
  // 原先 query 為 required,但現在可能傳入 query / source / category 其中一種
  final String? query;
  final String? source;
  final String? category;
  const ResultScreen({super.key, this.query, this.source, this.category});

  @override
  State<ResultScreen> createState() => _ResultScreenState();
}
接下來在 initState 根據傳入參數為何,給定不同的搜尋結果
@override
void initState() {
  super.initState();
  // 若傳入 source 不為 null,則強制解封 source ! 使用文字下去搜尋
  // 其餘依此類推
  if (widget.source != null) {
    _posts = NewsPostRepository().getPosts(source: widget.source!);
  } else if (widget.category != null) {
    _posts = NewsPostRepository().getPosts(category: widget.category!);
  } else {
    _posts = NewsPostRepository().getPosts(query: widget.query!);
  }
}
最後在建構畫面時,頂端列的顯示文字也使用同樣的處理方式。若是以關鍵字搜尋時,頂端列標題顯示關鍵字名稱;以新聞分類下去搜尋時則就顯示新聞分類的名字。因此可將 CupertinoNavigationBar 的 middle 參數改為承接以下函式:
Widget getNavigationBarTitle() {
  var style = CupertinoTheme.of(context)
      .textTheme
      .navLargeTitleTextStyle
      .copyWith(fontSize: 20);
  // 若搜尋字串不為空則顯示搜尋字串,其餘依此類推
  if (widget.query != null) {
    return Text(widget.query!, style: style);
  } else if (widget.category != null) {
    return Text(widget.category!, style: style);
  } else {
    // 當然你也可以弄的好看一點加上 source icon,教給各位讀者們發揮囉
    return Text(widget.source!, style: style);
  }
}
最終結果如下圖: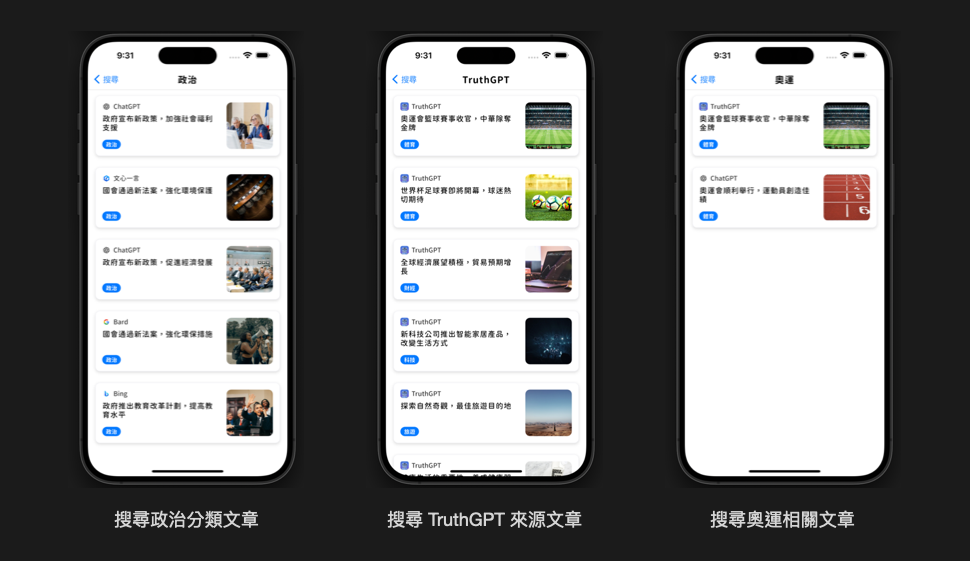
今天我們使用了 CupertinoListSection 搭配 CupertinoListTile 打造了類似 iOS 設定 APP 的顯示風格的個人檔案頁面,除此之外也將其餘導向頁面的功能一併完成了。
從在個人檔案頁面中,我們看到了兩個應用程式功能中未完成的項目,夜間模式與每日一報的通知。我們將會在接下來的篇章中一一的提及~
今天的參考程式碼:https://github.com/ChungHanLin/micro_news_tutorial/tree/day21/micro_news_app

 iThome鐵人賽