接續上篇文章,今天來實做fragment2,它的內容主要為抓取各地區的氣候資料,並顯示出該地區位於的縣市,以及當地的氣候狀況,話不多說,直接開始實作。
首先layout的部分,我們需要的元件有:六個textview、一個edittext、一個button。
效果如右圖: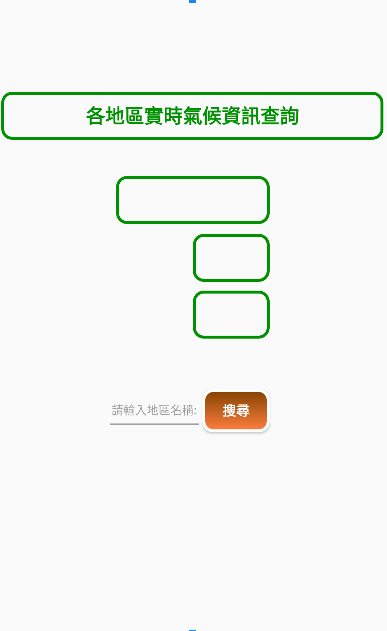
當在下方的輸入框我們輸入要搜尋的地區名稱按下搜尋後,最上面的框會顯示出地區名稱,再下來的第二個小框會顯示出氣候資訊,最底下的小框會顯示出該地區所在的縣市。
先把介面附上:
fragment2:
<?xml version="1.0" encoding="utf-8"?>
<FrameLayout xmlns:android="http://schemas.android.com/apk/res/android"
    xmlns:app="http://schemas.android.com/apk/res-auto"
    xmlns:tools="http://schemas.android.com/tools"
    android:layout_width="match_parent"
    android:layout_height="match_parent"
    tools:context=".Fragment2">

    <androidx.constraintlayout.widget.ConstraintLayout
        android:layout_width="match_parent"
        android:layout_height="match_parent">

        <TextView
            android:id="@+id/textView4"
            android:layout_width="398dp"
            android:layout_height="50dp"
            android:background="@drawable/linestyle2"
            android:gravity="center"
            android:text="各地區實時氣候資訊查詢"
            android:textSize="20dp"
            android:textStyle="bold"
            android:textColor="#FF009100"
            app:layout_constraintBottom_toBottomOf="parent"
            app:layout_constraintEnd_toEndOf="parent"
            app:layout_constraintHorizontal_bias="0.493"
            app:layout_constraintStart_toStartOf="parent"
            app:layout_constraintTop_toTopOf="parent"
            app:layout_constraintVertical_bias="0.159" />

        <EditText
            android:id="@+id/editTextText2"
            android:layout_width="100dp"
            android:layout_height="45dp"
            android:ems="10"
            android:gravity="center"
            android:hint="請輸入地區名稱:"
            android:inputType="text"
            android:text=""
            android:textSize="12dp"
            app:layout_constraintBottom_toBottomOf="parent"
            app:layout_constraintEnd_toEndOf="parent"
            app:layout_constraintHorizontal_bias="0.372"
            app:layout_constraintStart_toStartOf="parent"
            app:layout_constraintTop_toTopOf="parent"
            app:layout_constraintVertical_bias="0.661" />

        <Button
            android:id="@+id/button8"
            android:layout_width="70dp"
            android:layout_height="45dp"
            android:background="@drawable/orangebtn"
            android:text="搜尋"
            android:textColor="@color/white"
            android:textStyle="bold"
            app:layout_constraintBottom_toBottomOf="parent"
            app:layout_constraintEnd_toEndOf="parent"
            app:layout_constraintHorizontal_bias="0.633"
            app:layout_constraintStart_toStartOf="parent"
            app:layout_constraintTop_toTopOf="parent"
            app:layout_constraintVertical_bias="0.662" />

        <TextView
            android:id="@+id/textView12"
            android:layout_width="160dp"
            android:layout_height="50dp"
            android:background="@drawable/linestyle2"
            android:gravity="center"
            android:text=""
            android:textSize="20dp"
            android:textStyle="bold"
            android:textColor="#FF009100"
            app:layout_constraintBottom_toBottomOf="parent"
            app:layout_constraintEnd_toEndOf="parent"
            app:layout_constraintHorizontal_bias="0.501"
            app:layout_constraintStart_toStartOf="parent"
            app:layout_constraintTop_toTopOf="parent"
            app:layout_constraintVertical_bias="0.303" />

        <TextView
            android:id="@+id/textView9"
            android:layout_width="80dp"
            android:layout_height="50dp"
            android:background="@drawable/linestyle2"
            android:gravity="center"
            android:text=""
            android:textStyle="bold"
            android:textSize="20dp"
            android:textColor="#FF009100"
            app:layout_constraintBottom_toBottomOf="parent"
            app:layout_constraintEnd_toEndOf="parent"
            app:layout_constraintHorizontal_bias="0.622"
            app:layout_constraintStart_toStartOf="parent"
            app:layout_constraintTop_toTopOf="parent"
            app:layout_constraintVertical_bias="0.402" />

        <TextView
            android:id="@+id/textView10"
            android:layout_width="80dp"
            android:layout_height="50dp"
            android:gravity="center"
            android:text=""
            android:textStyle="bold"
            android:textSize="20dp"
            android:textColor="#FF009100"
            app:layout_constraintBottom_toBottomOf="parent"
            app:layout_constraintEnd_toEndOf="parent"
            app:layout_constraintHorizontal_bias="0.38"
            app:layout_constraintStart_toStartOf="parent"
            app:layout_constraintTop_toTopOf="parent"
            app:layout_constraintVertical_bias="0.402" />

        <TextView
            android:id="@+id/textView11"
            android:layout_width="80dp"
            android:layout_height="50dp"
            android:background="@drawable/linestyle2"
            android:gravity="center"
            android:text=""
            android:textStyle="bold"
            android:textSize="20dp"
            android:textColor="#FF009100"
            app:layout_constraintBottom_toBottomOf="parent"
            app:layout_constraintEnd_toEndOf="parent"
            app:layout_constraintHorizontal_bias="0.622"
            app:layout_constraintStart_toStartOf="parent"
            app:layout_constraintTop_toTopOf="parent"
            app:layout_constraintVertical_bias="0.499" />

        <TextView
            android:id="@+id/textView13"
            android:layout_width="80dp"
            android:layout_height="50dp"
            android:gravity="center"
            android:text=""
            android:textStyle="bold"
            android:textSize="20dp"
            android:textColor="#FF009100"
            app:layout_constraintBottom_toBottomOf="parent"
            app:layout_constraintEnd_toEndOf="parent"
            app:layout_constraintHorizontal_bias="0.38"
            app:layout_constraintStart_toStartOf="parent"
            app:layout_constraintTop_toTopOf="parent"
            app:layout_constraintVertical_bias="0.499" />
    </androidx.constraintlayout.widget.ConstraintLayout>
</FrameLayout>
接著我們來寫主程式,大致上方法都與fragment1一樣。
fragment2:
public class Fragment2 extends Fragment {
    private static final String base="https://opendata.cwb.gov.tw/api/v1/rest/datastore/";
    private static final String author="填入金鑰";
    private static final String element="Weather";
    private TextView tx1,tx2,tx3,tx4,tx5;
    private EditText ed1;
    private Button bt2;
    public Fragment2() {
    }

    @Override
    public View onCreateView(LayoutInflater inflater, ViewGroup container,
                             Bundle savedInstanceState) {
        View view=inflater.inflate(R.layout.fragment_2, container, false);
        tx1=view.findViewById(R.id.textView12);
        tx2=view.findViewById(R.id.textView10);
        tx3=view.findViewById(R.id.textView9);
        tx4=view.findViewById(R.id.textView13);
        tx5=view.findViewById(R.id.textView11);
        ed1=view.findViewById(R.id.editTextText2);
        bt2=view.findViewById(R.id.button8);
        return view;
    }

    @Override
    public void onViewCreated(@NonNull View view, @Nullable Bundle savedInstanceState) {
        super.onViewCreated(view, savedInstanceState);

        Retrofit retrofit = new Retrofit.Builder()
                .baseUrl(base)
                .addConverterFactory(GsonConverterFactory.create())
                .build();

        weather2 myAPIService = retrofit.create(weather2.class);

        bt2.setOnClickListener(new View.OnClickListener(){
            @Override
            public void onClick(View view){

                myAPIService.getweather(author,element).enqueue(new Callback<MyResponse2>() {
                    @Override
                    public void onResponse(Call<MyResponse2> call, Response<MyResponse2> response2) {
                        Log.d("title", "請求成功");

                        //利用迴圈取出與輸入的字串相同的那筆資料所有資訊
                        for(int j=0;j<response2.body().records.location.size();j++)
                        {
                            if(response2.body().records.location.get(j).locationName.equals(ed1.getText().toString()))
                            {
                                Log.d("title", "請求成功");
                                tx1.setText(response2.body().records.location.get(j).locationName);
                                tx2.setText(response2.body().records.location.get(0).weatherElement.get(0).elementName);
                                tx3.setText(response2.body().records.location.get(j).weatherElement.get(0).elementValue);
                                tx4.setText(response2.body().records.location.get(0).parameter.get(0).parameterName);
                                tx5.setText(response2.body().records.location.get(j).parameter.get(0).parameterValue);
                            }
                        }
                    }
                    @Override
                    public void onFailure(Call<MyResponse2> call, Throwable t) {
                        Log.d("title", "請求失敗");
                    }
                });
            }
        });
    }
}
順便將interface和MyResponse的程式附上:
weather2:
public interface weather2 {
    @GET("O-A0001-001")
    Call<MyResponse2> getweather(
            @Query("Authorization") String myauthorization,
            @Query("elementName") String myelementName);
}
MyResponse2:
public class MyResponse2 {
    public Records records;
    public class Records
    {
        public List<Location> location;

        public class Location
        {
            public String locationName;
            public List<WeatherElement> weatherElement;
            public List<Parameter> parameter;

            public class WeatherElement
            {
                public String elementName;
                public String elementValue;
            }
            public class Parameter
            {
                public String parameterName;
                public String parameterValue;
            }
        }
    }
}
到這裡就完成了第二個頁面,我們來看看實際效果:
基本上實作的部分就到這裡完全結束了,下一篇文章就來總結一下這一個月的心得~~


 iThome鐵人賽