今天我們進入最主要的功能,也就是利用API+retrofit抓取兩種氣象局開放平台的資料,在這之前,我們要先做出兩個分頁,然後以tablayout+viewpager的方式分別加入兩種資料。
首先我們先在MainActivity拉出元件tablayout和viewpager,其中tablayout有兩個item,方法就跟之前介紹的一樣,如果還沒有看過的可以參閱先前的文章。
這裡先將layout附上:
activity_main.xml:
<?xml version="1.0" encoding="utf-8"?>
<androidx.constraintlayout.widget.ConstraintLayout xmlns:android="http://schemas.android.com/apk/res/android"
    xmlns:app="http://schemas.android.com/apk/res-auto"
    xmlns:tools="http://schemas.android.com/tools"
    android:layout_width="match_parent"
    android:layout_height="match_parent"
    android:orientation="vertical"
    tools:context=".MainActivity">

    <com.google.android.material.tabs.TabLayout
        android:id="@+id/tl"
        android:layout_width="409dp"
        android:layout_height="wrap_content"
        app:layout_constraintEnd_toEndOf="parent"
        app:layout_constraintStart_toStartOf="parent"
        app:layout_constraintTop_toTopOf="parent"
        app:tabSelectedTextColor="#FF0072E3"
        app:tabTextColor="#FFADADAD"
        app:tabIndicatorColor="#FF0072E3">

        <com.google.android.material.tabs.TabItem
            android:layout_width="wrap_content"
            android:layout_height="wrap_content"
            android:text="1" />

        <com.google.android.material.tabs.TabItem
            android:layout_width="wrap_content"
            android:layout_height="wrap_content"
            android:text="2"
            tools:layout_editor_absoluteX="138dp"
            tools:layout_editor_absoluteY="129dp" />

    </com.google.android.material.tabs.TabLayout>

    <androidx.viewpager2.widget.ViewPager2
        android:id="@+id/vp2"
        android:layout_width="409dp"
        android:layout_height="609dp"
        app:layout_constraintBottom_toBottomOf="parent"
        app:layout_constraintEnd_toEndOf="parent"
        app:layout_constraintStart_toStartOf="parent" />
</androidx.constraintlayout.widget.ConstraintLayout>
tab的樣式也可以參閱之前的文章。
再來新增兩個fragment,將兩個fragment綁定在tablayout和viewpager,同樣利用之前介紹的方法。
添加一個適配器FragmentMainAdapter:
FragmentMainAdapter:
public class FragmentMainAdapter extends FragmentStateAdapter {
    Fragment1 fragment_1;
    Fragment2 fragment_2;
    public FragmentMainAdapter(@NonNull FragmentManager fragmentManager, @NonNull Lifecycle lifecycle) {
        super(fragmentManager, lifecycle);
    }

    @NonNull
    @Override
    public Fragment createFragment(int position) {
        switch (position) {
            case 0:
                fragment_1 = new Fragment1();
                return fragment_1;
            default:
                fragment_2 = new Fragment2();
                return fragment_2;
        }
    }

    @Override
    public int getItemCount(){
        return 2;
    }
}
MainActivity:
public class MainActivity extends AppCompatActivity {

    private TabLayout tabLayout;
    private ViewPager2 viewPager2;
    private String[] tab_title = {"各縣市氣溫資訊","各地區氣候資訊"};
    @Override
    protected void onCreate(Bundle savedInstanceState) {
        super.onCreate(savedInstanceState);
        setContentView(R.layout.activity_main);

        tabLayout=findViewById(R.id.tl);
        viewPager2=findViewById(R.id.vp2);

        viewPager2.setAdapter(new FragmentMainAdapter(getSupportFragmentManager(),getLifecycle()));

        new TabLayoutMediator(tabLayout, viewPager2,true, new TabLayoutMediator.TabConfigurationStrategy() {
            @Override
            public void onConfigureTab(@NonNull TabLayout.Tab tab, int position) {
                viewPager2.setCurrentItem(tab.getPosition());
            }
        }).attach();
        for(int i = 0 ; i < tabLayout.getTabCount() ; i++){
            tabLayout.getTabAt(i).setText(tab_title[i]);
        }
    }
}
再來就介紹下fragment1的介面,這個介面我們會將抓取到各縣市的最高氣溫與最低氣溫顯示出來。使用到的元件有:四個textview、一個spinner、一個button。
完成如右: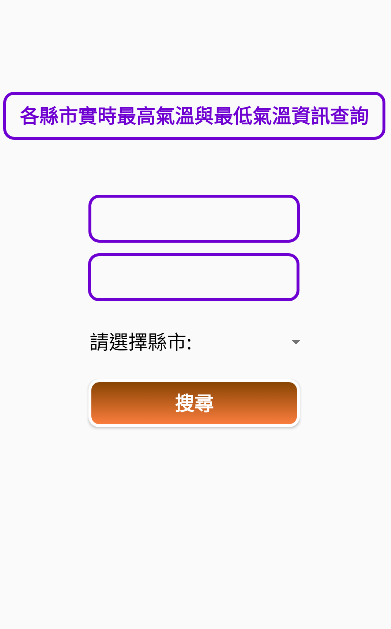
可以使用選單選擇縣市,選擇完按下搜尋按鈕後,就會將抓取到的資料顯示在中間兩個框中,分別顯示出最高氣溫與最低氣溫。
大部分的製作方法可以參閱之前介紹API的文章,裡面有實作的過程,這裡就不再贅述。值得一提的是,主要程式都是寫在onViewCreated()中,但綁定元件的部分,我們移至onCreateView()這個方法中進行:
@Override
public View onCreateView(LayoutInflater inflater, ViewGroup container,
                         Bundle savedInstanceState) {
    View view = inflater.inflate(R.layout.fragment_1, container, false);
    //綁定元件及變數
    bts=view.findViewById(R.id.search);
    tvMax=view.findViewById(R.id.tvMax);
    tvMin=view.findViewById(R.id.tvMin);
    spinner = view.findViewById(R.id.spinner);
    return view;
}
因為fragment中沒有findViewById()方法,所以我們設定一個變數view,並將介面綁定給view,再以view呼叫findViewById()方法。
這裡直接附上fragment1的程式:
fragment1:
public class Fragment1 extends Fragment {
    private static final String base="https://opendata.cwb.gov.tw/api/v1/rest/datastore/";
    //金鑰
    private static final String author="填入金鑰";
    //想要抓取的元素名稱
    private static final String element1="MaxT",element2="MinT";
    //定義變數
    private Button bts;
    private TextView tvMax,tvMin;
    private String location=city[0];
    private Spinner spinner;
    //定義下拉式選單的內容
    static final String[] city=
            {"宜蘭縣","花蓮縣","臺東縣","澎湖縣","金門縣","連江縣","臺北市","新北市","桃園市","臺中市","臺南市",
                    "高雄市","基隆市","新竹縣","新竹市","苗栗縣","彰化縣","南投縣","雲林縣","嘉義縣","嘉義市","屏東縣"};
    static final String[] array1= {element1,element2};
    public Fragment1() {
    }

    @Override
    public View onCreateView(LayoutInflater inflater, ViewGroup container,
                             Bundle savedInstanceState) {
        View view = inflater.inflate(R.layout.fragment_1, container, false);
        //綁定元件及變數
        bts=view.findViewById(R.id.search);
        tvMax=view.findViewById(R.id.tvMax);
        tvMin=view.findViewById(R.id.tvMin);
        spinner = view.findViewById(R.id.spinner);
        return view;
    }
    @Override
    public void onViewCreated(@NonNull View view, @Nullable Bundle savedInstanceState) {
        super.onViewCreated(view, savedInstanceState);

        Retrofit retrofit = new Retrofit.Builder()
                .baseUrl(base)
                .addConverterFactory(GsonConverterFactory.create())
                .build();

        weather myAPIService = retrofit.create(weather.class);

        //下拉式選單設定
        ArrayAdapter<CharSequence> adapter = new ArrayAdapter(getActivity(),android.R.layout.simple_spinner_item,city);
        spinner.setAdapter(adapter);

        //下拉式選單監聽器
        spinner.setOnItemSelectedListener(new AdapterView.OnItemSelectedListener() {
            @Override
            public void onItemSelected(AdapterView<?> adapterView, View view, int i, long l) {
                location=city[i];
            }

            @Override
            public void onNothingSelected(AdapterView<?> adapterView) {
            }
        });

        bts.setOnClickListener(new View.OnClickListener() {
            @Override
            public void onClick(View view) {
                for(int j=0;j<2;j++)
                {
                    if(j==0)
                    {
                        myAPIService.getweather(author, location, array1[j]).enqueue(new Callback<MyResponse>() {
                            @Override
                            public void onResponse(Call<MyResponse> call, Response<MyResponse> response) {
                                Log.d("title", "請求成功");
                                //Log.d("title", response.body().records.location.get(0).locationName);
                                //Log.d("title", response.body().records.location.get(0).weatherElement.get(0).time.get(0).parameter.parameterName);
                                tvMax.setText(location + "今日最高溫度:" + response.body().records.location.get(0).weatherElement.get(0).time.get(0).parameter.parameterName
                                        + '°' + response.body().records.location.get(0).weatherElement.get(0).time.get(0).parameter.parameterUnit);
                            }

                            @Override
                            public void onFailure(Call<MyResponse> call, Throwable t) {
                                Log.d("title", "請求失敗");
                            }
                        });
                    }
                    else if(j==1)
                    {
                        myAPIService.getweather(author, location, array1[j]).enqueue(new Callback<MyResponse>() {
                            @Override
                            public void onResponse(Call<MyResponse> call, Response<MyResponse> response) {
                                tvMin.setText(location + "今日最低溫度:" + response.body().records.location.get(0).weatherElement.get(0).time.get(0).parameter.parameterName
                                        + '°' + response.body().records.location.get(0).weatherElement.get(0).time.get(0).parameter.parameterUnit);
                            }

                            @Override
                            public void onFailure(Call<MyResponse> call, Throwable t) {
                            }
                        });
                    }
                }
            }
        });
    }
}
完成之後來看下成果: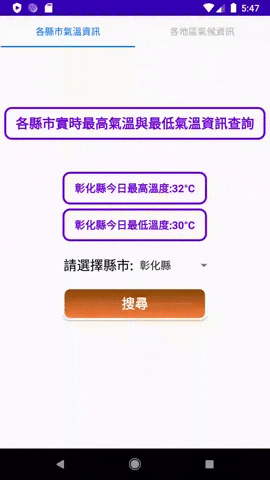
今天就先做完fragment1,明天來繼續做fragment2~~


 iThome鐵人賽