花了兩天稍微了解 FireStore Database 的 CRUD 後,今天著手將我使用先前做好的表單元件們,組裝成店家資料維護頁面,但一直卡在明明登入了 user ,卻一直讀不到 user 的問題上,我仔細觀察了 API,並使用 console.log 與 Redux 工具重複查看 n 次,找不太到問題,所以設了停損點,先開始做其他的...
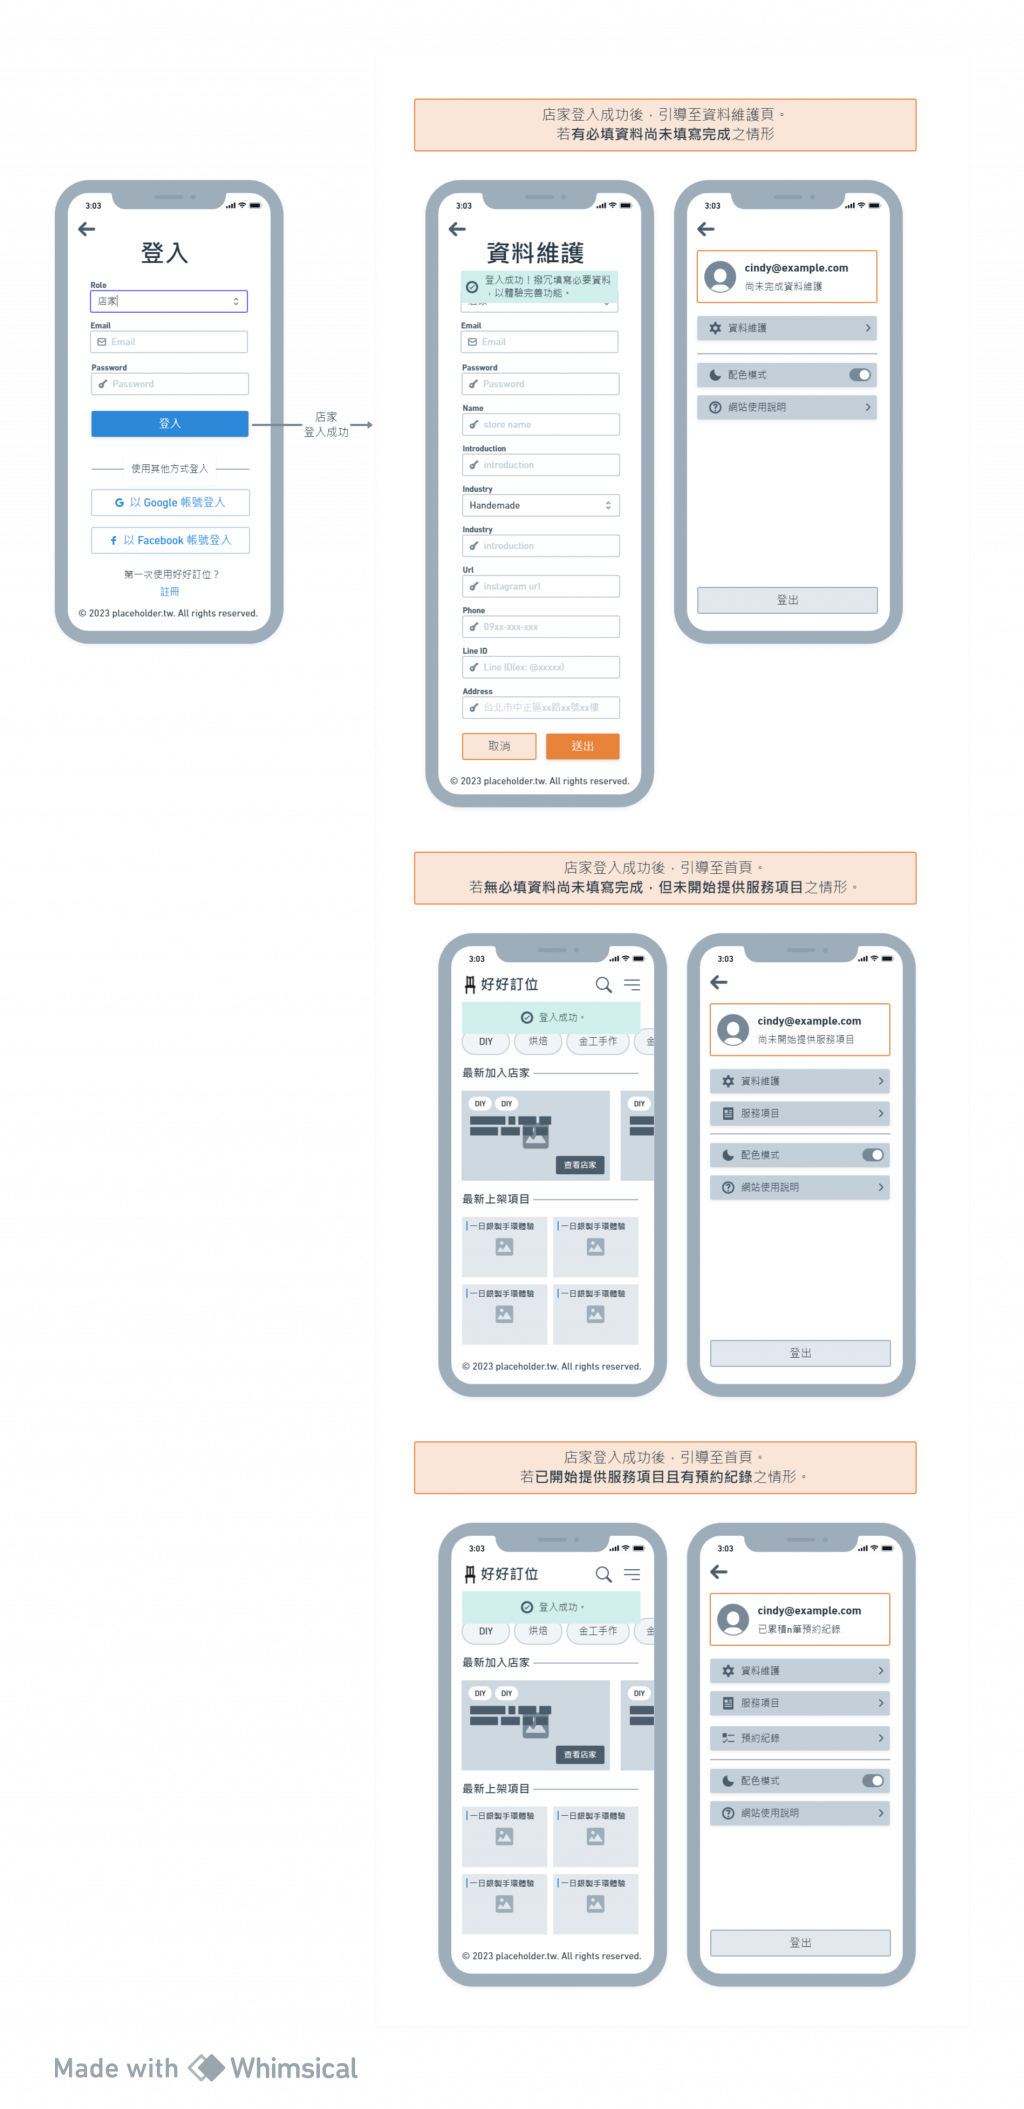
在網頁流程規劃中,有些頁面是沒有登入就看不見的、有些頁面是某些身分才可以看見,通常可以加上判斷讓按鈕狀態設為 disabled,不去觸發連結自然可以避免。但為了防止使用者直接在網址中輸入,打開不提供觀看的頁面之狀況,我選擇這樣操作:
import { getAuth, onAuthStateChanged } from "firebase/auth";
const auth = getAuth();
onAuthStateChanged(auth, (user) => {
  if (user) {
    // User is signed in
  } else {
    // User is signed out
  }
});
onAuthStateChanged 獲取登入者的 currentUser 屬性,找到該登入者的資料。官方文件中有提醒「當 auth 尚未完成初始化,currentUser 也可能為 null」,所以可以使用下列程式碼的寫法,在對的時機點取得 userData。我想我一早是踏入了這個坑裡,我直接在資料維護頁 call api,所以才一直讀不到 user...
const useAuthStatus = () => {
  const [loggedIn, setLoggedIn] = useState(false);
  const [checkingStatus, setCheckingStatus] = useState(true);

  useEffect(() => {
    const auth = getAuth();
    onAuthStateChanged(auth, (user) => {
      if (user) {
        const userData = user.currentUser;
        setLoggedIn(true);
      }
      setCheckingStatus(false);
    });
  }, []);
  return { loggedIn, checkingStatus };
};
const PrivateRoute = () => {
  const { loggedIn, checkingStatus } = useAuthStatus();
  if (checkingStatus) {
    return (
      <div>
         {/* 這裡放 loading 效果 */}
      </div>
    );
  }
  return (
    loggedIn ? <Outlet /> : <Navigate to="/login" />
  );
}
/profile 頁時,先進到 <PrivateRoute /> 元件(上述第5點)去判斷了。<Route path="/profile" element={<PrivateRoute />}>
<Route path="/profile" element={<Profile />} />
</Route>
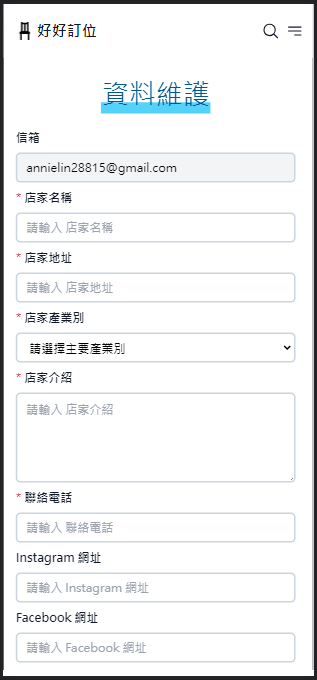
依照當初 Flow Chart 的設計,如果使用者註冊時選擇的是店家,他會有資料維護的頁面,用於編輯店家資料。目前要做的是下圖這頁:
關於這頁的 Wireflame 可以參考這篇文章
updateProfile 和 updateDoc,也要注意它們兩個函式引用的地方不同。
- 這邊也有個特別的坑跟大家分享:如果只是要更新某位使用者原有的資料(Firebase Authentication 原本就有的資料欄位),可以使用
updateDoc這個函式;但是如果你想新增一些客製化的欄位,就要使用setDoc覆蓋掉原本的那筆資料。- 如果看到「FirebaseError: Function updateDoc() called with invalid data. Unsupported field value: a custom ProactiveRefresh object (found in field proactiveRefresh in document」這樣的錯誤訊息,就是代表你應該使用
setDoc取代updateDoc。- 官方文件:覆寫單一文檔
import { getAuth, updateProfile } from "firebase/auth";
import { db } from '../../firebase';
import { doc, serverTimestamp, setDoc, updateDoc } from "firebase/firestore";
auth.currentUser.displayName(原有 Firebase Authentication 資料中的 displayName 欄位) 和 formData.name (實際頁面的店名)不同時,就呼叫 updateProfile 的函式。溫馨提醒:以下內容看到的
showNotify是我個人封裝使用的提示彈窗,並不是 Firebase 的功能。有需要的話,可以放入自己需要的內容或執行其他處理。
async function onSubmit(e) {
e.preventDefault();
try {
const auth = getAuth();
const docRef = doc(db, "users", auth.currentUser.uid);
// update display name in Firebase Authentication
if (auth.currentUser.displayName !== formData.name) {
await updateProfile(auth.currentUser, {
displayName: formData.name,
});
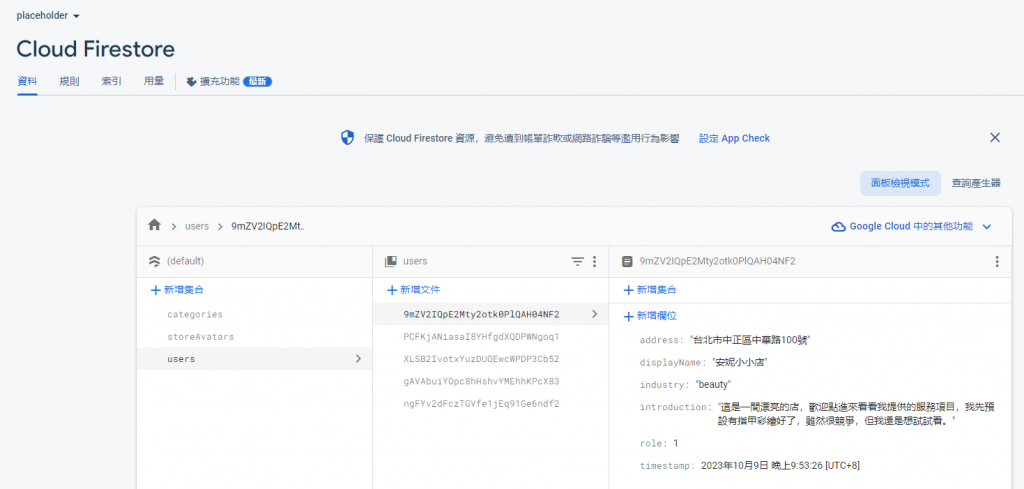
await setDoc(docRef, {
role: 1 || null,
displayName: formData.name || null,
address: formData.address || null,
industry: "beauty" || null,
introduction: formData.introduction || null,
introduction: formData.introduction || null,
timestamp: serverTimestamp() || null,
});
}
console.log("auth.currentUser.uid =>", auth.currentUser.uid);
showNotify("success", "更新成功");
} catch (error) {
console.log("error =>", error);
showNotify("error", "更新失敗");
}
};
那如果有需要更新或加入其他新欄位與對應值,就多呼叫一個 setDoc 函式,以正確的更新 FireStore Database 裡對應 id 文件的資料。
  async function onSubmit(e) {
    e.preventDefault();

    try {
      const auth = getAuth();
      const docRef = doc(db, "users", auth.currentUser.uid);


      if (auth.currentUser.displayName !== formData.name) {
        await updateProfile(auth.currentUser, {
          displayName: formData.name,
        });

        // update data in FireStore
        await setDoc(docRef, {
          role: 1 || null,
          displayName: formData.name || null,
          address: formData.address || null,
          introduction: formData.introduction || null,
          timestamp: serverTimestamp() || null,
        });
      }
      console.log("auth.currentUser.uid =>", auth.currentUser.uid);
      showNotify("success", "更新成功");
    } catch (error) {
      console.log("error =>", error);
      showNotify("error", "更新失敗");
    }
  };
今天是採坑的一天,雖然和習慣的有後端同事一起開發的模式不同,沒有 postman 試戳 API 看傳送內容和 error 訊息等,但還好已經有雛型並且實作更新 API 成功了,也算是一種進步吧!明天還有一天國慶假期,持續把握時間趕進度...