接續上一篇文章,繼續將 Firebase Authentication 電話驗證的串接完成!
關於 Firebase Authentication 的電話驗證設定可以看這篇文章
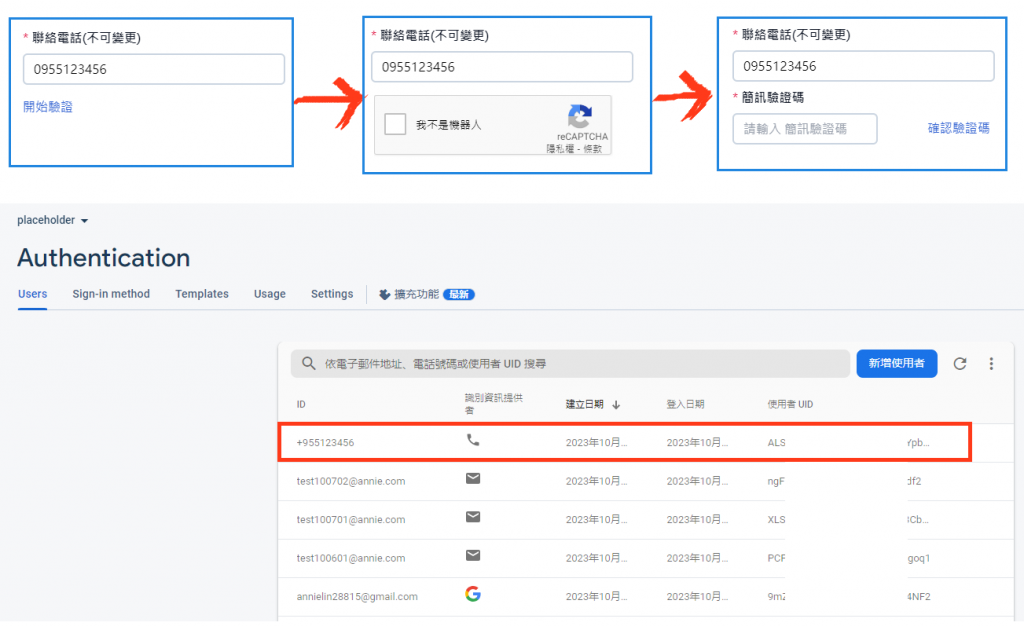
頁面都完成以後,接下來可以試想整個驗證流程(回想使用過的網站都是如何呈現)的順序。我這邊初步是以「輸入電話號碼→驗證電話號碼格式→出現開始驗證按鈕→點擊開始驗證→出現勾選不是機器人的介面→勾選不是機器人→發送驗證碼並出現驗證碼填寫的欄位→使用者輸入驗證碼完成按下確認驗證碼→進行驗證」來規劃。
我的專案是將電話驗證環節設計在「店家角色註冊後,資料維護的頁面」與「顧客角色登入後,要預約服務的當下」。
const [showOTPGenerateArea, setShowOTPGenerateArea] = useState(false);
const [showOTPInput, setShowOTPInput] = useState(false);
const [confirmObj, setConfirmObj] = useState({});
const [isCorrectOTP, setIsCorrectOTP] = useState(false);
依照個人喜好看是否要有機器人驗證,我選擇要!
recaptcha-container,所以一定要在你想要放的 tag 上加上這個 id,讓它有地方 render 出來。{showOTPGenerateArea === true &&
<div className="col-span-12">
<div className="grid grid-cols-12 gap-x-6 gap-y-2">
<div className="col-span-5">
<a onClick={getRobot} style={{lineHeight: '40px', color: '#3766d3'}}>開始驗證</a>
</div>
<div className="col-span-12">
<div id="recaptcha-container" />
</div>
</div>
</div>
}
getRobot ,適當加入需要的判斷後就可以呼叫第4點的 setUpRecaptha。const getRobot = async(e) => {
e.preventDefault();
try {
showNotify("success", "嗨!人類");
const response = await setUpRecaptha(countryPhone);
} catch (err) {
console.log(err);
showNotify("error", "目前無法驗證");
}
};
recaptchaVerifier 就是官方定義呼叫機器人區塊的生成實例,signInWithPhoneNumber 則是使用電話號碼驗證的方法,所以事先都要記得引入。當使用者勾選後,就會呼叫 signInWithPhoneNumber 方法,發送一組6位數的驗證碼到他填寫的手機裡。import { RecaptchaVerifier, signInWithPhoneNumber } from "firebase/auth";
const setUpRecaptha = (phoneNumber) => {
const recaptchaVerifier = new RecaptchaVerifier(
auth,
"recaptcha-container",
{}
);
recaptchaVerifier.render();
return signInWithPhoneNumber(auth, phoneNumber, recaptchaVerifier);
};

如果看到上述這段錯誤訊息,請再看一次第 3 點的內容!
StackOverflow 的相關問題與解答:Firebase otp recaptcha error: Cannot read properties of undefined (reading 'appVerificationDisabledForTesting')
{showOTPInput === true &&
  <div className="col-span-12">
    <div className="grid grid-cols-12 gap-x-6 gap-y-2">
      <div className="col-span-7">
        <FormInput text="簡訊驗證碼" type="number" id="OTPCode" labelText="簡訊驗證碼" onChange={onChange} required  />
      </div>
      <div className="col-span-5">
        <a onClick={verifyOtp} style={{lineHeight: '40px', color: '#3766d3'}}>確認驗證碼</a>
      </div>
    </div>
  </div>
}
const verifyOtp = async (e) => {
    e.preventDeault();
    setShowOTPInput(false);

    if (formData.OTPCode === "" || formData.OTPCode === null) return;
    try {
      await confirmObj.confirm(formData.OTPCode);
      showNotify("success", "太棒了!已完成手機認證");
      setIsCorrectOTP(true)
    } catch (err) {
      setIsCorrectOTP(false);
      showNotify("error", err.message);
    }
};
下圖就是我實際串接後,完成的部分畫面截圖。
今天完成了這個專案最大的挑戰(?)應該算是啦,因為其它就是 CRUD 、商業邏輯與組裝畫面並實作,雖然目前都覺得時程安排的不是很好,但努力一點還是有機會在時間內完成的!
以上小結是當工程師之後,很常對自己說的話,給自己鼓勵與肯定,在專案與需求開發時適當取捨,時間到之前都不會鬆懈、持續拚盡全力,與大家共勉之。
