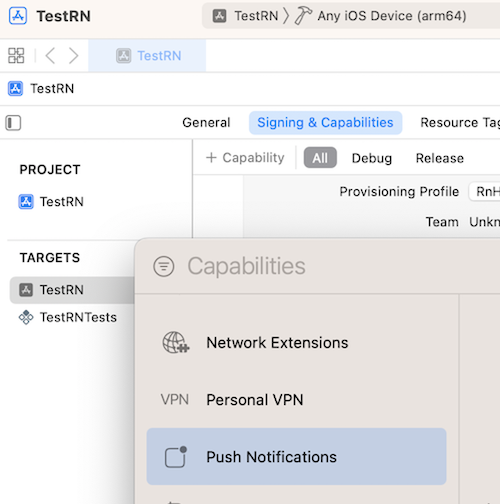
啟用推送功能
安裝push-notification-ios
在iOS上我們用push-notification-ios套件,它是針對 iOS 平台的推送通知庫,提供了與 iOS 系統推送通知 API 的直接接口。
npm i @react-native-community/push-notification-ios --save
cd ios && pod install
更新AppDelegate.h
#import <UserNotifications/UNUserNotificationCenter.h>
@interface AppDelegate : RCTAppDelegate,替換為以下代碼,讓 AppDelegate 成為 User Notifications 的代理:
@interface AppDelegate : RCTAppDelegate <UNUserNotificationCenterDelegate>
更新 AppDelegate.m 或 AppDelegate.mm
#import <UserNotifications/UserNotifications.h>
#import <RNCPushNotificationIOS.h>
    // Required for the register event.
   - (void)application:(UIApplication *)application didRegisterForRemoteNotificationsWithDeviceToken:(NSData *)deviceToken {
       [RNCPushNotificationIOS didRegisterForRemoteNotificationsWithDeviceToken:deviceToken];
   }

   // Required for the notification event. You must call the completion handler after handling the remote notification.
   - (void)application:(UIApplication *)application didReceiveRemoteNotification:(NSDictionary *)userInfo fetchCompletionHandler:(void (^)(UIBackgroundFetchResult))completionHandler {
       [RNCPushNotificationIOS didReceiveRemoteNotification:userInfo fetchCompletionHandler:completionHandler];
   }

   // Required for the registrationError event.
   - (void)application:(UIApplication *)application didFailToRegisterForRemoteNotificationsWithError:(NSError *)error {
       [RNCPushNotificationIOS didFailToRegisterForRemoteNotificationsWithError:error];
   }

   // Required for localNotification event
   - (void)userNotificationCenter:(UNUserNotificationCenter *)center didReceiveNotificationResponse:(UNNotificationResponse *)response withCompletionHandler:(void (^)(void))completionHandler {
       [RNCPushNotificationIOS didReceiveNotificationResponse:response];
   }
UNUserNotificationCenter *center = [UNUserNotificationCenter currentNotificationCenter];
center.delegate = self;
實現接收通知時的行為,在外面再加上以下代碼
// Called when a notification is delivered to a foreground app.
-(void)userNotificationCenter:(UNUserNotificationCenter *)center willPresentNotification:(UNNotification *)notification withCompletionHandler:(void (^)(UNNotificationPresentationOptions options))completionHandler {
    completionHandler(UNNotificationPresentationOptionSound | UNNotificationPresentationOptionAlert | UNNotificationPresentationOptionBadge);
}
完整代碼
這裡AppDelegate.m/mm原生的配置稍微複雜,這裡附上配置完的AppDelegate.mm代碼
#import "AppDelegate.h"
#import <UserNotifications/UserNotifications.h>
#import <RNCPushNotificationIOS.h>
#import <React/RCTBundleURLProvider.h>

@implementation AppDelegate

- (BOOL)application:(UIApplication *)application didFinishLaunchingWithOptions:(NSDictionary *)launchOptions
{
  self.moduleName = @"AwesomeProject";
  // You can add your custom initial props in the dictionary below.
  // They will be passed down to the ViewController used by React Native.
  self.initialProps = @{};
  UNUserNotificationCenter *center = [UNUserNotificationCenter currentNotificationCenter];
  center.delegate = self;
  return [super application:application didFinishLaunchingWithOptions:launchOptions];
}
//Called when a notification is delivered to a foreground app.
-(void)userNotificationCenter:(UNUserNotificationCenter *)center willPresentNotification:(UNNotification *)notification withCompletionHandler:(void (^)(UNNotificationPresentationOptions options))completionHandler
{
  completionHandler(UNNotificationPresentationOptionSound | UNNotificationPresentationOptionAlert | UNNotificationPresentationOptionBadge);
}

- (NSURL *)sourceURLForBridge:(RCTBridge *)bridge
{
#if DEBUG
  return [[RCTBundleURLProvider sharedSettings] jsBundleURLForBundleRoot:@"index"];
#else
  return [[NSBundle mainBundle] URLForResource:@"main" withExtension:@"jsbundle"];
#endif
}
// Required for the register event.
- (void)application:(UIApplication *)application didRegisterForRemoteNotificationsWithDeviceToken:(NSData *)deviceToken
{
 [RNCPushNotificationIOS didRegisterForRemoteNotificationsWithDeviceToken:deviceToken];
}
// Required for the notification event. You must call the completion handler after handling the remote notification.
- (void)application:(UIApplication *)application didReceiveRemoteNotification:(NSDictionary *)userInfo
fetchCompletionHandler:(void (^)(UIBackgroundFetchResult))completionHandler
{
  [RNCPushNotificationIOS didReceiveRemoteNotification:userInfo fetchCompletionHandler:completionHandler];
}
// Required for the registrationError event.
- (void)application:(UIApplication *)application didFailToRegisterForRemoteNotificationsWithError:(NSError *)error
{
 [RNCPushNotificationIOS didFailToRegisterForRemoteNotificationsWithError:error];
}
// Required for localNotification event
- (void)userNotificationCenter:(UNUserNotificationCenter *)center
didReceiveNotificationResponse:(UNNotificationResponse *)response
         withCompletionHandler:(void (^)(void))completionHandler
{
  [RNCPushNotificationIOS didReceiveNotificationResponse:response];
}
@end
import PushNotificationIOS from '@react-native-community/push-notification-ios';
useEffect(() => {
PushNotificationIOS.requestPermissions();
}, []);
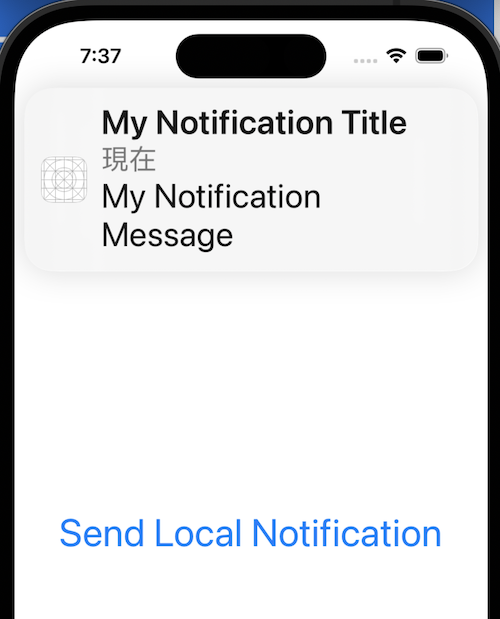
const handlePress = () => {
    const notification = {
      id: '1',
      title: "My Notification Title",
      body: "My Notification Message",
      category: "SOME_CATEGORY",
    };

    PushNotificationIOS.addNotificationRequest(notification);
};


return (
<View style={styles.container}>
  <Button title="Send Local Notification" onPress={handlePress} />
</View>
);


 iThome鐵人賽