今天也在實作前,先來了解vue傳值的方法。以下是使用 provide/inject、props 和 Vuex 等方法的圖例,今天先介紹官方提供的Prop和Provide / Inject這兩種方法。
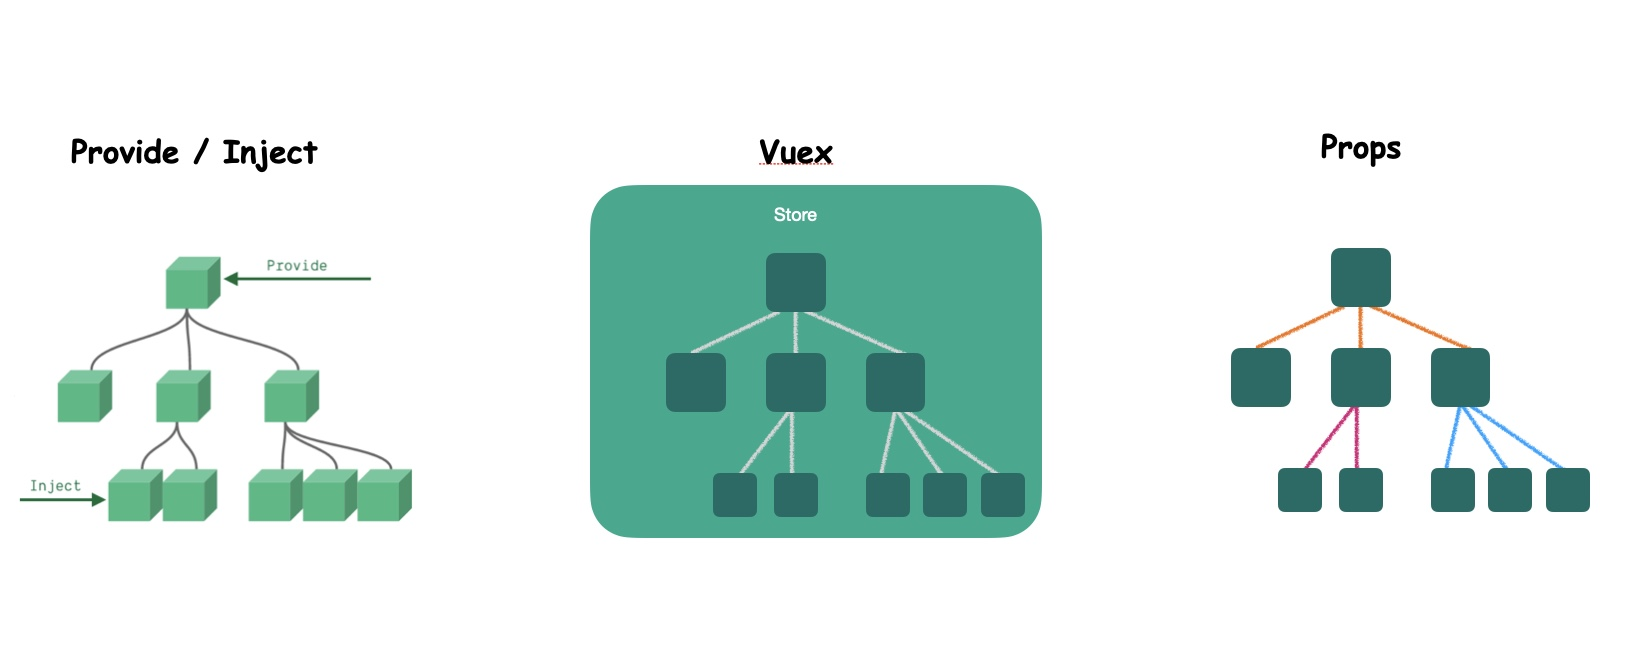
圖片來源:Vue3 的資料狀態管理,provide / inject、vuex、props
props是在子組件中聲明的屬性,通過父組件傳遞數據給子組件。
使用場景:適用於父子組件之間的簡單數據傳遞。
<script setup>
import { ref } from 'vue'
import BlogPost from './BlogPost.vue'

const posts = ref([
  { id: 1, title: 'My journey with Vue' },
  { id: 2, title: 'Blogging with Vue' },
  { id: 3, title: 'Why Vue is so fun' }
])

const postFontSize = ref(1)
</script>

<template>
	<div :style="{ fontSize: postFontSize + 'em' }">
    <BlogPost
      v-for="post in posts"
      :key="post.id"
      :title="post.title"
      @enlarge-text="postFontSize += 0.1"
    ></BlogPost>
  </div>
</template>
在父組件中,我們使用v-for迴圈遍歷 posts 陣列,並將每一個 BlogPost 子組件渲染出來。
再通過 :title="post.title" 將標題數據傳遞給子組件,並透過@enlarge-text監聽子組件觸發的自定義事件,當事件發生時,執行postFontSize += 0.1以更新字體大小。
<script setup>
defineProps(['title'])
defineEmits(['enlarge-text'])
</script>

<template>
  <div class="blog-post">
    <h4>{{ title }}</h4>
    <button @click="$emit('enlarge-text')">Enlarge text</button>
  </div>
</template>
在子組件我們用了兩個函數:
defineProps 定義了 title 屬性:讓他能夠接收父組件傳遞的標題數據。 defineEmits 定義了一個 enlarge-text 的自定義事件,當按鈕被點擊時,通過 $emit('enlarge-text') 觸發這個事件,告知父組件執行相應的操作。在官方的例子中,使用props將數據傳遞給子組件,以及使用 $emit 在子組件中觸發自定義事件,實現了父子組件之間的通信。
參考資料:組件基礎–傳遞props
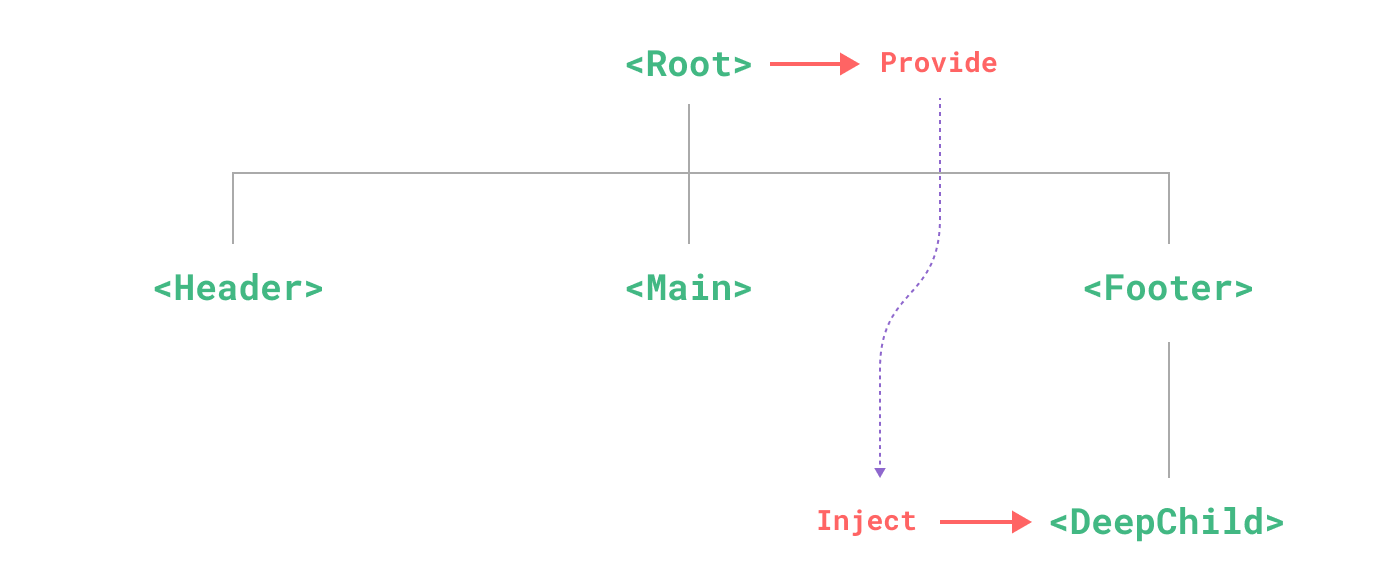
圖片來源:官方文件—依赖注入
使用場景: 主要用於祖先和後代(爺孫等)組件之間的狀態傳遞。
<!-- ParentComponent.vue -->
<template>
  <div>
    <child-component></child-component>
  </div>
</template>

<script setup>
import { ref, provide } from 'vue'
import ChildComponent from './ChildComponent.vue'

const sharedData = ref('Hello from parent!')

provide('sharedData', sharedData)
</script>
在提供者組件中,我們使用 provide 函數將數據 sharedData 提供給後代組件。
provide 函數的第一個參數是提供的 key,這是一個唯一標識符,用於在注入者組件中檢索數據。第二個參數是要提供的實際數據。
provide() 函数接收两个参数。第一个参数被称为注入名,可以是一个字符串或是一个 Symbol。后代组件会用注入名来查找期望注入的值。一个组件可以多次调用 provide(),使用不同的注入名,注入不同的依赖值。
資料來源:官方文件—依赖注入
// 官方文件代碼
import { createApp } from 'vue'

const app = createApp({})

app.provide(/* 注入名 */ 'message', /* 值 */ 'hello!')
<!-- ChildComponent.vue -->
<template>
  <div>
    <p>{{ injectedData }}</p>
  </div>
</template>

<script setup>
import { inject } from 'vue'

const injectedData = inject('sharedData', 'Default Value')
</script>
在注入者組件中,我們使用 inject 函數獲取提供的數據。inject 函數的第一個參數是要注入的 key,它與提供者組件中的 key 相對應。第二個參數是默認值,如果找不到提供者,則使用默認值。
// 官方文件代碼
// 如果没有祖先组件提供 "message"
// `value` 会是 "这是默认值"
const value = inject('message', '这是默认值')
当提供 / 注入响应式的数据时,建议尽可能将任何对响应式状态的变更都保持在供给方组件中。这样可以确保所提供状态的声明和变更操作都内聚在同一个组件内,使其更容易维护。
資料來源:[官方文件—依赖注入]
<!-- 在供给方组件内 -->
<script setup>
import { provide, ref } from 'vue'

const location = ref('North Pole')

//聲明並提供一個更改數據的方法函數
function updateLocation() {
  location.value = 'South Pole'
}

provide('location', {
  location,
  updateLocation
})
</script>
<!-- 在注入方组件 -->
<script setup>
import { inject } from 'vue'

const { location, updateLocation } = inject('location')
</script>

<template>
  <button @click="updateLocation">{{ location }}</button>
</template>


 iThome鐵人賽