照昨天介紹了props與provide,今天決定來看一下Vuex的基本介紹,並大致了解這個套件的運作模式。
Vuex是Vue官方推出的狀態管理工具,它可以集中管理一個Vue應用中多個組件的共享狀態。
在不使用Vuex的情況下,像昨天介紹的:不同組件之間需要通過props或provide傳遞值,但當專案規模較大時,組件之間的關系會變得非常複雜。
使用Vuex後,我們可以把組件的共享狀態抽取出來,統一存放在store中進行管理。
當狀態需要變更時,只需要顯式地提交(commit) mutation來變更store中的狀態,而不需要通過組件間複雜的通信方式。
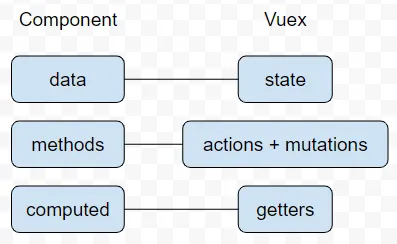
(如下圖官方文件提供的圖示)

圖片來源:[Vue] Vuex 是什麼? 怎麼用? — 統整、專案結構(5/5)
Vuex也提供了諸如Action、Getter等機制來更好地組織管理狀態。
npm install vuex@next --save
在store建立index.js檔案,並加入:
import { createStore } from 'vuex'

export default createStore({
    state: { ... },
    mutations: { ... },
    actions: { ... },
    modules: { ... }
})
State 是存儲在 Vuex 中的數據源。它代表應用程序的狀態,可以被組件訪問和使用。
每一个 Vuex 应用的核心就是 store(仓库)。“store”基本上就是一个容器,它包含着你的应用中大部分的状态 (state)。Vuex 和单纯的全局对象有以下两点不同:
來源:Vuex官方文件—最简单的 Store
import { createStore } from 'vuex'

export const store = createStore({
  state () {
    return {
      count: 1
    }
  }
})
將Vuex安裝至Vue實例:
import { createApp } from 'vue'
import { store } from './store'
import App from './App.vue'

const app = createApp(App)

app.use(store)

app.mount('#app')
而要在store實例中讀取狀態,最簡單的方式就是在computed中返回一個狀態:
// 创建一个 Counter 组件
// 來源:官方文件代碼
const Counter = {
  template: `<div>{{ count }}</div>`,
  computed: {
    count () {
      return store.state.count
    }
  }
}
每一個mutation都有一個字符串的事件類型(type)和一個回調函數(handler):回調函數是實際進行狀態更改的地方。
// 定義一個突變
mutations: {
  increment(state) {
    state.count++
  }
}
// 定義一個動作
actions: {
  incrementAsync({ commit }) {
    setTimeout(() => {
      commit('increment')
    }, 1000)
  }
}
// 定義一個獲取器
getters: {
  doubleCount: state => state.count * 2
}
usestore:在setup函數中訪問storecommit:訪問mutationdispatch:使用action
// 透過useStore函式
import { useStore } from 'vuex'

export default {
  setup () {
    const store = useStore()
  }
      return {
      // 使用 mutation
      increment: () => store.commit('increment'),

      // 使用 action
      asyncIncrement: () => store.dispatch('asyncIncrement')
    }

}
當你在應用程序中觸發一個操作(比如按鈕點擊)時,你可能會調用一個 action,該 action 可能會 commit 一個 mutation,然後 mutation 改變狀態。Getters 則用於從這個狀態中獲取派生的數據。
由於昨天用provide / inject不是很順利,決定今天臨時改變路線來整理Vuex的安裝與使用簡介,讓專案之後如果需要可以嘗試用這個套件管理狀態模式。
