邏輯寫完了我們就可以來將畫面使用到畫面上了!
我們在 Day26 定義了一個 ConceptHomeView,要把它拿來用!
首先先在 UI 資料夾新增一個 HomeView.swift,定義一個 HomeView 結構,並把 ConceptHomeView 的內容都複製過去。
因為我們需要在 Preview 內注入 DIContainer,但每個 View 都建立一個新的 DIContainer 很麻煩,所以我們可以在 extension 額外定義一個。
在 DependencyInjector.swift 內加入以下程式碼:
extension DIContainer {
    static let preview = DIContainer(isMock: true)
}
這樣就可以把 HomeView_Previews 裡的注入這樣寫:
struct HomeView_Previews: PreviewProvider {
    static var previews: some View {
        HomeView()
            .inject(.preview)
    }
}
別忘了
import Ditto
首先我們從 Environment 取得 DIContainer:
@Environment(\.injected) private var container: DIContainer
接下來把 data 改成我們需要的 [TodoEvent] 型別:
@State private var data = [TodoEvent]()
然後把對應的地方修改一下。
在 adderView 中,新增待辦事項的「新增按鈕」行為原本是:
showAdderView = false
if input.count != 0 {
    withAnimation {
        data.append(input)
    }
}
我們把它改成調用 Interactor 的新增待辦事項:
showAdderView = false
if input.count != 0 {
    container.interactor.todoEvent.createEvent(
        TodoEvent(id: 0, title: input, createAt: .now, complete: false)
    )
}
在 listView 顯示資料的地方,原本是 Text(d),改為:
Text(d.title)
這時 ForEach 會噴錯,我們需要把 TodoEvent 實作 Identifiable:
extension TodoEvent: Identifiable {}
然後將 ForEach 的 id: \.self 拿掉:
ForEach(data) { d in
另外還要把 swipeActions 內的刪除按鈕改為調用 Interactor 的刪除待辦事項:
.swipeActions(edge: .trailing, allowsFullSwipe: false) {
    Button(role: .destructive) {
        container.interactor.todoEvent.deleteEvent(d)
    } label: {
        Image(systemName: "trash.fill")
    }

}
最後在 body 內加上 onReceive、onAppear 來獲取資料:
var body: some View {
    VStack {
        titleView()
        listView()
        Spacer()
        adderButtonView()
    }
    .sheet(isPresented: $showAdderView) {
        input = ""
    } content: {
        adderView()
    }
    .onReceive(container.appState.todoEvents) { data = $0 }
    .onAppear {
        container.interactor.todoEvent.listEvents()
    }
}
然後記得在 TodoListApp.swift 初始化及注入 DIContainer,還有將 ContentView 替換成 HomeView:
import SwiftUI
import Ditto

@main
struct TodoListApp: App {
    let container = DIContainer(isMock: false)

    var body: some Scene {
        WindowGroup {
            HomeView()
                .inject(container)
        }
    }
}
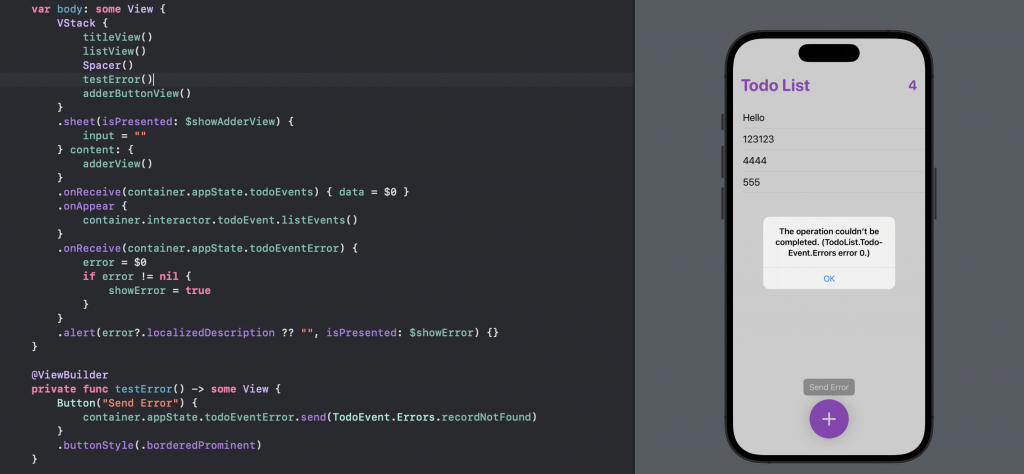
記得我們有在 AppState 內定義一個 todoEventError 嗎?
我們可以試試看使用它來顯示警告。
首先在 HomeView 內定義我們需要的變數:
@State private var error: Error? = nil
@State private var showError = false
並且在 body 內加上 onReceive 來訂閱 todoEventError:
.onReceive(container.appState.todoEventError) {
    error = $0
    if error != nil {
        showError = true
    }
}
然後在 body 內加上 alert:
.alert(error?.localizedDescription ?? "", isPresented: $showError) {}
這樣如果有 Error 訊息,就會跳出警告了。
一樣我們可以簡單寫個測試按鈕:
@ViewBuilder
private func testError() -> some View {
    Button("Send Error") {
        container.appState.todoEventError.send(TodoEvent.Errors.recordNotFound)
    }
    .buttonStyle(.borderedProminent)
}
隨便塞到 body 內做測試:

APP 完成後可以進模擬器跑跑看。
也可以把你的手機接上,在手機上安裝你的 APP:

詳細這邊就不多做說明了,網路上很多資源自己去找吧!
本章我們將前幾章定義的邏輯運用在 View 上。
未來可以根據需要,把不同的組件額外獨立寫成一個 View。
比如說
listView可以額外寫成另一個View結構
TodoList 專案的程式碼放在 github,有興趣可以去看看。
