最後五個章節要來分享我一般在開發 APP 時的流程,並實際執行來製作一款 Todo List APP。
一般而言我會先以幾個大步驟來規劃並設計 APP:
接下來五個章節會分別以這五個步驟來講解,跟著我一起做吧!
一般我如果心裡有個初步的概念,我都會先把概念圖做出來,看看效果怎麼樣。
SwiftUI 簡易的語法可以很快速的刻出概念畫面,這讓我們在建立概念畫面的步驟上輕鬆很多,可以更注重在畫面上而不是在程式碼上。
首先我們先開一個新專案,命名為 TodoList,把該分的資料夾分好。
並使用 SQLite Sworm Ditto 套件。
不使用也可以
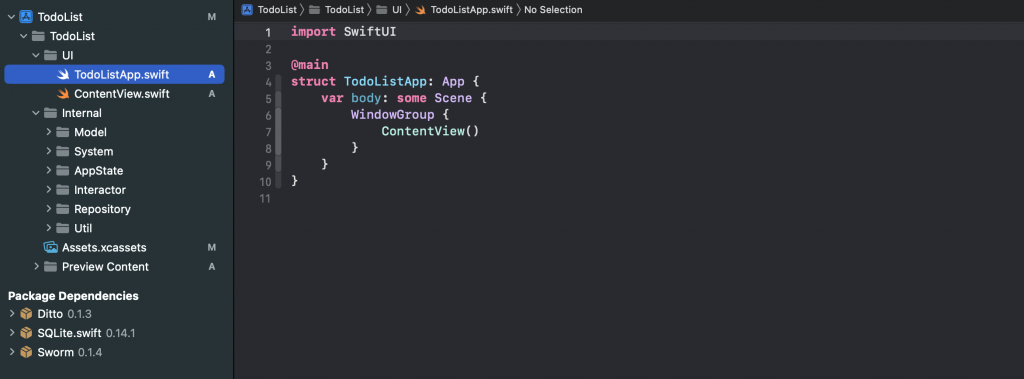
接著在 UI 資料夾內新增 Concept 資料夾,來管理我們的概念畫面,並新增一個 ConceptHomeView.swift:

身為一個 Todo List,當然會有顯示 Todo 的列表,所以我們先刻我們要的列表:
這邊都先在
View內定義假資料
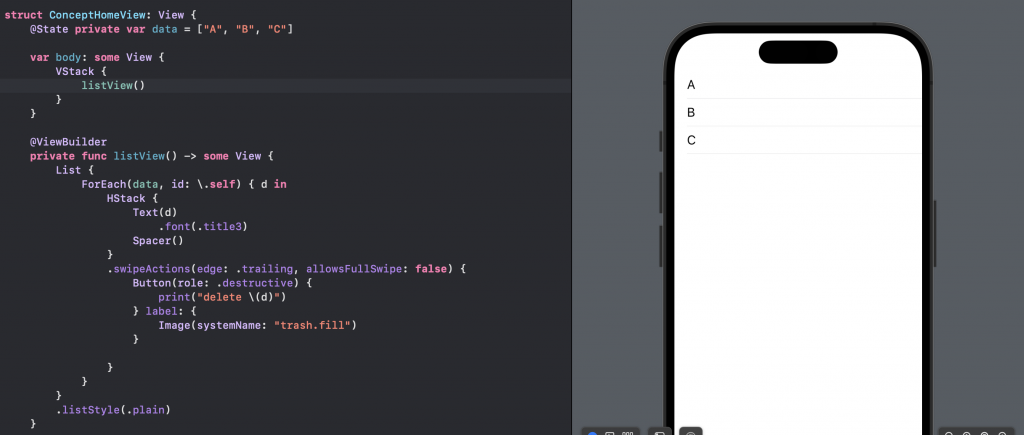
@State private var data = ["A", "B", "C"]

@ViewBuilder
private func listView() -> some View {
    List {
        ForEach(data, id: \.self) { d in
            HStack {
                Text(d)
                    .font(.title3)
                Spacer()
            }
            .swipeActions(edge: .trailing, allowsFullSwipe: false) {
                Button(role: .destructive) {
                    print("delete \(d)")
                } label: {
                    Image(systemName: "trash.fill")
                }

            }
        }
    }
    .listStyle(.plain)
}
定義
swipeActions來達到左滑可以選擇刪除待辦事項
定義一個含有數量的標題:

@ViewBuilder
private func titleView() -> some View {
    HStack {
        Text("Todo List")
            .font(.system(.largeTitle, design: .rounded, weight: .bold))
        Spacer()
        Text("\(data.count)")
            .font(.system(.title, design: .rounded, weight: .bold))
    }
    .foregroundColor(.purple)
    .padding()
}
定義一個新增代辦事項的按鈕。
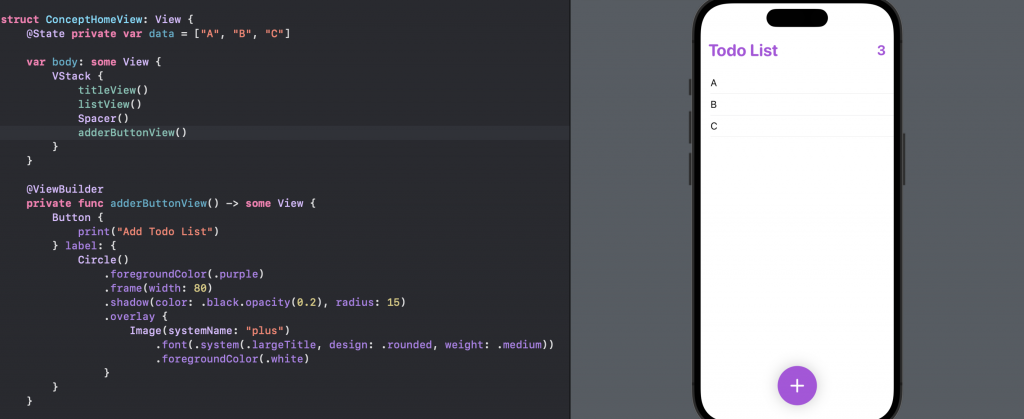
@ViewBuilder
private func adderButtonView() -> some View {
    Button {
        print("Add Todo List")
    } label: {
        Circle()
            .foregroundColor(.purple)
            .frame(width: 80)
            .shadow(color: .black.opacity(0.2), radius: 15)
            .overlay {
                Image(systemName: "plus")
                    .font(.system(.largeTitle, design: .rounded, weight: .medium))
                    .foregroundColor(.white)
            }
    }

}
按下新增待辦事項按鈕後,我們希望能彈出一個視窗讓我們輸入要新增的代辦事項資訊。
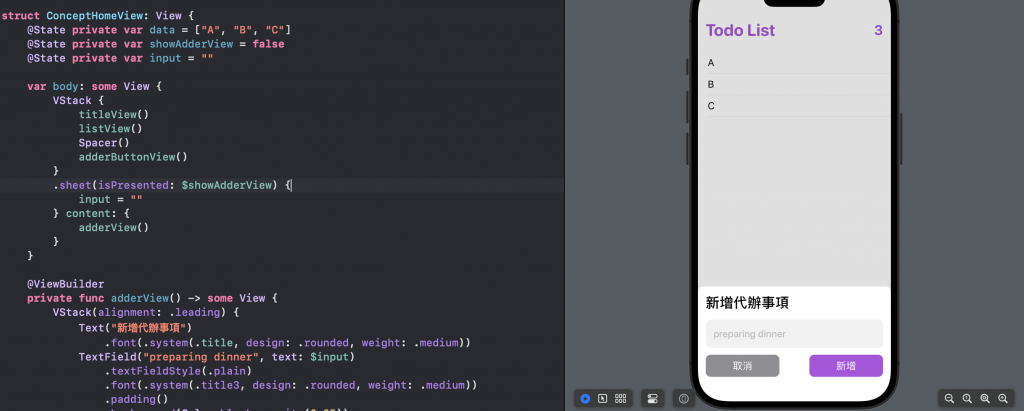
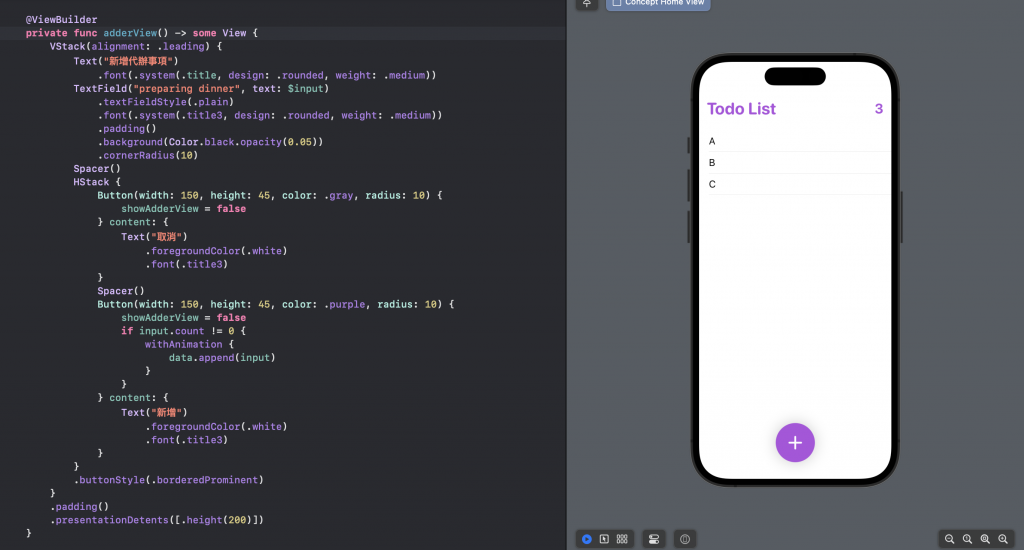
@State private var data = ["A", "B", "C"]
    @State private var showAdderView = false
    @State private var input = ""

    var body: some View {
        VStack {
            titleView()
            listView()
            Spacer()
            adderButtonView()
        }
        .sheet(isPresented: $showAdderView) {
            input = ""
        } content: {
            adderView()
        }
    }

    @ViewBuilder
    private func adderView() -> some View {
        VStack(alignment: .leading) {
            Text("新增代辦事項")
                .font(.system(.title, design: .rounded, weight: .medium))
            TextField("preparing dinner", text: $input)
                .textFieldStyle(.plain)
                .font(.system(.title3, design: .rounded, weight: .medium))
                .padding()
                .background(Color.black.opacity(0.05))
                .cornerRadius(10)
            Spacer()
            HStack {
                Button(width: 150, height: 45, color: .gray, radius: 10) {
                    showAdderView = false
                } content: {
                    Text("取消")
                        .foregroundColor(.white)
                        .font(.title3)
                }
                Spacer()
                Button(width: 150, height: 45, color: .purple, radius: 10) {
                    showAdderView = false
                    if input.count != 0 {
                        withAnimation {
                            data.append(input)
                        }
                    }
                } content: {
                    Text("新增")
                        .foregroundColor(.white)
                        .font(.title3)
                }
            }
            .buttonStyle(.borderedProminent)
        }
        .padding()
        .presentationDetents([.height(200)])
    }
利用
sheet修飾器來做出彈窗利用
presentationDetents([.height(200)])來定義彈窗高度再利用
TextField來輸入文字將
adderButtonView的行為改成showAdderView = true
可以在 Canvas 玩玩看最後的結果。
附上最後 ConceptHomeView.swift 的程式碼:
import SwiftUI
import Ditto

struct ConceptHomeView: View {
    @State private var data = ["A", "B", "C"]
    @State private var showAdderView = false
    @State private var input = ""

    var body: some View {
        VStack {
            titleView()
            listView()
            Spacer()
            adderButtonView()
        }
        .sheet(isPresented: $showAdderView) {
            input = ""
        } content: {
            adderView()
        }
    }

    @ViewBuilder
    private func adderView() -> some View {
        VStack(alignment: .leading) {
            Text("新增代辦事項")
                .font(.system(.title, design: .rounded, weight: .medium))
            TextField("preparing dinner", text: $input)
                .textFieldStyle(.plain)
                .font(.system(.title3, design: .rounded, weight: .medium))
                .padding()
                .background(Color.black.opacity(0.05))
                .cornerRadius(10)
            Spacer()
            HStack {
                Button(width: 150, height: 45, color: .gray, radius: 10) {
                    showAdderView = false
                } content: {
                    Text("取消")
                        .foregroundColor(.white)
                        .font(.title3)
                }
                Spacer()
                Button(width: 150, height: 45, color: .purple, radius: 10) {
                    showAdderView = false
                    if input.count != 0 {
                        withAnimation {
                            data.append(input)
                        }
                    }
                } content: {
                    Text("新增")
                        .foregroundColor(.white)
                        .font(.title3)
                }
            }
            .buttonStyle(.borderedProminent)
        }
        .padding()
        .presentationDetents([.height(200)])
    }


    @ViewBuilder
    private func adderButtonView() -> some View {
        Button {
            showAdderView = true
        } label: {
            Circle()
                .foregroundColor(.purple)
                .frame(width: 80)
                .shadow(color: .black.opacity(0.2), radius: 15)
                .overlay {
                    Image(systemName: "plus")
                        .font(.system(.largeTitle, design: .rounded, weight: .medium))
                        .foregroundColor(.white)
                }
        }
    }

    @ViewBuilder
    private func titleView() -> some View {
        HStack {
            Text("Todo List")
                .font(.system(.largeTitle, design: .rounded, weight: .bold))
            Spacer()
            Text("\(data.count)")
                .font(.system(.title, design: .rounded, weight: .bold))
        }
        .foregroundColor(.purple)
        .padding()
    }

    @ViewBuilder
    private func listView() -> some View {
        List {
            ForEach(data, id: \.self) { d in
                HStack {
                    Text(d)
                        .font(.title3)
                    Spacer()
                }
                .swipeActions(edge: .trailing, allowsFullSwipe: false) {
                    Button(role: .destructive) {
                        print("delete \(d)")
                    } label: {
                        Image(systemName: "trash.fill")
                    }

                }
            }
        }
        .listStyle(.plain)
    }

}

struct ConceptHomeView_Previews: PreviewProvider {
    static var previews: some View {
        ConceptHomeView()
    }
}
以上就是我們這次要製作的 APP 概念畫面。
概念畫面就是在這個 View 內就可以到的展示畫面,不用依靠任何外部的資料,快速檢驗最終畫面的效果。
