讓我們將繼續完善 playground 元件,這次的目標是實現滑鼠和觸控事件的座標監聽,來實現對 canvas 的操控,並且,搭配 ease out、ease in 過渡效果,設計一個簡易但實用的動畫物件。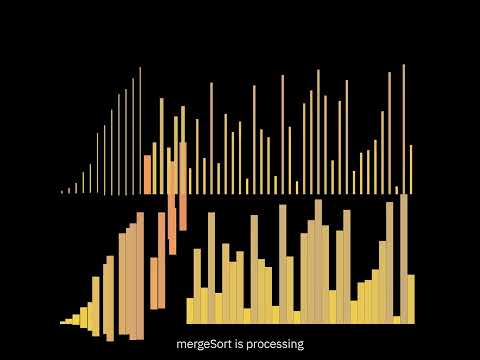
主題C的排序演算法,就是利用本篇實作的類,所高效完成的動畫
這個動畫物件將具備以下功能:
使用方式也十分簡單,透過 NewTarget(x, y, frames) 設定新的目標座標,並利用 pointX 和 pointY 取得當前的滑鼠座標。
在監聽滑鼠事件時,先計算滑鼠相對於元件的座標,再乘以 ratio 來取得正確的像素位置:
const divRef = useRef();
function handleMouseMove(e){
    const rect = divRef.current.getBoundingClientRect();
    const x = (e.pageX - rect.x) * ratio;
    const y = (e.pageY - rect.y) * ratio;
    const frames = 30;
    myMouse.NewTarget(x, y, frames);
}
return (
    <div id="playground" ref={divRef} onMouseMoveCapture={handleMouseMove}>
        //......ratio={ratio} min={min}......
    </div>
)
onMouseMoveCapture 設置為捕獲機制,讓父元件先於子元件(canvas)執行。
除了滑鼠事件,還需要支援移動設備的觸控事件。以下是對應的 TouchMove 和 TouchStart 事件:
const divRef = useRef();
function handleTouchMove(e){
    const rect = divRef.current.getBoundingClientRect();
    const x = (e.touches[0].clientX - rect.x) * ratio;
    const y = (e.touches[0].clientY - rect.y) * ratio;
    const frames = 30;
    myMouse.NewTarget(x, y, frames);
}
return (
    <div id="playground" ref={divRef}
        onTouchMoveCapture={handleTouchMove}
        onTouchStartCapture={handleTouchMove}
    >
        //......ratio={ratio} min={min}......
    </div>
)
考慮到手指按下但未滑動的情況,這裡同時監聽了 touchMove 和 touchStart 事件,兩者互不衝突,並依據第一根手指的位置來判斷座標。
接下來,我們希望將 myMouse 動畫物件作為模組導入到其他 canvas 中使用。以下是模組化的方式:
import { Path } from "../js/path.js";

const myMouse = new Path();
export default myMouse;
將 Path 動畫物件實例化並模組化,讓各個 canvas 可以方便載入並使用。
接下來就要生產我們的動畫物件拉,為了實現非線性過渡的效果,需要兩個端點,一個起點、一個終點,並且,透過一個0~1的數值由函數映射到當前的位置,就包含了以下數值:
class Path extends PathConfig{
    constructor(x = 0, y = 0){
        super();
        this.pointX = x;
        this.pointY = y;

        this.originX = x;
        this.originY = y;

        this.targetX = x;
        this.targetY = y;

        this.period = 90;
        this.timer = 0;
        this.ID = 0;
    }
}
point 表示當前的位置、origin 表示起點、target 表示終點、timer 是計時器、timer/period 則是介於0~1的數值,並且用 ID 來記錄上一個動畫禎。
同時,為了節省記憶體空間,Path 類繼承了 PathConfig,允許我們設置全局的過渡效果(如線性、ease in、ease out)。透過不同端點之間的非線性過渡,我們可以讓動畫變得更加自然與流暢。
class PathConfig{
    static linear = -1;
    static easein = 0;
    static easeout = 2;

    static resetPath(linear = 1, easein = 0, easeout = 0){
        if(linear + easein + easeout != 1)
            console.warn("PathConfig.resetPath:
                sum of parameter is recommend to be 1"
            );
        PathConfig.linear = linear;
        PathConfig.easein = easein;
        PathConfig.easeout = easeout;
    }

    getPath(){
        return [PathConfig.linear, PathConfig.easein, PathConfig.easeout];
    }
}

class Path extends PathConfig{
    //......
    getPath(){
        return super.getPath();
    }
}

export { Path };
export { PathConfig };
設計上透過linear、easein、easeout的線性組合,組合出不同效果
接著就到我們封裝的時候啦!每次呼叫 NewTarget 函數時,動畫的初始點會重置,並根據新設定的終點重新開始動畫過程:
class Path extends PathConfig{
    //......
    NewTarget = function(targetX, targetY, frames){
        this.targetX = targetX;
        this.targetY = targetY;
        this.originX = this.pointX;
        this.originY = this.pointY;
        this.timer = (frames >= 10) ? frames : 0;
        this.period = (frames >= 10) ? frames : 1;
        cancelAnimationFrame(this.ID);
        this.ID = requestAnimationFrame(this.NextFrame);
    };
}
動畫的禎數不能太少,否則動畫會顯得過於突兀,因此這裡設置了一個最小閾值來保障動畫流暢性。
在 NextFrame 函數內,每一禎會遞減 timer 並逐步更新 pointX 和 pointY,直到 timer 為 0,動畫結束:
class Path extends PathConfig{
    //......
    NextFrame = function(){
        if(this.timer <= 0){
            this.pointX = this.targetX;
            this.pointY = this.targetY;
            return;
        }

        this.timer--;
        const dX = this.targetX - this.originX;
        const dY = this.targetY - this.originY;
        const t = this.timer;
        const p = this.period;
        const linear = 1/p;
        const easeout = Math.pow((t+1)/p, 2) - Math.pow((t)/p, 2);
        const easein = Math.pow(1 - (t-1)/p, 2) - Math.pow(1 - t/p, 2);
        const [a, b, c] = this.getPath();
        this.pointX+= (a * linear + b * easein + c * easeout) * dX;
        this.pointY+= (a * linear + b * easein + c * easeout) * dY;

        this.ID = requestAnimationFrame(this.NextFrame);
    }.bind(this);
}
requestAnimationFrame 中的回調函數需要使用 bind(this) 來確保 this 指向當前對象,否則會因為作用域問題導致 this 指向 window。
那麼,花了這麼多力氣,就只是為了完成滑鼠事件嗎?並不是,後續,我們將用這個動畫物件進行擴展。如同開頭展示的影片,會在排序演算法的實踐中,製作活潑的動畫!除此之外,這個控制器可以取代css transition的效果,允許你用js更加靈活控制佈局。同樣的架構下,我們也能實現Cubic Bézier提供更複雜的控制,
另外,由於篇幅不夠,以上主要針對架構進行講解,如果對上述內容有任何疑問,歡迎在下方留言。如果大家有興趣了解更多細節,我將另開一篇文章進行進一步的討論,也可以參考我的github查看完整代碼!