上一次我們將手稿交給 AI 進行分析生成,但結果並不令人滿意,或者嚴格說起來,令人不滿意。感覺 AI 只做了一半,拿到了「半成品」而已。
然而,這不能只怪 AI ,問題不僅僅在於「圖片」的部分,正如之前提到的 AI 指令技巧,之前下的指令並不夠明確,只提供了粗略的要求:「要做一個記帳 App(使用 React)」,這樣的指令仍遠遠不夠具體。
接下來,我們需要進行調整和修正,探討如何搭配設計稿來制定更具體的指令,做到「一步到位」的目標!
上一次我們拿手稿餵給 AI,並不是很滿意,AI 給的答案有點粗糙,不是個「production-ready」的程式碼,無法直接拿來用呀!
自己還要修修補補,幾乎要整個重寫,根本也沒有比較快。
既然如此,還能做得更好嗎? 當然可以,從 AI 生成的程式碼來看,再看一下我們給的圖,可以初步推論說:AI 沒有很懂我們想做什麼,並沒有清晰了解設計稿的需求。
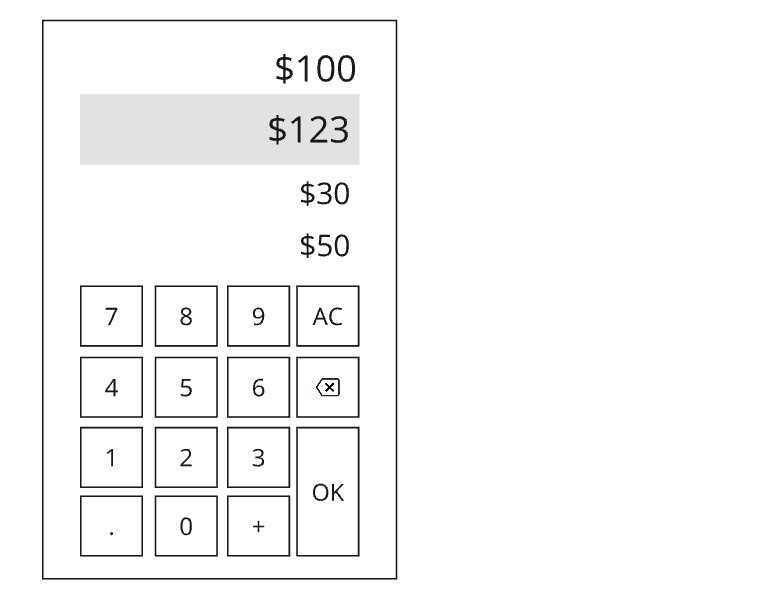
因此,只好花點時間,用 Miro 把手稿給美化一下,以更清晰的線條加強表達,再餵給 AI 試試看吧!
以下是努力生出來的線框稿,雖然不是很美觀,不過已經很夠了,遠比先前的設計稿要來得清楚許多。
努力了一番之後,線框圖總算生出來了,看起來表達清晰許多了。雖然是有點簡單簡陋,不過應該是可以遠比上一次的手繪稿,給出更好的結果吧?

此外,除了以上設計圖以外,還補了一些比較明確的指令給 AI 參考。
等了一會… AI 生成了以下程式碼:
import React, { useState } from 'react';

const AccountingApp: React.FC = () => {
  const [input, setInput] = useState('');
  const [records, setRecords] = useState<number[]>([]);

  const handleInput = (value: string) => {
    if (value === 'OK') {
      const amount = parseFloat(input);
      if (!isNaN(amount)) {
        setRecords([...records, amount]);
        setInput('');
      }
    } else {
      setInput(input + value);
    }
  };

  const getTotal = () => {
    return records.reduce((sum, record) => sum + record, 0);
  };

  return (
    <div className="max-w-sm mx-auto">
      <div className="bg-gray-200 p-4 mb-4">
        <div className="text-right text-3xl mb-4">${getTotal().toFixed(2)}</div>
        <div className="text-right text-4xl">${input}</div>
      </div>
      <div className="grid grid-cols-4 gap-2">
        {[7, 8, 9, 'AC', 4, 5, 6, '⌫', 1, 2, 3, 'OK', '.', 0, '+'].map((key) => (
          <button
            key={key}
            className="bg-white text-2xl p-4 rounded shadow"
            onClick={() => handleInput(key.toString())}
          >
            {key}
          </button>
        ))}
      </div>
      <ul className="mt-4">
        {records.map((record, index) => (
          <li key={index}>${record.toFixed(2)}</li>
        ))}
      </ul>
    </div>
  );
};

export default AccountingApp;
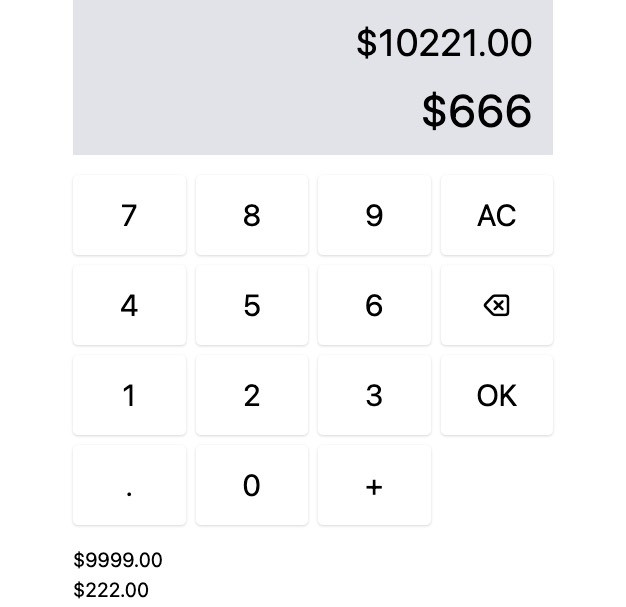
用 Claude.ai 的 preview 功能預覽一下,做出來的成果好多了。
至少功能真的可以用,至少基本數字的輸入後,再按 OK 就能記帳了,且長得跟線框稿有點像。

嗯…就有點像而已。 😭
線框稿餵給 AI 後,生成的程式碼完成度已經蠻不錯了,但還想要更好。
希望 AI 可以照著設計稿「照抄」,幫我做到一步到位。心中 OS 疑問:到底能不能單純靠著「指令和設計稿」,就產出可以直接用的程式碼?
雖然不是很有信心,但不試也不會知道,但作為開發者也不太會畫畫,這時候只好請設計師幫忙畫一下囉。(撒嬌一下)
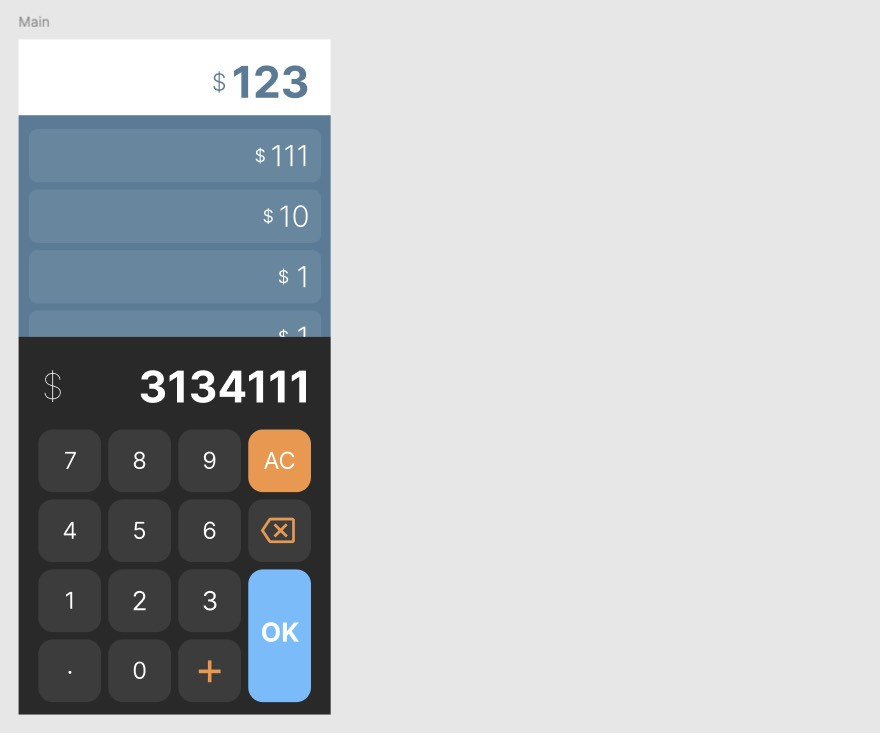
總之設計折騰了一番,總算產出了如下的設計圖,好看多了 :)

除了圖稿變得更漂亮以外,指令也要更精進具體,輸入的指令如下:
 幫我依照設計稿,製作記帳 App。
- 最上方之金額,為記帳金額的總和
- 可以用數字鍵盤輸入數字
- AC 可以歸零
- Backspace icon 的按鍵可將數字倒退
- 按下 OK 即可紀錄該筆帳目
稍等一會,AI 生成了這樣的程式碼,程式碼有點長,相比第一次產出的很完整!
import React, { useState } from "react";

interface DisplayProps {
  total: number;
  currentAmount: string;
}

const Display: React.FC<DisplayProps> = ({ total, currentAmount }) => {
  return (
    <div className="bg-white p-4 rounded-t-lg">
      <div className="text-3xl font-bold text-right mb-2">${total}</div>
      <div className="text-2xl text-right">${currentAmount}</div>
    </div>
  );
};

interface KeypadProps {
  onInput: (value: string) => void;
  onClear: () => void;
  onBackspace: () => void;
  onOk: () => void;
}

const Keypad: React.FC<KeypadProps> = ({
  onInput,
  onClear,
  onBackspace,
  onOk
}) => {
  const buttons = [
    "7",
    "8",
    "9",
    "AC",
    "4",
    "5",
    "6",
    "⌫",
    "1",
    "2",
    "3",
    "OK",
    ".",
    "0",
    "+",
    ""
  ];

  return (
    <div className="grid grid-cols-4 gap-2 bg-gray-800 p-4 rounded-b-lg">
      {buttons.map((btn, index) => (
        <button
          key={index}
          className={`p-4 text-xl font-bold rounded ${
            btn === "OK"
              ? "bg-blue-500 text-white col-span-2"
              : btn === "AC"
              ? "bg-red-500 text-white"
              : btn === "⌫"
              ? "bg-yellow-500 text-white"
              : "bg-gray-700 text-white"
          }`}
          onClick={() => {
            if (btn === "AC") onClear();
            else if (btn === "⌫") onBackspace();
            else if (btn === "OK") onOk();
            else onInput(btn);
          }}
        >
          {btn}
        </button>
      ))}
    </div>
  );
};

interface HistoryListProps {
  history: number[];
}

const HistoryList: React.FC<HistoryListProps> = ({ history }) => {
  return (
    <div className="mt-4 bg-white p-4 rounded-lg">
      <h2 className="text-xl font-bold mb-2">記帳歷史</h2>
      <ul>
        {history.map((amount, index) => (
          <li key={index} className="text-lg">
            ${amount}
          </li>
        ))}
      </ul>
    </div>
  );
};

const App: React.FC = () => {
  const [currentAmount, setCurrentAmount] = useState<string>("0");
  const [total, setTotal] = useState<number>(0);
  const [history, setHistory] = useState<number[]>([]);

  const handleInput = (value: string) => {
    if (currentAmount === "0") {
      setCurrentAmount(value);
    } else {
      setCurrentAmount(currentAmount + value);
    }
  };

  const handleClear = () => {
    setCurrentAmount("0");
  };

  const handleBackspace = () => {
    if (currentAmount.length > 1) {
      setCurrentAmount(currentAmount.slice(0, -1));
    } else {
      setCurrentAmount("0");
    }
  };

  const handleOk = () => {
    const amount = parseFloat(currentAmount);
    setTotal(total + amount);
    setHistory([...history, amount]);
    setCurrentAmount("0");
  };

  return (
    <div className="max-w-md mx-auto mt-10 p-4 bg-gray-100 rounded-lg shadow-lg">
      <Display total={total} currentAmount={currentAmount} />
      <Keypad
        onInput={handleInput}
        onClear={handleClear}
        onBackspace={handleBackspace}
        onOk={handleOk}
      />
      <HistoryList history={history} />
    </div>
  );
};

export default App;
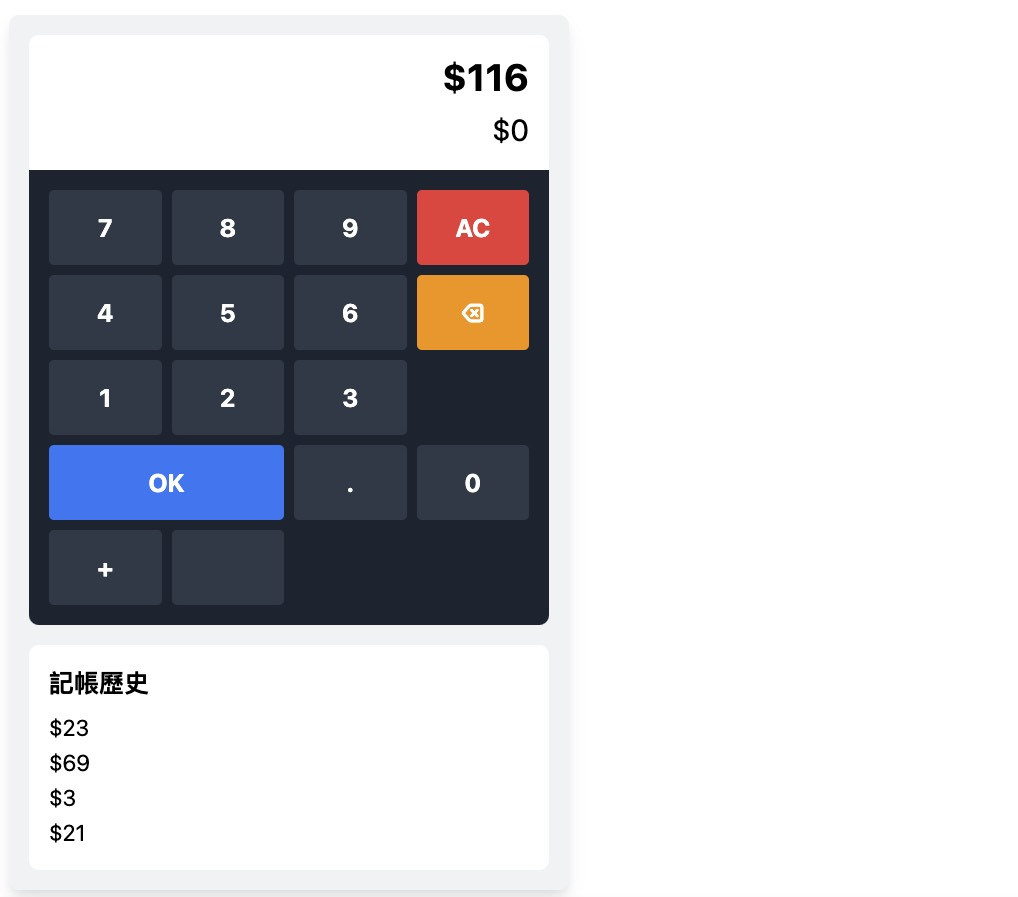
用了 Preview 功能來預覽一下,看起來該做到的功能都有做到。雖然畫面鍵盤排版有點怪怪的,但瑕不掩瑜,已經很好了!
歸零、刪除和 OK 之類的都有做到,顏色也有填上去,挺好的!

由以上的生成範例,以及自己使用生成式 AI 的經驗,大致上得出了這樣的結論:「自己覺得表達夠清楚,AI 才會清楚。」
之前畫的手稿雖然「足以溝通」,但並不是個夠好的想法載體,無法「精準」地表達想法。而在經過圖形的精準演進之後,很明顯 AI 的生成結果,已經相當接近圖案所表達的需求了。
除了圖案清楚以外,搭配的文字指令也要清晰且具體,最好是不要讓 AI 用猜的,能夠用文字表達的需求,盡量寫清楚說明白。
有了乾淨清楚的設計稿,搭配具體清晰的需求指令,就能大幅提高 AI 生成的精準度呦!
