昨天,我們介紹了虛擬檔案系統 (Virtual File System, VFS) 的各種操作介面,包括 file_operations、inode_operations 和 dentry_operations,並提到了 super block 和檔案系統驅動程式。
接下來,我們將以 cat /var/log/dpkg.log 為例,來探討這整個過程的工作流程。
從 strace 的結果可以看到,cat 指令主要呼叫了 openat 和 read 這兩個系統呼叫 (system call) 來讀取該檔案。
> strace cat /var/log/dpkg.log
...
openat(AT_FDCWD, "/var/log/dpkg.log", O_RDONLY) = 3
read(3, "2022-08-29 21:46:05 startup pack"..., 131072) = 131072
...
openat 系統呼叫類似於 open 系統呼叫,差別在於 openat 多了一個目錄文件描述符 (directory file descriptor, dfd) 的參數。這個參數用來指定要從哪個目錄作為相對路徑來找檔案。在此例中,AT_FDCWD 代表的是當前執行程式的位置。
openat 和 open 的系統呼叫在 Linux 核心中,open 和 openat 系統呼叫都會最終轉發到同一個內部函數 do_sys_open 進行處理。以下為這些系統呼叫的定義:
// fs/open.c
COMPAT_SYSCALL_DEFINE3(open, const char __user *, filename, int, flags, umode_t, mode)
{
	return do_sys_open(AT_FDCWD, filename, flags, mode);
}

COMPAT_SYSCALL_DEFINE4(openat, int, dfd, const char __user *, filename, int, flags, umode_t, mode)
{
	return do_sys_open(dfd, filename, flags, mode);
}
無論是 open 還是 openat,最終都會呼叫到 do_sys_open。open 只是將 AT_FDCWD 作為 dfd 參數傳入,剛好與 cat 使用的參數相同。
do_sys_open 的流程do_sys_open 函數會進一步呼叫 do_sys_openat2 來完成實際的打開操作。
long do_sys_open(int dfd, const char __user *filename, int flags, umode_t mode)
{
	struct open_how how = build_open_how(flags, mode);
	return do_sys_openat2(dfd, filename, &how);
}
do_sys_openat2 和 open_how 是 Linux Kernel 為了增強安全性而設計,主要用來避免惡意訪問。
static long do_sys_openat2(int dfd, const char __user *filename,
			   struct open_how *how)
{
    ...
    int fd
	struct filename *tmp;
    ...
	tmp = getname(filename); // 複製檔案名稱到 kernel space
    ...
    fd = get_unused_fd_flags(how->flags); // 申請 fd
    struct file *f = do_filp_open(dfd, tmp, &op);
    fd_install(fd, f); // 將file struct設置到 process
    ...
	return fd;
}
這裡的流程可以分為幾個步驟:
getname 函數將使用者空間的路徑字串複製到 kernel space,並保存在 filename 結構體中。get_unused_fd_flags 函數分配一個尚未使用的文件描述符 (file descriptor, fd)。do_filp_open 函數來找到指定路徑的檔案,並建立對應的 file 結構。fd_install 將 file 結構保存到當前進程的結構中。fd_install 的詳細操作fd_install 函數會將分配到的 file 結構放入當前進程的 files_struct 中的 fd 索引位置:
// fs/file.c
void fd_install(unsigned int fd, struct file *file)
{
	struct files_struct *files = current->files;
	struct fdtable *fdt;
    ...
	fdt = rcu_dereference_sched(files->fdt);
	rcu_assign_pointer(fdt->fd[fd], file);
	...
}
這裡的 current 指向當前進程的 task_struct,然後將 file 結構放入進程的文件描述符表 (fdtable) 中。
在 linux 處理打開檔案過程,會涉及到 inode, dentry 還有很多不同的系統元件跟資料,linux 將這些搜尋上下文資料保存在一個叫做 nameidata 的結構體中。
// fs/namei.c
struct file *do_filp_open(int dfd, struct filename *pathname,
		const struct open_flags *op)
{
	struct nameidata nd; // 建立搜尋檔案上下文
	int flags = op->lookup_flags;
	struct file *filp;

	set_nameidata(&nd, dfd, pathname, NULL);
	filp = path_openat(&nd, op, flags | LOOKUP_RCU);
    ...
    return filp;
}
do_filp_open 函數會實例化nameidata 結構體,將目標檔案路徑放入nameidata 結構體,接著呼叫 path_openat 函數來進行進一步的處理。
static struct file *path_openat(struct nameidata *nd,
			const struct open_flags *op, unsigned flags)
{
    struct file *file;
	int error;

	file = alloc_empty_file(op->open_flag, current_cred()); // 建立空的file結構
	..
    const char *s = path_init(nd, flags);
    while (!(error = link_path_walk(s, nd)) && // link_path_walk: 找到檔案的dentry和inode
           (s = open_last_lookups(nd, file, op)) != NULL)
        ;
    if (!error)
        error = do_open(nd, file, op); // 實際打開檔案
    terminate_walk(nd);
    ...
}
path_openat 函數主要分成三個步驟來打開檔案:
alloc_empty_file 建立一個空的 file 結構。link_path_walk ,根據路徑字串找到對應的檔案的 dentry 和 inode。do_open 函數來實際打開檔案,並將結果填充到 file 結構中。static int link_path_walk(const char *name, struct nameidata *nd)
{
...
for(;;) {
...
walk_component(nd, WALK_MORE);
}
...
}
為了找到檔案,link_path_walk 函數不斷呼叫 walk_component,沿著使用者輸入的路徑,從當前目錄 (dfd) 的 dentry 或根目錄 (/) 的 dentry 開始,逐層找到對應的目錄或檔案的 dentry 和 inode。
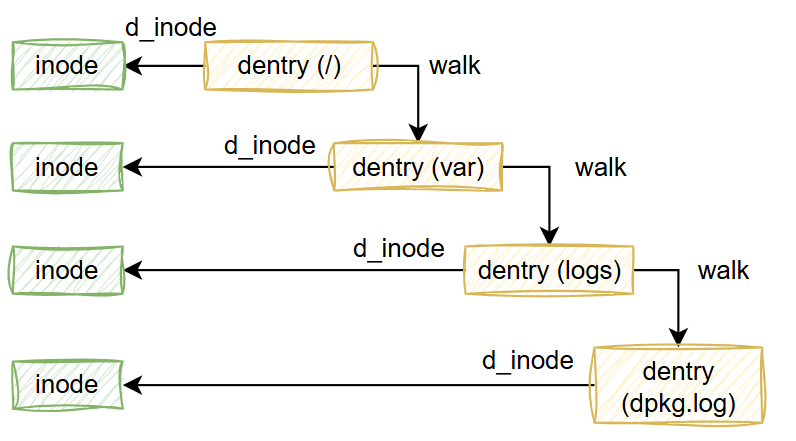
假設,原本目標是打開/var/logs/dpkg.log,當前 nd 指向 /var ,那搜尋的剩餘字串會是logs/dpkg.log。那walk_component 就會從 /var 的dentry出發,找到下一層目錄 logs 的 dentry 和 inode,並將結果寫回 nameidata 結構中。持續到剩餘的搜尋字串為空,那nd指向的dentry跟inode就會是目標 /var/logs/dpkg.log。
static const char *walk_component(struct nameidata *nd, int flags)
{
	struct dentry *dentry;
	dentry = lookup_fast(nd);
	...
	if (unlikely(!dentry)) {
		dentry = lookup_slow(&nd->last, nd->path.dentry, nd->flags);  // 讀出下一層目錄名稱及當前目錄
    }
    ...
    return step_into(nd, flags, dentry); // 更新 nd
}

// 更新 nd
static const char *step_into(struct nameidata *nd, int flags,
		     struct dentry *dentry)
{
    // 簡化版本
    nd->path->dentry = dentry; // 保存 dentry
    struct inode *inode = dentry->d_inode
    nd->inode = inode; // 保存 inode
}
前面提到,dentry 是保存在記憶體中的目錄結構,考慮到記憶體空間還有時間成本,所以不可能所有硬碟的所有目錄都載入到記憶體中。所以子目路的 dentry 可能會出現尚未載入的狀況。所以 walk_component 就分成 fast path 跟 slow path,差別就在於能不能直接從記憶中取得下一層目錄的 dentry。 如果沒辦法,就需要呼叫slow path,讀取硬碟的目錄資料,把當前目錄下的檔案和子目錄的 dentry 及 inode 實例建立出來,並與當前目錄的dentry連結。
我們主要是要看 kernel 與檔案系統驅動的互動,所以我們只看 slow path,這邊會呼叫到 lookup_slow。
呼叫 lookup_slow 主要是兩個參數 nd->last 是下一層目錄名稱,根據例子是 "logs" , nd->path.dentry 是當前目錄的 dentry ,例子中是 /var 的 dentry。
static struct dentry *lookup_slow(const struct qstr *name,
				    struct dentry *dir,
				    unsigned int flags)
{
	struct dentry *dentry, *old;
	struct inode *inode = dir->d_inode;
    ...
	dentry = d_alloc_parallel(dir, name, &wq);
    inode->i_op->lookup(inode, dentry, flags);
    ...
	return dentry;
}
lookup_slow 的運作方式與 file 結構的建立過程頗為相似,首先會建立一個空的 dentry 結構。這裡的「空」是指僅包含檔名與位置信息,但尚未綁定到 inode 與整個VFS的目錄樹。
然後我們的inode_operations出現了,這邊會呼叫當前目錄的 inode->i_op->lookup。此時,檔案系統的驅動必須負責定義 lookup 函數,並檢查該目錄是否真實存在。若該目錄存在,驅動將把對應的檔案資訊載入到 Kernel 中,並建立相關的 inode 結構,處理好 dentry 結構的綁定。
為了更好理解,我們可以參考 ext4 檔案系統的驅動:
// ext4/namei.c
const struct inode_operations ext4_dir_inode_operations = {
	...
	.lookup		= ext4_lookup,
    ...
};
在 ext4 檔案系統中,目錄的 inode 使用的 inode_operations 是 ext4_dir_inode_operations,其中包含了 lookup 的函數定義 ext4_lookup。
lookup 函數的參數是父目錄的 inode,與目標子目錄的空 dentry (帶有名稱資訊)。
static struct dentry *ext4_lookup(struct inode *dir, struct dentry *dentry, unsigned int flags)
{
	struct inode *inode;
	struct ext4_dir_entry_2 *de;
	struct buffer_head *bh;

	bh = ext4_lookup_entry(dir, dentry, &de);

	inode = NULL;
	if (bh) {
		__u32 ino = le32_to_cpu(de->inode);
		inode = ext4_iget(dir->i_sb, ino, EXT4_IGET_NORMAL);
    }

    return d_splice_alias(inode, dentry);
}
在 ext4_lookup 函數中,首先呼叫 ext4_lookup_entry 函數,從硬碟中查找目錄資料,並將其保存在 de (即 ext4_dir_entry_2) 中。ext4_dir_entry_2 結構中包含了該目錄的 inode number,因此接著會呼叫 ext4_iget,從中取得 inode 資料並建立對應的 inode 結構。
最後,函數會呼叫 Kernel 提供的 d_splice_alias 函數,將 inode 與 dentry 綁定在一起,並把 dentry 結構接入整個VFS目錄樹。到此,我們成功找到了下一層目錄的 dentry 與 inode。

透過 link_path_walk,nameidata 最終會指向到我們要開啟的目標檔案的 dentry 和 inode ,回到 path_openat,我們接下來需要使用 do_open 函數來填充預先建立好的 file 結構實例:
// fs/namei.c
static int do_open(struct nameidata *nd,
		   struct file *file, const struct open_flags *op)
{
    ...link_path_walk... // walk 走完了
	...
    error = vfs_open(&nd->path, file); // nd->path 指向最終我們要打開的檔案的 dentry
	...
	return error;
}

// fs/open.c
int vfs_open(const struct path *path, struct file *file)
{
	file->f_path = *path;
	return do_dentry_open(file, d_backing_inode(path->dentry), NULL);
}

static int do_dentry_open(struct file *f,
			  struct inode *inode,
			  int (*open)(struct inode *, struct file *))
    f->f_inode = inode; // 綁定 file 跟 inode
	f->f_mapping = inode->i_mapping;
	f->f_wb_err = filemap_sample_wb_err(f->f_mapping);
	f->f_sb_err = file_sample_sb_err(f);
	...

    f->f_op = fops_get(inode->i_fop); // 取得 file operations

    if (!open)
        open = f->f_op->open;
	if (open) {
		error = open(inode, f);
	}
	...
}
do_open最終會呼叫到do_dentry_open。do_dentry_open 會根據要打開的檔案 (inode),對file結構填充資料。
包含幾個重要步驟,首先會把f->f_inode設置為目標檔案的inode,另外會設置f->f_op也就是file_operations,並且是從 inode 繼承過來,由此可知,file_operations實際上也是由底層檔案系統驅動決定的。
過程中,do_dentry_open 也會呼叫到 file_operations 中定義的 open 函數,允許檔案系統驅動在檔案打開的過程中進行額外的處理。最終,整個檔案的打開過程到此結束。
當檔案開啟完成後,像 cat 這樣的程式會取得一個 file descriptor (fd),然後使用 read 系統呼叫,將 fd 作為參數來讀取檔案的內容。
接下來,我們來看看 read system call的實作。
// fs/read_write.c
SYSCALL_DEFINE3(read, unsigned int, fd, char __user *, buf, size_t, count)
{
	return ksys_read(fd, buf, count);
}

ssize_t ksys_read(unsigned int fd, char __user *buf, size_t count)
{
	struct fd f = fdget_pos(fd); // 從 fd 取得對應的 file 結構
	ssize_t ret = -EBADF;
	...
    ret = vfs_read(f.file, buf, count, ppos); // 呼叫 vfs_read 進行檔案讀取
	...
	return ret;
}
read 的實作就比 open 簡單很多。在 read 系統呼叫的實作中,首先透過 fdget_pos 從目前的Process資訊 (task_struct) 中取得對應的 file 結構。接著,呼叫 vfs_read 函數來執行檔案的讀取操作。
// fs/read_write.c
ssize_t vfs_read(struct file *file, char __user *buf, size_t count, loff_t *pos)
{
	ssize_t ret;

	...
    ret = file->f_op->read(file, buf, count, pos);
	...
	return ret;
}
在 vfs_read 函數中,核心步驟是呼叫 file->f_op->read,進入到檔案系統驅動定義的read函數,由驅動去完成實際的檔案讀取。
我們今天透過 cat /var/log/dpkg.log 的例子,了解到了 open 及 read 這兩個 system call 是如何與 vfs 檔案系統還有檔案系統驅動協作,完成檔案的讀取操作。


 iThome鐵人賽