計畫趕不上變化,最後15天的標題與內容會依情況做更改,在這裡先跟各位說聲抱歉。那回歸正題,說到旅遊網站那肯定少不了地圖吧,但現在許多圖API都是需要付錢的而且要花上一些時間來理解,在這裡我們發現了一款簡單好上手的免費地圖API叫做”Leaflet”。Leaflet 是一個輕量級的開源 JavaScript 地圖庫,用於在網頁上嵌入互動地圖。它的 API 簡單易用,適合需要地圖功能但不想使用較為複雜的 Google Maps API 的開發者。Leaflet 支援大多數現代瀏覽器,並且針對行動裝置進行了優化,能夠快速渲染互動式地圖。那現在就來安裝他吧!
使用 npm 安裝Leaflet套件:
npm install react react-dom leaflet
npm install react-leaflet
而這裡記得也要匯入leaflet.css喔!
//components/MapItem.jsx
import styles from "./map.module.css"
import { Row, Col } from 'antd';
import { MapContainer, TileLayer, Marker, Popup } from 'react-leaflet';
import 'leaflet/dist/leaflet.css'; // 引入 Leaflet 的樣式
export default function MapItem() {
return (
<div className={styles.fullScreen}>
{/* 地圖區域 */}
<Row className={styles.mapContainer}>
<Col span={24} className={styles.mapCol}>
<MapContainer center={[25.0330, 121.5654]} zoom={13}
className={styles.map}>
<TileLayer
url="https://{s}.tile.openstreetmap.org/{z}/{x}/{y}.png"
attribution='©
<a href="https://www.openstreetmap.org/copyright">
OpenStreetMap
</a> contributors'
/>
<Marker position={[25.0330, 121.5654]}>
<Popup>
這是台北 101 的位置。
</Popup>
</Marker>
</MapContainer>
</Col>
</Row>
</div>
);
}
而Leaflet中有一些常見的元件,在這邊先做簡單的解釋:
MapContainer:是地圖容器,包含地圖的顯示範圍和中心點。TileLayer:加載地圖圖塊,這裡使用的是 OpenStreetMap 的 TileLayer。Marker 和 Popup:在地圖上放置標記,並提供標記點的彈出框說明。/*map.module.css*/
.fullScreen {
height: 90vh;
width: 75vw;
display: flex;
flex-direction: column;
margin: 0; /* 確保沒有額外的邊距 */
padding: 0; /* 確保沒有額外的填充 */
}
.mapContainer {
flex: 1;
display: flex;
width: 100%;
margin: 0; /* 確保沒有額外的邊距 */
padding: 0; /* 確保沒有額外的填充 */
}
.mapCol {
flex: 1;
display: flex;
margin: 0; /* 確保沒有額外的邊距 */
padding: 0; /* 確保沒有額外的填充 */
}
.map {
flex: 1;
height: 100%;
width: 100%;
margin: 0; /* 確保沒有額外的邊距 */
padding: 0; /* 確保沒有額外的填充 */
}
@media (max-width: 995px) {
.mapContainer {
height: 100%;
width: 100%;
}
.mapCol {
height: 100%;
width: 100%;
}
.map {
height: 100%;
width: 100%;
}
}
也要在pages/Map.jsx中調整Col的大小,地圖畫面才不會跑版!
//pages/Map.jsx
import MapItem from "../../components/MapItem/MapItem";
import styles from "./map.module.css"
import Header from "../../components/Header/Header";
import { Row,Col } from "antd";

export default function Map() {
  return (
    <>
      <div className={styles.container}>
        <Row className={styles.row}>
          <Col
            sm={{ span: 2 }}
            md={{ span: 2 }} /* 調整這裡的寬度 */
            lg={{ span: 4 }} /* 這裡維持不變 */
            className={styles.col_4}
          >
            <Header />
          </Col>
          <Col
            sm={{ span: 20 }}
            md={{ span: 20 }} /* 對應調整這裡的寬度 */
            lg={{ span: 20 }} /* 擴展內容區域 */
            className={styles.col_16}
          >
            <MapItem/>
          </Col>
        </Row>
      </div>
    </>
  );
}
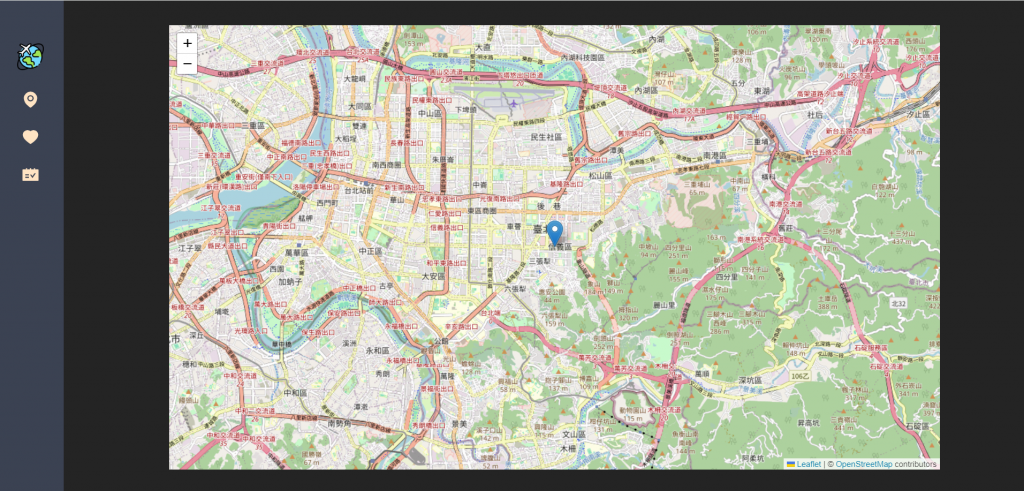
實際畫面如下圖,若有其他部分畫面看起來不一致的情況,可以再調整pages/Map/map.module.css!
今天下載了Leaflet地圖套件並簡單介紹了其中的幾個常用的元件,希望大家都能理解!這個地圖API非常輕量化,非常好上手,但我們這裡做的算是離線地圖的概念,不能隨時搜尋並將景點加入收藏,所以還是有不方便之處。當然Leaflet也是有提供搜尋功能的套件需要另外下載,有興趣的朋友可以搜尋"react-leaflet-search"。我們在下一篇中,會再從JSON檔中讀取景點的經緯度,並且在地圖中自定義Marker圖標樣式,那就明天見了!
