今天用 Semgrep 對一個最小可執行的範例進行 SAST:site/index.html(頁面) + site/vuln.js(刻意有洞的 JS)。
Push / PR 後,CI 會掃描並把結果丟到 GitHub → Security → Code scanning alerts。
可以直接git clone今天的進度喔
git clone https://github.com/and910805/devsecops_Sast
site/index.html(外掛 vuln.js)<!doctype html>
<html lang="zh-Hant">
<head>
<meta charset="utf-8" />
<title>Day 6 - SAST Demo (Vulnerable)</title>
<meta name="viewport" content="width=device-width, initial-scale=1" />
<style>body{font-family:ui-sans-serif,system-ui;max-width:820px;margin:40px auto;padding:0 16px}</style>
</head>
<body>
<h1>SAST Demo - Vulnerable Page</h1>
<div id="hello"></div>
<div id="hash"></div>
<h2>2) Open Redirect</h2>
<button onclick="go()">跳轉(讀取 ?next=...)</button>
<h2>3) HTTP 請求</h2>
<pre id="http"></pre>
<h2>4) 其他危險用法</h2>
<button onclick="renderUserHtml()">插入使用者提供的 HTML</button>
<div id="slot"></div>
<!-- 外掛的危險程式碼 -->
<script src="vuln.js"></script>
</body>
</html>
site/vuln.js(刻意含弱點)本次範例放的弱點(含 OWASP 參考)
在site/vuln.js中,我刻意塞了多種常見的 Web 弱點,涵蓋 OWASP Top 10 的經典案例:
範例:localStorage.setItem("jwt", "...")
說明:JWT/Token 不該放在 localStorage,容易被 XSS 讀取。
參考:
範例:document.cookie = "session=abc123"
說明:缺少 HttpOnly/Secure 可能被竊取或在非加密通道外洩。
參考:
innerHTML
範例:element.innerHTML = userInput
說明:未過濾的使用者輸入插入 HTML,易被注入腳本。
參考:
location.hash 注入
範例:hashEl.innerHTML = location.hash.slice(1)
說明:攻擊者可控制 URL 片段,直接插入 HTML。
參考:
範例:location.href = next
說明:使用者可指定外部惡意網址,導致釣魚 / 轉址攻擊。
參考:
範例:fetch("http://httpbin.org/get?x=" + userInput)
說明:流量未加密,易遭竊聽與竄改。
參考:
eval)
範例:eval(code)
說明:可執行任意 JavaScript,風險極高。
參考:
document.write() 直接寫入 HTML
範例:document.write(userHtml)
說明:不受控內容插入,常見造成 XSS。
參考:
window.open 未加 rel=noopener(Reverse Tabnabbing)
範例:window.open(ext, "_blank")
說明:新開頁能反制原頁(釣魚 / 竄改)。
參考:
// ❌ 將敏感資料放在 localStorage(示範)
localStorage.setItem("jwt", "header.payload.signature");

// ❌ 以 JS 設 Cookie(無 Secure/HttpOnly;HttpOnly 也無法用 JS 設定)
document.cookie = "session=abc123; path=/";

const qs = new URLSearchParams(location.search);

// ❌ DOM XSS:直接把使用者輸入塞進 innerHTML
const name = qs.get("name") || "Guest";
document.getElementById("hello").innerHTML = `Hello, ${name}`;

if (location.hash) {
  document.getElementById("hash").innerHTML = "Hash says: " + location.hash.slice(1);
}

// ❌ Open Redirect:未驗證就導頁
function go() {
  const next = qs.get("next");
  if (next) location.href = next; // e.g., ?next=https://evil.example
}
window.go = go;

// ❌ HTTP 明文請求 + 串連使用者輸入
const x = qs.get("x") || "demo";
fetch("http://httpbin.org/get?x=" + x)
  .then(r => r.text())
  .then(t => (document.getElementById("http").textContent = t))
  .catch(console.log);

// ❌ 動態執行:eval
const code = qs.get("code");
if (code) {
  // 例如:?code=alert(1)
  eval(code); // 危險!任意 JS 執行
}

// ❌ 直接寫入整段 HTML
function renderUserHtml() {
  const html = qs.get("html") || "<b>no user html</b>";
  document.write(html);                         // 危險
  document.getElementById("slot").innerHTML = html; // 危險
}
window.renderUserHtml = renderUserHtml;

// ❌ window.open 未加 rel=noopener(reverse tabnabbing 風險)
const ext = qs.get("ext");
if (ext) {
  window.open(ext, "_blank"); // e.g., ?ext=https://example.com
}
.semgrep/custom-rules.yml(自訂規則)rules:
- id: js-eval-usage
message: "避免 eval(),可能造成任意程式碼執行"
severity: HIGH
languages: [javascript, typescript]
pattern: eval(...)
- id: dom-innerhtml-assignment
message: "直接賦值 innerHTML 可能造成 XSS,請改用 textContent 或先消毒"
severity: HIGH
languages: [javascript, typescript]
pattern: $EL.innerHTML = $X
- id: document-write-usage
message: "避免使用 document.write(),容易引入 XSS/不受控內容"
severity: MEDIUM
languages: [javascript, typescript]
pattern: document.write(...)
- id: open-redirect-location-href
message: "未驗證來源即導頁(Open Redirect)"
severity: HIGH
languages: [javascript, typescript]
pattern: location.href = $X
- id: window-open-noopener
message: "window.open 需搭配 noopener/noreferrer"
severity: MEDIUM
languages: [javascript, typescript]
pattern: window.open($URL, "_blank")
- id: fetch-http-insecure
message: "HTTP 請求不安全,請改 HTTPS"
severity: HIGH
languages: [javascript, typescript]
patterns:
- pattern: fetch($U, ...)
- metavariable-regex:
metavariable: $U
regex: "^['\"]http://"
- id: localstorage-token
message: "避免將 Token/JWT 存在 localStorage"
severity: MEDIUM
languages: [javascript, typescript]
patterns:
- pattern: localStorage.setItem($K, $V)
- metavariable-regex:
metavariable: $K
regex: "(?i)(token|jwt|auth)"
.github/workflows/sast-semgrep.yml(GitHub Actions)name: SAST - Semgrep (HTML Demo)
on:
pull_request:
branches: [ "main", "mainer" ]
push:
branches: [ "main", "mainer" ]
workflow_dispatch:
permissions:
contents: read
security-events: write
pull-requests: write
jobs:
semgrep:
runs-on: ubuntu-latest
steps:
- name: Checkout
uses: actions/checkout@v4
- name: Setup Python
uses: actions/setup-python@v5
with:
python-version: '3.x'
- name: Install Semgrep
run: pip install --upgrade semgrep jq
# Run scan,即使有 Findings 也繼續(避免中斷 SARIF 上傳)
- name: Run Semgrep
id: semgrep_scan
continue-on-error: true
run: |
semgrep scan \
--include '**/*.js' \
--include '**/*.ts' \
--include '**/*.tsx' \
--include '**/*.jsx' \
--include '**/*.html' \
--config p/owasp-top-ten \
--config .semgrep/custom-rules.yml \
--sarif-output=semgrep.sarif \
--error
# 一律上傳 SARIF
- name: Upload SARIF
if: always()
uses: github/codeql-action/upload-sarif@v3
with:
sarif_file: semgrep.sarif
- name: Keep artifact
if: always()
uses: actions/upload-artifact@v4
with:
name: semgrep.sarif
path: semgrep.sarif
# 最後根據 SARIF 內容決定 fail
- name: Fail if findings > 0
if: always()
run: |
COUNT=$(jq '.runs[0].results | length' semgrep.sarif)
echo "Semgrep findings: $COUNT"
if [ "$COUNT" -gt 0 ]; then
echo "Failing the job due to findings."
exit 1
fi
Checkout → 把程式碼抓下來。
Setup Python → 準備 Semgrep 的環境。
Install Semgrep → 安裝 Semgrep + jq。
Run Semgrep → 執行掃描,把結果輸出成 SARIF。
Upload SARIF → 把掃描結果丟到 GitHub Security。
Keep artifact → 把 SARIF 檔保存起來(方便下載檢查)。
Fail if findings > 0 → 如果發現弱點,工作流標記為失敗(exit code 1)。
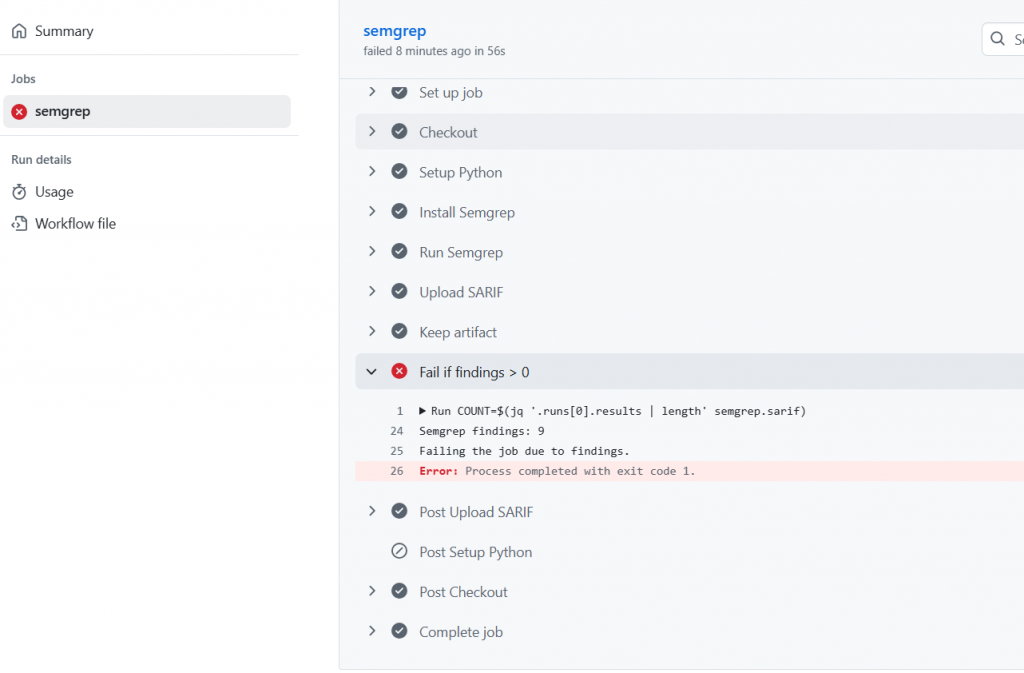
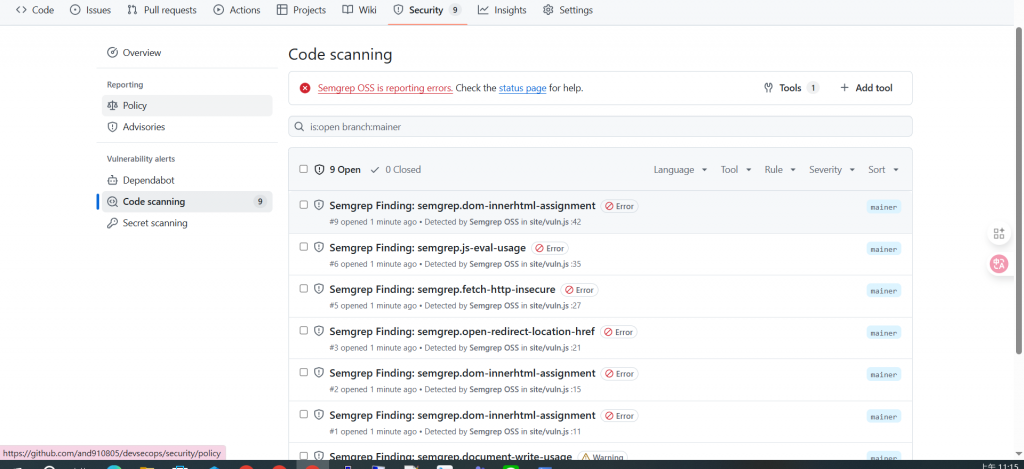
在 Actions 會看到 Findings > 0,而在 Security → Code scanning alerts 也會列出剛才那 9 條左右的問題(依內容略有差異)。
明天換SCA實作?


 iThome鐵人賽