早上好~
時間匆匆,又到了周末~周末這幾天自己的電腦不在身邊,
老家的電腦真的只能查資料打打文章,
所以~又是推論的時候了,對的,沒錯lol
請大佬們鞭小力一點 :(
昨日我們已經使用 16 進位的數字來裝入 short nShade 裡面,並在 wchar_t screen 作用的畫面緩衝區(active screen buffer)上呈現寬字元
我們今天來看看成果吧!
原先,我們只有使用:
: 代表天花板、地板#: 代表牆壁screen: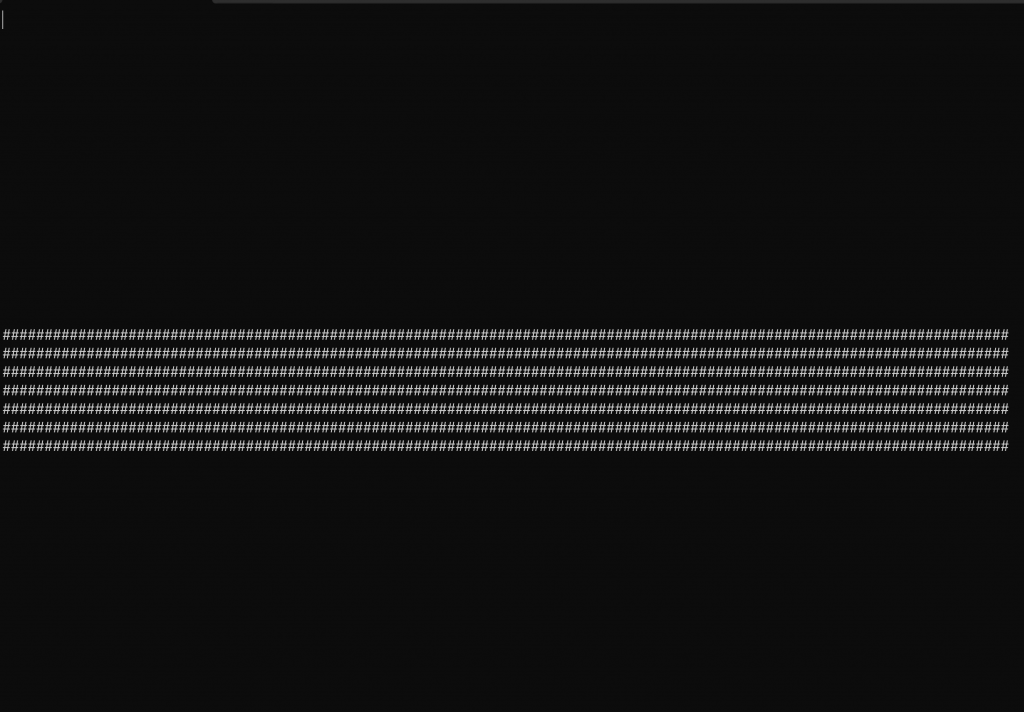
當然,隨著 fDistanceToWall 的遠近,牆壁的大小就會改變,這是我們一開始做的
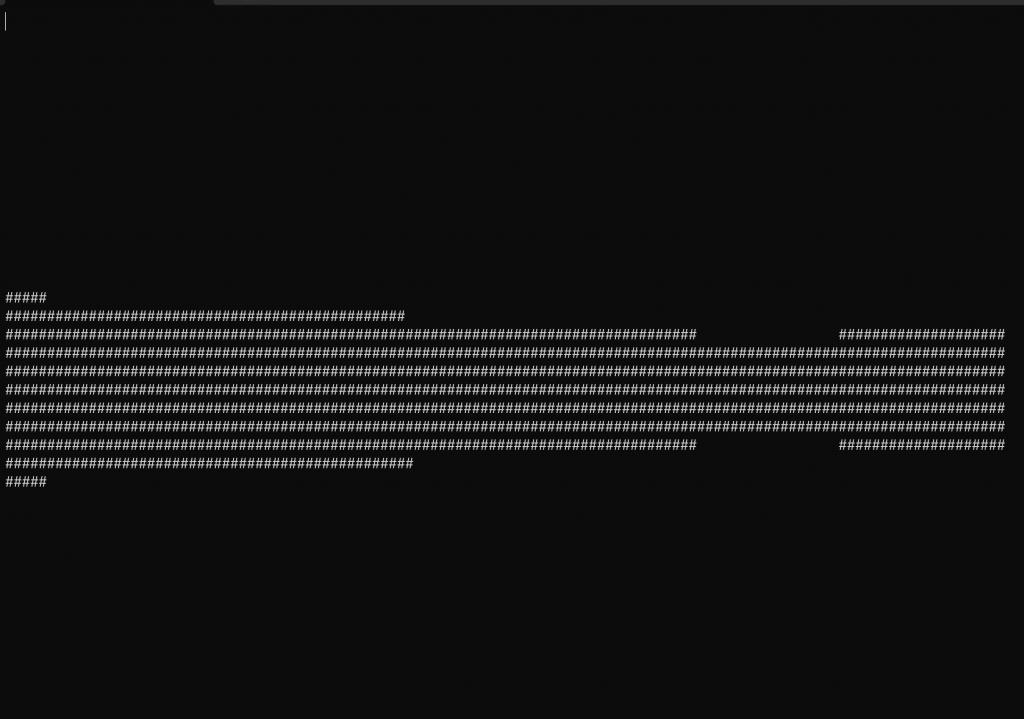
後面,我們加上了 short nShade 並以 16進位數字 附值,來記錄寬字元:
: 依舊代表天花板、地板░、▒、▓、█: 隨著距離 fDistanceToWall 並以 fDepth(最大map 的距離) 的比例對牆壁進行不同的渲染。
牆壁的大小沒有變化,但是會隨著四個階段(對 fDepth 劃分不同比例)來渲染四種不同的牆壁顏色~
It looks much more vivid, doesn't it?
fDepth 以不同比例劃分為四種情況,當 fDistanceToWall 看到這四種情況時渲染成四種不同顏色的牆壁牆壁的渲染就先到這裡吧,明日就要講講玩家向前、向後移動的原理~
我們快把一整個的遊戲做完了,後面有一些推倒尚未完成,預計會過完30天鐵人賽後,慢慢地整理資訊並重新彙整在這一系列的文章內~
我們繼續走下去~
目前code 如下:
int main()
{
    const int nScreenWidth{ 120 };
    const int nScreenHeight{ 40 };

    // Create the canvas
    wchar_t* screen{ new wchar_t[nScreenWidth * nScreenHeight] };
    // Create elements in screen
    for (int i = 0; i < nScreenWidth * nScreenHeight; i++)
    {
        if (i < 1200)
            screen[i] = L' ';
        else
            screen[i] = L'%';
    }
    screen[nScreenWidth * nScreenHeight - 1] = '\0'; // null terminator


    // Create console handler (custom screen buffer)
    HANDLE hConsole{ CreateConsoleScreenBuffer(
        GENERIC_READ | GENERIC_WRITE, 0, NULL, CONSOLE_TEXTMODE_BUFFER, NULL) };
    // Set Active Screen Buffer so that console will show this buffer first
    SetConsoleActiveScreenBuffer(hConsole);
    DWORD dwBytesWritten{ 0 };


    // Create world map
    std::wstring map{};

    map += L"################";
    map += L"#..............#";
    map += L"#..............#";
    map += L"#..............#";
    map += L"#..............#";
    map += L"#..............#";
    map += L"#..............#";
    map += L"#..............#";
    map += L"#..............#";
    map += L"#..............#";
    map += L"#..............#";
    map += L"#..............#";
    map += L"#..............#";
    map += L"#..............#";
    map += L"#..............#";
    map += L"################";


    // Get two time point to get frame rate
    auto tp1 { chrono::system_clock::now() };
    auto tp2 { chrono::system_clock::now() };


    while (true) {
        // Get frame rate per loop
        tp2 = chrono::system_clock::now();
        chrono::duration<float> elaspedTime = tp2 - tp1;
        tp1 = tp2;
        float fElaspedTime{ elaspedTime.count() };

        // Controls
        // Handle rotation
        if (GetAsyncKeyState((unsigned short)'Q') & 0x8000)
            fPlayerA += (0.1f) * fElaspedTime;

        if (GetAsyncKeyState((unsigned short)'E') & 0x8000)
            fPlayerA -= (0.1f) * fElaspedTime;

        // Axis going across the screen
        for (int x = 0; x < nScreenWidth; x++)
        {
            // for each column, calculate the projected ray angle into the world space
            float fRayAngle{ (fPlayerA + fAOV / 2.0f) - ((float)x / (float)nScreenWidth) * fAOV };

            // Track distance from player to the wall
            float fDistanceToWall{ 0.0f };
            bool bHitWall{ false }; // Whether we hit a wall
            // Unit vector of the ray direction so that we can take one step on that direction to see if we hit a wall
            float fEyeX{ sinf(fRayAngle) };
            float fEyeY{ cosf(fRayAngle) };

            // Unit vector for the ray -> we can make one step on that direction to detect walls


            while (!bHitWall && fDistanceToWall < fDepth)
            {
                // If we didn't hit the wall, we can take a step in the ray direction
                fDistanceToWall += 0.1f;

                // because wall's boundaries are at integer coordinates(dot index), so we use intger casting to get the coordinates of the wall
                int nTestX{ (int)(fPlayerX + fEyeX * fDistanceToWall) };
                int nTestY{ (int)(fPlayerY + fEyeY * fDistanceToWall) };

                // Check if ray is out of bounds
                if ((nTestX < 0) || (nTestX >= nMapWidth) || (nTestY < 0) || (nTestY >= nMapHeight))
                {
                    bHitWall = true; // Out of bounds, we hit the wall
                    fDistanceToWall = fDepth; // Set distance to the maximum depth
                }
                else // If ray is still in bounds
                {
                    if (map[nTestY * nMapWidth + nTestX] == '#') // If we hit a wall
                    {
                        bHitWall = true;
                    }
                }
            }


            // Decide the height of the wall by distance to the wall
            int nCeiling = (float)(nScreenHeight / 2.0) - nScreenHeight / ((float)fDistanceToWall);
            int nFloor = (float)(nScreenHeight / 2.0) + nScreenHeight / ((float)fDistanceToWall); // nFloor = nScreenHeight - nCeiling;

            short nShade = ' ';
            if (fDistanceToWall <= fDepth / 4.0f) // Get very close to wall -> will be full-shaded
                nShade = 0x2588;
            else if (fDistanceToWall <= fDepth / 3.0f)
                nShade = 0x2593;
            else if (fDistanceToWall <= fDepth / 2.0f)
                nShade = 0x2592;
            else if (fDistanceToWall <= fDepth) // Get far to wall -> will be light-shaded
                nShade = 0x2591;
            else
                nShade = ' '; // So far, far way -> will see nothing

            for (int y = 0; y < nScreenHeight; y++)
            {
                if (y < nCeiling) // If the pixel is above the nCeiling -> should be ceiling
                {
                    screen[y * nScreenWidth + x] = ' '; // Set to space
                }
                else if (y > nCeiling && y <= nFloor) // If the pixel is between the nCeiling and nFloor -> should be wall
                {
                    screen[y * nScreenWidth + x] = nShade; // Set to wall character
                }
                else // If the pixel is below the nFloor -> should be floor
                {
                    screen[y * nScreenWidth + x] = ' '; // Set to floor character
                }
            }

        }
        // Write cavas into console to show screen
        WriteConsoleOutputCharacter(hConsole, screen, nScreenWidth * nScreenHeight, { 0,0 }, &dwBytesWritten);
    }
    return 0;

}

