昨天(Day 2)我們已經定義了 out port:ContentSourcePort。今天要做的,就是讓它「真的去拿資料」有有三個常見方法可以可以發 HTTP Request RestTemplate、WebClient、 OpenFeign。本系列主要以 OpenFeign 實作 HackerNews 的來源,並接成一個 Hexagonal Adapter。不過在介紹前我們先熟悉一寫Spring的概念。
RestTemplate:傳統、同步阻塞、API 簡單。在 Spring 5 之後進入「maintenance mode」,新功能主要走 WebClient/RestClient,但仍可用(之後他就deprecated不是他不好,而是指不會有更多new features了)。WebClient:Spring 5 引入的 reactive 客戶端,支援Sync/Async,適合高併發或需要 non-blocking (非阻塞)。OpenFeign:只要定義 interface 即可使用,與 Spring Boot/Cloud 深度整合,能串 服務註冊/負載平衡(Spring Cloud LoadBalancer)。因為我只想 access news api 沒有要 build 一個 reactive 的 app 所以用 OpenFeign 就好,在 Hexagonal Architecture 的設計裡 (已經夠複雜了),我們的目標就是 盡量減少不必要的樣板程式碼 (boilerplate code)。下面的程式範例你可以看到 OpenFeign 只要處理 interface 註冊。
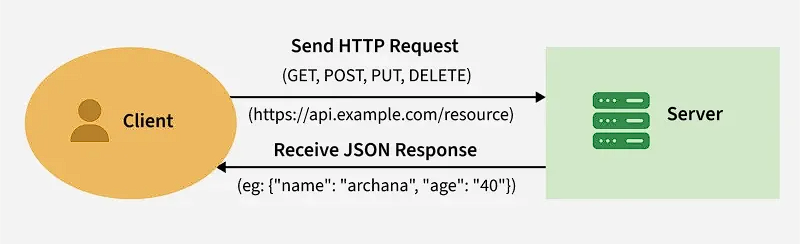
API endpoint:/v0/topstories.json 會return一串 story IDs;/v0/item/{id}.json
可參見 https://github.com/HackerNews/API
下面的 code 有 Spring 框架常見的 DI 簡單說就是 Spring 它可以幫你管理物件的週期,被管理的物件稱為Bean,而這些 Bean 會被加入倒 context 中,你要用 annoation 去表示他是 Bean。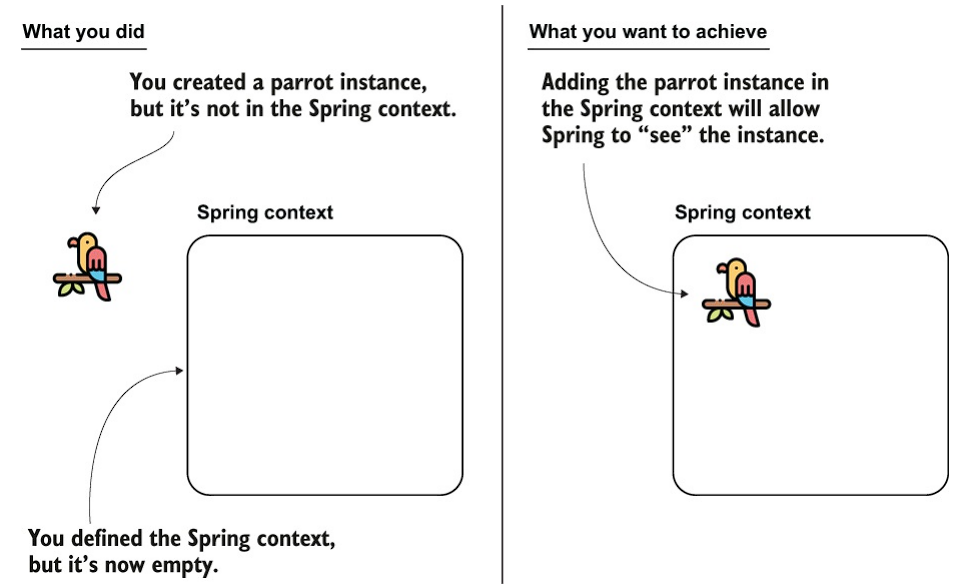
Class 級別的註解:@Configuration、@Service、@Repository…
→ 加在 class 上,Spring 會自動把它註冊為 Bean。
Method 級別的註解:@Bean
→ 加在 @Configuration 類別的方法上,Spring 會把該方法回傳的物件 (return值) 註冊為 Bean,Bean 的名稱預設就是方法名第一個字母小寫。
注意的是 Bean 是 Singleton by default,除非特別定義他的 Scope , @Scope 簡單來說就是你設定 Bean 要怎麼被 Spring 管理,像是你可以把它改成不是 Singleton 而是 Prototype 等等。
因為一旦定義好 Bean,Spring 在 DI 的時候就能從 Context 中找到並注入到建構子,讓程式碼 更彈性、低耦合。
public class Car {
    private final Engine engine;
    public Car(Engine engine) {
        this.engine = new Engine(); // 直接在建構子裡 new
    }
}
這樣 Car 永遠只能用 new Engine(),但如果你:
public class Car {
    private final Engine engine;
    public Car(Engine engine) {
        this.engine = engine; // 注入,而不是自己 new
    }
}
這樣在 new Car 的時候
Car c1 = new Car(new GasEngine());
Car c2 = new Car(new ElectricEngine());
// 方便unit test
Car c3 = new Car(new MockEngine()); // 用假的 Engine
如果 Engine 是介面,那就更符合 面向抽象程式設計 (Program to an interface) 的原則:
interface Engine {
    void start();
}

class GasEngine implements Engine {
    public void start() { System.out.println("Gas engine starts"); }
}

class ElectricEngine implements Engine {
    public void start() { System.out.println("Electric engine starts silently"); }
}
Car 只依賴 Engine 介面,而"不管具體是哪個實作":
Car gasCar = new Car(new GasEngine());
Car electricCar = new Car(new ElectricEngine());
DI + Interface 不只是低耦合,還能達到 Information Hiding:
在 Spring 中,DI 由 IoC Container 來自動完成 (這就是用Spring框架的好處之一):
@Component
class GasEngine implements Engine {}

@Component
class Car {
    private final Engine engine;
    @Autowired
    public Car(Engine engine) {//因為只有 1 個建構子 不寫 @Autowired 也沒關係
        this.engine = engine;
    }
}
上述的code讓兩個物件 Engine and Car 有了 relationship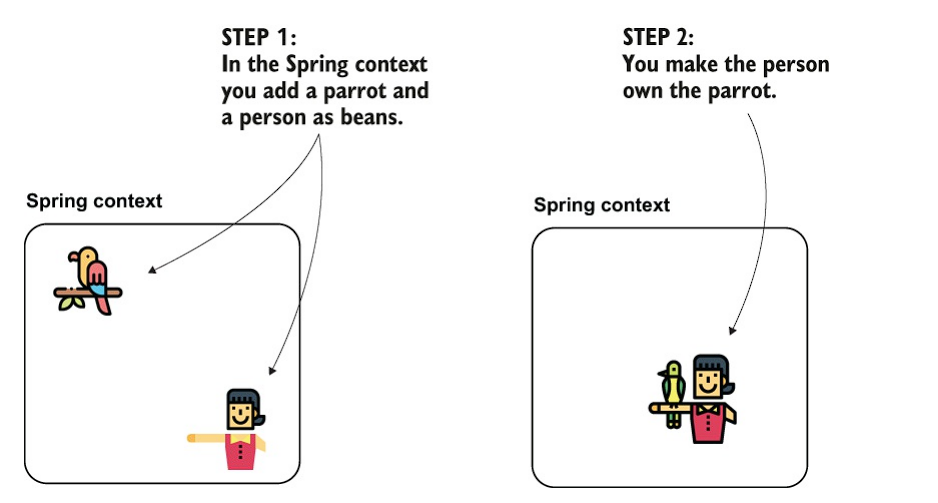
@Value 可以幫我們 access 到 application.yml 的設定參數,我們可以輕鬆地進行管理參數,不必重新 compile 程式碼。
source:
  hn:
    base-url: https://hacker-news.firebaseio.com/v0
這樣,我們在程式裡把 YAML 裡的 base-url 注入進來。
下面的三個方法就是在建立左側的 client
<dependency>
    <groupId>org.springframework.boot</groupId>
    <artifactId>spring-boot-starter-web</artifactId>
</dependency>
@Configuration
public class HttpClientConfig {
    @Bean
    RestTemplate restTemplate(RestTemplateBuilder builder) {
        return builder.build();
    }
}
必須先建立 header -> 然後製作 request data -> 然後用 exchange()
@Component
public class HackerNewsRestTemplateClient {
    private final RestTemplate restTemplate;
    private final String baseUrl;

    public HackerNewsRestTemplateClient(
            RestTemplate restTemplate,
            @Value("${source.hn.base-url}") String baseUrl
    ) {
        this.restTemplate = restTemplate;
        this.baseUrl = baseUrl;
    }

    public List<Long> topStories() {
        String url = baseUrl + "/topstories.json";

        // 1 先建立 header
        HttpHeaders headers = new HttpHeaders();
        headers.setContentType(MediaType.APPLICATION_JSON);

        // 2 製作request data: body is null because of we are using http method "GET"
        HttpEntity<String> request = new HttpEntity<>(null, headers);

        // 3 用exchange()去發送http request: put header + request + what http method into exchange() to call hackernews API
        ResponseEntity<long[]> response =
        restTemplate.exchange(
                url,
                HttpMethod.GET,
                request,
                long[].class
        );

        return Arrays.stream(response.getBody())
                     .boxed()
                     .toList();
    }
<dependency>
    <groupId>org.springframework.boot</groupId>
    <artifactId>spring-boot-starter-webflux</artifactId>
</dependency>
@Configuration
public class HttpClientConfig {
    @Bean
    WebClient webClient() {
        return webClient
                .builder()
                .build();
    }
}
@Component
public class HackerNewsWebClient {
    private final WebClient webClient;

    private final String baseUrl;

    public HackerNewsWebClient(
        WebClient webClient,
        @Value("${source.hn.base-url}") String baseUrl) {
        this.webClient = webClient;
        this.baseUrl = baseUrl;
    }

    public List<Integer> topStories() {
        return webClient.get()
                .uri(baseUrl + "/topstories.json")
                .retrieve()
                .bodyToMono(new ParameterizedTypeReference<List<Integer>>() {})
                .block(); // 示範 也可以改成 blocking
    }
}
需要以下的 dependency :
<properties>
    <java.version>17</java.version>
    <spring-cloud.version>2025.0.0</spring-cloud.version>
</properties>
<dependency>
    <groupId>org.springframework.cloud</groupId>
    <artifactId>spring-cloud-starter-openfeign</artifactId>
</dependency>
<dependencyManagement>
    <dependencies>
        <dependency>
            <groupId>org.springframework.cloud</groupId>
            <artifactId>spring-cloud-dependencies</artifactId>
            <version>${spring-cloud.version}</version>
            <type>pom</type>
            <scope>import</scope>
        </dependency>
    </dependencies>
</dependencyManagement>
使用 OpenFeign 時,我們只需要定義一個 interface,並加上 @FeignClient 註解。
在 app 啟動的時候,Spring 會自動為這個介面產生實作類別,並把它註冊成 Bean 放進 conetext 中(ApplicationContext)。
@Configuration
@EnableFeignClients(
        basePackageClasses = {
                HackerNewsClient.class,
        }
)
public class ProjectConfig {
}
@FeignClient(
        name = "hn",
        url = "${source.hn.base-url}"
)
public interface HackerNewsClient {
    @GetMapping("/topstories.json")
    long[] topStories();

    @GetMapping("/item/{id}.json")
    HnItem item(@PathVariable("id") long id);
}
在一開始的時候,我們就預想到會有很多不同的新聞來源(HackerNews、Guardian…)。如果每個來源都直接和 Domain 溝通,會造成 strongly coupled and hard to extend。
所以我們先透過一個 interface (ContentSourcePort) 定義「契約 (contract)」:新聞來源必須能提供 top() 和 byId() 這些方法。
HackerNewsAdapter 的角色:
FeedItem。這樣一來,在 runtime 時,Spring 會幫我們用 依賴注入 (DI) 把正確的 Adapter 注入進去。
如果未來要再加 GuardianAdapter、NYTimesAdapter,也只要同樣implements ContentSourcePort 就能無縫接入,不需要改 Domain 不需要修改任何程式碼,因為 AggregateFeedService depends on ContentSourcePort 這個 interface。
"Open for extension, Closed for modification." — Bertrand Meyer, Object-Oriented Software Construction (1988)
ContentSourcePort 的存在正好符合 OCP:
public class HackerNewsAdapter implements ContentSourcePort {

    private final HackerNewsClient client;

    public HackerNewsAdapter(HackerNewsClient client) {
        this.client = client;
    }

    @Override
    public String sourceName() {
        return "hackernews";
    }

    @Override
    public List<FeedItem> top(int limit) {
        // Ommit 之後的文章會說明
    }

    @Override
    public Optional<FeedItem> byId(String id) {
        // Ommit 之後的文章會說明
    }

    // Further api
}
LAURENŢIU SPILCĂ, Spring Start Here: Learn what You Need and Learn it Well

