🧐 上一篇我們談到 為什麼在某些情境下必須用 Canvas(像是大量即時繪製、逐像素操作、高自由度變形等)。但光是換成 Canvas 還不夠,如果使用方式不對,仍然可能掉幀、卡頓,甚至浪費資源。本篇要進一步探討:如何讓 Canvas 發揮效能極限。
在網頁動畫的早期,工程師最常用的工具是 setInterval 或 setTimeout。
只要設定一個固定時間間隔,瀏覽器就會照著排程呼叫你的程式碼。
理論上,如果我設定 16ms,就能得到每秒 60 幀的動畫(1000ms/60Hz)。
聽起來很美好,但實際跑起來有很多問題:
setInterval 還是會繼續跑,CPU 白白被吃掉。🎉 於是,瀏覽器推出了一個更聰明的 Web API —— requestAnimationFrame。
它的核心概念很單純:
「告訴瀏覽器:在下次重繪畫面之前,幫我呼叫這個函式。」
這代表:
DOMHighResTimeStamp),方便計算動畫進度。Canvas 是「立即模式繪製」。一旦像素被畫上去,就會一直留在畫布上,直到你主動清掉或覆蓋。所以當畫面需要改變時,每一幀都必須重新繪製該區域。
更新畫布的流程:畫布繪製 (JS) → 瀏覽器重繪 (渲染) → 螢幕更新
如果用 setInterval 來驅動,「畫布繪製」和「瀏覽器重繪」的時機常常對不上 → 很容易出現閃爍或掉幀。
但有了 requestAnimationFrame,就能把畫布繪製時機交給瀏覽器,確保「畫布繪製 → 瀏覽器重繪」完全同步。
動畫不只看起來更流暢,也更省電,因為不會做多餘的重繪。
setInterval(() => {
  ctx.clearRect(0, 0, w, h);
  draw();
}, 16);
function loop() {
  ctx.clearRect(0, 0, w, h);
  draw();
  requestAnimationFrame(loop);
}
loop();
😖 我試過在球體移動、雪花掉落的 demo 裡比較 setInterval 和 requestAnimationFrame,但在我自己的筆電上幾乎看不出差異。可能在低階裝置或早期手機上,掉幀與撕裂會更明顯。
requestAnimationFrame 解決了「動畫節奏」的問題,但在更複雜的場景裡,光靠同步還不夠。
真正的效能瓶頸往往來自 「每一幀都把整張畫布重畫」。以下三種方法,可以進一步提升效能。
Canvas 是「立即模式」:畫完就忘記,下一幀需要重新畫。
如果背景是靜止的,不必每次都重畫。
附上簡易的程式碼 - 全部重繪(每幀重繪背景與前景):
function loop() {
  // 背景
  ctx.fillStyle = '#eee';
  ctx.fillRect(0, 0, w, h);

  ctx.fillStyle = '#ccc';
  for(let i = 0; i < 5000; i++) {
    ctx.fillRect(Math.random() * w, Math.random() * h, 2, 2);
  }

  // 前景
  ctx.beginPath();
  ctx.arc(x, y, 20, 0, Math.PI * 2);
  ctx.fill();

  requestAnimationFrame(loop);
}
// 建立暫存背景
const bgCanvas = document.createElement('canvas');
bgCanvas.width = w;
bgCanvas.height = h;
const bgCtx = bgCanvas.getContext('2d');

// 只畫一次背景
bgCtx.fillStyle = '#eee';
for (let i = 0; i < 5000; i++) {
  bgCtx.fillRect(Math.random() * w, Math.random() * h, 2, 2);
}

// 主動畫 loop
function loop() {
  ctx.clearRect(0, 0, w, h);

  // 直接 drawImage 複製背景
  ctx.drawImage(bgCanvas, 0, 0);

  // 畫前景小球
  ctx.beginPath();
  ctx.arc(x, y, 20, 0, Math.PI * 2);
  ctx.fill();

  requestAnimationFrame(loop);
}
線上範例網址:Canvas:全量重繪 vs 快取背景
條件:錄製時間 ~12 秒,背景 15,000 個粒子。
由於硬體效能優良,肉眼觀察 FPS 幾乎無差異,因此採 DevTools Performance 進行效能分析,展示兩種模式的內部差異。
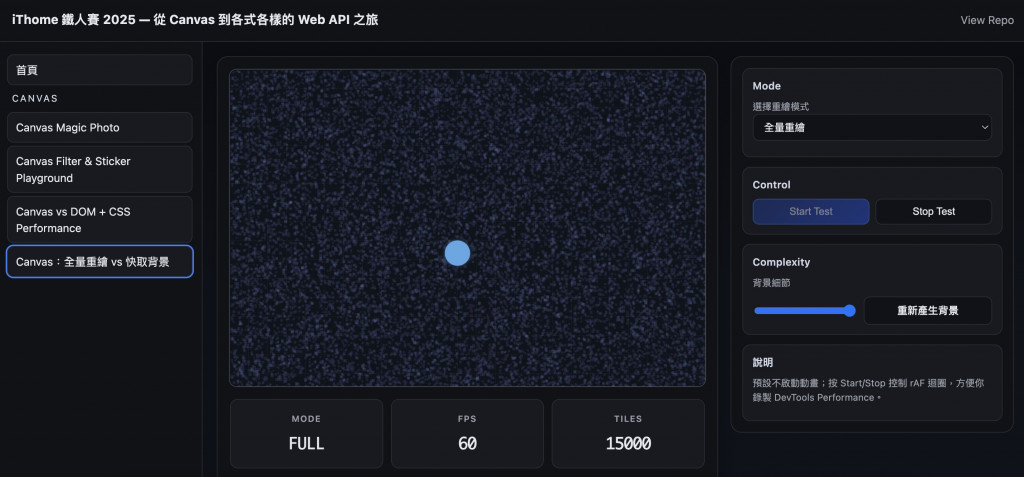
觀察:
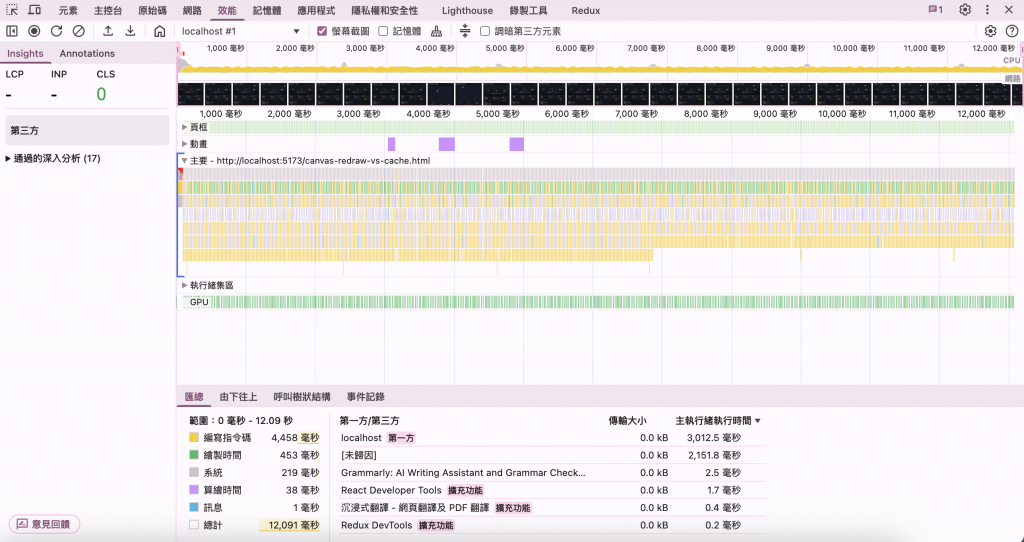
匯總:
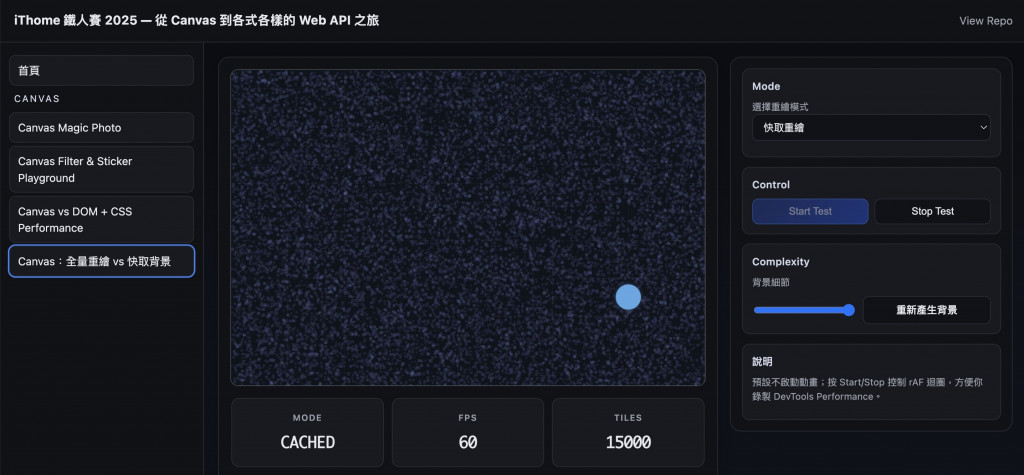
觀察:
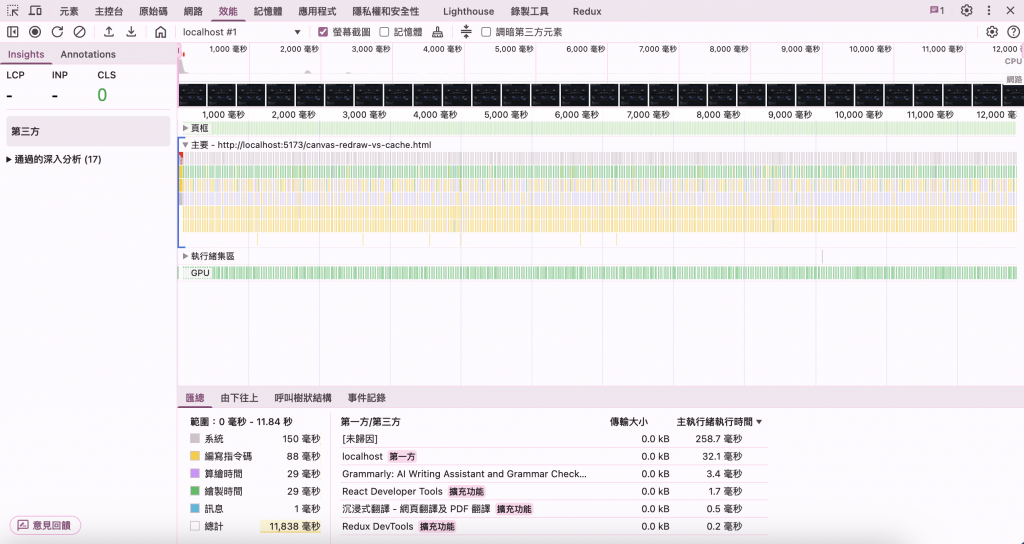
匯總:
| 指標 | 全量重繪 | 快取重繪 | 解讀 |
|---|---|---|---|
| 🟡 編寫指令碼(Scripting JS) | 4458 ms | 88 ms | 全量每幀大量 API 呼叫;快取只需一次 drawImage |
| 🟢 繪製時間(Painting) | 453 ms | 29 ms | 全量每幀重繪像素;快取直接複製背景,繪製量大幅減少 |
| 總計 | 12,0xx ms | 11,8xx ms | 手動操作,錄製時長略有誤差XD 但差距清楚 |
只清除並重繪「有物件變動」的矩形區域,而不是整張畫布。
附上簡易的程式碼:
const canvas = document.getElementById('canvas');
const ctx = canvas.getContext('2d');

let posX = 10;
const posY = 50;
const size = 30;
const speed = 2;

function drawRect(x, y, color) {
  ctx.fillStyle = color;
  ctx.fillRect(x, y, size, size);
}

// 初始畫面
drawRect(posX, posY, 'blue');

function animate() {
  const oldRect = { x: posX, y: posY, w: size, h: size };

  posX += speed;

  // 邊界反彈
  if (posX > canvas.width - size || posX < 0) speed = -speed;

  const newRect = { x: posX, y: posY, w: size, h: size };

  // 清除舊位置(清髒矩形)
  clearRect(oldRect);

  // 繪製新位置藍色方塊
  drawRect(posX, posY, 'blue');

  requestAnimationFrame(animate);
}

function clearRect(rect) {
  ctx.clearRect(rect.x - 1, rect.y - 1, rect.w + 2, rect.h + 2);
  // 加上緩衝避免邊緣殘影
}

animate();
允許在 Web Worker 裡繪圖 → 不會阻塞主線程。
postMessage 傳 ImageBitmap 回主線程。附上簡易的程式碼:
const canvas = document.getElementById('canvas');
const ctx = canvas.getContext('2d');

const worker = new Worker('worker.js');

worker.onmessage = async (e) => {
  const bitmap = e.data;
  // 清空畫布並繪製 Worker 回傳的 ImageBitmap
  ctx.clearRect(0, 0, canvas.width, canvas.height);
  ctx.drawImage(bitmap, 0, 0);
  bitmap.close(); // 釋放資源
};

// 傳送 OffscreenCanvas 給 Worker 控制
const offscreen = canvas.transferControlToOffscreen();
worker.postMessage({ canvas: offscreen }, [offscreen]);
這些技巧可與 requestAnimationFrame 搭配使用:由它統一節奏,再依需求選擇最佳重繪策略。
👉 歡迎追蹤這個系列,我會從 Canvas 開始,一步步帶你認識更多 Web API 🎯

