
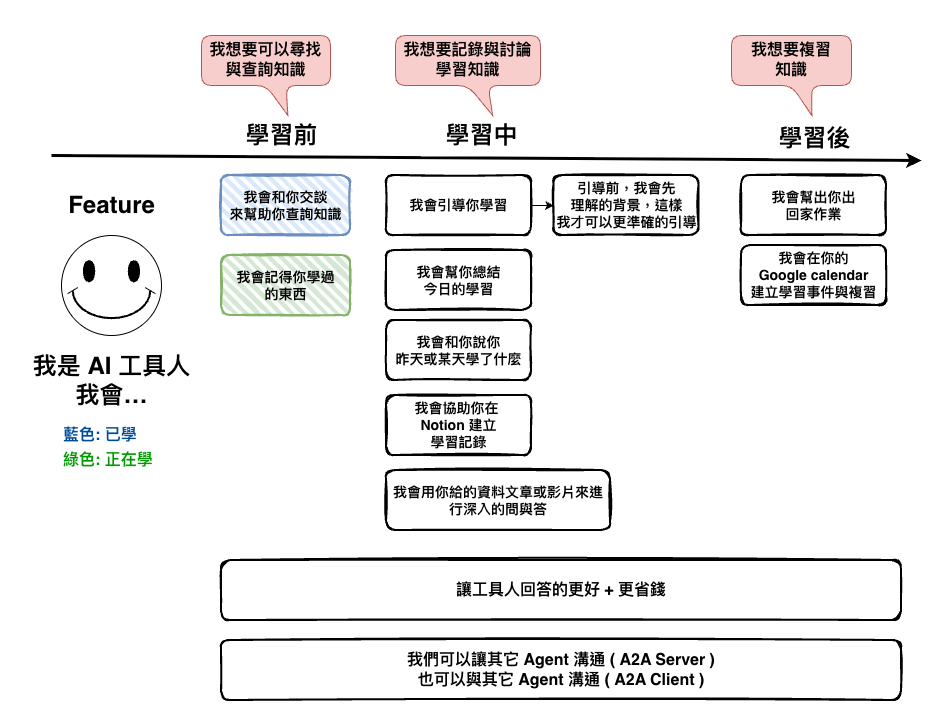
在這一篇文章中,我們說明了要如何讓 AI 記得我們說過的話,接下來我們就來實作它。
30-4: [知識] LangChain X LangGraph 之要如何記得你 ? ( Memory )
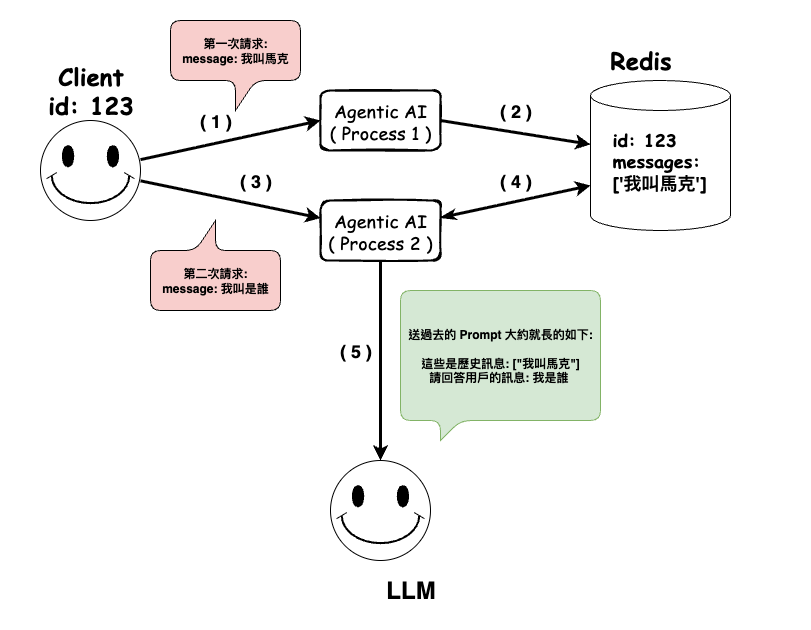
然後今天我們要實作的架構大約如下,主要是會用 Redis 來儲放資訊 :
🤔 套件
npm install @langchain/langgraph-checkpoint-redis
但正常來說你執行下去會看到以下的錯誤,主要的原因是 LangChain 我們的版本是 1.0.0 以上,而這個官方的套件只支援到 0.4.0。
$ npm install @langchain/langgraph-checkpoint-redis
npm error code ERESOLVE
npm error ERESOLVE unable to resolve dependency tree
npm error
npm error While resolving: 2025-ai-mark@1.0.0
npm error Found: @langchain/core@1.0.0-alpha.5
npm error node_modules/@langchain/core
npm error   @langchain/core@"^1.0.0-alpha.5" from the root project
npm error
npm error Could not resolve dependency:
npm error peer @langchain/core@">=0.2.31 <0.4.0" from @langchain/langgraph-checkpoint-redis@0.0.1
npm error node_modules/@langchain/langgraph-checkpoint-redis
npm error   @langchain/langgraph-checkpoint-redis@"*" from the root project
npm error
npm error Fix the upstream dependency conflict, or retry
但我實際上測試使用後,發現事實上只是它們的 pageage.json 還沒升級,實際上還是可以動,不過這個建議只是先當實驗品,正式環境還是乖乖等他們,或是你自已送 PR 過去。
然後我這裡是指先在 package.json 加上這段,然後再執行 npm i 來安裝。
  "dependencies": {
    "@langchain/langgraph-checkpoint-redis": "^0.0.1"
  },
  "overrides": {
    "@langchain/langgraph-checkpoint-redis": {
      "@langchain/core": "1.0.0-alpha.5"
    }
  }
🤔 docker-compose
version: '2.1'

services:
  redis:
    image: redis:8.2.0-alpine
    ports: ['6379:6379']
    volumes:
      - './docker-data/redis-data:/data'
volumes:
  redis-data:
🤔 環境變數
REDIS_URL=redis://localhost:6379
🤔 Workflow 的修改
主要有以下幾個地方有修改,下面程式碼可以用列表號來看到:
thread_id。import {
StateGraph,
START,
END,
Annotation,
MessagesAnnotation,
} from "@langchain/langgraph";
import { BaseChatAI } from "./agents/base.agent";
import { RedisSaver } from "@langchain/langgraph-checkpoint-redis";
import { BaseCheckpointSaver } from "@langchain/langgraph";
enum Steps {
INITIAL = "initial",
CALL_CHAT_AI = "call_chat_ai",
}
const ChatStateAnnotation = Annotation.Root({
// 它可以自動 append messages
...MessagesAnnotation.spec,
query: Annotation<string>,
step: Annotation<Steps>,
});
type ChatState = typeof ChatStateAnnotation.State;
export class ChatWorkflow {
private baseChatAI: BaseChatAI | null = null;
private graph: ReturnType<typeof this.buildGraph>;
private threadId: string | null = null;
private checkpointSaver: BaseCheckpointSaver | null = null;
constructor() {}
public async initialize(threadId: string) {
this.threadId = threadId;
// --------------------------------------------------- ( 1 ) 的修改
this.checkpointSaver = await RedisSaver.fromUrl(process.env.REDIS_URL!, {
defaultTTL: 5, // TTL in minutes
refreshOnRead: true,
});
this.baseChatAI = new BaseChatAI(this.checkpointSaver, {
threadId: this.threadId,
});
this.graph = this.buildGraph();
}
private buildGraph() {
const workflow = new StateGraph(ChatStateAnnotation)
.addNode(Steps.INITIAL, async (state: ChatState): Promise<ChatState> => {
return {
step: Steps.INITIAL,
query: state.query,
messages: [],
};
})
.addNode(
Steps.CALL_CHAT_AI,
async (state: ChatState): Promise<ChatState> => {
const response = await this.baseChatAI!.callLLM(state.query);
return {
step: Steps.CALL_CHAT_AI,
messages: [...response],
query: state.query,
};
}
)
.addEdge(START, Steps.INITIAL)
.addEdge(Steps.INITIAL, Steps.CALL_CHAT_AI)
.addEdge(Steps.CALL_CHAT_AI, END);
if (!this.checkpointSaver) {
throw new Error("Checkpoint saver is not initialized");
}
// --------------------------------------------------- ( 2 ) 的修改
return workflow.compile({
checkpointer: this.checkpointSaver,
});
}
async *processMessage(
message: string
): AsyncGenerator<string, void, unknown> {
const initialState: ChatState = {
query: message,
step: Steps.INITIAL,
messages: [],
};
// --------------------------------------------------- ( 3 ) 的修改
const result: ChatState = await this.graph.invoke(initialState, {
configurable: {
thread_id: this.threadId
},
});
yield result.messages[result.messages.length - 1].content as string;
}
}
🤔 Agent 的修改
主要的修改以下幾個地方:
thread_id。事實上他整體的修改和 workflow 幾乎是相同的。
import { BaseMessage, SystemMessage, HumanMessage } from "langchain";
import { createAgent } from "langchain";
import { Configurable } from "./interfaces/configurable";
import { BaseCheckpointSaver } from "@langchain/langgraph";

/**
 * 基礎 Chat AI 服務,他可以做任何事情,不會做任何限制
 */
export class BaseChatAI {
  private checkpointSaver: BaseCheckpointSaver;
  private configurable: Configurable;
  private agent: any;

  constructor(
    checkpointSaver: BaseCheckpointSaver,
    configurable: Configurable
  ) {
    this.checkpointSaver = checkpointSaver;
    this.configurable = configurable;

    // ------------------------------------------------- ( 1 ) ( 2 )的修改
    this.agent = createAgent({
      model: "openai:gpt-5-mini",
      tools: [],
      checkpointer: this.checkpointSaver,
    });
  }

  async callLLM(message: string): Promise<BaseMessage[]> {
    const messages = [
      new SystemMessage(
        "你是 AI 知識學習助理,會回答 AI 相關知識,回應不超過 300 個字"
      ),
      new HumanMessage(message),
    ];

    const response = await this.agent.invoke(
      {
        messages,
      },
      {
        configurable: {
          thread_id: this.configurable.threadId
        },
      }
    );

    return response.messages;
  }
}
我們上面的範例實際上中,有一個東西要注意一下 :
你的 createAgent 沒進行特別處理的話,送多送很多東西給 LLM,如下圖,因為 agent 是會直接將 LLM 回傳的 messages 放到 checkpoint。
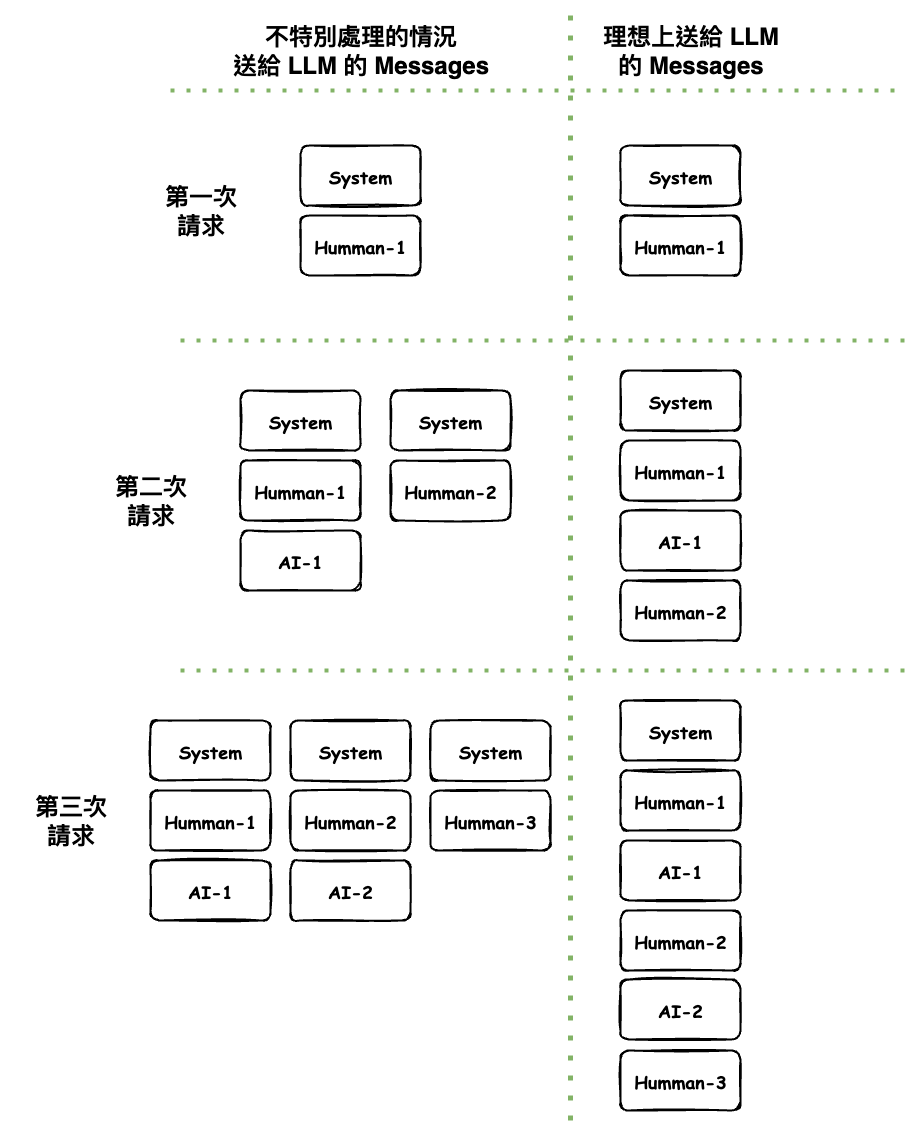
其中問題在於 SystemMessage 每次都相同,但是都會帶入。
事實上有幾個解法 :
這裡我們會選擇第 2 種來執行,因為這次需求我想嘗試走看看 Workflows + 多 Agent 情境。
🤔 先問一下,System Role Prompt 是啥 ?
這裡有個知識要先科普一下,那就是在 LLM 的世界中 message 通常會有以下幾種 :
然後每個 AI 基本上就是分這三類,然後再長出一些,但是名詞都不同,可以看以下 OpenAI 的文件,它在裡面叫 developer、user、assistant,然後看 Google Gemini 的則是兩種 user、model,但 user 內好像又有分。
OpenAI-message-roles-and-instruction-following
然後 LangChain 這裡就統一抽象成以下幾個,你正你用了他,LangChain 會自動轉成對應的送給 LLM。
https://docs.langchain.com/oss/javascript/langchain/messages#message-types
然後因為我們每一次 SystemMessage 都是一樣,浪費資源,因為我們只會保留一個就好。
🤔 程式碼修改的地方
主要就是在 agent 那加上下面我寫的這個 cleanMessageMiddleware 這個 middleware,這樣你就會發現整個 agent 的 checkpoint 就只會儲放 HumanMessage 與 AIMessage。
import { BaseMessage, SystemMessage, HumanMessage, AIMessage } from "langchain";
import { createAgent, createMiddleware } from "langchain";
import { Configurable } from "./interfaces/configurable";
import { BaseCheckpointSaver } from "@langchain/langgraph";

const cleanMessageMiddleware = createMiddleware({
  name: "cleanMessageMiddleware",
  afterModel: (state: { messages: BaseMessage[] }) => {
    state.messages = state.messages.filter((message: BaseMessage) => {
      if (message instanceof HumanMessage || message instanceof AIMessage) {
        return true;
      }
      return false;
    });

    return state;
  },
});

/**
 * 基礎 Chat AI 服務,他可以做任何事情,不會做任何限制
 */
export class BaseChatAI {
  private checkpointSaver: BaseCheckpointSaver;
  private configurable: Configurable;
  private agent: any;

  constructor(
    checkpointSaver: BaseCheckpointSaver,
    configurable: Configurable
  ) {
    this.checkpointSaver = checkpointSaver;
    this.configurable = configurable;
    this.agent = createAgent({
      model: "openai:gpt-5-mini",
      tools: [],
      checkpointer: this.checkpointSaver,
      // ref: https://blog.langchain.com/agent-middleware/
      middleware: [cleanMessageMiddleware],  // <------------------- 修改了這裡 ~
    });
  }

  async callLLM(message: string): Promise<BaseMessage[]> {
    ...
  }
}
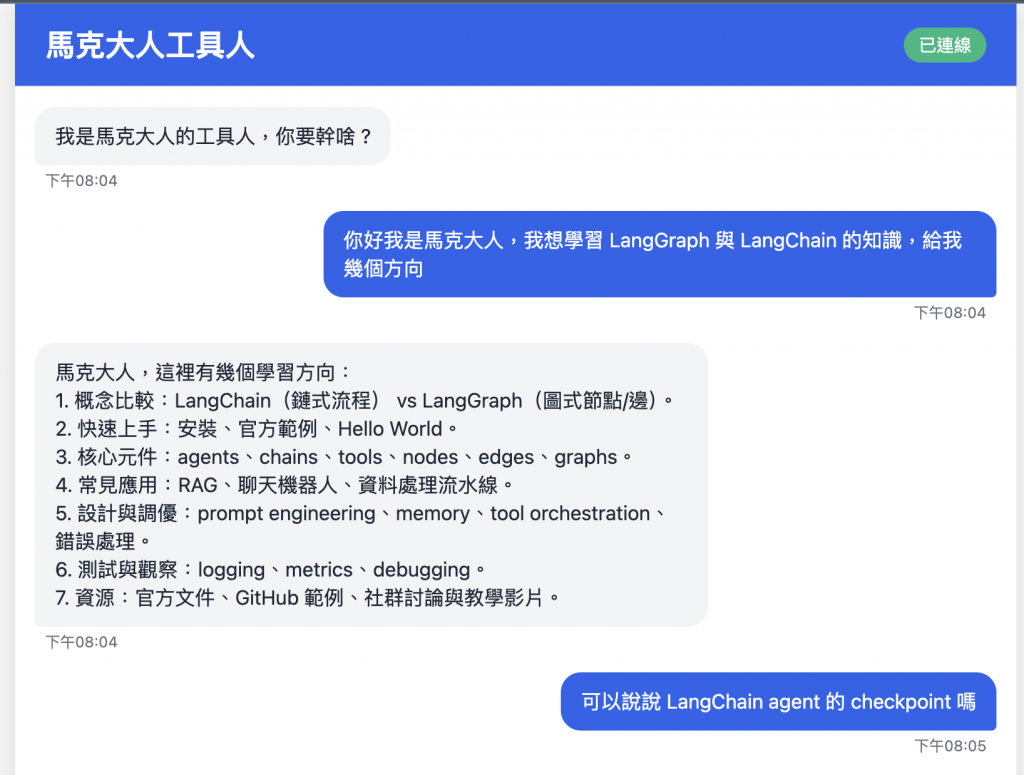
最後接下來我們來試一下結果。
實作完了今天的東西以後,我們大約學習到以下幾個東西 :
不過今天實作完以後,比較讓我糾結的是,LangChain 的 Agent 要不要讓他也有 checkpointer,還是統一由 LangGraph 的 Workflow 來管理呢 ? 這個在接下來的需求在看看沒有沒新的發現,現在目前簡單的情況下,好像都可以。
備註: 我現在 Workflow 與 Agent 是用同一個 checkpointer 這個我知道,這個之後會優化,因為現在這還看不出問題。
