本章將介紹如何利用霍夫轉換(Hough Transform)在影像中偵測直線,並比較標準霍夫轉換與機率霍夫轉換的差異與應用。
OpenCV 提供兩種直線偵測方式:
cv2.HoughLines():標準霍夫轉換,回傳 (ρ, θ)cv2.HoughLinesP():機率霍夫轉換,回傳線段兩端點座標,適合實務應用請準備一張圖片 road.jpg,並放在程式同一資料夾。
import cv2
import numpy as np

# 讀取原始圖片並複製備份
img = cv2.imread("road.jpg")
img_hough = img.copy()    # 用於標準霍夫轉換繪圖
img_houghP = img.copy()   # 用於機率霍夫轉換繪圖

# 轉為灰階,便於後續邊緣偵測
img_gray = cv2.cvtColor(img, cv2.COLOR_BGR2GRAY)

cv2.imshow('Original', img)
cv2.waitKey()
cv2.destroyAllWindows()

有時我們只關心影像的特定區域(如車道下半部),可設定 ROI 來聚焦偵測範圍。
# 設定ROI(下半部區域,根據實際需求可調整)
height, width = img.shape[:2]
roi_y1 = int(height / 1.5)
roi_y2 = height
roi_x1 = int(width / 3)
roi_x2 = width

roi = img[roi_y1:roi_y2, roi_x1:roi_x2]
img_hough_roi = img.copy()
img_houghP_roi = img.copy()
gray_roi = cv2.cvtColor(roi, cv2.COLOR_BGR2GRAY)
# 邊緣檢測(只針對ROI)
edges_roi = cv2.Canny(gray_roi, 50, 150, apertureSize=3)

lines_roi = cv2.HoughLines(edges_roi, 1, np.pi/180, 80)
# 標準霍夫直線畫在 img_hough_roi(加回ROI偏移量)
if lines_roi is not None:
    for rho, theta in lines_roi[:,0]:
        a = np.cos(theta)
        b = np.sin(theta)
        x0 = a * rho
        y0 = b * rho
        x1 = int(x0 + 1000*(-b))
        y1 = int(y0 + 1000*(a))
        x2 = int(x0 - 1000*(-b))
        y2 = int(y0 - 1000*(a))
        cv2.line(img_hough_roi, (x1+roi_x1, y1+roi_y1), (x2+roi_x1, y2+roi_y1), (0,0,255), 2)

# 將ROI邊緣圖像放大到原圖大小顯示
edges_full = np.zeros((height, width), dtype=np.uint8)
edges_full[roi_y1:roi_y2, roi_x1:roi_x2] = edges_roi
cv2.imshow("Edges (ROI)", edges_full)
cv2.imshow("Hough Lines (ROI)", img_hough_roi)
說明:先用 Canny 邊緣偵測取得輪廓,再用 HoughLines 找出所有直線,最後將直線繪製於原圖。
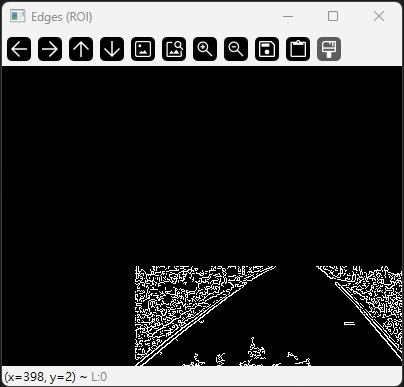
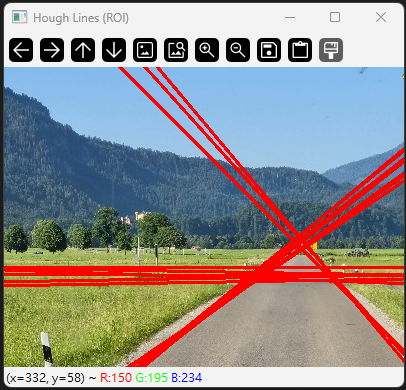
image:輸入灰階影像threshold1、threshold2:低/高閾值,決定邊緣敏感度apertureSize:Sobel 核大小,常用 3image:二值化或邊緣影像rho:距離解析度(像素),通常設為 1theta:角度解析度(弧度),通常設為 np.pi/180threshold:累加器門檻值,越高偵測到的線越少image:二值化或邊緣影像rho、theta、threshold:同上minLineLength:線段最短長度(像素)maxLineGap:線段間最大間距(像素),允許斷線連接# linesP_roi = cv2.HoughLinesP(edges_roi, 1, np.pi/180, 100, minLineLength=50, maxLineGap=10)
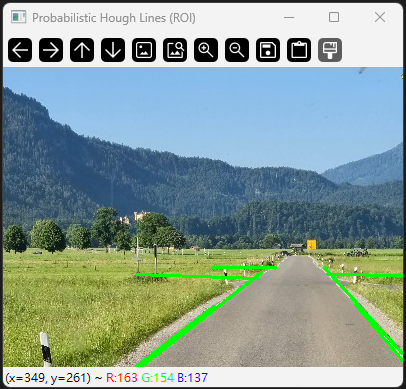
linesP_roi = cv2.HoughLinesP(edges_roi, 1, np.pi/180, 80, minLineLength=50, maxLineGap=10)
# 機率霍夫直線畫在 img_houghP_roi(加回ROI偏移量)
if linesP_roi is not None:
for line in linesP_roi:
x1, y1, x2, y2 = line[0]
cv2.line(img_houghP_roi, (x1+roi_x1, y1+roi_y1), (x2+roi_x1, y2+roi_y1), (0, 255, 0), 2)
cv2.imshow("Probabilistic Hough Lines (ROI)", img_houghP_roi)
說明:HoughLinesP 直接回傳線段端點座標,繪製更直觀,適合實務應用如車道線偵測。
| 方法 | 回傳結果 | 適用場景 |
|---|---|---|
| HoughLines | (ρ, θ) | 數學分析、特殊直線偵測 |
| HoughLinesP | (x1, y1, x2, y2) | 車道線偵測、工業檢測 |
HoughLines 適合數學分析與特殊需求,需手動轉換座標;HoughLinesP 更直觀,直接取得線段端點,適合實務應用。
常見應用:
霍夫轉換是影像直線偵測的經典方法,標準與機率霍夫轉換各有優勢。選擇合適方法並搭配前處理,可有效提升偵測精度與效率


 iThome鐵人賽