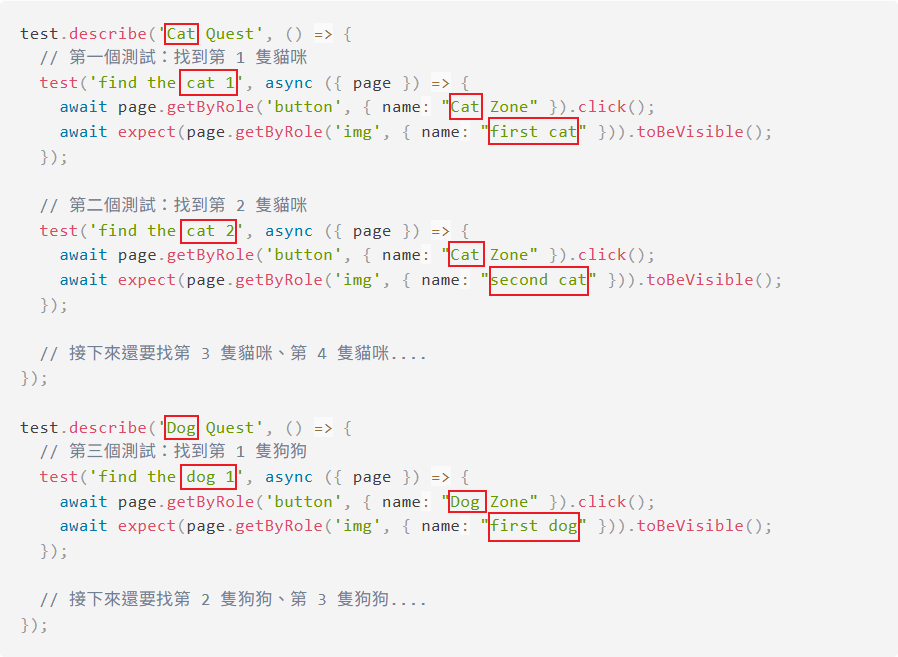
上一篇我們成功地運用 Hooks 收納重複執行的程式碼,只需編寫一次就可重複使用,大大提升了可讀性,但是,各位玩家們請仔細看一下 describe 內的測試:
test.describe('Cat Quest', () => {
  // 第一個測試:找到第 1 隻貓咪
  test('find the cat 1', async ({ page }) => {
    await page.getByRole('button', { name: "Cat Zone" }).click();
    await expect(page.getByRole('img', { name: "first cat" })).toBeVisible();
  });

  // 第二個測試:找到第 2 隻貓咪
  test('find the cat 2', async ({ page }) => {
    await page.getByRole('button', { name: "Cat Zone" }).click();
    await expect(page.getByRole('img', { name: "second cat" })).toBeVisible();
  });

  // 接下來還要找第 3 隻貓咪、第 4 隻貓咪....
});

test.describe('Dog Quest', () => {
  // 第三個測試:找到第 1 隻狗狗
  test('find the dog 1', async ({ page }) => {
    await page.getByRole('button', { name: "Dog Zone" }).click();
    await expect(page.getByRole('img', { name: "first dog" })).toBeVisible();
  });

  // 接下來還要找第 2 隻狗狗、第 3 隻狗狗....
});
這兩個 test.describe 看起來是不是也在重複執行相同的程式碼?先點擊 Cat Zone 或 Dog Zone 的按鈕,接著確認畫面顯示相對應的照片。
相信聰明的玩家立刻想起令人頭痛的維護地獄,別擔心!我們可以應用 參數化測試 (Parameterized Tests) 的概念來分離資料與邏輯,讓測試更加純粹與專注,我們立刻動手吧!
// Cat Quest
[
  { name: 'Cat 1', category: 'Cat', expected: 'first cat' },
  { name: 'Cat 2', category: 'Cat', expected: 'second cat' },
]
// Dog Quest
[
  { name: 'Dog 1', category: 'Dog', expected: 'first dog' },
]
接著我們就能將資料與程式碼組裝起來,有 2 個方式可以選擇:
【方法一】以變數存取資料
test.describe('Cat Quest', () => {
  const testCases = [
  { name: 'Cat 1', category: 'Cat', expected: 'first cat' },
  { name: 'Cat 2', category: 'Cat', expected: 'second cat' },
];

  for (const { name, category, expected } of testCases) {
    test(`find the ${name}`, async ({ page }) => {
      await page.getByRole('button', { name: `${category} Zone` }).click();
      await expect(page.getByRole('img', { name: ${expected} })).toBeVisible();
    });
  }
});
【方法二】測試層級:以 forEach 方式組合
[
  { name: 'Cat 1', category: 'Cat', expected: 'first cat' },
  { name: 'Cat 2', category: 'Cat', expected: 'second cat' },
].forEach(({ name, expected }) => {
    test.describe(`${category} Quest`, () => {
  test(`find the ${name}`, async ({ page }) => {
      await page.getByRole('button', { name: `${category} Zone` }).click();
      await expect(page.getByRole('img', { name: ${expected} })).toBeVisible();
    });
  });
})
上述兩個參數化測試的方法適合單純資料不同的測試使用,但如果測試環境配置不同,例如以下情境:
locale: 'en-US'、locale: 'zh-TW',讓同一個測試跑多語系版本baseURL 就能共用測試程式碼。這時候就適合在專案層級設定參數,讓我們以在不同環境當中測試登入流程來舉例:
擴充自訂 option 預設值(可以在專案中被覆蓋)
// test/env.ts

// 從 Playwright 測試框架匯入原始的 test 函式,並命名為 base
// (這樣做是為了後面能用 base.extend() 來擴充成自訂版的 test)
import { test as base } from '@playwright/test';

// 定義測試參數 (options),後續以透過 fixture 注入到測試中
export type TestOptions = {
  environment: string;
  baseURL: string;
  username: string;
  password: string;
};

// 用 base.extend() 擴充出自訂版的預設 option,後續可以在 config 裡覆蓋
export const test = base.extend<TestOptions>({
  environment: ['development', { option: true }],
  baseURL: ['development url', { option: true }],
  username: ['development username', { option: true }],
  password: ['development password', { option: true }],
});
在 playwright.spec.ts 的 project 當中設置不同環境的參數
// playwright.spec.ts
import { defineConfig, devices } from '@playwright/test';
import type { TestOptions } from './tests/env';

export default defineConfig<TestOptions>({
  projects: [
    {
      name: 'development',
      use: { ...devices['Desktop Chrome'],
        environment: 'development',
        baseURL: 'development url',
        username: 'development username',
        password: 'development password',
       },
    },
    {
      name: 'staging',
      use: { ...devices['Desktop Chrome'],
        environment: 'staging',
        baseURL: 'staging url',
        username: 'staging username',
        password: 'staging password',
      },
    },
    {
      name: 'production',
      use: { ...devices['Desktop Chrome'],
        environment: 'production url',
        baseURL: 'production',
        username: 'production username',
        password: 'production password',
      },
    },
  ]
});
透過 fixture 注入到測試中
// test/login.spec.ts
import { expect } from '@playwright/test';
import { test } from './env';

test('login', async ({ page, environment, baseURL, username, password }) => {
  await page.goto(baseURL);
  await page.locator('input[name="txtAccount"]').fill(username);
  await page.locator('input[name="txtPassword"]').fill(password);
  await page.locator('button[type="submit"]').click();
  await expect(page).toHaveURL(environment);
  console.log(environment, 'Login successful');
});
📌 Did You Know?
專案層級的參數化設置,是透過參數注入到測試中才能使用,因此無法像使用變數或forEach那樣,直接動態改變測試名稱。
執行結果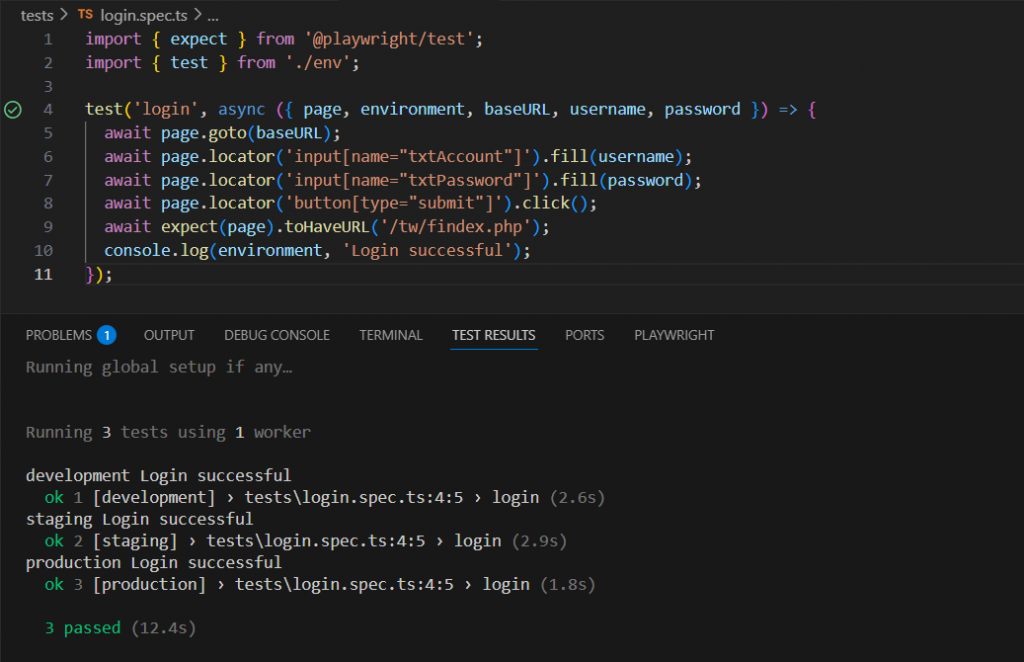
由上面的執行結果我們可以看到,只要執行 login 這個測試,就會自動跑 development、staging、production 三個環境的測試,不須手動切換測試環境。透過這種方式,我們能一次驗證多個環境,大幅減少重複的程式碼,除了增加可維護性,也讓測試流程更加自動化與可靠。
到這裡,我們已經掌握了參數化測試的技巧,能夠靈活應用在大量資料或多種環境的情境中,藉由將資料與測試邏輯分離,使腳本更為精簡且易於維護。接下來,我們將進一步探討定位技巧,當頁面上出現重複元素或是標籤內沒有屬性可供定位時,該如何精準鎖定目標。

