在前幾天我們已經熟悉了 Cilium 的 Service Mesh 架構,今天要來更進一步 直接跨越地理界線(我部署在 Tokyo 與 HK),實際打通兩個 Kubernetes Cluster!我預計這篇會先教學怎麼配置好 Cilium Cluster Mesh,接著下一篇文章我們會來教學一些 Cluster Mesh 的進階用法
今天這主題,是我很感興趣仍在持續鑽研、同時也是我目前所任職公司的其中一塊夢想藍圖,目前在台灣我還沒有看到有公司分享他們在生產環境導入 Cilium Cluster Mesh,如果有讀者讀到這篇,剛好你們公司已經在生產環境導入 Cilium Cluster Mesh 的話,很希望小弟我能有一份榮幸能認識您,一起交流技術!
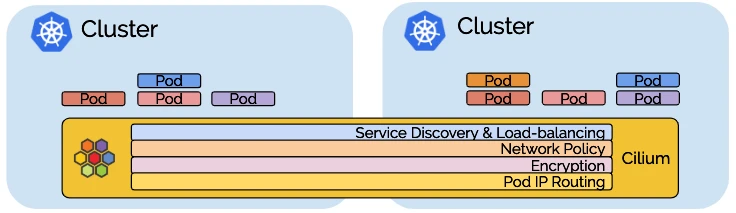
圖片取自:https://cilium.io/blog/2019/03/12/clustermesh/
如果你已經了解 Cilium 是一個以 eBPF 為基礎的 CNI Plugin,負責處理 K8s Cluster 內的網路,那麼 Cluster Mesh 就是它用來 把多個 Cilium Cluster「串起來」形成一個邏輯上單一網路空間 的機制。
簡單來說:
👉 Cilium Cluster Mesh 是讓多個獨立的 Kubernetes Clusters 共享 Service、Identity 與 Policy 的多 Cluster 網路控制平面
在真實的生產環境中,你很可能不只運行一個 Cluster
當我們擁有多個獨立 Cluster 時,這些 Cluster 之間沒有共享的網路控制面:
Cluster Mesh 解決的就是這個問題,它讓不同 Cluster 的 Cilium Agents 能同步:
這裡分享幾個我自己比較有體悟也比較想實踐的 Use Case,其他 Use cases 可以參考:https://cilium.io/use-cases/cluster-mesh/
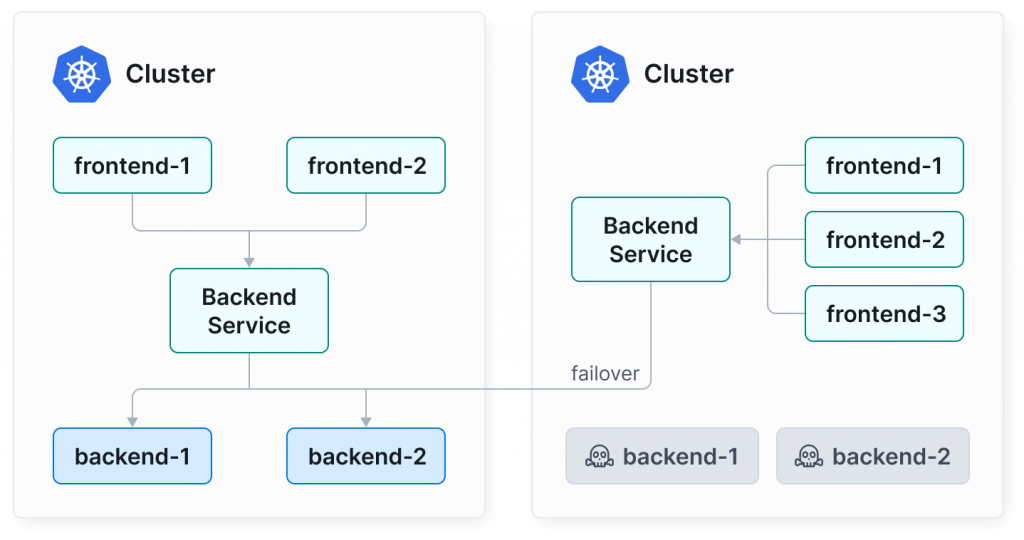
圖片取自:https://cilium.io/use-cases/cluster-mesh/
Cluster Mesh 讓多個 Clusters 可以分散部署在不同的 Region 或 Availability Zone,形成一個跨區高可用架構。
當某個 Cluster 因為升級、網路中斷、或配置錯誤而暫時不可用時,流量會自動 failover 到其他 Cluster
這個就是我很想示範的一個 Use Case,也是我自己深有體悟:像是前陣子曾因為 AWS Singapore Region 的 Global Accelerator 機率性不可用,當下就覺得有 Failover 該有多好…
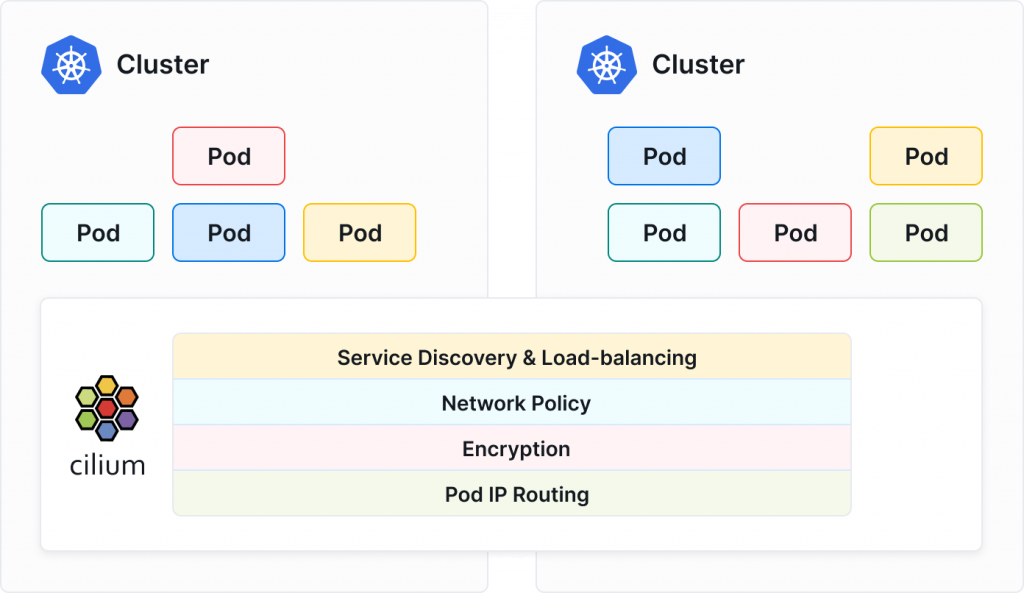
圖片取自:https://cilium.io/use-cases/cluster-mesh/
我覺得這功能真的很香,其中一大關鍵在於它是 Identity-based 的設計。
在單一 Cluster 裡,Cilium 可以用 CiliumNetworkPolicy (CNP) 來控制 L3~L7 的流量。但如果你有好幾個 Cluster,要讓它們都遵守一樣的規則,事情就會變得複雜很多。
假設你有 20 個 Clusters,每個都跑著一樣的服務,如果沒有 Cilium Cluster Mesh,你可能要靠 CIDR 或 IP 來控制誰能連誰,但這種做法超痛苦,一旦某個 Cluster 的 IP 範圍有變動,你就得改整套 Policy,光想就知道維護起來會多麻煩。
Cilium 的厲害之處是,CNP 能讓你用 Label / Identiy / L7 / DNS 來定義存取關係,直接寫「誰」可以連「誰」,像是 frontend → backend,語意清楚又好維護。
舉例:
Cluster Mesh 不會幫你自動同步 Policy ,仍要自己在每個 cluster apply,但它能確保「同一份 Policy」在不同 Cluster 上有「一致的語義與結果」。某種程度上也算是一種 Write once, enforce everywhere
創建一個 K8s Cluster 可以直接回顧 [Day2] Cilium 安裝與初體驗
我會將新的 K8s Cluster 建立在 AWS ap-east-1 (Hong Kong) Region,並且這座新的 Cluster 我將以 hk-cluster 稱呼他,舊有的 Cluster 位於 AWS ap-northeast-1 (Tokyo) Region,所以舊有的 Cluster 我將以 tokyo-cluster 稱呼
以下是重要提醒:
10.14.0.0/16 這個網段10.245.0.0/16 這個網段提供 hk-cluster 安裝 Cilium 範例指令,如下:
helm install cilium cilium/cilium \
  --namespace kube-system \
  --version 1.18.1 \
  --set kubeProxyReplacement=true \
  --set k8sServiceHost=10.14.1.128 \ # 注意要換成對應的 Control Plane IP
  --set k8sServicePort=6443 \
  --set ipam.mode=cluster-pool \
  --set ipam.operator.clusterPoolIPv4PodCIDRList=10.245.0.0/16 \ # 不要重疊
  --set ipam.operator.clusterPoolIPv4MaskSize=24 \
  --set hubble.relay.enabled=true \
  --set hubble.ui.enabled=true \
  --set externalIPs.enabled=true \
  --set nodePort.enabled=true \
  --set hostPort.enabled=true \
  --set bpf.masquerade=true \
  --set enableIPv4Masquerade=true \
  --set enableIPv6Masquerade=false \
  --set policyAuditMode=false \
  --set cluster.name=hk-cluster \ # 取名字,記得要設定
  --set cluster.id=2 # 設定 ID,記得要設定
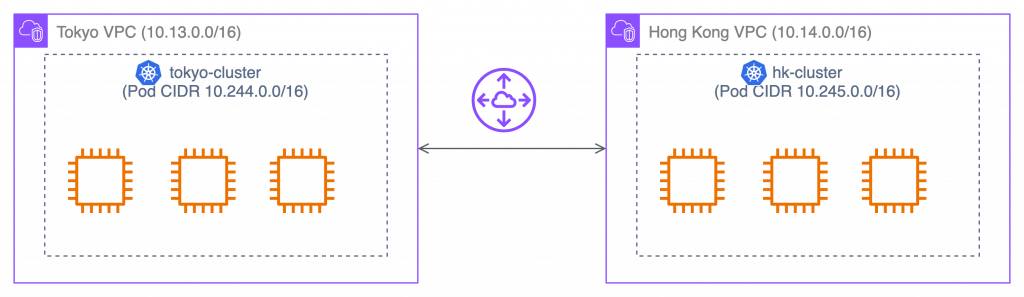
在開始前我們需要確保 Cluster 之間的網路是打通的,簡單來說你要確保這兩座 Cluster 的 Node 是可以互相通信的,由於我是在 AWS 上自建 Cluster,因此我將透過 VPC Peeing Connection 將這兩座 Cluster 的網路打通
讀者若也是使用 AWS 可以依照此段落的圖文教學一起做:
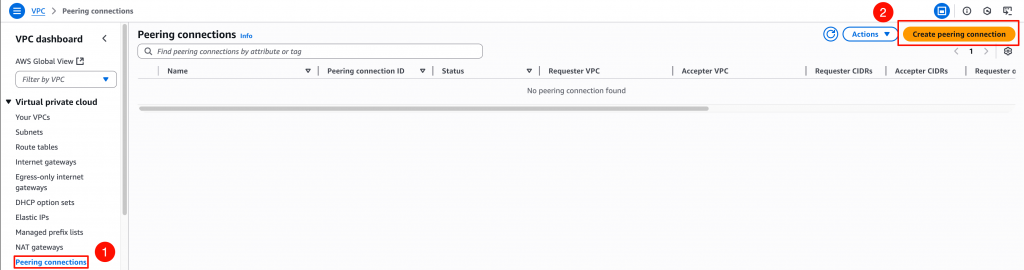
我將從 AWS Hong Kong Region 出發,請進入 VPC > Peering connections,然後點擊 Create peering connection
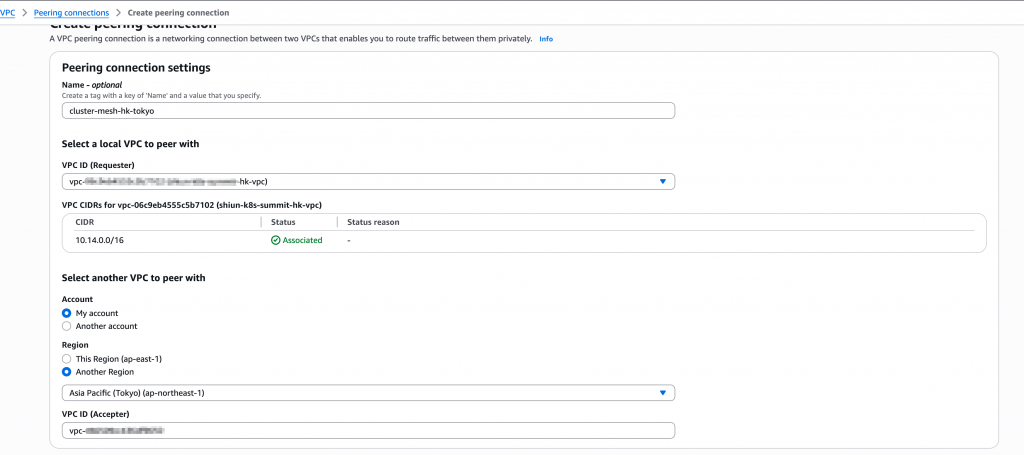
可參考下圖的配置方式來創建 Peering connection
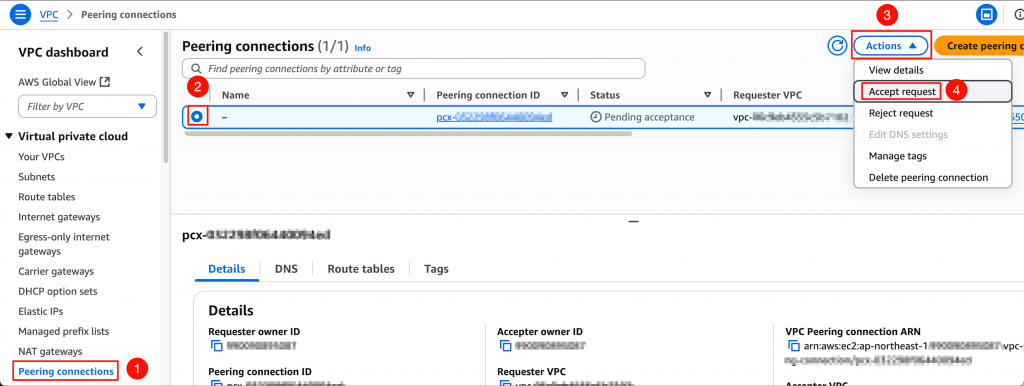
以我這裡為例,切換到 Tokyo Region,或是其他帳號的 AWS VPC Console,依照下圖指示接受 Peering connection
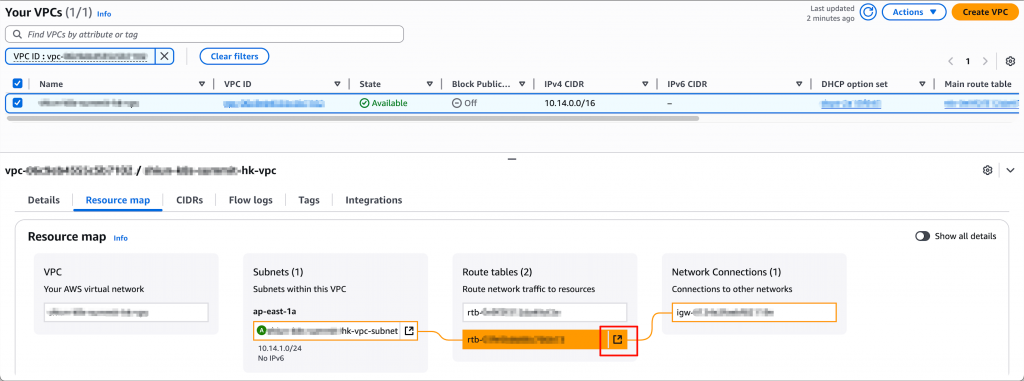
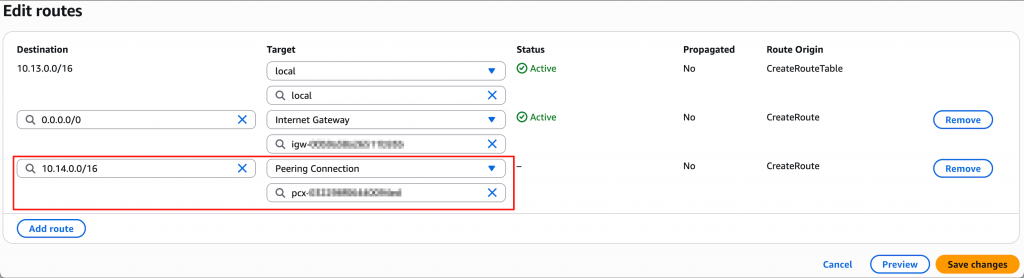
回到 AWS Hong Kong Region,我們需要配置路由表,才能讓「通往 Tokyo VPC 網段的流量導去 Peering connection」,所以請至 VPC Console > 選取 hk-vpc > Resource map 頁籤 > 點擊 Subnet 關聯的路由表,如下圖
點擊 Edit routes

點擊 Add route > Destination 輸入 10.13.0.0/16 (Tokyo VPC 網段) > Target 選擇先前建立的 Peering conneciton > 點擊 Save changes

請在 tokyo-vpc 重複 4~6 的步驟,Destination 改成輸入 10.14.0.0/16 (HK VPC 網段)
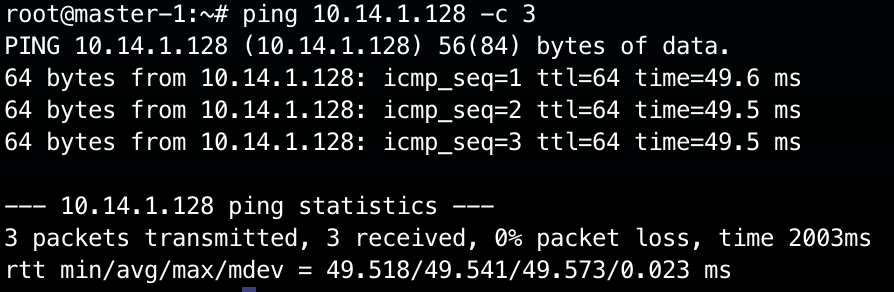
接著要驗證是否打通,這裡我連線到 Tokyo VPC 內某台 EC2,然後 ping HK 的 EC2:
# 連線進去 Tokyo 的某台 EC2
# ping HK 的機器
ping 10.14.1.128 -c 3
成功打通,畫面如下圖:
在 hk-cluster 安裝 Cilium 時,我們已經配置好 Cluster Name 和 Cluster ID 了,但是 tokyo-cluster 尚未配置好,我們可以透過 helm --set cluster.name 和 --set cluster.id 來配置:
helm upgrade cilium cilium/cilium \
  --namespace kube-system \
  --version 1.18.1 \
  --reuse-values \
  --set cluster.name=tokyo-cluster \
  --set cluster.id=1
目前為止,我們的兩座 Clusters 的配置如下:
tokyo-cluster:
tokyo-cluster
1
hk-cluster:
hk-cluster
2
並且我現在已經有兩個 K8s Cluster,Contexts 如下:
如何配置 Multiple Clusters Access 請參考 K8s 官方文件
$ kubectl config get-contexts

CURRENT   NAME            CLUSTER         AUTHINFO           NAMESPACE
          hk-cluster      hk-cluster      hk-admin
*         tokyo-cluster   tokyo-cluster   kubernetes-admin
為了方便後續操作,我們先將這兩個 Context 設定成環境變量:
export CLUSTER1_CONTEXT=tokyo-cluster
export CLUSTER2_CONTEXT=hk-cluster
驗證有設定正確:
$ echo $CLUSTER1_CONTEXT
tokyo-cluster

$ echo $CLUSTER2_CONTEXT
hk-cluster
要啟用 Cluster Mesh,我們需要在每個 Cluster 裡部署控制平面元件,並讓 Cilium 自動建立跨 Cluster 通訊所需的憑證與設定。這件事可以透過以下指令完成:
cilium clustermesh enable --context $CLUSTER1_CONTEXT
cilium clustermesh enable --context $CLUSTER2_CONTEXT
執行後,Cilium 會自動在 Cluster 中部署 clustermesh-apiserver,並自動產生一組 CA、Server、Client 憑證,再把它們匯入到 Kubernetes Secret 裡。
同時,Cilium 也會嘗試自動偵測適合的 Service Type(例如 LoadBalancer、NodePort 或 ClusterIP)來對外暴露 Cluster Mesh 的控制平面。
不過在某些環境(例如沒有 LoadBalancer 的情況下),自動偵測可能會失敗,出現以下錯誤訊息:
Error: cannot auto-detect service type, please specify using '--service-type'
這時我們就必須手動指定 Service Type,例如使用 NodePort 模式:
cilium clustermesh enable --context $CLUSTER1_CONTEXT --service-type NodePort --enable-kvstoremesh=false
cilium clustermesh enable --context $CLUSTER2_CONTEXT --service-type NodePort --enable-kvstoremesh=false
從 Cilium v1.16 開始,KVStoreMesh 預設是啟用的。
KVStoreMesh 是 Cluster Mesh 的一個擴充功能
它會把從 Remote Cluster 同步來的狀態資訊(service、endpoint、identity 等)cache 在本地的 kvstore(例如 etcd)之中。
在沒有啟用 KVStoreMesh 模式下,每個 Cilium agent 都會 直接從 remote Cluster 的 control plane / etcd 拉資料。也就是 agent → 各remote cluster 的 etcd/watch
關於 KVStoreMesh 概念,在這部影片 16:50 處有提到:Scaling Network Policy Enforcement Beyond the Cluster Boundary w... Hemanth Malla & Maxime Visonneau
初次體驗,建議先關掉 KVStoreMesh,保持簡單
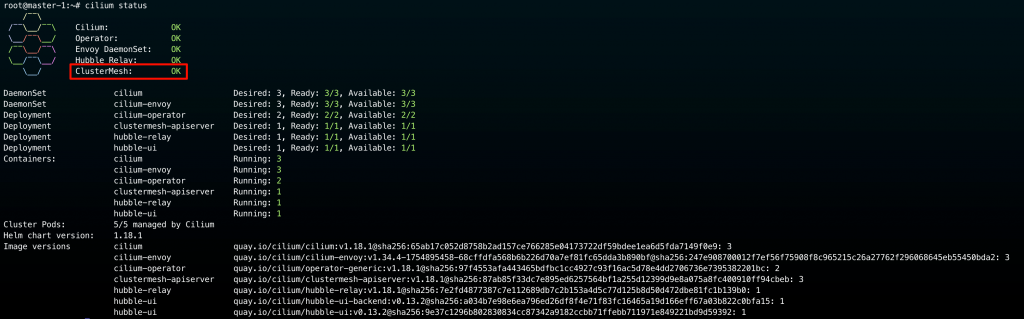
接著我們可以運行 cilium status 來查看 ClsuterMesh 是否啟用成功:
cilium status
成功畫面如下圖所示:
或是也可以執行以下指令來檢查 cluster mesh 的狀態:
$ cilium clustermesh status --context $CLUSTER1_CONTEXT --wait

# 成功啟用 Cluster Mesh 如下
⚠️  Service type NodePort detected! Service may fail when nodes are removed from the cluster!
✅ Service "clustermesh-apiserver" of type "NodePort" found
✅ Cluster access information is available:
  - 10.13.1.243:32379
✅ Deployment clustermesh-apiserver is ready
ℹ️  KVStoreMesh is enabled

🔌 No cluster connected

🔀 Global services: [ min:-1 / avg:0.0 / max:0 ]
從執行 cilium clustermesh status --context $CLUSTER1_CONTEXT --wait 的結果中,你會注意到 :
🔌 No cluster connected
實際上我們剛才只是啟用 Cluster Mesh 控制平面,但是還沒讓 Clusters 之間互通。
接下來就可以讓它們彼此建立連線。這一步只需要在其中一邊執行即可:
$ cilium clustermesh connect --context $CLUSTER1_CONTEXT --destination-context $CLUSTER2_CONTEXT

✨ Extracting access information of cluster tokyo-cluster...
🔑 Extracting secrets from cluster tokyo-cluster...
⚠️  Service type NodePort detected! Service may fail when nodes are removed from the cluster!
ℹ️  Found ClusterMesh service IPs: [10.13.1.243]
✨ Extracting access information of cluster hk-cluster...
🔑 Extracting secrets from cluster hk-cluster...
⚠️  Service type NodePort detected! Service may fail when nodes are removed from the cluster!
ℹ️  Found ClusterMesh service IPs: [10.14.1.128]
ℹ️ Configuring Cilium in cluster tokyo-cluster to connect to cluster hk-cluster
ℹ️ Configuring Cilium in cluster hk-cluster to connect to cluster tokyo-cluster
✅ Connected cluster tokyo-cluster <=> hk-cluster!
接著我們可以再次使用下方指令來檢查連線狀態:
$ cilium clustermesh status --context $CLUSTER1_CONTEXT

⚠️  Service type NodePort detected! Service may fail when nodes are removed from the cluster!
✅ Service "clustermesh-apiserver" of type "NodePort" found
✅ Cluster access information is available:
  - 10.13.1.243:32379
✅ Deployment clustermesh-apiserver is ready
ℹ️  KVStoreMesh is disabled

✅ All 3 nodes are connected to all clusters [min:1 / avg:1.0 / max:1]

🔌 Cluster Connections:
  - hk-cluster: 3/3 configured, 3/3 connected

🔀 Global services: [ min:1 / avg:1.0 / max:1 ]
會注意從原本的 「 🔌 No cluster connected」 現在變成 「 🔌 Cluster Connections」
同樣地也可以檢查 hk-cluster → tokyo-cluster:
cilium clustermesh status --context $CLUSTER2_CONTEXT
詳細輸出就不贅述了!
到這裡我們就成功配置好 Cilium Cluster Mesh
現在我們成功配置好 Cilium Cluster Mesh,這段落就要來驗證真的已經打通了 tokyo-cluster 和 hk-cluster 之間的網路
驗證方法很簡單,我先在 hk-cluster 起一個 nginx Pod 作為 server 端:
kubectl run hk-nginx --image=nginx --context $CLUSTER2_CONTEXT
查看 hk-nginx IP :
$ kubectl get po -o wide --context $CLUSTER2_CONTEXT

NAME       READY   STATUS    RESTARTS   AGE    IP             NODE       NOMINATED NODE   READINESS GATES
hk-nginx   1/1     Running   0          111m   10.245.2.249   worker-2   <none>           <none>
接著我們從 tokyo-cluster 的 netshoot Pod 向 hk-nginx Pod 發出請求:
# 從 Tokyo netshoot 調用 hk-nginx
kubectl exec netshoot --context $CLUSTER1_CONTEXT -- curl -s http://10.245.2.249
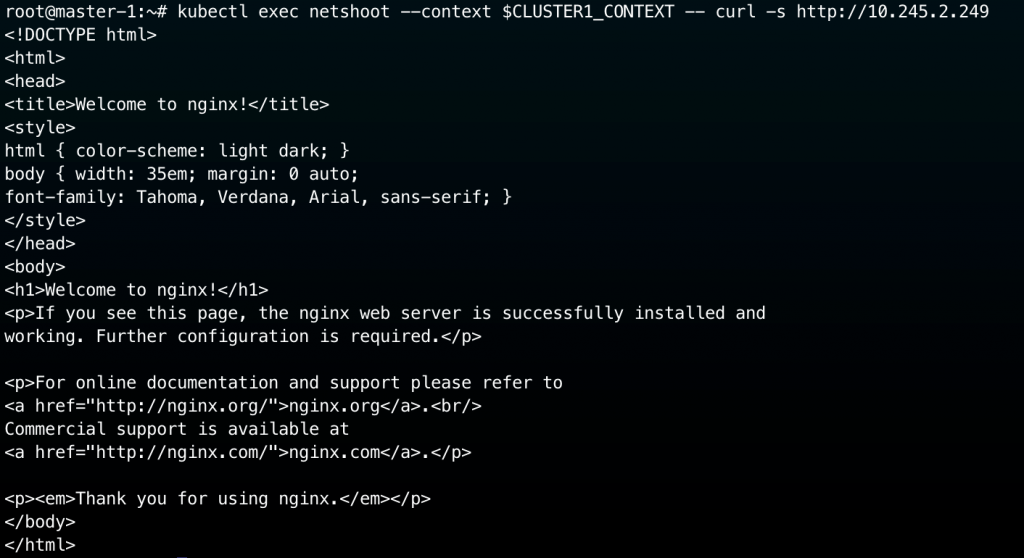
如上圖所示,我們成功收到 hk-nginx 的回應!
今天這篇文章我們實際體驗了 Cilium 的多 Cluster 網路控制平面 — Cluster Mesh。
從網路打通、設定 Cluster ID 與 Name、啟用控制平面到最後連線驗證,我們完整走了一遍整個流程。
這個章節結束後,我們的兩個 Cluster:tokyo-cluster 與 hk-cluster 已經成功互通。
在下一篇文章中,我會帶大家進一步實驗 Cluster Mesh 的進階功能:像是 Global Service、跨 Cluster 的 Service Discovery,以及 Policy 同步與流量觀察 (Hubble)
透過實際觀察封包路徑與 eBPF 層的流量行為,我們將更深入了解 Cilium 如何真正實現「多 Cluster 一體化」的網路架構


