從命令列走向視覺化,打造一個真正好用的知識庫對話介面
在 Day 23,我們介紹了 Streamlit 基礎概念與功能。今天,我們要進一步把這個「原型」變成「可用的工具」——具備對話記憶、回答來源顯示、資料庫連動的 AI 知識助理。
在設計 UI 之前,先釐清這個 App 的目標互動流程:
使用者輸入問題
     ↓
RAG 從 Chroma 檢索相關 Notion 筆記
     ↓
LLM 根據筆記生成回答
     ↓
介面顯示:
  🧠 回答內容
  📚 引用來源(筆記標題+類別)
  💬 對話歷史
我希望這個頁面能達到三件事:
┌────────────────────────────────────────────────┐
│  🧠 Notion AI 知識助手                          │
├──────────┬────────────────────────────────────┤
│          │  💬 對話區                          │
│  ⚙️ 設定  │  ───────────────────────────────   │
│          │  👤 用戶: 機器學習專案有哪些重點?      │
│ 🔍 檢索   │                                    │
│ 數量: 3   │  🤖 AI: 根據你的筆記,主要有三個重點:  │
│          │         1. 資料預處理...             │
│ 🤖 模型   │         2. 模型選擇...               │
│ gpt-4o   │         3. 評估指標...               │
│          │                                    │
│ 📚 來源   │  📚 查看來源 ▼                       │
│ ✓ 顯示   │    ├─ 來源 1: ML專案筆記 (87%)        │
│          │    └─ 來源 2: 模型訓練記錄 (82%)      │
│          │  ───────────────────────────────   │
│ 🗑️ 清空  │  💭 輸入你的問題...                    │
└──────────┴─────────────────────────────────────┘
| 組件 | 功能 | 位置 |
|---|---|---|
| 側邊欄 | 參數調整、統計資訊 | st.sidebar |
| 對話區 | 顯示對話歷史 | st.chat_message |
| 來源區 | 展開式來源顯示 | st.expander |
| 輸入框 | 接收用戶問題 | st.chat_input |
用戶輸入 → Session State → RAG Backend → LLM 回應 → 顯示結果
            ↓                                        ↓
      保存歷史記錄 ←─────────────────────────── 更新介面
app.py# app.py
import streamlit as st
from src import notion_rag_backend
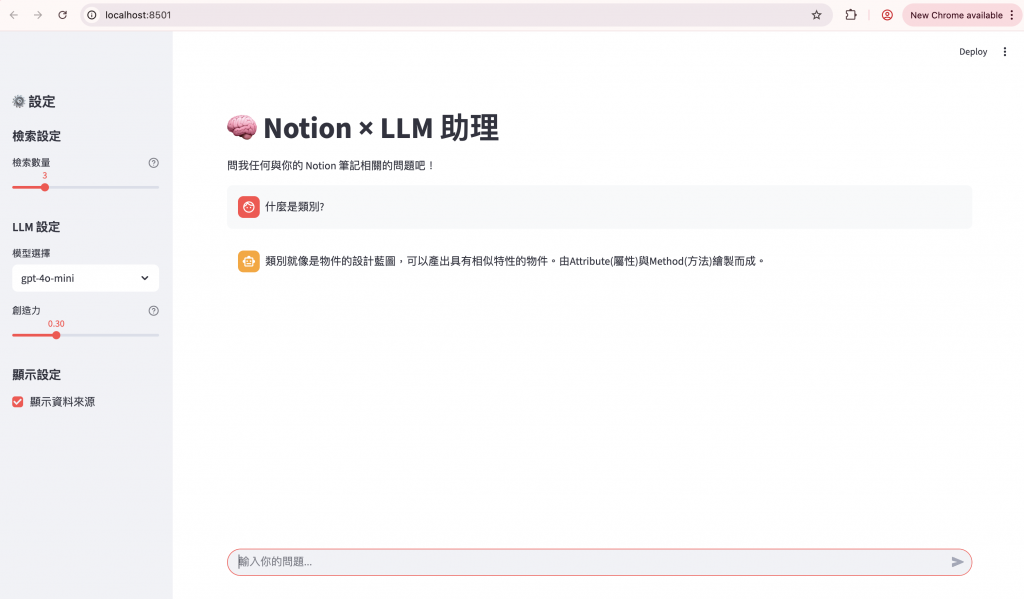
st.set_page_config(page_title="Notion × LLM", page_icon="🧠", layout="wide")
st.title("🧠 Notion × LLM 助理")
st.markdown("問我任何與你的 Notion 筆記相關的問題吧!")
# 側邊欄設定
with st.sidebar:
st.header("⚙️ 設定")
# 檢索參數
st.subheader("檢索設定")
top_k = st.slider("檢索數量", 1, 10, 3, help="從知識庫中檢索幾筆相關內容")
# LLM 參數
st.subheader("LLM 設定")
model_name = st.selectbox(
"模型選擇",
["gpt-4o-mini", "gpt-4o", "gpt-3.5-turbo"],
index=0
)
temperature = st.slider("創造力", 0.0, 1.0, 0.3, 0.1, help="越高越有創意,越低越精確")
# 顯示設定
st.subheader("顯示設定")
st.session_state.show_sources = st.checkbox("顯示資料來源", value=True)
# 初始化 session_state
if "chat_history" not in st.session_state:
st.session_state.chat_history = []
# 使用者輸入
user_query = st.chat_input("輸入你的問題...")
if user_query:
with st.spinner("思考中..."):
answer = notion_rag_backend.generate_answer(user_query)
st.session_state.chat_history.append({"role": "user", "content": user_query})
st.session_state.chat_history.append({"role": "assistant", "content": answer})
# 顯示聊天紀錄
for msg in st.session_state.chat_history:
with st.chat_message(msg["role"]):
st.markdown(msg["content"])
| 主題 | 說明 |
|---|---|
| Session State | 用於保存多輪對話記錄,讓回答具備記憶。 |
| Spinner | 顯示「思考中」動畫,避免使用者誤以為系統卡住。 |
| Sidebar Controls | 即時調整檢索數量與模型參數,便於測試。 |
| 模組化架構 | 將後端邏輯(RAG)獨立放在 src/notion_rag_backend.py,前後分離清晰。 |
| 可延展性 | 未來能輕鬆加上「顯示來源」、「篩選類別」等功能。 |
pip install streamlit
streamlit run app.py
今天我們完成了 Notion × LLM 助理的 UI 基礎建置。
透過 Streamlit,我們成功讓 RAG 系統從命令列變成可互動的視覺化應用。
這個版本雖然簡單,但已具備核心骨架 —— 輸入、檢索、生成、回覆,一條完整的「知識對話鏈」已經建立起來。
明天(Day 25),我們將延伸這個基礎,加入更多智慧化的互動設計:
讓這個 Notion Chatbot 更聰明、更自然,也更貼近真實使用情境。

