Ayo 各位我回來了。昨天我們已經看了這個 Packer 是如何偵測執行檔的架構跟格式,也看了它的加密邏輯,今天我們要繼續把這個 Packer 給做完囉!
如果還沒有看過上篇的,可以先去看看上篇,不然可能會不太完整。今天主要會來看它的 Stub 的實作以及 Packer 本身的邏輯,然後最後來看一下整個 build.zig 是如何被撰寫的。
完整程式碼可於此處找到:https://github.com/CX330Blake/ZYRA
中華民國刑法第 362 條:「製作專供犯本章之罪之電腦程式,而供自己或他人犯本章之罪,致生損害於公眾或他人者,處五年以下有期徒刑、拘役或科或併科六十萬元以下罰金。」
本系列文章涉及多種惡意程式的技術,旨在提升個人技術能力與資安意識。本人在此強烈呼籲讀者,切勿使用所學到的知識與技術從事任何違法行為!
本系列文章中使用的 Zig 版本號為 0.14.1。
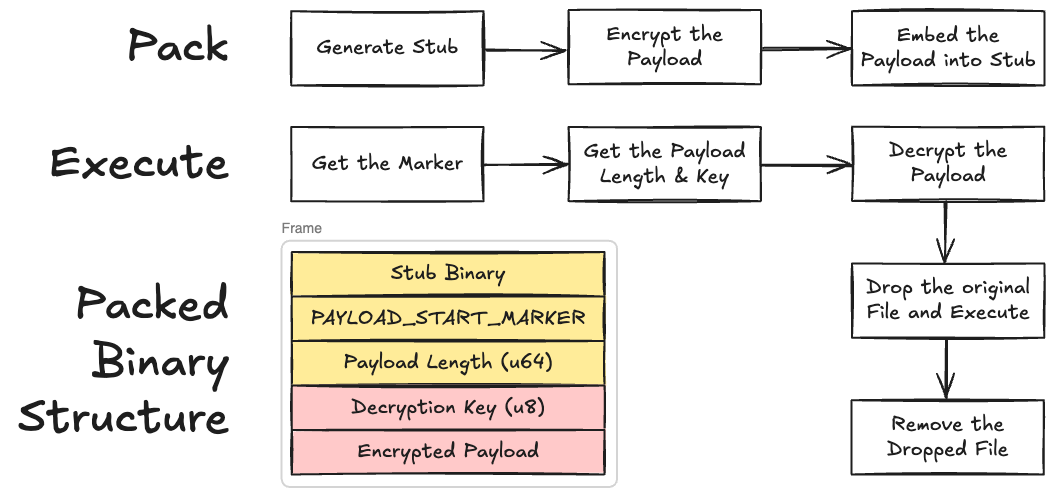
這邊複習一下,Stub 會用來在運行的時候解密原始的執行檔,並將其 Drop 到某個暫時的資料夾,然後執行原始執行檔並在執行後刪除它。所以可以把這個 Stub 想成是一個外層的程式,裡面打包的是加密過的原始的執行檔。
所以這個 Stub 要做的事情有以下這些:
PAYLOAD_START_MARKER,也就是告知這個 Stub 說 Payload 從這邊開始那我們先來看一下這個 Stub 的幾個函數吧,不過在看這些函數之前,我還是想要放一下昨天的圖,大家可以複習一下這個流程!

這個函數只接收一個 std.mem.Allocator 型別的參數,用來負責分配記憶體。並且這個函數會回傳 Key 和嵌入在 Pack 過的執行檔中的加密過的 Payload。如果用昨天的精美小圖來看的話,就是圖中紅色的那塊區域。
那我們來看一下程式碼吧!
fn getEmbeddedPayload(allocator: std.mem.Allocator) ![]u8 {
    var self_path_buffer: [std.fs.max_path_bytes]u8 = undefined;
    const self_path = try std.fs.selfExePath(&self_path_buffer);

    const file = try std.fs.openFileAbsolute(self_path, .{});
    defer file.close();
    const size = (try file.stat()).size;
    const n = std.math.cast(usize, size) orelse return error.FileTooLarge;
    const self_binary = try allocator.alloc(u8, n);
    defer allocator.free(self_binary);
    _ = try file.readAll(self_binary);

    if (std.mem.lastIndexOf(u8, self_binary, PAYLOAD_START_MARKER)) |marker_start| {
        const data_start = marker_start + PAYLOAD_START_MARKER.len;
        const size_bytes = self_binary[data_start .. data_start + 8];
        const payload_size = std.mem.readInt(u64, size_bytes[0..8], .little);

        const payload_start = data_start + 8;
        // +1 for the key byte
        const total_payload_size = payload_size + 1;
        const payload_len = std.math.cast(usize, total_payload_size) orelse return error.PayloadTooLarge;
        if (payload_start + payload_len > self_binary.len) return error.PayloadOutOfBounds;
        const payload = try allocator.alloc(u8, payload_len);
        @memcpy(payload, self_binary[payload_start .. payload_start + payload_len]);
        return payload;
    }
    return error.PayloadNotFound;
}
這個函數會在一開始先去取得自己本身的路徑,這邊會使用到 std.fs.selfExePath 這個標準庫所提供的函數。取得路徑後,會用絕對路徑開啟自己這個檔案,然後透過 (try file.stat()).size 來取得自己的大小。
之後呢會把所有的內容存到一個 self_binary 變數中,再用 std.mem.lastIndexOf 來尋找 PAYLOAD_START_MARKER。這個 Marker 會標示著從這之後開始就是 Payload 的資料了,所以我們的 Stub 會去讀取他並獲取到它的偏移量。
知道了 Payload 的偏移量後,它會用 self_binary[data_start..data_start + 8] 來把後面的 Payload 長度
(u64,8 個位元組)給讀取出來,之後再用 std.mem.readInt 將其以小端序的形式解讀成 u64 的 Payload 長度。
至此,這個函數已經知道了 Payload 的長度以及其偏移量,後面就是把 Key 跟 Payload 讀出來並回傳回去。值得注意的是,回傳的總大小會是 Payload 的總大小 + 1,這是因為我們還要加上一個 u8 的 Key 的大小,也就是 1 個位元組。
第二個要介紹的函數是 getTempDirPath,它會接收一個 Allocator 並回傳臨時目錄的絕對路徑。
fn getTempDirPath(allocator: std.mem.Allocator) []const u8 {
    // Try to get both Windows & Linux tmp dir
    return std.process.getEnvVarOwned(allocator, "TMPDIR") catch std.process.getEnvVarOwned(allocator, "TEMP") catch std.process.getEnvVarOwned(allocator, "TMP") catch "/tmp";
}
而它的實作也很簡單,它會依序讀取 TMPDIR、TEMP、TMP 這三個環境變數。第一個最常出現於 Unix/MacOS 系統,而後兩個則常見於 Windows 系統。若是三者都讀取失敗,則會使用 /tmp 作為預設值。
最後一個要介紹的就是 executeViaTempfile 這個函數了。它接收了一個 Allocator 跟一個解密後的 Payload。我們先來看一下程式碼吧!
fn executeViaTempfile(allocator: std.mem.Allocator, payload: []const u8) !void {
    const tmp_dir = getTempDirPath(allocator);
    defer if (!std.mem.eql(u8, tmp_dir, "/tmp")) allocator.free(tmp_dir);

    var temp_name_buffer: [256]u8 = undefined;
    const base_name = if (builtin.os.tag == .windows) "zyra_temp" else "zyra_temp";
    const temp_name = try std.fmt.bufPrint(&temp_name_buffer, "{s}/{s}_{}", .{ tmp_dir, base_name, std.time.timestamp() });

    const temp_file = try std.fs.createFileAbsolute(temp_name, .{ .read = true, .truncate = true });
    defer temp_file.close();
    defer std.fs.deleteFileAbsolute(temp_name) catch {};

    try temp_file.writeAll(payload);
    if (builtin.os.tag != .windows) {
        try temp_file.chmod(0o755);
    }
    temp_file.close();

    var argv = std.ArrayList([]const u8).init(allocator);
    defer argv.deinit();
    try argv.append(temp_name);

    var process = std.process.Child.init(argv.items, allocator);
    process.stdin_behavior = .Inherit;
    process.stdout_behavior = .Inherit;
    process.stderr_behavior = .Inherit;
    _ = try process.spawnAndWait();
}
在一開始,函數會先去呼叫剛剛的 getTempDirPath 取得臨時目錄的路徑,接著會比較這個路徑是不是 /tmp,如果不是,則用 defer 來在函數結束時釋放記憶體。這麼做的原因是因為剛剛的 getTempDirPath 裡面,/tmp 並不是分配記憶體來的,而是常數字串,不需要釋放。
獲取到臨時目錄的路徑後,函數會用臨時目錄、「zyra_temp」這個字串以及秒級的時間戳來組合出臨時的檔名,並且使用 std.fs.createFileAbsolute 來創建一個檔案。它將使用 defer 在最後關閉這個檔案,並使用 std.fs.deleteFileAbsolute 來刪除這個檔案。
在建立這個臨時執行檔 temp_file 後,我們會使用 temp_file.writeAll(payload) 把明文的 Payload 寫進檔案中,並用 temp_file.chmod(0o755) 讓其有可執行權限。
至此,原始執行檔已經被 Drop 到了臨時的目錄中。接下來就會使用 std.process.Child 來建立一個子進程,然後用 spawnAndWait 來執行它並同步等待它執行結束。
最後看一下 main 函數吧,其實就是把剛剛的函數組裝。
pub fn main() !void {
    const allocator = std.heap.page_allocator;

    // Get the encrypted payload
    const payload_data = try getEmbeddedPayload(allocator);
    defer allocator.free(payload_data);

    // Decrypt the payload
    const key = payload_data[0];
    const encrypted_payload = payload_data[1..];
    const decrypted = try decryptor.xorDecrypt(allocator, encrypted_payload, key);
    defer allocator.free(decrypted);

    // Execute via tempfile (cross-platform)
    try executeViaTempfile(allocator, decrypted);
}
如此一來,我們的 Stub 就完成了。不過因為這個 Stub 必須要能跑在 x86 和 x64 的 Windows 和 Linux 上,所以需要編譯出 4 種不同的版本。為了自動化,這部分我們又寫了一個 generate_embedded_stub.zig 來做這件事,接下來我們就來看一下吧!
這個 generate_embedded_stub.zig 的內容其實很簡單,就是會去交叉編譯 4 個不同版本的 Stubs,把產生的執行檔讀進記憶體,並為每個版本產生各自的 Zig 檔放在 src/packer/embedded_stubs/ 這層目錄中,內容都會像是這樣:
pub const STUB_BINARY = [_]u8{ 0x.., 0x.., 0x.., ...};
之後主程式就可以用 @import 來拿到這些檔案的 Raw bytes,並將它們跟加密過的 Payload 拼接打包到一起。
全部程式碼的話不是太複雜,主要都是在處理如何生成 Zig 的語法的邏輯。礙於篇幅,這邊就放上程式碼,但不細節講解了。
const std = @import("std");

const StubTarget = struct {
    name: []const u8,
    target: []const u8,
    extension: []const u8, // For .exe on Windows, "" on Linux
};

pub fn main() !void {
    const allocator = std.heap.page_allocator;

    // Define your desired output stubs here
    const stubs = [_]StubTarget{
        .{ .name = "elf_x86_64", .target = "x86_64-linux", .extension = "" },
        .{ .name = "elf_x86", .target = "x86-linux", .extension = "" },
        .{ .name = "pe_x86_64", .target = "x86_64-windows", .extension = "" },
        .{ .name = "pe_x86", .target = "x86-windows", .extension = "" },
    };

    for (stubs) |stub| {
        // Build the stub
        const temp_output = try std.fmt.allocPrint(allocator, "temp_stub_{s}{s}", .{ stub.name, stub.extension });
        defer allocator.free(temp_output);

        var build_args = std.ArrayList([]const u8).init(allocator);
        defer build_args.deinit();
        try build_args.append("zig");
        try build_args.append("build-exe");
        try build_args.append("src/packer/stub.zig");
        try build_args.append("-O");
        try build_args.append("ReleaseFast");
        try build_args.append("-target");
        try build_args.append(stub.target);
        try build_args.append("-fstrip");
        try build_args.append("--name");
        try build_args.append(temp_output);

        std.debug.print("👾 Building stub for {s}...\n", .{stub.name});
        var build_process = std.process.Child.init(build_args.items, allocator);
        try build_process.spawn();
        const result = try build_process.wait();

        if (result != .Exited or result.Exited != 0) {
            std.debug.print("Failed to build stub {s}\n", .{stub.name});
            continue;
        }

        // Read built stub binary
        var stub_file_path = temp_output;
        var stub_file_path_allocated = false;
        if (std.mem.endsWith(u8, stub.target, "windows")) {
            stub_file_path = try std.fmt.allocPrint(allocator, "{s}.exe", .{temp_output});
            stub_file_path_allocated = true;
        }

        // ... now use stub_file_path for ALL file operations ...
        const temp_stub_file = std.fs.cwd().openFile(stub_file_path, .{}) catch |err| switch (err) {
            error.FileNotFound => {
                std.debug.print("Stub file '{s}' was not produced by the build step!\n", .{stub_file_path});
                if (stub_file_path_allocated) allocator.free(stub_file_path);
                continue;
            },
            else => return err,
        };
        defer temp_stub_file.close();

        const stub_stat = try temp_stub_file.stat();
        const stub_size = stub_stat.size;

        const stub_data = try std.fs.cwd().readFileAlloc(allocator, stub_file_path, stub_size);
        defer allocator.free(stub_data);

        if (stub_file_path_allocated) allocator.free(stub_file_path);

        // Generate embedded stub Zig file in src/packer/embedded_stubs/
        const output_file_name = try std.fmt.allocPrint(allocator, "src/packer/embedded_stubs/embedded_{s}.zig", .{stub.name});
        defer allocator.free(output_file_name);

        const output_file = try std.fs.cwd().createFile(output_file_name, .{});
        defer output_file.close();

        try output_file.writeAll("// Auto-generated embedded stub binary\n");
        try output_file.writeAll("// DO NOT EDIT - Run generate_embedded_stubs.zig to regenerate\n\n");
        try output_file.writeAll("pub const STUB_BINARY = [_]u8{\n");

        for (stub_data, 0..) |byte, i| {
            if (i % 16 == 0) try output_file.writeAll("    ");
            try output_file.writer().print("0x{X:0>2},", .{byte});
            if (i % 16 == 15) try output_file.writeAll("\n");
        }
        if (stub_data.len % 16 != 0) try output_file.writeAll("\n");
        try output_file.writeAll("};\n");

        // Clean up all files starting with temp_output name as prefix
        var dir = try std.fs.cwd().openDir(".", .{ .iterate = true });
        defer dir.close();

        var it = dir.iterate();
        while (try it.next()) |entry| {
            if (std.mem.startsWith(u8, entry.name, temp_output)) {
                std.fs.cwd().deleteFile(entry.name) catch {};
            }
        }
        std.debug.print("✅ Embedded stub generated: {s}\n", .{output_file_name});
        std.debug.print("📦 Stub size: {} bytes\n", .{stub_data.len});
        std.debug.print("-----------------------------------------\n", .{});
    }
}
這個檔案我們會在 build.zig 中去呼叫。這是因為我們的主要 Packer 的邏輯,勢必得先等到這些 Stub 被生產出來後才能繼續運作,所以這個檔案會攸關到我們的整體編譯邏輯,還有各個檔案間的依賴關係,所以我們來看一下我們的 build.zig 吧。
const std = @import("std");

pub fn build(b: *std.Build) void {
    const target = b.standardTargetOptions(.{});
    const optimize = b.standardOptimizeOption(.{});

    // Define version
    const version = std.SemanticVersion{ .major = 0, .minor = 1, .patch = 6 };

    // Create build options to pass version to the code
    const options = b.addOptions();
    options.addOption([]const u8, "version_string", b.fmt("{}", .{version}));
    options.addOption(u32, "version_major", version.major);
    options.addOption(u32, "version_minor", version.minor);
    options.addOption(u32, "version_patch", version.patch);

    // Build the stubs first
    const gen_stub = b.addSystemCommand(&[_][]const u8{
        "zig", "run", "generate_embedded_stub.zig",
    });

    const exe = b.addExecutable(.{
        .name = "zyra",
        .root_source_file = b.path("src/main.zig"),
        .target = target,
        .optimize = optimize,
        .version = version,
    });

    exe.root_module.addOptions("build_options", options);

    exe.step.dependOn(&gen_stub.step);

    b.installArtifact(exe);

    const run_cmd = b.addRunArtifact(exe);
    run_cmd.step.dependOn(b.getInstallStep());
    if (b.args) |args| {
        run_cmd.addArgs(args);
    }

    const run_step = b.step("run", "Run the packer");
    run_step.dependOn(&run_cmd.step);
}
前面的優化、設定等等的我都先跳過,最重要的是,它會使用以下的程式碼,先去執行一些前置步驟,也就是去跑 generate_embedded_stub.zig 來生成那 4 個 Stubs。
const gen_stub = b.addSystemCommand(&[_][]const u8{
    "zig", "run", "generate_embedded_stub.zig",
});
在生成完了之後,我們才會去編譯後面的檔案。這邊會用 exe.step.dependOn(&gen_stub.step); 來確保只有等到 generate_embedded_stub.zig 跑完之後才會編譯 ZYRA 本身。
在我們把 Stub 的一切都搞定後,終於可以來實作 Packer 了!
這個 Packer 主要的功能,其實就是拼拼圖(?)。它會負責把剛剛的 Stub、PAYLOAD_START_MARKER、Payload 長度、加密的 Key、Payload 本身都組裝再一起。這個 packer.zig 會有一個 Public 的函數叫做 packStub,它負責做以上的這坨事情。
這個函數接收 4 個參數並回傳 Pack 過的執行檔的原始位元組資料,其中這 4 個參數分別如下:
allocator: std.mem.Allocator
bin_type: BinType
encrypted_payload: []const u8
key: u8
那我們一起來看一下這個函數的實作吧!
pub fn packStub(
    allocator: std.mem.Allocator,
    bin_type: BinType,
    encrypted_payload: []const u8,
    key: u8,
) ![]u8 {
    const stub_binary = switch (bin_type.format) {
        .elf => switch (bin_type.arch) {
            .x86 => &embedded_elf_x86_stub.STUB_BINARY,
            .x64 => &embedded_elf_x86_64_stub.STUB_BINARY,
            else => return error.UnsupportedArch,
        },
        .pe => switch (bin_type.arch) {
            .x86 => &embedded_pe_x86.STUB_BINARY,
            .x64 => &embedded_pe_x86_64.STUB_BINARY,
            else => return error.UnsupportedArch,
        },
        else => return error.UnsupportedFormat,
    };

    const marker = "PAYLOAD_START_MARKER";
    const total_size = stub_binary.len + marker.len + 8 + 1 + encrypted_payload.len;
    var packed_binary = try allocator.alloc(u8, total_size);

    var offset: usize = 0;
    @memcpy(packed_binary[offset .. offset + stub_binary.len], stub_binary);
    offset += stub_binary.len;

    @memcpy(packed_binary[offset .. offset + marker.len], marker);
    offset += marker.len;

    var size_bytes: [8]u8 = undefined;
    std.mem.writeInt(u64, &size_bytes, encrypted_payload.len, .little);
    @memcpy(packed_binary[offset .. offset + 8], &size_bytes);
    offset += 8;

    packed_binary[offset] = key;
    offset += 1;

    @memcpy(packed_binary[offset .. offset + encrypted_payload.len], encrypted_payload);

    return packed_binary;
}
一開始,會先用一個 switch 語句來取得對應的 Stub,並去計算最終 Pack 過的執行檔所需要的檔案大小。這個大小的計算方式是透過以下幾項的總和得來的:
u64 型別,也就是 8 個位元組u8 型別,也就是 1 個位元組把這 5 個相加後,就可以得到最後的大小了,它會被存放在 total_size 變數中。下一步,我們會去分配一塊這麼大的記憶體,稱作 packed_binary,它會用來存放 Pack 過的執行檔的 Raw bytes,然後就是用 @memcpy 把內容一步一步複製進去並回傳。
至此,這個 Packer 的大部分邏輯都實作完了,最後一個步驟就是要把它們全都封裝到一起啦!
這個就是我們的 main.zig 了,它負責會處理整個封裝和輸出輸入的邏輯。反正檔案不大,我們一個一個函數來看吧!
這個函數會接收一個 Allocator 和一個原始執行檔名稱,並回傳新的執行檔名稱。這個新的執行檔名稱可以讓使用者自由透過參數設定,但預設會是原始名稱加上 zyra 加上原始後綴名。
fn getOutputFilename(allocator: std.mem.Allocator, filename: []const u8) ![]const u8 {
    const dot_idx = std.mem.lastIndexOf(u8, filename, ".");
    if (dot_idx) |idx| {
        const base = filename[0..idx];
        const ext = filename[idx..]; // Includes "."
        return try std.fmt.allocPrint(allocator, "{s}.zyra{s}", .{ base, ext });
    } else {
        return try std.fmt.allocPrint(allocator, "{s}.zyra", .{filename});
    }
}
函數一開始會先去取得 . 的索引值,並將原始名稱拆分並回傳。
這個函數會接收 6 個參數,沒有回傳值。它會負責把所有剛剛提到過的組件都組裝在一起,拼裝成一個最後的 Pack 過的執行檔。這 6 個參數分別如下:
allocator: std.mem.Allocator
input_path: []const u8
bin_type: BinType
output_path: []const u8
key: u8
verbose: bool
fn packFile(allocator: std.mem.Allocator, input_path: []const u8, bin_type: BinType, output_path: []const u8, key: u8, verbose: bool) !void {
    const stdout = std.io.getStdOut().writer();

    const format = bin_type.format;
    const arch = bin_type.arch;
    var file_type: FileType = .unknown;

    if (format == .elf and arch == .x64) {
        file_type = .elf_x86_64;
    } else if (format == .elf and arch == .x86) {
        file_type = .elf_x86;
    } else if (format == .pe and arch == .x64) {
        file_type = .pe_x86_64;
    } else if (format == .pe and arch == .x86) {
        file_type = .pe_x86;
    } else {
        try output.printError("Error: Unknown file format or architecture\n", .{});
        return;
    }

    if (verbose) {
        try stdout.print("Input file:     {s}\n", .{input_path});
        try stdout.print("File format:     {s}\n", .{@tagName(file_type)});
        try stdout.print("Output file:    {s}\n", .{output_path});
        try stdout.print("Encryption key: 0x{X:0>2}\n\n", .{key});
    }

    // Read input file
    const file = std.fs.cwd().openFile(input_path, .{}) catch |err| {
        try output.printError("Error: Cannot open input file '{s}': {}\n", .{ input_path, err });
        return;
    };
    defer file.close();

    // Maximum input is 100MB
    const input_data = file.readToEndAlloc(allocator, 100 * 1024 * 1024) catch |err| {
        try output.printError("Error: Cannot read input file: {}\n", .{err});
        return;
    };
    defer allocator.free(input_data);

    if (verbose) try stdout.print("Encrypting...   ", .{});

    // Encrypt
    const encrypted = try encryptor.xorEncrypt(allocator, input_data, key);
    defer allocator.free(encrypted);

    if (verbose) try stdout.print("OK\nPacking...      ", .{});

    // Pack
    const packed_binary = try packer.packStub(allocator, bin_type, encrypted, key);
    defer allocator.free(packed_binary);

    if (verbose) try stdout.print("OK\nWriting...      ", .{});

    // Write output
    const output_file_handle = std.fs.cwd().createFile(output_path, .{}) catch |err| {
        try output.printError("Error: Cannot create output file '{s}': {}\n", .{ output_path, err });
        return;
    };
    defer output_file_handle.close();

    try output_file_handle.writeAll(packed_binary);

    // Set executable permissions on the file handle
    try output_file_handle.chmod(0o755);

    if (verbose) try stdout.print("OK\n\n", .{});

    // Summary - Fixed the format specifier
    try output.printResult(packed_binary.len, input_data.len, key, file_type, output_path);

    if (!verbose) {
        try stdout.print("Packed 1 file.\n", .{});
    }
}
它會去把那個執行檔先打開來,之後用 encryptor.xorEncrypt 來加密整個檔案內容,加密後會使用剛剛提到的 packStub 來打包那整坨東西,然後用 createFile 和 writeAll 來建立檔案並寫入,產生 Pack 後的執行檔。
因為前面已經說過了,它是一個 CLI 工具,所以勢必會有一段邏輯來處理輸入的參數等等的,我們就先來看一下它的程式碼。
pub fn main() !void {
    const allocator = std.heap.page_allocator;
    const stdout = std.io.getStdOut().writer();
    const args = try std.process.argsAlloc(allocator);
    defer std.process.argsFree(allocator, args);

    // Needs an input file
    if (args.len < 2) {
        try output.printUsage();
        return;
    }

    var target_file: ?[]const u8 = null;
    var output_file: ?[]const u8 = null;
    var key: u8 = 0x42; // Default key
    var verbose = false; // Default verbose mode off

    // Parsing args
    var i: usize = 1;
    while (i < args.len) : (i += 1) {
        const arg = args[i];

        if (std.mem.eql(u8, arg, "-h") or std.mem.eql(u8, arg, "--help")) {
            try output.printUsage();
            return;
        } else if (std.mem.eql(u8, arg, "--version")) {
            try output.printVersion();
            return;
        } else if (std.mem.eql(u8, arg, "-v") or std.mem.eql(u8, arg, "--verbose")) {
            verbose = true;
        } else if (std.mem.eql(u8, arg, "-o") or std.mem.eql(u8, arg, "--output")) {
            if (i + 1 >= args.len) {
                try output.printError("Error: -o requires output filename\n", .{});
                return;
            }
            i += 1;
            output_file = args[i];
        } else if (std.mem.eql(u8, arg, "-k") or std.mem.eql(u8, arg, "--key")) {
            if (i + 1 >= args.len) {
                try output.printError("Error: -k requires hex key value (e.g. -k 42 means key is 0x42)\n", .{});
                return;
            }
            i += 1;
            key = try std.fmt.parseInt(u8, args[i], 16);
        } else if (!std.mem.startsWith(u8, arg, "-")) {
            target_file = arg;
        } else {
            try stdout.print("Unknown option: {s}\n", .{arg});
            return;
        }
    }

    if (target_file == null) {
        try output.printError("Error: No input file specified\n", .{});
        try output.printUsage();
        return;
    }

    const filename = target_file.?;
    const output_filename = output_file orelse
        try getOutputFilename(allocator, filename); // Default output filename if not specified
    defer if (output_file == null) allocator.free(output_filename);

    // Print the version banner
    try output.printVersion();

    // Identify the arch and format
    const bin_type: BinType = arch_identifier.identifyExecutableFormat(filename) catch {
        try output.printError("Error: {s} not exist\n", .{filename});
        return;
    };

    // Pack the file
    try packFile(allocator, filename, bin_type, output_filename, key, verbose);
}
函數一開始會去檢查輸入的長度,如果沒有提供任何引數,則打印使用方式並結束。下一步會去一個一個讀取所有傳入的引數,函數提供了幾個 Flag 來讓使用者設置一些選項,它們的用途如下:
-h/--help
--version
-v/--verbose
-o/--output
-k/--key <hex>
在解析完成之後,它會去調用 arch_identifier.identifyExecutableFormat 來偵測輸入的執行檔的架構和格式。等一切就緒之後,就會調用 packFile 來完成讀檔、加密、打包等等的邏輯,並輸出最後的結果摘要。
在全部的流程結束後,我們終於寫完了這個專案啦!它的安裝方式我也有寫成一個簡單的腳本來自動化安裝,還有關於它的使用方式也可以在我的 GitHub 找到,這邊我們就來看一下它的成效吧!
以下的範例我們會用一隻最最最簡單的 Hello World 程式來當作範例。範例的程式碼是用 C 寫的,程式碼如下:
#include <stdio.h>

int main() {
    printf("Hello, world");
}
就是如此簡單的程式,我們把它編譯後丟進到 Binary Ninja 裡面看一下(當然,其他 Disassembler/Decompiler 也都可以)。
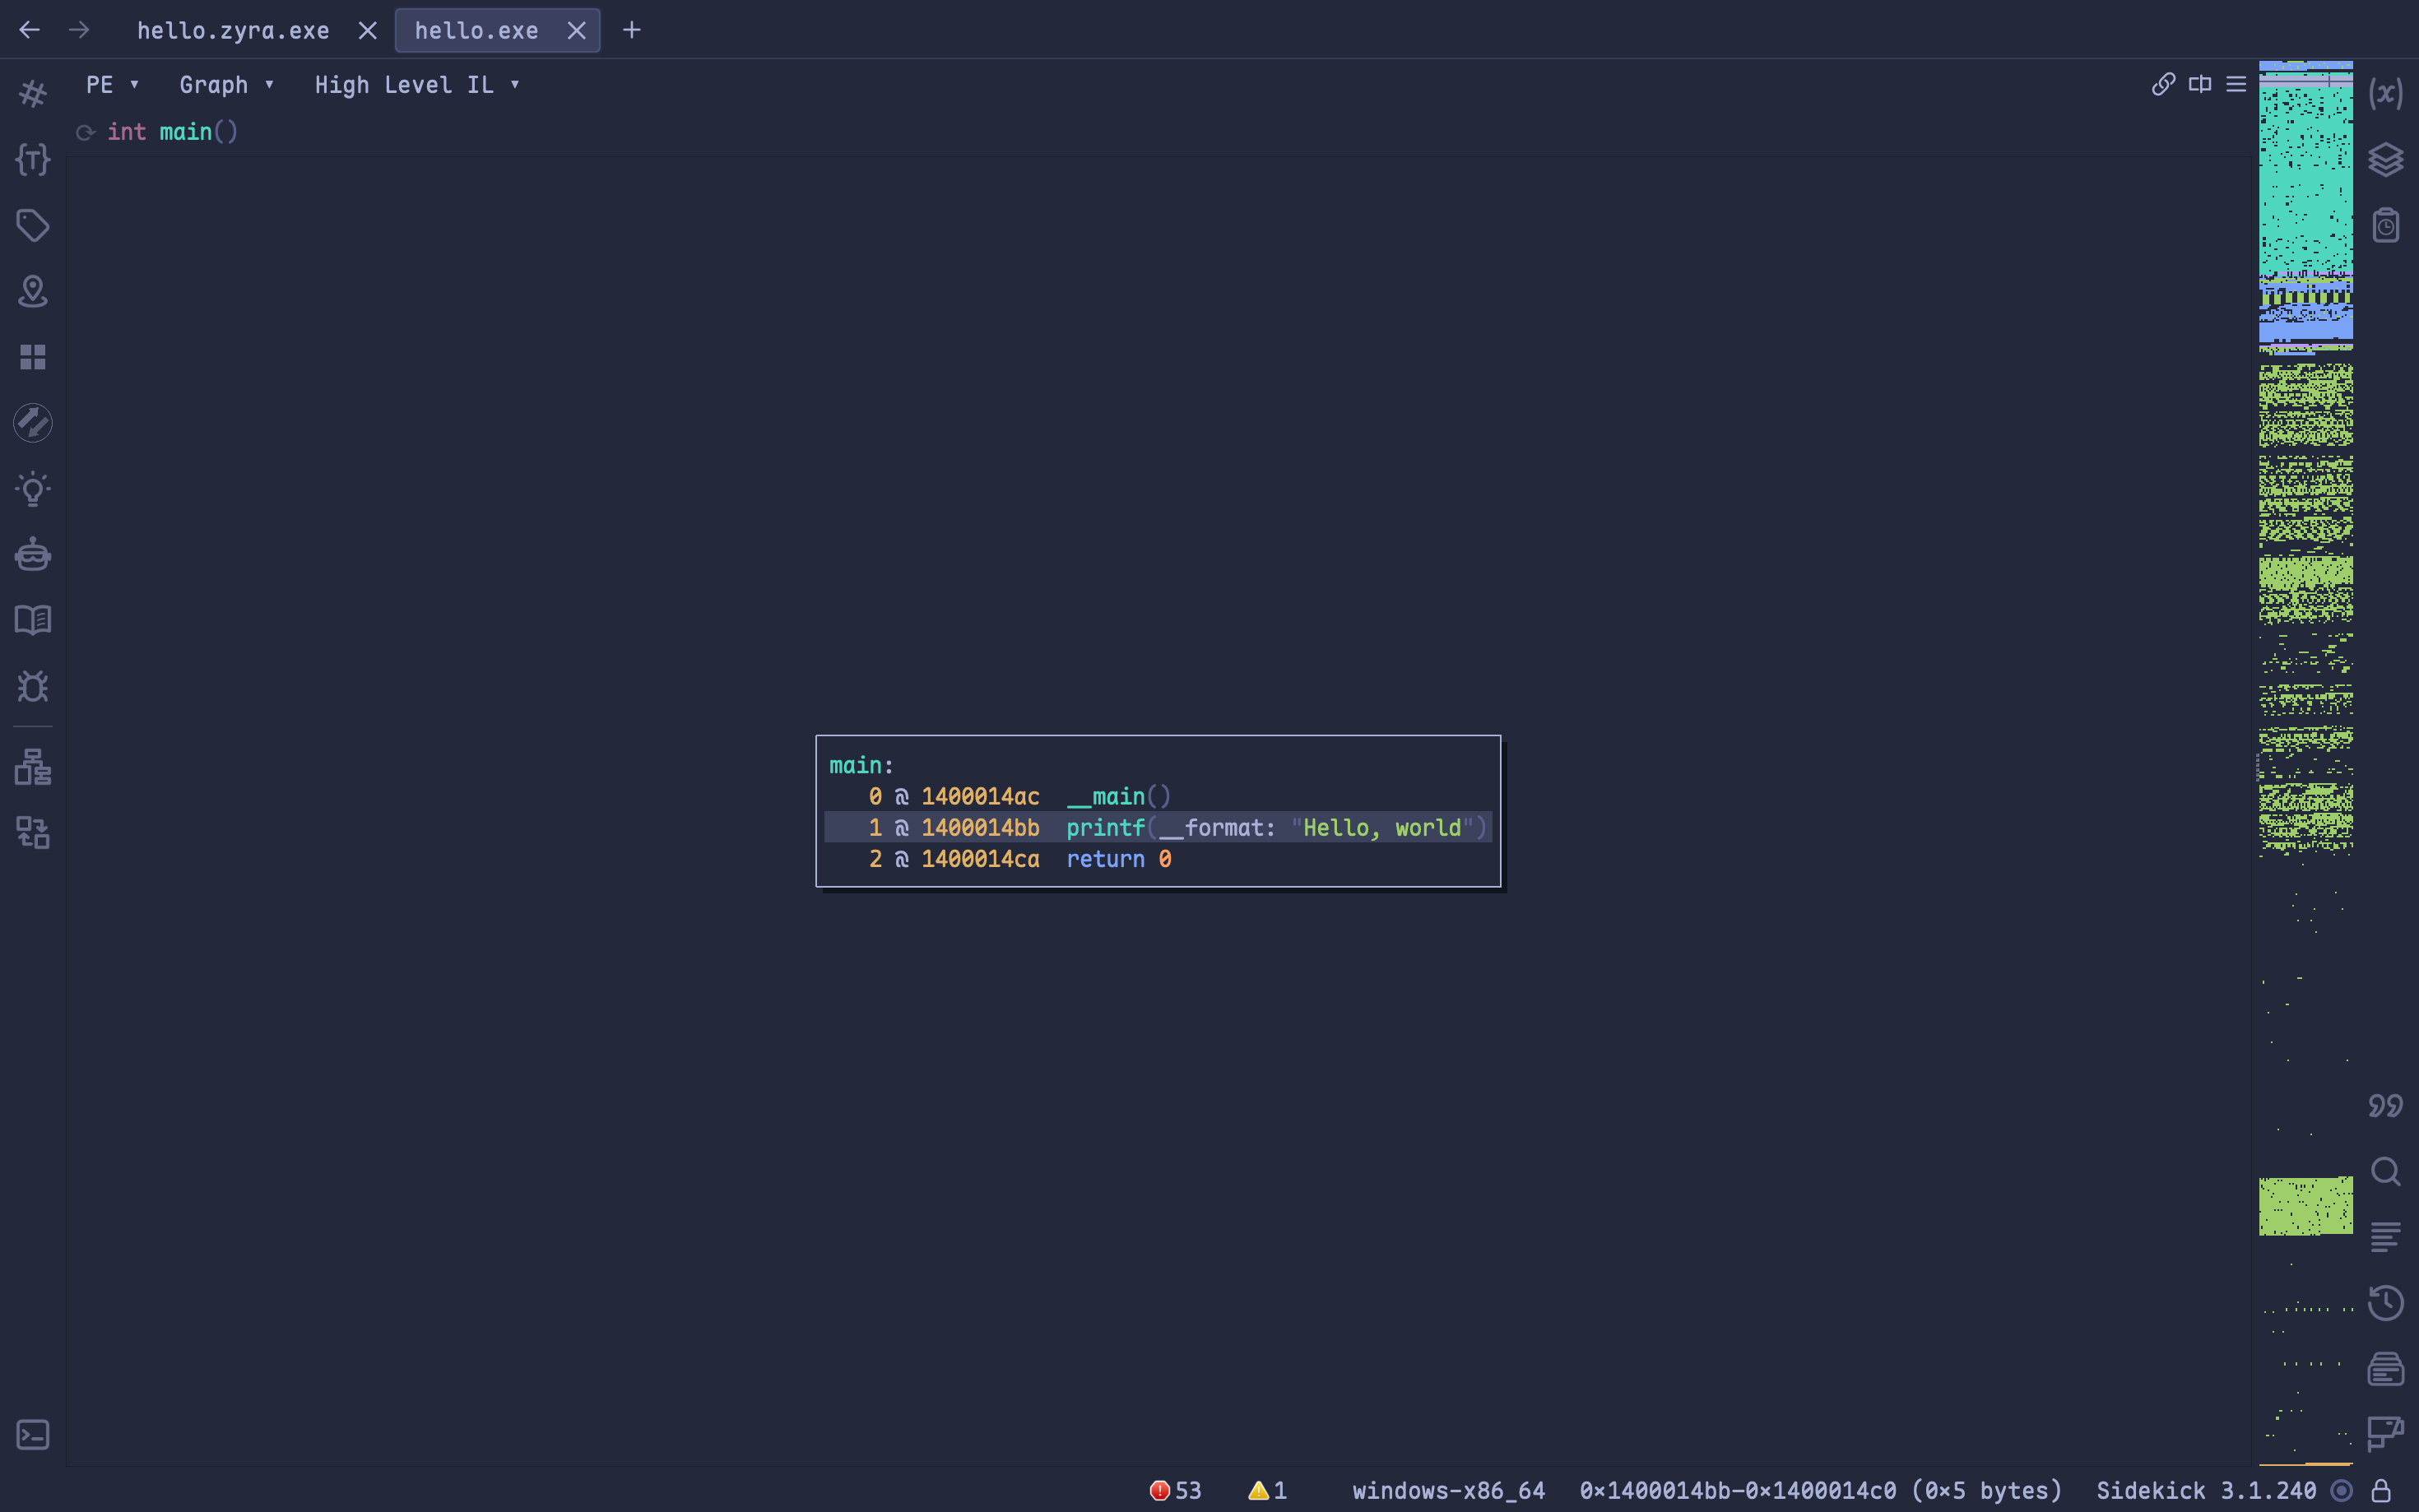
這是在我們 Pack 前的,可以看到它的 CFG(Control Flow Graph)十分簡單,就是一個很簡單的函數。但是我們接下來來看一下 Pack 過後的成果。
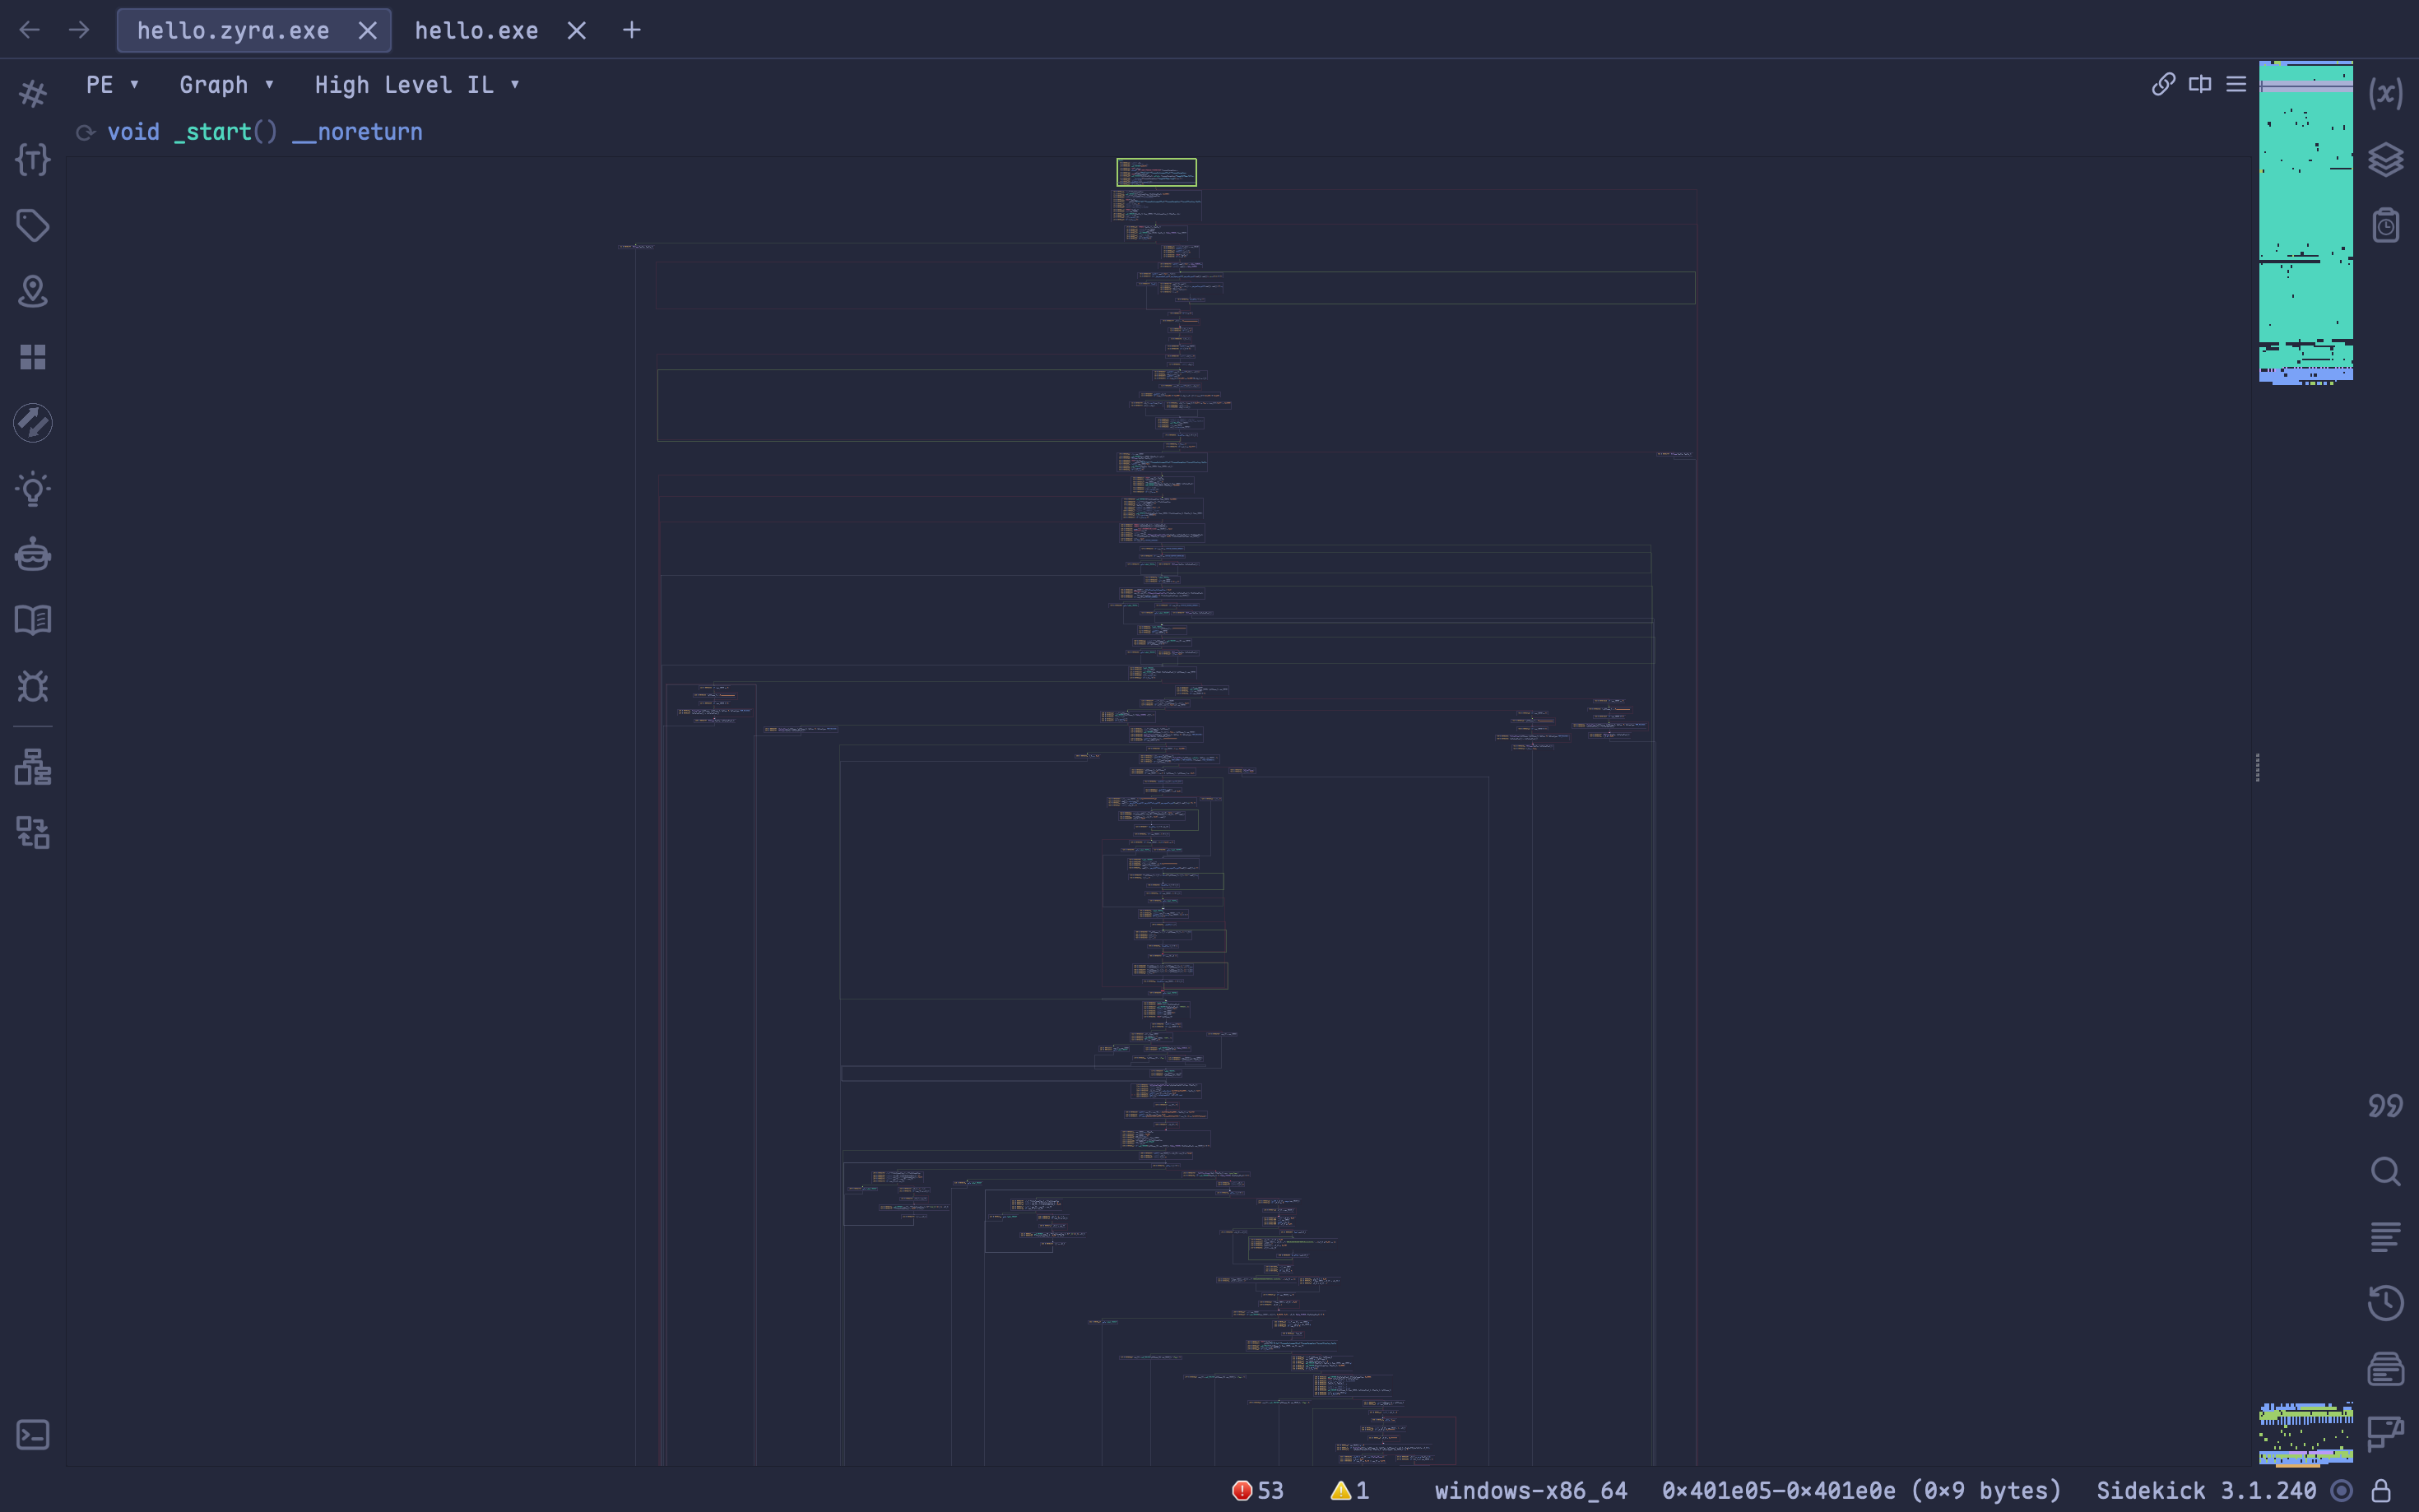
我們看到整個 CFG 變得非常複雜,讓靜態分析變得十分困難!
不過即便如此,逆向工程師或惡意程式分析師依然可以透過動態分析來發現有檔案被 Drop 到某個目錄,所以還有許多改進的空間,例如在記憶體中執行。
這兩天跟大家一起實作了一個 Naive 的 Binary packer,也算是對先前的內容(包括 PE 結構、加密解密等)有了很好的複習!同時,也藉由這個專案,對於之後開發的惡意程式可以有更多的反分析保護!
當然,如同我所說,這個專案的實作都還很 Naive,還有很多可以改進的地方。例如加入更複雜的加密和混淆技術、運行於記憶體之中而非讓檔案落地等等的,都還有很多改進空間。只不過我最近比較忙,一直沒時間來處理它,如果大家看完了這兩天的內容,想要去原始的專案提交 PR 幫忙改進的話我十分十分的歡迎,也感謝大家的回饋,希望大家都有所收穫!
好啦,那就這樣囉!
如果對惡意程式開發或是惡意程式分析有興趣的話,這個系列會很適合你!最後也感謝大家的閱讀,歡迎順手按讚留言訂閱轉發(轉發可以讓朋友們知道你都在讀這種很技術的文章,他們會覺得你好帥好強好電,然後開始裝弱互相吹捧)~明天見!

