

Controller 是路由跟資料層之間的那一層調度員,核心寫法(Resource Controller 七個方法、路由模型綁定、Request 物件)從 Laravel 10 到 13 完全沒變——唯一一個照舊教材寫就會直接噴錯的地方,是在建構子裡用 $this->middleware('auth') 套用中介層,這個方法在新骨架裡已經不存在了,今天會把三種替代寫法一次講清楚。
Day 7 定義了 Route::resource('posts', PostController::class),Day 9-11 把 Post 的資料層建好了,今天終於要把 PostController 實際寫出來,串起路由跟資料層。依賴注入的完整原理留到 Day 23(Service Container)才深入,這裡先知道怎麼用就好,原理之後再補。
Day 9 執行 make:model Post -mfcr 時已經連帶產生了 PostController,打開它會看到七個空的方法,正好對應 Day 7 Route::resource 展開的七條路由:
class PostController extends Controller
{
    public function index() { }
    public function create() { }
    public function store(Request $request) { }
    public function show(Post $post) { }
    public function edit(Post $post) { }
    public function update(Request $request, Post $post) { }
    public function destroy(Post $post) { }
}
注意 show/edit/update/destroy 這幾個方法直接接受 Post $post 型別提示的參數——這是「路由模型綁定(Route Model Binding)」,Laravel 會自動用 URL 裡的 {post} 參數去查詢對應的 Post 實例並注入進來,找不到就自動回 404,不需要自己寫 Post::findOrFail($id)。
class PostController extends Controller
{
    public function index()
    {
        $posts = Post::with('author')->latest()->paginate(10);

        return view('posts.index', ['posts' => $posts]);
    }

    public function create()
    {
        return view('posts.create');
    }

    public function store(Request $request)
    {
        $validated = $request->validate([
            'title' => ['required', 'string', 'max:255'],
            'body' => ['required', 'string'],
        ]);

        $post = auth()->user()->posts()->create($validated);

        return redirect()->route('posts.show', $post);
    }

    public function show(Post $post)
    {
        return view('posts.show', ['post' => $post]);
    }

    public function edit(Post $post)
    {
        return view('posts.edit', ['post' => $post]);
    }

    public function update(Request $request, Post $post)
    {
        $validated = $request->validate([
            'title' => ['required', 'string', 'max:255'],
            'body' => ['required', 'string'],
        ]);

        $post->update($validated);

        return redirect()->route('posts.show', $post);
    }

    public function destroy(Post $post)
    {
        $post->delete();

        return redirect()->route('posts.index');
    }
}
驗證規則今天先簡單帶過,Day 17 會深入 Form Request 這種更適合複雜驗證邏輯的做法。
這行程式碼值得停下來多看一眼,因為它同時示範了三件事:auth()->user() 取得目前登入的使用者、->posts()(Day 9 定義的關聯方法)取得這位使用者的文章關聯查詢建構器、->create($validated) 在這個關聯的基礎上建立新紀錄。這種寫法叫做「透過關聯建立資料」,它的價值在於不需要手動把 user_id 塞進 $validated 陣列——Eloquent 會自動根據關聯定義(belongsTo(User::class, 'user_id'))把目前使用者的 id 填進新紀錄的 user_id 欄位。比起手動 Post::create([...$validated, 'user_id' => auth()->id()]),這種寫法更不容易漏寫、也更清楚表達「這是某位使用者底下的資源」這層語意。
如果一個 Controller 只做一件事(例如「切換文章的精選狀態」這種單一動作),可以用 __invoke 建立單一動作 Controller,不需要在路由裡指名方法:
// app/Http/Controllers/TogglePostFeaturedController.php
class TogglePostFeaturedController extends Controller
{
    public function __invoke(Post $post)
    {
        $post->update(['is_featured' => ! $post->is_featured]);

        return back();
    }
}
// routes/web.php
Route::patch('/posts/{post}/toggle-featured', TogglePostFeaturedController::class);
__construct 則是每次建立 Controller 實例時都會先執行的建構子。舊教材常用它來套用中介層($this->middleware('auth')->except([...])),但這個寫法在 Laravel 11 起已經不能用了——新骨架的基底 Controller 類別不再繼承 Illuminate\Routing\Controller,身上根本沒有 middleware() 這個方法,照抄會直接噴 Call to undefined method。
現在 Controller 建構子的正確定位是「宣告這個 Controller 需要哪些依賴」,交給 Service Container 自動注入(Day 23 會完整解釋):
class PostController extends Controller
{
    public function __construct(
        protected PostService $postService,
    ) {}
}
那中介層改寫在哪?官方文件提供三種方式,依「這條規則屬於路由還是屬於 Controller」來選:
// 方式一:直接寫在路由上(最單純的情境優先用這個)
Route::resource('posts', PostController::class)
    ->middlewareFor(['create', 'store', 'edit', 'update', 'destroy'], 'auth');
// 方式二:實作 HasMiddleware 介面,用靜態 middleware() 方法回傳規則
use Illuminate\Routing\Controllers\HasMiddleware;
use Illuminate\Routing\Controllers\Middleware;

class PostController extends Controller implements HasMiddleware
{
    public static function middleware(): array
    {
        return [
            new Middleware('auth', except: ['index', 'show']),
        ];
    }
}
// 方式三:PHP Attribute 標註(Laravel 13 新增,語意最直觀)
use Illuminate\Routing\Attributes\Controllers\Middleware;

#[Middleware('auth', except: ['index', 'show'])]
class PostController extends Controller
{
    // ...
}
blog-app 採用方式二或方式三都可以,本系列後續示範以 Attribute 寫法為主——理由跟 Day 9 的 #[ObservedBy]、Day 19 的 Job Attribute 是同一條線:把「這個類別受哪些規則約束」直接標在類別定義上,讀程式碼時一眼看得到。Attribute 也可以標在個別方法上,跟類別層級的標註會自動合併。
順帶一提,如果你的授權判斷是走 Policy,Laravel 13 還提供 #[Authorize] 這個對應 can 中介層的捷徑:
use Illuminate\Routing\Attributes\Controllers\Authorize;

#[Authorize('update', 'post')]
public function update(Request $request, Post $post) { /* ... */ }
上面的 #[Authorize] 有個前提:你得先有一個 Policy。授權(Authorization)這塊之前幾天已經零星出現過好幾次——Day 12 的 @can('update', $post) Blade 指令、等一下 Day 17 Form Request 的 authorize() 方法——但一直沒有正式交代它背後是什麼。今天補上,因為 blog-app 從現在開始就會需要它:一篇文章只有作者本人能編輯跟刪除,草稿也只有作者自己看得到。
Policy 是一個對應某個 Model 的類別,裡面每個方法就是一種「能力(ability)」:
php artisan make:policy PostPolicy --model=Post
// app/Policies/PostPolicy.php
namespace App\Policies;

use App\Models\Post;
use App\Models\User;

class PostPolicy
{
    /** 誰能編輯這篇文章:只有作者本人 */
    public function update(User $user, Post $post): bool
    {
        return $user->id === $post->user_id;
    }

    /** 誰能刪除這篇文章:一樣只有作者本人 */
    public function delete(User $user, Post $post): bool
    {
        return $user->id === $post->user_id;
    }

    /** 誰能看到未發布的草稿:只有作者本人 */
    public function viewDraft(User $user, Post $post): bool
    {
        return $user->id === $post->user_id;
    }
}
Laravel 會依命名慣例自動把 App\Models\Post 對應到 App\Policies\PostPolicy,不需要手動註冊(這也是 Day 5 提過的「AuthServiceProvider 消失了,那些工作去哪了」的其中一個答案——Policy 的自動探索就是框架接手的部分之一)。如果你的目錄結構不符合慣例,才需要在 AppServiceProvider::boot() 用 Gate::policy(Post::class, PostPolicy::class) 明確指定。
定義好之後,三個地方都能直接用同一套規則,不需要各自複製一份判斷邏輯:
// 1. Controller 裡:不符合就自動拋出 403
public function update(Request $request, Post $post)
{
    $this->authorize('update', $post);
    // ...
}

// 2. Controller 上:用 Day 13 的 Attribute 寫法,等同上面那行
#[Authorize('update', 'post')]
public function update(Request $request, Post $post) { /* ... */ }

// 3. 任何地方:拿到布林值自己決定怎麼處理
if ($request->user()->can('viewDraft', $post)) {
    // ...
}
{{-- 4. Blade 裡:Day 12 看過的 @can 指令,背後就是同一個 Policy --}}
@can('update', $post)
    <a href="{{ route('posts.edit', $post) }}">編輯文章</a>
@endcan
這就是授權邏輯集中管理的價值:規則只寫在 PostPolicy 一個地方,Controller、Blade、Middleware、Form Request 全部共用。哪天規則從「只有作者能編輯」放寬成「作者或管理員都能編輯」,你只需要改 Policy 裡的那一行,不用去翻遍整個專案找有哪些地方寫了 $user->id === $post->user_id。
一個常見的補充需求是「管理員可以做任何事」,不需要在每個方法都加一句判斷,用 before() 攔在最前面:
public function before(User $user, string $ability): ?bool
{
    return $user->isAdmin() ? true : null;   // 回傳 null 代表「我不表態,繼續往下跑各自的方法」
}
注意 before() 回傳 null 跟回傳 false 意義完全不同:null 是「這題我不回答,交給後面的方法判斷」,false 則是「直接否決,後面的方法不用跑了」。寫成 return $user->isAdmin(); 會讓所有非管理員被無條件擋死,是這裡最容易寫錯的地方。
Day 16 的 EnsurePostIsPublished 中介層、Day 18 的 abort_if() 範例都會用到今天定義的 viewDraft 能力,Day 17 的 Form Request authorize() 則會用到 update——今天這個 PostPolicy 是後面好幾天共用的基礎。
Illuminate\Http\Request 透過依賴注入自動帶入 Controller 方法(前面範例的 Request $request),底層怎麼被注入的原理留到 Day 23,這裡先整理最常用的方法:
$request->all();                       // 所有輸入資料(陣列)
$request->input('title');              // 取單一欄位,支援點記法('products.0.name')
$request->input('limit', 20);          // 給預設值
$request->only(['title', 'body']);     // 只取部分欄位
$request->except(['_token']);          // 排除部分欄位
$request->has('title');                // 判斷欄位是否存在於請求中(不管值是不是空)
$request->filled('title');             // 判斷欄位存在「且」有實際內容(Day 8 提過的 filled() 概念在這裡也適用)
$request->boolean('is_featured');      // 把常見的「1/0、true/false、on/off」字串正確轉成布林值,比自己判斷字串安全

$request->query('page');               // 只取 URL query string(?page=2 這種),不含 POST body
$request->route('post');               // 取得路由參數本身(綁定前的原始值/已綁定的 Model,視情境而定)

$request->file('cover');               // 取得上傳的檔案(UploadedFile 實例)
$request->hasFile('cover');            // 判斷是否有檔案
$request->file('cover')->store('covers'); // 儲存檔案,回傳儲存路徑

$request->header('X-Custom-Header');   // 取得 Header
$request->bearerToken();               // 取得 Authorization: Bearer 後面的 token
$request->ip();                        // 取得使用者 IP
$request->userAgent();                 // 取得瀏覽器/客戶端資訊

$request->cookie('name');              // 讀取 Cookie(Day 24 深入)
$request->wantsJson();                 // 判斷客戶端是否期待 JSON 回應(常用於同一個 Controller 同時服務網頁跟 API 的情境)
$request->expectsJson();               // 跟 wantsJson() 類似,額外考慮 AJAX 請求的慣例標頭
input() 跟 query() 的差異,容易被忽略$request->input('page') 會同時檢查 query string、POST body、路由參數,只要任何一處有這個欄位就會取到;$request->query('page') 只從 URL 的 query string 取值。多數情況下用 input() 已經夠用,但如果你的路由剛好有一個跟 query string 同名的路由參數(例如 /posts/{post} 又想讀 ?post=xxx 這種罕見情境),input() 的「來源不明確」可能導致取到非預期的值,這時候明確用 query() 會更安全。實務上這個陷阱出現機率不高,但知道差異存在,遇到奇怪的行為時能更快定位問題。
blog-app 之後如果想讓文章支援封面圖上傳,完整流程大致是:
public function store(Request $request)
{
    $validated = $request->validate([
        'title' => ['required', 'string', 'max:255'],
        'body' => ['required', 'string'],
        'cover' => ['nullable', 'image', 'max:2048'],   // Day 17 會深入這類驗證規則
    ]);

    if ($request->hasFile('cover')) {
        $validated['cover_path'] = $request->file('cover')->store('covers', 'public');
    }

    $post = auth()->user()->posts()->create($validated);

    return redirect()->route('posts.show', $post);
}
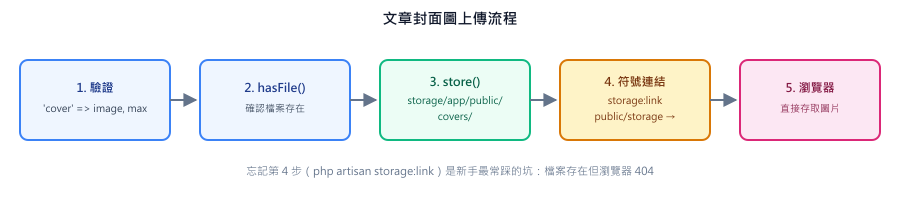
store('covers', 'public') 的第二個參數指定要用哪個「磁碟(disk)」儲存,public 是 Laravel 預設就設定好、對外可存取的儲存位置(實際檔案存在 storage/app/public/,需要執行 php artisan storage:link 建立一個從 public/storage 指向該目錄的符號連結,瀏覽器才能直接存取)。如果 blog-app 之後部署到 Render 這類沒有持久化本機硬碟的雲端平台(Day 29 會遇到),上傳的檔案需要改存到 S3 這類物件儲存服務,Laravel 的檔案系統抽象層(Storage facade)讓你只需要換一個磁碟設定,程式碼本身幾乎不用改。
如果 PostController 之後要同時服務 API 請求(Day 14 RESTful API 會示範),常用的回傳方式:
return response()->json(['data' => $post]);
return response()->json(['message' => '找不到文章'], 404);
return response()->noContent();             // 204,常用於 destroy 成功後
return response()->download($filePath);      // 檔案下載
return redirect()->route('posts.index')->with('success', '文章已更新');
如果一個 Controller 方法要同時處理「一般網頁請求回 HTML」跟「API 請求回 JSON」,可以用前面提到的 wantsJson() 判斷:
public function store(Request $request)
{
    $post = auth()->user()->posts()->create($request->validated());

    if ($request->wantsJson()) {
        return response()->json(['data' => $post], 201);
    }

    return redirect()->route('posts.show', $post);
}
不過這種「一個 Controller 兩用」的寫法容易讓程式碼裡到處都是條件判斷,Day 14 會示範把它拆成獨立的 Api\PostController,通常是更乾淨的做法——這裡先讓你知道 wantsJson() 這個判斷方式存在,之後可以自己權衡要不要採用。
{post} 沒對上:Controller 方法的參數變數名稱必須跟路由裡的 {post} 一致(都是 post),否則 Laravel 不知道要把哪個路由參數綁定給哪個方法參數。public function show($post) 沒有 Post 型別提示的話,拿到的只是路由參數的原始字串(例如 "1"),不是自動查好的 Model 實例,記得型別提示要寫 Post $post。store/update 忘記做驗證直接寫入資料庫:這系列 Day 17 才深入講 Validation,但別因此在中間這幾天的範例養成「先跳過驗證」的習慣——今天範例裡簡化的 $request->validate() 已經是最基本必要的防線,正式專案不該省略。$this->middleware(...):這是今天唯一一個「照抄舊寫法會直接壞掉」的地方,錯誤訊息是 Call to undefined method。網路上大量 Laravel 10 以前的教學文章仍然是這個寫法,看到時記得對照上面三種現行做法改寫。$request->boolean() 該用卻用了 $request->input():HTML checkbox 未勾選時根本不會出現在請求資料裡,勾選時通常送出字串 "1" 或 "on",如果直接用 input('is_featured') 再自己判斷真假,容易漏掉各種邊界情況(例如客戶端送了字串 "false",用鬆散的 PHP 真假值判斷反而會誤判成 true),boolean() 已經處理好這些常見案例。php artisan storage:link:public 磁碟存的檔案,如果沒有建立這個符號連結,瀏覽器完全無法存取上傳的檔案(會得到 404),這是新手第一次做檔案上傳功能時很容易漏掉的一步。今天把 PostController 的七個方法補完,也認識了 Magic Method(__invoke 適合單一動作 Controller)、Request 物件最常用的方法、檔案上傳的完整流程,並建立了 blog-app 的 PostPolicy,讓前面 Day 12 出現過的 @can 指令、以及後面 Day 16/17/18 會用到的授權判斷都有了共同的規則來源。這章唯一的版本斷點是中介層:建構子裡的 $this->middleware() 在 Laravel 11 起已經移除,改用路由的 middlewareFor()、HasMiddleware 介面,或 Laravel 13 新增的 #[Middleware] Attribute。Model 依賴注入是怎麼運作的,Day 23 會回頭完整解釋。
凡事豫則立,不豫則廢 — 《禮記・中庸》
Day 14 把今天的 PostController 擴充成完整的 RESTful API 設計範例,並認識 Laravel 13 新增的 JSON:API 原生支援。


 iThome鐵人賽
 看影片追技術