

昨天我們學了 Node Affinity 和 Taints & Tolerations —— 一個是 Pod 選 Node,一個是 Node 限制 Pod,但它們處理的都是「Pod 跟 Node 的關係」。
在真實環境中,我們常常還需要控制「Pod 跟 Pod 的關係」。
例如:
這類需求就不是 Node Affinity 或 Taints & Tolerations 主要解決的問題,而是要靠 Pod Affinity 與 Pod Anti-Affinity。
今天我們會學:
以下操作皆在 master 節點 執行。
想像大學選宿舍:
Pod Affinity 讓你表達:
「如果符合條件的 Pod 已經在某個位置,那我也希望被排到相同的範圍內。」
這個「相同範圍」可以是同一台 Node,也可以是同一個 Zone,實際範圍會由後面要介紹的 topologyKey 決定。
Pod Affinity 有一個 Node Affinity 沒有的關鍵欄位 —— topologyKey。
它用來定義「在一起」或「分開」的範圍。
Kubernetes 會查看 Node 上對應的 Label,並根據 Label 的值判斷哪些 Node 屬於同一個拓樸範圍。
| topologyKey | 意思 | 常見用途 |
|---|---|---|
kubernetes.io/hostname |
同一台 Node | 控制 Pod 是否要在同一台主機 |
topology.kubernetes.io/zone |
同一個 Zone | 控制 Pod 是否要在同一個可用區 |
topology.kubernetes.io/region |
同一個 Region | 控制 Pod 是否要在同一個較大區域 |
跟 Node Affinity 一樣,Pod Affinity 也有 required 和 preferred 兩種模式:
| 模式 | 行為 | 類比 |
|---|---|---|
| requiredDuringSchedulingIgnoredDuringExecution | 硬性條件:排程時一定要符合,找不到符合條件的位置就會 Pending |
「一定要跟好朋友住同一棟,否則我不住」 |
| preferredDuringSchedulingIgnoredDuringExecution | 偏好條件:排程時會盡量滿足,但不是強制要求 | 「優先跟好朋友住同一棟,沒辦法也可以接受」 |
vim cache-pod.yaml
apiVersion: v1
kind: Pod
metadata:
  name: cache
  labels:
    app: cache        # 這個標籤是 Pod Affinity 的匹配依據
spec:
  containers:
  - name: redis
    image: redis:7
kubectl apply -f cache-pod.yaml
確認 Cache Pod 跑在哪個 Node:
kubectl get pod cache -o wide

vim web-with-affinity.yaml
apiVersion: v1
kind: Pod
metadata:
  name: web
  labels:
    app: web
spec:
  affinity:
    podAffinity:
      requiredDuringSchedulingIgnoredDuringExecution:
      - labelSelector:
          matchExpressions:
          - key: app
            operator: In
            values:
            - cache
        topologyKey: kubernetes.io/hostname
  containers:
  - name: nginx
    image: nginx
💡 解讀這段 YAML
「找到標籤符合
app=cache的 Pod,並把Web Pod排到與它相同的Node。」因為這裡設定:
topologyKey: kubernetes.io/hostname
kubectl apply -f web-with-affinity.yaml
kubectl get pods cache web -o wide
Web Pod 應該會跟 Cache Pod 排在同一台 Node 上!

kubectl delete pod cache web
先不建立 Cache Pod,直接部署 Web Pod:
kubectl apply -f web-with-affinity.yaml
kubectl get pod web
Web Pod 會一直 Pending!因為找不到任何 Node 上有 app=cache 的 Pod。

用 describe 確認原因:
kubectl describe pod web | grep -A 5 Events
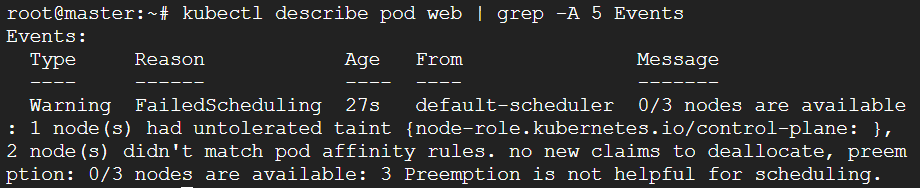
會看到類似 didn't match pod affinity rules 的訊息 — 這就是 required 的硬性約束。
如果 Pod Affinity 是「我要跟好朋友住同一棟」,那 Pod Anti-Affinity 就像「考試座位要分開」—— 同一科考試的學生盡量不要坐在一起,降低彼此互相影響的風險。
在 Kubernetes 中,Pod Anti-Affinity 很常用來讓同一個應用程式的多個副本分散到不同 Node。
例如一個 Deployment 有 3 個副本,如果它們全部被排到同一台 Node,一旦這台 Node 發生故障,3 個副本可能會同時受到影響。
透過 Pod Anti-Affinity,可以讓這些 Pod 分散到不同 Node,降低單一 Node 故障造成的影響。
vim web-spread.yaml
apiVersion: apps/v1
kind: Deployment
metadata:
  name: web-spread
spec:
  replicas: 3
  selector:
    matchLabels:
      app: web-spread
  template:
    metadata:
      labels:
        app: web-spread
    spec:
      affinity:
        podAntiAffinity:
          requiredDuringSchedulingIgnoredDuringExecution:
          - labelSelector:
              matchExpressions:
              - key: app
                operator: In
                values:
                - web-spread
            topologyKey: kubernetes.io/hostname
      containers:
      - name: nginx
        image: nginx
kubectl apply -f web-spread.yaml
💡 解讀這段 YAML
「我是
app=web-spread的 Pod,不要把我排到已經有其他app=web-spreadPod 的 Node 上。」因為這裡使用:
topologyKey: kubernetes.io/hostname所以 Anti-Affinity 會以「同一台 Node」作為判斷範圍。
又因為使用的是
requiredDuringSchedulingIgnoredDuringExecution,因此只要某台 Node 上已經有符合app=web-spread的 Pod,其他符合相同條件的 Pod 就不能再被排到同一台 Node。
kubectl get pods -l app=web-spread
如果你的叢集只有 2 個 worker Node,但 Deployment 設定 replicas: 3:
原因是每台 Node 上都已經有一個 app=web-spread Pod,而 requiredDuringSchedulingIgnoredDuringExecution 不允許另一個符合相同條件的 Pod 再排到同一台 Node。

這正是 required Anti-Affinity 的硬性約束 —— 寧可讓 Pod 停留在 Pending,也不會違反既定的排程規則。
如果你希望「盡量分散,但真的沒有其他選擇時,排在一起也可以」,就可以改用 preferred:
vim web-spread-preferred.yaml
apiVersion: apps/v1
kind: Deployment
metadata:
  name: web-spread-soft
spec:
  replicas: 3
  selector:
    matchLabels:
      app: web-spread-soft
  template:
    metadata:
      labels:
        app: web-spread-soft
    spec:
      affinity:
        podAntiAffinity:
          preferredDuringSchedulingIgnoredDuringExecution:
          - weight: 100
            podAffinityTerm:
              labelSelector:
                matchExpressions:
                - key: app
                  operator: In
                  values:
                  - web-spread-soft
              topologyKey: kubernetes.io/hostname
      containers:
      - name: nginx
        image: nginx
kubectl delete deployment web-spread
kubectl apply -f web-spread-preferred.yaml
kubectl get pods -o wide -l app=web-spread-soft
這次 3 個 Pod 都可以進入 Running。
即使叢集只有 2 台 Node,第 3 個 Pod 仍然可以被排程,只是 Scheduler 會盡量避免把它和其他 app=web-spread Pod 放在同一台 Node。
這就是 preferred Anti-Affinity 的特性:優先分散,但不會因為無法完全滿足條件而讓 Pod 停留在 Pending。

假設有一個 Web 應用程式和 Cache 服務,希望達成兩個排程目標:
這兩個需求可以透過不同的規則搭配完成:
app=cache 的 Podapp=web Pod 盡量分散到不同 Node也就是:
Web 靠近 Cache,但 Web 彼此盡量分開。
接下來我們一步一步完成這個配置。
kubectl apply -f cache-pod.yaml
kubectl get pod cache -o wide

vim web-combo.yaml
apiVersion: apps/v1
kind: Deployment
metadata:
  name: web-combo
spec:
  replicas: 2
  selector:
    matchLabels:
      app: web-combo
  template:
    metadata:
      labels:
        app: web-combo
    spec:
      affinity:
        # Pod Affinity:跟 Cache 排在一起
        podAffinity:
          preferredDuringSchedulingIgnoredDuringExecution:
          - weight: 80
            podAffinityTerm:
              labelSelector:
                matchExpressions:
                - key: app
                  operator: In
                  values:
                  - cache
              topologyKey: kubernetes.io/hostname
        # Pod Anti-Affinity:副本盡量分散
        podAntiAffinity:
          preferredDuringSchedulingIgnoredDuringExecution:
          - weight: 50
            podAffinityTerm:
              labelSelector:
                matchExpressions:
                - key: app
                  operator: In
                  values:
                  - web-combo
              topologyKey: kubernetes.io/hostname
      containers:
      - name: nginx
        image: nginx
kubectl apply -f web-combo.yaml
kubectl get pods -l 'app in (web-combo, cache)' -o wide

為什麼這裡用 preferred?
因為兩個規則可能互相衝突:
- Affinity:希望 Web 靠近 Cache
- Anti-Affinity:希望 Web 副本彼此分散
如果都用
required,可能找不到同時符合條件的 Node,導致 PodPending。改用
preferred後,Scheduler 會依照weight綜合評分,選擇較適合的 Node。
經過 Day 12 到 Day 14,我們已經學了 Kubernetes 核心的排程控制機制,最後來做一個完整對照:
| 比較項目 | nodeSelector | Node Affinity | Taints & Tolerations | Pod Affinity / Anti-Affinity |
|---|---|---|---|---|
| 控制什麼? | Pod → Node | Pod → Node | Node → Pod | Pod → Pod |
| 方向 | 選擇 | 選擇 / 偏好 | 限制 | 靠近(Affinity)/ 分散(Anti-Affinity) |
| 條件類型 | 硬性 | required / preferred |
NoSchedule / PreferNoSchedule / NoExecute |
required / preferred |
| 匹配依據 | Node Label | Node Label | Node Taint + Pod Toleration | Pod Label + topologyKey |
| 有 topologyKey? | 無 | 無 | 無 | 有,用來定義拓樸範圍 |
| 典型場景 | 簡單指定 Node | GPU、SSD 等 Node 條件 | 專用 Node、隔離工作負載 | Pod 共置 / 分散部署 |
💡 總結
- nodeSelector / Node Affinity:Pod 的「志願表」—— 我想去哪個 Node
- Taints & Tolerations:Node 的「門禁系統」—— 哪些 Pod 可以進來
- Pod Affinity:Pod 的「組隊偏好」—— 我想跟誰靠近
- Pod Anti-Affinity:Pod 的「迴避清單」—— 我想跟誰分開
今天我們學會了控制 Pod 之間排程關係的機制:
| 重點 | 說明 |
|---|---|
| Pod Affinity | 讓 Pod 靠近符合條件的其他 Pod |
| Pod Anti-Affinity | 讓 Pod 與符合條件的其他 Pod 分散部署 |
| topologyKey | 定義「靠近」或「分散」的範圍,例如 hostname / zone / region |
| required vs preferred | required 是硬性條件;preferred 是偏好條件 |
| 組合應用 | Affinity + Anti-Affinity 搭配 weight,讓 Scheduler 綜合不同排程偏好 |
到這裡,我們已經掌握了 Pod 之間的排程控制。
Pod Anti-Affinity 可以讓副本彼此分散,但如果我們希望 Pod 能夠在不同 Node 或 Zone 之間更均勻地分布,就需要另一個更適合的機制。
明天我們來學 Topology Spread Constraints(topologySpreadConstraints),看看 Kubernetes 如何更精確地控制 Pod 的分散程度!


 iThome鐵人賽
 看影片追技術