

昨天(Day 13)我們完成了接收路徑(Receive Path),成功將外部客戶端傳來的資料一路從 L2 拆解到應用層:
TAP (L2) ──► Ethernet (L2) ──► IPv4 (L3) ──► UDP (L4) ──► Application (L7)
然而,一個完整的網路協定堆疊絕不能「只進不出」。
今天(Day 14),我們正式打造逆向的傳送路徑(Transmit Path),實作了從應用層由上至下親手「包禮物」的完整封裝流程(Encapsulation):
Application (L7) ──► UDP (L4) ──► IPv4 (L3) ──► ARP Lookup ──► Ethernet (L2) ──► TAP (L2)
透過本次實作,我們的自製 Network Stack 成功主動將 UDP 封包射出虛擬網卡,在 Linux 主機端的 nc -lu 9999 成功接收到來自我們的問候:
Hello UDP
udp_send() 不在函式內部寫死來源 Port,而是由呼叫端傳入 src_port;本日範例使用 8080 作為伺服器回覆來源埠,未來也可傳入臨時埠號(Ephemeral Port)實作客戶端主動通訊。arp_table_lookup 取得目標主機的實體 MAC 位址,體會「沒有 MAC 封包就出不去」的網路鐵律。"Hello UDP\n"(10 Bytes)。如果說 Day 13 的解封裝是「一層層拆禮物」,那麼 Day 14 的發送就是「一層層包裝禮物」:
[ 應用層資料 Payload: "Hello UDP\n" (10 bytes) ]
       │
       ▼ 包上 UDP Header (8 bytes)
[ UDP Header (8) | Payload (10) ]
       │
       ▼ 包上 IPv4 Header (20 bytes,並計算校驗和)
[ IPv4 Header (20) | UDP Header (8) | Payload (10) ]
       │
       ▼ 查 ARP 表取得真實 MAC,包上 Ethernet Header (14 bytes)
[ Ethernet Header (14) | IPv4 Header (20) | UDP Header (8) | Payload (10) ]
       │
       ▼
write(tap_fd, buffer, 52) ──► 送入 TAP 虛擬網卡!
在實作發送時,最常讓人疑惑的是:「既然都在虛擬網卡裡,我們不能隨便給一個假 MAC 發送嗎?」
答案是:不行!因為接收端的作業系統(Linux 核心)跟我們一樣嚴格!
ethernet_accept_frame() 會丟棄不是給自己的 MAC 封包一樣,Linux 的網卡驅動程式收到訊框時,也會檢查 Destination MAC 是否等於 tap0 網卡的真實 MAC 或廣播位址。nc -lu 9999 永遠收不到任何資料。arp_table_lookup((const uint8_t *)&dst_ip) 查出對方的真實 MAC 位址,填入 eth->dst,封包才能被合法簽收。在封包解析過程中,我們看到了來源 IP(10.0.0.1)與目的 IP(10.0.0.2),但卻完全沒看到子網路遮罩(Subnet Mask)的蹤影。
這是因為:
(IP & Mask) == Network Address。ip->dst_ip == LOCAL_IP。
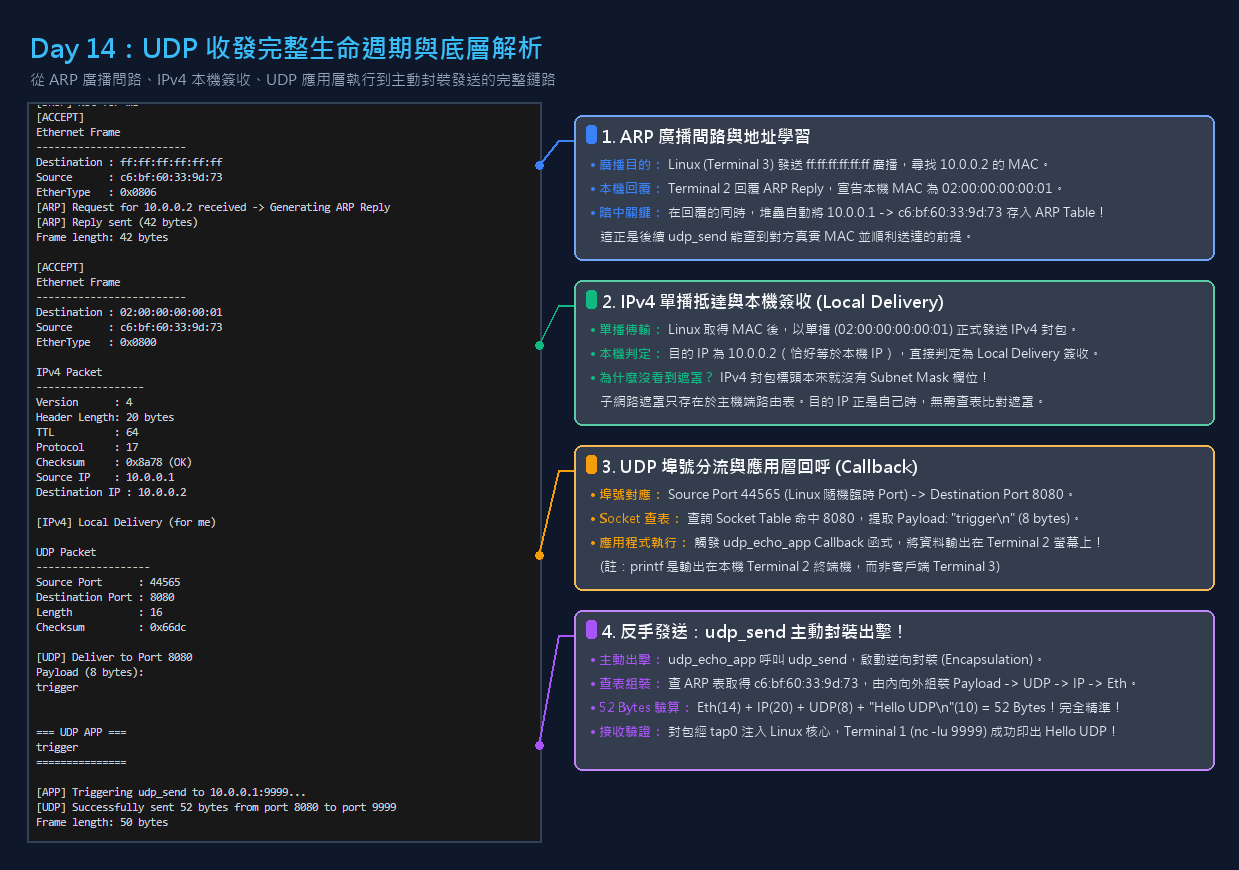
下圖為本次實測中,Terminal 2(Network Stack)從接收廣播、學習 MAC、本機交付,到反手呼叫 udp_send 發送的完整日誌與逐層解析:
實作前提:
udp_send()依賴 ARP Table 查詢目的 MAC,因此本日三終端機實測會先由 Linux 主機送一個 UDP 封包進來,讓我們的 Network Stack 透過先前的 ARP Request / Reply 流程學到10.0.0.1的 MAC。若 ARP Table 裡尚未有目的 IP 對應的 MAC,udp_send()會印出Destination MAC not in ARP table並放棄送出。
include/udp.h:宣告發送介面/* 支援由呼叫端指定來源 Port 的發送介面 */
int udp_send(int fd, uint16_t src_port, uint32_t dst_ip, uint16_t dst_port, const uint8_t *data, size_t len);
src/udp.c:udp_send 完整封裝實作#include <stdio.h>
#include <string.h>
#include <arpa/inet.h>
#include <unistd.h> // 提供 write()
#include "ethernet.h"
#include "ipv4.h"
#include "udp.h"
#include "checksum.h" // 提供 ipv4_checksum()
#include "arp_table.h" // 提供 arp_table_lookup()
#include "config.h" // 提供 LOCAL_MAC 與 LOCAL_IP
int udp_send(int fd, uint16_t src_port, uint32_t dst_ip, uint16_t dst_port, const uint8_t *data, size_t len)
{
// 1. 查詢 ARP 表:要送到目標 IP,必須先知道對方的 MAC 位址
struct arp_entry *entry = arp_table_lookup((const uint8_t *)&dst_ip);
if (!entry || !entry->valid) {
printf("[UDP] Send failed: Destination MAC not in ARP table\n");
return -1;
}
// 2. 準備緩衝區,並切分各層標頭的指標位置
uint8_t buffer[1514];
memset(buffer, 0, sizeof(buffer));
struct ethernet_hdr *eth = (struct ethernet_hdr *)buffer;
struct ipv4_hdr *ip = (struct ipv4_hdr *)(buffer + ETH_HEADER_LEN);
struct udp_hdr *udp = (struct udp_hdr *)(buffer + ETH_HEADER_LEN + sizeof(struct ipv4_hdr));
uint8_t *payload = buffer + ETH_HEADER_LEN + sizeof(struct ipv4_hdr) + sizeof(struct udp_hdr);
// 3. 填充 Payload (應用層資料)
memcpy(payload, data, len);
// 4. 封裝 UDP Header (L4)
udp->src_port = htons(src_port); // 由呼叫端指定來源 Port (可為 8080 或臨時 Port)
udp->dst_port = htons(dst_port); // 目標 Port
udp->length = htons(sizeof(struct udp_hdr) + len); // UDP 標頭長度(8) + 資料長度
udp->checksum = 0; // IPv4 下 UDP Checksum 設為 0 代表不校驗
// 5. 封裝 IPv4 Header (L3)
ip->version_ihl = 0x45; // IPv4, 標頭長度 20 bytes (IHL=5)
ip->tos = 0;
ip->total_length = htons(sizeof(struct ipv4_hdr) + sizeof(struct udp_hdr) + len);
ip->identification = htons(1);
ip->flags_fragment = 0;
ip->ttl = 64;
ip->protocol = 17; // 17 代表 UDP
ip->src_ip = *(uint32_t *)LOCAL_IP; // 10.0.0.2
ip->dst_ip = dst_ip; // 目標 IP
ip->checksum = 0;
ip->checksum = ipv4_checksum(ip, sizeof(struct ipv4_hdr)); // 計算 IP 標頭校驗和
// 6. 封裝 Ethernet Header (L2)
memcpy(eth->dst, entry->mac, ETH_ADDR_LEN); // 從 ARP 快取取得目標 MAC
memcpy(eth->src, LOCAL_MAC, ETH_ADDR_LEN); // 本機 MAC
eth->ethertype = htons(ETHERTYPE_IPV4); // 0x0800 代表 IPv4
// 7. 透過 TAP 虛擬網卡送出 Frame
size_t total_len = ETH_HEADER_LEN + sizeof(struct ipv4_hdr) + sizeof(struct udp_hdr) + len;
ssize_t sent = write(fd, buffer, total_len);
if (sent < 0) {
perror("[UDP] write failed");
return -1;
}
printf("[UDP] Successfully sent %ld bytes from port %u to port %u\n", sent, src_port, dst_port);
fflush(stdout);
return 0;
}
src/tap.c:全域網卡綁定與應用程式觸發static int global_tap_fd = -1;
void udp_echo_app(const uint8_t *data, size_t len)
{
printf("\n=== UDP APP ===\n");
fwrite(data, 1, len, stdout);
printf("===============\n\n");
fflush(stdout);
// 收到請求後,主動發送一包 "Hello UDP" 到 10.0.0.1 的 9999 Port!
printf("[APP] Triggering udp_send to 10.0.0.1:9999...\n");
udp_send(global_tap_fd, 8080, inet_addr("10.0.0.1"), 9999, (const uint8_t *)"Hello UDP\n", 10);
}
int main()
{
...
int fd = tun_alloc(dev);
global_tap_fd = fd; // 保存網卡描述符供應用程式使用
...
}
# 在 Linux 主機端監聽 9999 Port 等待收信
nc -lu 9999
make network
sudo ./network
# 確保 tap0 IP 設定完畢並啟用
sudo ip addr add 10.0.0.1/24 dev tap0 2>/dev/null || true
sudo ip link set tap0 up

# 送出觸發封包
echo "trigger" | nc -u -w 1 10.0.0.2 8080
Hello UDP
(成功接收到我們主動發出的資料!)
[ACCEPT]
Ethernet Frame
-------------------------
Destination : ff:ff:ff:ff:ff:ff
Source      : c6:bf:60:33:9d:73
EtherType   : 0x0806
[ARP] Request for 10.0.0.2 received -> Generating ARP Reply
[ARP] Reply sent (42 bytes)
Frame length: 42 bytes

[ACCEPT]
Ethernet Frame
-------------------------
Destination : 02:00:00:00:00:01
Source      : c6:bf:60:33:9d:73
EtherType   : 0x0800

IPv4 Packet
------------------
Version      : 4
Header Length: 20 bytes
TTL          : 64
Protocol     : 17
Checksum     : 0x8a78 (OK)
Source IP    : 10.0.0.1
Destination IP : 10.0.0.2

[IPv4] Local Delivery (for me)

UDP Packet
-------------------
Source Port      : 44565
Destination Port : 8080
Length           : 16
Checksum         : 0x66dc

[UDP] Deliver to Port 8080
Payload (8 bytes):
trigger


=== UDP APP ===
trigger
===============

[APP] Triggering udp_send to 10.0.0.1:9999...
[UDP] Successfully sent 52 bytes from port 8080 to port 9999
Frame length: 50 bytes
注意:這裡有兩個不同封包。
Frame length: 50 bytes是剛剛收到的 trigger UDP 封包長度;Successfully sent 52 bytes則是udp_echo_app()callback 中另外主動送出的"Hello UDP\n"封包長度,因此兩個數字不同是正常的。
| 協定層級 | 欄位 / 內容 | 長度 | 累計長度 | 說明 |
|---|---|---|---|---|
| L2 Ethernet | MAC Header | 14 Bytes | 14 Bytes | 目的 MAC (Linux tap0) + 來源 MAC (02:00:00:00:00:01) + 0x0800 |
| L3 IPv4 | IP Header | 20 Bytes | 34 Bytes | IHL=5, Protocol=17, 10.0.0.2 ➔ 10.0.0.1, Checksum 重新計算 |
| L4 UDP | UDP Header | 8 Bytes | 42 Bytes | Src=8080, Dst=9999, Length=18, Checksum=0 |
| L7 Application | Payload 資料 | 10 Bytes | 52 Bytes | 字串 "Hello UDP\n"(9 個字元 + 1 個換行符號) |
發送的每一筆資料長度與內容均精確吻合!
有了收(Day 13)與發(Day 14)的完整傳輸層基礎,明天我們將打造第一個真正的網際網路應用:Mini DNS Client!
你將親手實作:
udp_send 向 Google 公共 DNS(8.8.8.8:53)主動發送查詢
google.com 翻譯成真正的 IP 位址!

 iThome鐵人賽
 看影片追技術