
原則上就是,以我為原則
今天任務多了一點,要測試執行以及嘗試錯誤修正,當元件需要跟外面的資料互動,問題也會隨不同的資料浮現。
開啟昨天修改好的 welcome.tsx,開始囉。
之前的資料是在 Welcome 裡直接宣告:
export function Welcome() {
  const topic = "JSX";
  const day = 3;
  const totalDays = 30;
  return (
      <main className="min-h-screen bg-gray-100 px-6 py-10 text-gray-900">
        <section className="mx-auto max-w-xl space-y-4 rounded-xl bg-white p-6 shadow">
      //...略
如果想重複使用這個版型與樣式,建立元件就好,但如果同一個畫面要出現多個相同元件,且內容要不一樣,就要改很多數字,這時候可以使用 props。
來個小範例:
type LearningCardProps = {
  title: string;
};

function LearningCard(props: LearningCardProps) {
  return <h2>{props.title}</h2>;
}
props 是一個物件,props.title 表示讀取其中的 title。
LearningCardProps 是 TypeScript 的 type 型別。
也可以通過 解構 取出資料欄位,變成:
function LearningCard({ title }: LearningCardProps) {
  return <h2>{title}</h2>;
}
注意 ({ title }) 裡的大括號不要漏掉。元件接收的是一個 props 物件,不是把每個欄位當成不同的函式參數。
回想 HTML Tag,通常可以放 style、class 等參數,props 讓開發者建立需要的參數。
我們預期要把上面的卡片變成一行的 Tag,像是:<LearningCard title="我的 React 練習" topic="props" day={4} />
title、topic、day 是我們替這個元件取的資料名稱。接收的名稱也要一致。
這裡要注意的是,使用 {} 和雙引號是不同的意思,看表格:
| 寫法 | 傳遞的意思 |
|---|---|
| topic="props" | 字串 "props" |
| day={4} | 數字 4 |
| day="4" | 字串 "4" |
| topic={topic} | 讀取父元件中名為 topic 的變數,左邊是 prop 名稱,右邊是變數 |
以原本的 Welcome 為例,先提取我們要的內容為元件。
function LearningCard() {
  const topic = "JSX";
  const day = 3;
  const totalDays = 30;
  const remainingDays = totalDays - day;

  return (
    <section className="mx-auto max-w-xl space-y-4 rounded-xl bg-white p-6 shadow">
      <h1 className="text-2xl font-bold">我的 React 學習卡片</h1>
      <p className="text-gray-600">
        今天練習 {topic}
        <br />
        先讓畫面長出來。
      </p>
      <hr className="border-gray-200" />
      <h2 className="font-bold text-blue-800">學習進度</h2>
        <p className="mt-2">
          目前進度:第 {day} 天 / 共 {totalDays} 天
        </p>
        <p>接下來還有 {remainingDays} 天</p>
      <MyButton />
    </section>
  );
}
提取參數,用 TypeScript 的 type 來建立。
type LearningCardProps = {
  title: string;
  topic: string;
  day: number;
  totalDays?: number; // 可以省略;預設值在接收參數時設定。
};
別忘了原本的卡片有大客戶想要的按鈕,在 React 可以使用 children
將標籤內的內層元素放進卡片裡面。
用 children?: ReactNode 描述這個資料欄位,放進上面的 LearningCardProps。
ReactNode是 React 提供的型別,可以描述 JSX、文字等可渲染內容,加上問號,表示卡片也可以不放額外內容。React:Typing children
import type { ReactNode } from "react"; // 使用到 ReactNode 型別,要 import react

type LearningCardProps = {
  title: string;
  topic: string;
  day: number;
  totalDays?: number;
  children?: ReactNode;
};

function LearningCard({
  title,
  topic,
  day,
  totalDays = 30,
  children,
}: LearningCardProps) {
  const remainingDays = totalDays - day;

  return (
    <section className="space-y-4 rounded-xl bg-white p-6 shadow">
      <h2 className="text-xl font-bold">{title}</h2>
      <p className="text-gray-600">今天練習 {topic}</p>
      <hr className="border-gray-200" />
      <h3 className="font-bold text-blue-800">學習進度</h3>
      <p>
        目前進度:第 {day} 天 / 共 {totalDays} 天
      </p>
      <p>接下來還有 {remainingDays} 天</p>
      {children}
    </section>
  );
}
把 <LearningCard /> 元件應用到 Welcome.tsx:
import type { ReactNode } from "react";

type LearningCardProps = {
  title: string;
  topic: string;
  day: number;
  totalDays?: number;
  children?: ReactNode;
};

export function Welcome() {
  return (
    <main className="min-h-screen bg-gray-100 px-6 py-10 text-gray-900">
      <div className="mx-auto max-w-xl space-y-6">
        <h1 className="text-2xl font-bold">我的 React 學習卡片</h1>

        <LearningCard title="我的 React 練習" topic="props" day={4}>
          <MyButton />
        </LearningCard>

        <LearningCard title="小明的 React 練習" topic="JSX" day={3}>
          <p className="text-gray-600">先把 JSX 的大括號弄清楚。</p>
        </LearningCard>

        <LearningCard
          title="小美的短期練習"
          topic="元件"
          day={2}
          totalDays={7}
        >
          <p className="text-gray-600">
            今天的筆記:<strong>元件可以重複使用。</strong>
          </p>
        </LearningCard>
      </div>
    </main>
  );
}

function LearningCard({
  title,
  topic,
  day,
  totalDays = 30,
  children,
}: LearningCardProps) {
  const remainingDays = totalDays - day;

  return (
    <section className="space-y-4 rounded-xl bg-white p-6 shadow">
      <h2 className="text-xl font-bold">{title}</h2>
      <p className="text-gray-600">今天練習 {topic}</p>
      <hr className="border-gray-200" />
      <h3 className="font-bold text-blue-800">學習進度</h3>
      <p>
        目前進度:第 {day} 天 / 共 {totalDays} 天
      </p>
      <p>接下來還有 {remainingDays} 天</p>
      {children}
    </section>
  );
}

function MyButton() {
  return (
    <button
      className="cursor-pointer rounded bg-blue-500 px-3 py-2 text-white hover:bg-blue-600"
      type="button"
    >
      按鈕來了
    </button>
  );
}
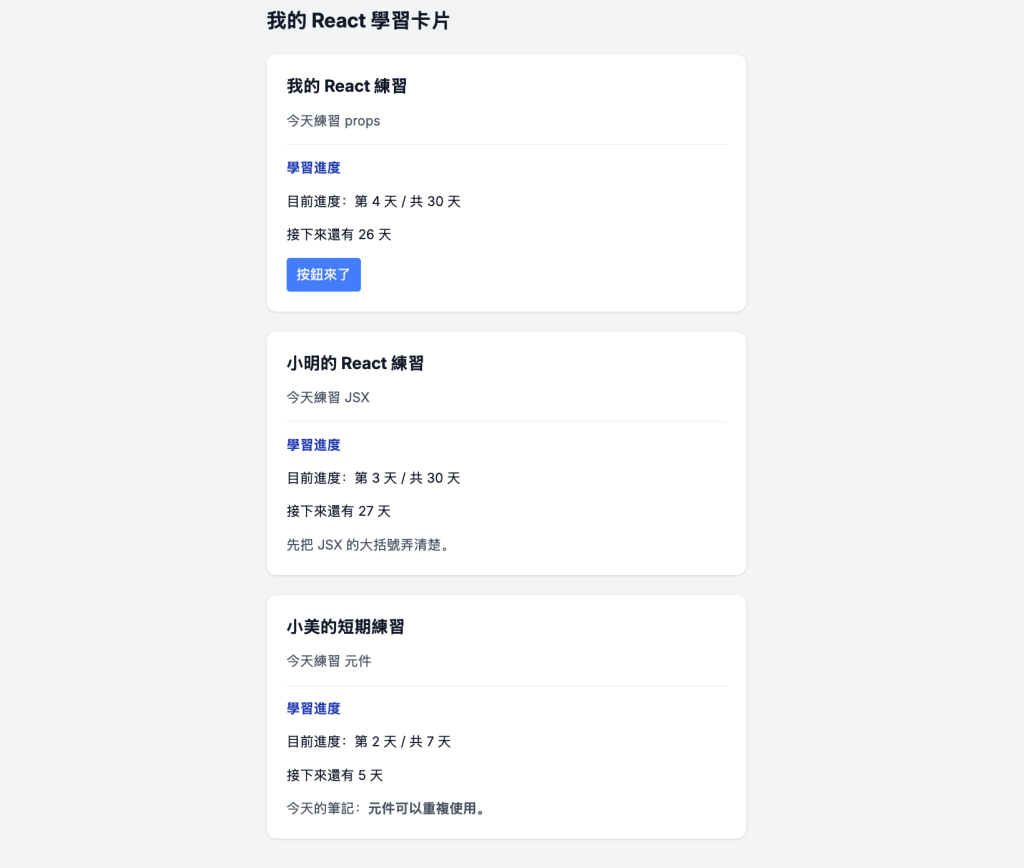
現在畫面上有三張卡片,程式裡只定義了一次 LearningCard。,以後要改樣式就可以統一變動了。
現在來演練錯誤問題發生
<LearningCard title="我的 React 練習" topic="props" day="4">
day 要接收數字,使用大括號傳入 4,不要用引號(會變成字串)。
<LearningCard title="我的 React 練習" topic="props" day={4}>
function LearningCard({ title, children }: LearningCardProps) {
  return (
    <section className="space-y-4 rounded-xl bg-white p-6 shadow">
      <h2 className="text-xl font-bold">{title}</h2>
    </section>
  );
}
因為裡面少放了,加上去就好。
function LearningCard({ title, children }: LearningCardProps) {
  return (
    <section className="space-y-4 rounded-xl bg-white p-6 shadow">
      <h2 className="text-xl font-bold">{title}</h2>
      {children}
    </section>
  );
}
宇宙的外面有一個宇宙的外面有一個...
React:Render and Commit
範例:
function LearningCard({ title }: LearningCardProps) {
  return (
    <section className="space-y-4 rounded-xl bg-white p-6 shadow">
      <h2 className="text-xl font-bold">{title}</h2>
      <Welcome />
    </section>
  );
}
如果用別的元件,在別的元件也使用到了外層元件,那就會形成 間接遞迴。
因為這些無限遞迴範例仍可通過型別檢查,必須另外檢查渲染路徑與停止條件,盡量少使用。
今天把一張卡片改成可重複使用的元件,資料能各自傳入,外觀統一調整。



 iThome鐵人賽
 看影片追技術