
一萬,兩萬,三萬...哎呀,那是老闆的錢
舉凡像是條列商品頁、演唱會座位、輪替顯示等,如果每個都刻在程式內,那會累死人的。
今天來修改卡片的資料,使用陣列與 key 來處理,一樣只修改 welcome.tsx (會不會用到最後還在這裡  )
)
陣列(Array)的認識,看下面示範更清楚
const colors = ["red", "yellow", "blue"];
上面宣告一組陣列,放三個字串元素,每個元素還會被分到一個 index (索引值),由左到右分別是:
0: "red"
1: "yellow"
2: "blue"
最基本的認識就是每個元素會有一個索引值,索引值可以找到對應的元素,例如:
const selectedColor = colors[1]; // 這裡通過索引值 1 選擇到 yellow
更多認識可以看Array
物件(Object)可以用來承載資料的屬性,例如:
王小明同學
學習卡 ID:"ming-react"
標題:"我的 React 練習"
主題:"清單與 key"
學習進度:6 天
挑戰總天數:30 天
今日筆記:"今天讓資料排成清單"
將以上資訊轉成物件,變成:
const ming = {
    id: "ming-react",
    title: "我的 React 練習",
    topic: "清單與 key",
    day: 6,
    totalDays: 30,
    note: "今天讓資料排成清單"
}
除了物件,還有型別(Type)與類別(Class),看下面的整理表格有個概念;
| 名稱 | 用途 | 範例 |
|---|---|---|
| 物件(object) | 程式執行時,實際存放屬性和值的資料,也可以包含方法 | 陣列裡的元素 { id: "ming-react", ... } |
| 型別(type) | 描述資料的結構,讓 TypeScript 檢查 | 下方完整範例的 type LearningPlan = { ... } |
| 類別(class) | 定義物件的建立方式、屬性和方法,可以用 new 建立實例 |
下方的 LearningProgress |
因為 TypeScript 可以對資料屬性定義嚴格的檢查,也比較不容易出錯。
例如以下用法是天數的簡化範例,示範物件和型別怎麼配合:
type ProgressData = { //這裡宣告ProgressData,並使用 (type) 來描述資料結構,下方屬性定資料型別
  day: number; // 像是 day 只能為 number
  totalDays: number;
};

const progress: ProgressData = {
  day: 6,
  totalDays: 30,
};
之後還會看到
interface,它也可以描述物件的結構。這裡先使用type,兩者的進階差異留到需要時再深入。Object、Type Aliases 與 Interfaces
如果想把「建立進度資料」和「判斷是否完成」一起整理,也可以寫成類別,例如:
class LearningProgress { // 定義類別,名稱為 LearningProgress
  day: number;
  totalDays: number;

  constructor(day: number, totalDays: number) { // 建構子,使用 new 的時候會執行
    this.day = day;
    this.totalDays = totalDays;
  }

  isCompleted(): boolean { // 成員函式,可以呼叫使用
    return this.day >= this.totalDays;
  }
}

const myProgress = new LearningProgress(6, 30);
const mingProgress = new LearningProgress(30, 30);

console.log(myProgress.day); // 6
console.log(myProgress.isCompleted()); // false
console.log(mingProgress.isCompleted()); // true
constructor 是建構子,使用 new 建立物件時會執行,用來設定初始資料。這裡的 this 指向正在建立的那個物件,所以 this.day = day 是把傳進來的天數存到它自己的屬性。
myProgress 和 mingProgress 是同一個類別建立的兩個實例,各自保存自己的天數。isCompleted() 是方法,會讀取呼叫它的那個物件資料;後面的 : boolean 表示回傳布林值。TypeScript:Classes
使用 TypeScript 不代表一定要使用 class。 class 本來就是 JavaScript 的語法,TypeScript 在它的基礎上提供型別檢查等能力。type 和 interface 的宣告在轉成 JavaScript 時會移除;類別的建構子和方法則是執行時的程式。(之後再講 interface ,又挖坑)
昨天 welcome.tsx 裡放了三個卡片,每個都各有自己的資料,全部提取出來。
範例:
type LearningPlan = { // 建一個型別,名稱是 LearningPlan,底下資料訂定資料名稱和屬性
  id: string;
  title: string;
  topic: string;
  day: number;
  totalDays: number;
  note: string;
};

const learningPlans : LearningPlan[] = [ // 建一組陣列,名稱是 learningPlans
  {
    id: "my-react",
    title: "我的 React 練習",
    topic: "清單與 key",
    day: 6,
    totalDays: 30,
    note: "今天讓資料自己排成清單。",
  },
  {
    id: "ming-react",
    title: "小明的 React 練習",
    topic: "總複習",
    day: 30,
    totalDays: 30,
    note: "完成之後,也可以回頭看看筆記。",
  },
];
這個需求相對簡單,用一般物件搭配型別就可以很清楚表達了。上面可以這樣看,建一組陣列 learningPlans,裡面放元素,元素的型別是 LearningPlan。
接著我們看 map() 和 filter() 怎麼用。
建立好陣列,我們可以來用陣列提供的函式,map() 和 filter()。
翻譯應該是"映射"之類的吧,概念就是一個對一個那樣? 我自己是這樣理解
以標題為範例:
<ul>
  {learningPlans.map((plan) => ( // 這裡的 "=>" 就是 Arrow Function 的用法
    <li key={plan.id}>{plan.title}</li>
  ))}
</ul>
map() 會依序拿出每筆資料,交給我們提供的函式,再把每次回傳的結果組成新陣列。這裡回傳的是 JSX,所以得到一組清單項目。MDN:Array.prototype.map()
plan 是我們替「這次拿到的那一筆資料」取的參數名稱,plan.title 就是讀取它的標題。=> 是箭頭函式(Arrow Function)的寫法;這裡用 (...) 包住要回傳的 JSX。
ul 表示清單,裡面每個 li 表示一個項目。完整版本會把 LearningCard 放進 li,讓每筆資料變成一張卡片
有點抽象,畫成圖好了,看下面的圖。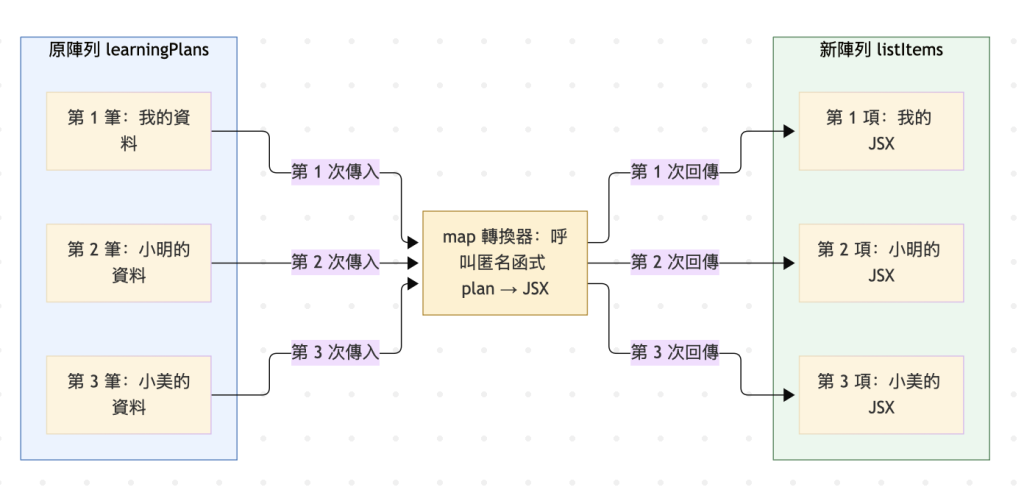
從圖中就可以理解map()主要將陣列裡的元素依序取出,送到裡面的函式處理,函式會將資料跟 HTML Tag 結合,回傳給 map(),而 React 會顯示這些項目,是因為陣列被放進元件回傳的 JSX 裡。
上面可以注意到 key={plan.id} ,這是讓 React 對應清單項目的識別資訊。把它放在 map() 直接回傳到的外層元素上。
同一層清單的 key 要唯一(unique),同一筆資料在後續渲染時也要保持穩定。它不負責排序,畫面順序仍然跟著陣列走。React:Rendering Lists
為什麼知道用哪個屬性當 key 呢,下面的範例表格說明:
| 寫法 | 意義 |
|---|---|
key={plan.id} |
使用資料裡事先準備好的識別碼,假設 id 不重複 |
key={index} |
陣列索引代表位置,新增、刪除或換位置時,可能對應到別筆資料 |
key={plan.title} |
可能會改標題,也可能同名,不適合拿來識別 |
key={Math.random()} |
每次渲染都重新產生,無法穩定對應同一個項目 |
key 也不會成為子元件收到的一般 prop。卡片如果需要顯示識別碼,要另外傳入,例如 planId={plan.id},並在自己的 props 型別裡定義 planId,更多可以參考這篇:React:Why does React need keys?
如果只想看已完成的計畫,可以用 filter() 篩選:
const completedPlans = learningPlans.filter(
  (plan) => plan.day >= plan.totalDays,
);
filter() 會把每筆資料交給判斷函式,留下結果為 true 的項目,回傳新陣列。這裡使用昨天的完成條件 day >= totalDays。MDN:Array.prototype.filter()
使用順序會是:先 filter() 挑資料,再用 map() 產生 JSX。
這兩個都是 JavaScript 陣列有提供的方法。
注意:篩選出來的陣列不會把原本的項目刪掉。
將 welcome.tsx 替換成下面的版本。(有越來越長的趨勢了 )
)
import type { ReactNode } from "react";

type LearningPlan = { // 建型別,名稱是 LearningPlan,底下資料訂定資料名稱和屬性
  id: string;
  title: string;
  topic: string;
  day: number;
  totalDays: number;
  note: string;
};

type LearningCardProps = { // 之前的 props
  title: string;
  topic: string;
  day: number;
  totalDays?: number;
  children?: ReactNode;
};

const learningPlans: LearningPlan[] = [ // 建陣列,名稱是 learningPlans,型別是LearningPlan
  {
    id: "my-react",
    title: "我的 React 練習",
    topic: "清單與 key",
    day: 6,
    totalDays: 30,
    note: "今天讓資料自己排成清單。",
  },
  {
    id: "ming-react",
    title: "小明的 React 練習",
    topic: "總複習",
    day: 30,
    totalDays: 30,
    note: "完成之後,也可以回頭看看筆記。",
  },
  {
    id: "mei-react",
    title: "小美的短期練習",
    topic: "元件",
    day: 2,
    totalDays: 7,
    note: "元件可以重複使用,資料各自準備。",
  },
];

export function Welcome() {
  const showCompletedOnly = false; // 加一個變數,用來調整是否要顯示已完成的計劃
  const visiblePlans = showCompletedOnly
    ? learningPlans.filter((plan) => plan.day >= plan.totalDays)
    : learningPlans;
  const emptyMessage = learningPlans.length === 0
    ? "目前沒有學習資料,先安排一個主題吧。"
    : "目前沒有符合條件的學習計畫。";

  return (
    <main className="min-h-screen bg-gray-100 px-6 py-10 text-gray-900">
      <div className="mx-auto max-w-xl space-y-6">
        <h1 className="text-2xl font-bold">我的 React 學習卡片</h1>
        <p>
          {showCompletedOnly ? "只看已完成" : "顯示全部"}:
          {visiblePlans.length} / {learningPlans.length} 筆
        </p>

        {visiblePlans.length === 0 ? ( // '==='用來檢查值與型別
          <p className="rounded-xl bg-white p-6 shadow">{emptyMessage}</p>
        ) : (
          <ul className="space-y-6">
            {visiblePlans.map((plan) => ( // map 把元素逐個轉換成 JSX
              <li key={plan.id}>
                <LearningCard
                  title={plan.title}
                  topic={plan.topic}
                  day={plan.day}
                  totalDays={plan.totalDays}
                >
                  <p className="text-gray-600">{plan.note}</p>
                </LearningCard>
              </li>
            ))}
          </ul>
        )}
      </div>
    </main>
  );
}

function LearningCard({
  title,
  topic,
  day,
  totalDays = 30,
  children,
}: LearningCardProps) {
  const remainingDays = totalDays - day;
  const isCompleted = day >= totalDays;

  return (
    <section className="space-y-4 rounded-xl bg-white p-6 shadow">
      <h2 className="text-xl font-bold">{title}</h2>
      <p className="text-gray-600">今天練習 {topic}</p>
      <hr className="border-gray-200" />
      <h3 className="font-bold text-blue-800">學習進度</h3>
      <p>
        目前進度:第 {day} 天 / 共 {totalDays} 天
      </p>
      <p className="font-bold">{isCompleted ? "已完成" : "還在努力"}</p>
      {remainingDays > 0 && <p>接下來還有 {remainingDays} 天</p>}
      {children}
    </section>
  );
}
LearningPlan[] 表示這是一個每筆都符合 LearningPlan 型別的陣列。它描述資料有哪些欄位,LearningCardProps 則描述卡片接收哪些內容。
卡片仍然保留昨天的完成判斷、預設總天數與 children。今天把三張卡片的最後一塊都改成筆記,透過 children 傳入;原本尚未設定事件的按鈕先換成文字。
昨天的 hasCards 就可以拿掉了。現在是直接檢查真正的資料筆數,而且能區分「原本就沒有資料」和「有資料,但篩選後沒有符合條件的項目」。
全部三筆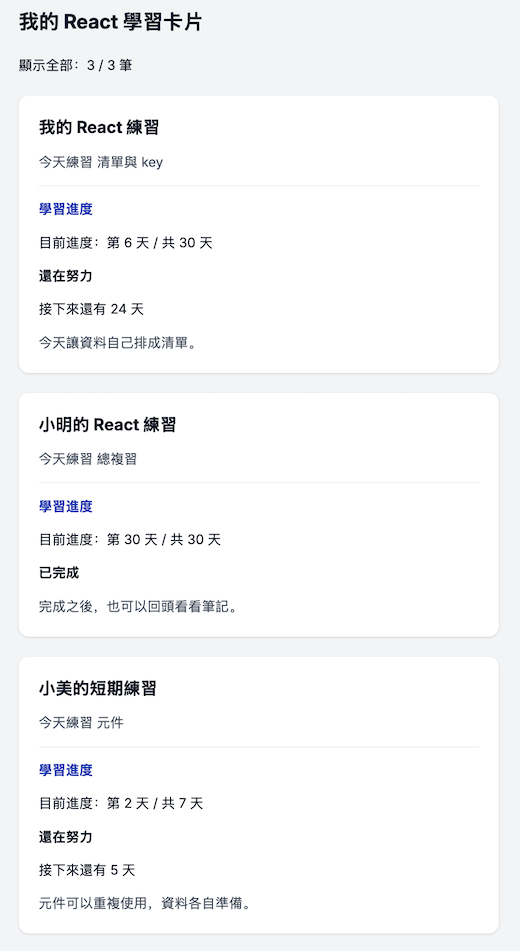
原始資料為空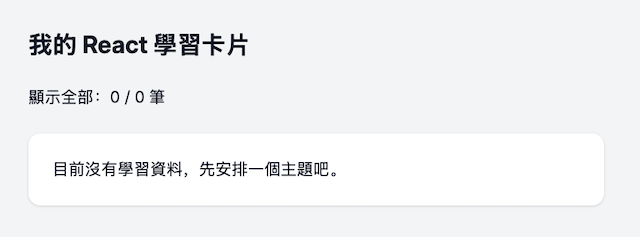
範例 {visiblePlans.map(...)}:
{visiblePlans.map((plan) => {
  <li key={plan.id}>{plan.title}</li>;
})}
這是因為箭頭函式用大括號 {} 作為函式本體時,需要自己寫 return。
這個函式有寫 JSX,卻沒有回傳。map() 會得到一組 undefined,不會產生想要的清單。在 TypeScript 專案執行型別檢查時,也會指出 void[] 無法當作可渲染內容。
補上 return,或改回原本 => (...) 的寫法就可以了。
{visiblePlans.map((plan) => {
  return <li key={plan.id}>{plan.title}</li>;
})}
filter() 也要注意同一件事。
範例示意:
? learningPlans.filter((plan) => { plan.day >= plan.totalDays; })
這段沒有回傳判斷結果。設為只看已完成時,所有資料都會被排除,型別檢查卻可能仍然通過,補 return 就OK了。
? learningPlans.filter((plan) => { return plan.day >= plan.totalDays; })
今天把資料整理好,新增卡片終於不用一直複製 JSX。客戶要幾筆資料,就有幾筆。希望我的薪水也可以這樣
明天再來認識元件為什麼要保持純粹,元件在產生畫面時,如果順手改了外面的資料,會發生什麼事吧。



 iThome鐵人賽
 看影片追技術