
講完 DX 那端的 Compute pipeline 設定後,這篇就是正式要開始用到 Compute Shader 了。
前面有提到 StructuredBuffer,是可以把大量格式相同的資料一次傳進 GPU 來處理 Draw call 問題的作法。
不過其實StructuredBuffer 是唯讀的, Shader 無法去修改裡面的值。像是如果要傳粒子的資料,然後他要是可以位移的,就不能用 StructuredBuffer 了。
struct Particle
{
		float3 position; //像是這種就無法更改
		float3 velocity;
};
但今天我還是希望可以在 GPU 計算出位置後去更改 position 的話,就會用到另一個可以讀寫的版本,也就是 RWStructuredBuffer
// HLSL 寫法
RWStructuredBuffer<Particle> particles : register(u0)
//particle_common.hlsli

#ifndef PARTICLE_COMMON_HLSLI
#define PARTICLE_COMMON_HLSLI

// 定義 Compute Shader 與 Render Shader 共用的粒子資料格式
struct Particle
{
    // 儲存粒子在世界空間中的位置
    float3 position;

    // 儲存粒子的剩餘生命時間
    float life;

    // 儲存粒子的移動方向
    float3 velocity;

    // 保留欄位以維持結構的記憶體對齊
    float padding;
};

#endif
//particle_compute.hlsl

#include "particle_common.hlsli"

// 宣告可由 Compute Shader 讀寫的粒子 StructuredBuffer 並綁定至 u0
RWStructuredBuffer<Particle> particles : register(u0);

// 宣告粒子模擬使用的常數緩衝區並綁定至 b0
cbuffer ParticleSimulationConstants : register(b0)
{
    // 儲存目前 Frame 經過的時間
    float deltaTime;

    // 儲存目前實際使用的粒子數量
    uint particleCount;

    // 儲存粒子 Buffer 可容納的最大粒子數量
    uint particleCapacity;

    // 儲存粒子活動空間的邊界大小
    float boundarySize;

    // 儲存粒子的移動速度倍率
    float speed;

    // 儲存新粒子的基礎生命週期
    float lifetime;

    // 控制是否重新初始化所有粒子
    uint resetParticles;

    // 儲存產生隨機數時使用的 Seed
    uint randomSeed;
};

// 將輸入整數經過多次位元運算與乘法混合產生 Hash 值
uint Hash(uint value)
{
    // 將高位元資訊混合至低位元
    value ^= value >> 16;

    // 使用常數乘法進一步打散位元分布
    value *= 0x7feb352du;

    // 再次混合不同區段的位元
    value ^= value >> 15;

    // 使用另一組常數降低 Hash 結果的規律性
    value *= 0x846ca68bu;

    // 最後再次混合高低位元
    value ^= value >> 16;

    // 回傳完成混合後的 Hash 值
    return value;
}

// 根據傳入狀態產生 0 到 1 之間的偽隨機浮點數
float Random01(inout uint state)
{
    // 更新隨機狀態避免連續取得相同結果
    state = Hash(state);

    // 取低 24 位元並正規化至 0 到 1 的範圍
    return (state & 0x00ffffffu) / 16777216.0f;
}

// 根據粒子索引建立具有隨機位置與方向的新粒子
Particle CreateParticle(uint particleIndex)
{
    // 結合粒子索引與全域 Seed 建立此粒子的初始隨機狀態
    uint state = Hash(particleIndex ^ randomSeed);

    // 產生每個分量皆位於負 1 到正 1 的隨機位置
    float3 position = float3(Random01(state), Random01(state), Random01(state)) * 2.0f - 1.0f;

    // 產生每個分量皆位於負 1 到正 1 的隨機移動方向
    float3 direction = float3(Random01(state), Random01(state), Random01(state)) * 2.0f - 1.0f;

    // 檢查方向向量的平方長度是否過度接近零
    if (dot(direction, direction) < 0.0001f)

        // 使用向上的單位方向避免 normalize 產生不穩定結果
        direction = float3(0.0f, 1.0f, 0.0f);

    // 建立準備初始化的粒子資料
    Particle particle;

    // 將隨機位置限制在邊界大小的百分之八十範圍內
    particle.position = position * boundarySize * 0.8f;

    // 將生命週期隨機設定為基礎生命週期的百分之二十五到百分之一百
    particle.life = lifetime * (0.25f + Random01(state) * 0.75f);

    // 將隨機方向正規化後設為粒子的移動方向
    particle.velocity = normalize(direction);

    // 將用於記憶體對齊的欄位初始化為零
    particle.padding = 0.0f;

    // 回傳完成初始化的粒子
    return particle;
}

// 設定每個 Thread Group 使用 64 個 X 軸執行緒
[numthreads(64, 1, 1)]

// Compute Shader 的主要進入點
void CSMain(uint3 dispatchThreadID : SV_DispatchThreadID)
{
    // 以目前 Dispatch Thread 的 X 編號作為粒子索引
    const uint particleIndex = dispatchThreadID.x;

    // Reset 時處理整個 Buffer 否則只處理目前有效粒子
    const uint dispatchCount = resetParticles != 0 ? particleCapacity : particleCount;

    // 排除因 Thread Group 向上取整而超出有效範圍的執行緒
    if (particleIndex >= dispatchCount)

        // 結束目前執行緒避免存取超出 Buffer 範圍
        return;

    // 判斷目前是否要求重新初始化粒子
    if (resetParticles != 0)
    {
        // 重新建立目前索引對應的粒子
        particles[particleIndex] = CreateParticle(particleIndex);

        // Reset 完成後不執行後續模擬
        return;
    }

    // 從 StructuredBuffer 讀取目前粒子的資料
    Particle particle = particles[particleIndex];

    // 根據方向速度與 Frame 時間更新粒子位置
    particle.position += particle.velocity * speed * deltaTime;

    // 檢查粒子是否超出 X 軸邊界
    if (particle.position.x > boundarySize || particle.position.x < -boundarySize)
    {
        // 將 X 座標限制回合法邊界範圍
        particle.position.x = clamp(particle.position.x, -boundarySize, boundarySize);

        // 反轉 X 軸速度形成碰撞反彈效果
        particle.velocity.x *= -1.0f;
    }

    // 檢查粒子是否超出 Y 軸邊界
    if (particle.position.y > boundarySize || particle.position.y < -boundarySize)
    {
        // 將 Y 座標限制回合法邊界範圍
        particle.position.y = clamp(particle.position.y, -boundarySize, boundarySize);

        // 反轉 Y 軸速度形成碰撞反彈效果
        particle.velocity.y *= -1.0f;
    }

    // 檢查粒子是否超出 Z 軸邊界
    if (particle.position.z > boundarySize || particle.position.z < -boundarySize)
    {
        // 將 Z 座標限制回合法邊界範圍
        particle.position.z = clamp(particle.position.z, -boundarySize, boundarySize);

        // 反轉 Z 軸速度形成碰撞反彈效果
        particle.velocity.z *= -1.0f;
    }

    // 扣除目前 Frame 經過的時間
    particle.life -= deltaTime;

    // 檢查粒子的生命週期是否已結束
    if (particle.life <= 0.0f)
    {
        // 使用額外混合過的索引重新產生粒子避免固定重複相同序列
        particle = CreateParticle(particleIndex + randomSeed * 1664525u);

        // 將重新生成的粒子移動至世界原點
        particle.position = float3(0.0f, 0.0f, 0.0f);
    }

    // 將更新完成的粒子資料寫回 StructuredBuffer
    particles[particleIndex] = particle;
}
//particle_render.hlsl

#include "particle_common.hlsli"

// 宣告供渲染階段唯讀使用的粒子 StructuredBuffer 並綁定至 t0
StructuredBuffer<Particle> particles : register(t0);

// 宣告相機與粒子渲染參數的常數緩衝區並綁定至 b0
cbuffer CameraConstants : register(b0)
{
    // 儲存 View Matrix 與 Projection Matrix 合併後的矩陣
    float4x4 viewProjection;

    // 儲存相機在世界空間中的右方向
    float3 cameraRight;

    // 儲存 Billboard 粒子的尺寸
    float particleSize;

    // 儲存相機在世界空間中的上方向
    float3 cameraUp;

    // 保留欄位以符合 Constant Buffer 的記憶體對齊需求
    float padding;

    // 儲存所有粒子使用的 RGBA 顏色
    float4 particleColor;
};

// 定義 Vertex Shader 傳遞給 Pixel Shader 的資料
struct VSOutput
{
    // 儲存經過座標轉換後的 Clip Space 位置
    float4 position : SV_POSITION;

    // 儲存傳遞給 Pixel Shader 的 UV 座標
    float2 uv : TEXCOORD0;
};

// Vertex Shader 的主要進入點
VSOutput VSMain(
    // 取得目前 Instance 中正在處理的頂點編號
    uint vertexID : SV_VertexID,

    // 取得目前正在繪製的 Instance 編號
    uint instanceID : SV_InstanceID)
{
    // 建立 Vertex Shader 的輸出資料
    VSOutput output;

    // 建立兩個三角形所需的六個 Billboard 頂點座標
    float2 corners[6] =
    {
        // 第一個三角形的左下角
        float2(-1.0f, -1.0f),

        // 第一個三角形的左上角
        float2(-1.0f, 1.0f),

        // 第一個三角形的右上角
        float2(1.0f, 1.0f),

        // 第二個三角形的左下角
        float2(-1.0f, -1.0f),

        // 第二個三角形的右上角
        float2(1.0f, 1.0f),

        // 第二個三角形的右下角
        float2(1.0f, -1.0f)
    };

    // 建立與六個 Billboard 頂點一一對應的 UV 座標
    float2 uvs[6] =
    {
        // 第一個三角形左下頂點使用左下 UV
        float2(0.0f, 1.0f),

        // 第一個三角形左上頂點使用左上 UV
        float2(0.0f, 0.0f),

        // 第一個三角形右上頂點使用右上 UV
        float2(1.0f, 0.0f),

        // 第二個三角形左下頂點使用左下 UV
        float2(0.0f, 1.0f),

        // 第二個三角形右上頂點使用右上 UV
        float2(1.0f, 0.0f),

        // 第二個三角形右下頂點使用右下 UV
        float2(1.0f, 1.0f)
    };

    // 使用 Instance ID 取得目前要繪製的粒子
    Particle particle =
        particles[instanceID];

    // 使用 Vertex ID 取得目前 Billboard 頂點的區域座標
    float2 corner =
        corners[vertexID];

    // 將粒子中心沿相機 Right 與 Up 方向展開成面向相機的 Billboard
    float3 worldPosition =
        particle.position
        + cameraRight
            * corner.x
            * particleSize
        + cameraUp
            * corner.y
            * particleSize;

    // 將 Billboard 頂點從 World Space 轉換到 Clip Space
    output.position =
        mul(
            float4(worldPosition, 1.0f),
            viewProjection);

    // 將目前頂點對應的 UV 傳遞至 Pixel Shader
    output.uv =
        uvs[vertexID];

    // 回傳完成計算的頂點輸出
    return output;
}

// Pixel Shader 的主要進入點
float4 PSMain(VSOutput input)
    : SV_TARGET
{
    // 將 UV 從 0 到 1 轉換成以中心為原點的負 1 到正 1 範圍
    float2 centeredUV =
        input.uv * 2.0f - 1.0f;

    // 計算目前 Pixel 與 Billboard 中心的距離
    float radius =
        length(centeredUV);

    // 根據距離產生從中心向外逐漸降低的透明度
    float alpha =
        saturate(
            1.0f - radius);

    // 排除圓形範圍外以及幾乎完全透明的 Pixel
    if (alpha <= 0.01f)
    {
        // 中止目前 Pixel 的輸出
        discard;
    }

    // 結合粒子顏色與計算後的透明度輸出最終顏色
    return float4(particleColor.rgb, particleColor.a * alpha);
}
//main.cpp

#include <algorithm>
#include <array>
#include <chrono>
#include <cstdint>
#include <cstdlib>
#include <directx/d3dx12_core.h>
#include <DirectXMath.h>
#include <exception>
#include <imgui.h>
#include <stdexcept>

#include "constant_buffer.h"
#include "graphics_engine.h"
#include "my_engine.h"
#include "pipeline_state.h"
#include "render_pass/render_state.h"
#include "root_signature.h"
#include "rw_structured_buffer.h"
#include "shader.h"
#include "skyline_debugger.h"
#include "system.h"
#include "ui/imgui_system.h"

namespace
{
// 定義粒子 Buffer 最多可容納十萬個粒子
constexpr UINT ParticleCapacity = 100000;

// 定義 Compute Shader 每個 Thread Group 的執行緒數量
constexpr UINT ComputeThreadCount = 64;

// 定義 CPU 端與 HLSL StructuredBuffer 對應的粒子資料結構
struct Particle
{
    // 儲存粒子的世界空間位置
    DirectX::XMFLOAT3 position;

    // 儲存粒子的剩餘生命時間
    float life;

    // 儲存粒子的移動方向
    DirectX::XMFLOAT3 velocity;

    // 保留欄位以維持與 HLSL 相同的記憶體配置
    float padding;
};

// 定義傳送給 Compute Shader 的粒子模擬參數
struct ParticleSimulationConstants
{
    // 儲存目前 Frame 經過的時間
    float deltaTime;

    // 儲存目前實際使用的粒子數量
    UINT particleCount;

    // 儲存粒子 Buffer 的最大容量
    UINT particleCapacity;

    // 儲存粒子活動空間的邊界大小
    float boundarySize;

    // 儲存粒子的移動速度
    float speed;

    // 儲存粒子的基礎生命週期
    float lifetime;

    // 控制是否重新初始化所有粒子
    UINT reset;

    // 儲存粒子隨機生成使用的 Seed
    UINT randomSeed;
};

// 定義傳送給 Graphics Shader 的相機與粒子渲染參數
struct CameraConstants
{
    // 儲存 View Matrix 與 Projection Matrix 合併後的矩陣
    DirectX::XMFLOAT4X4 viewProjection;

    // 儲存相機在世界空間中的右方向
    DirectX::XMFLOAT3 cameraRight;

    // 儲存 Billboard 粒子的尺寸
    float particleSize;

    // 儲存相機在世界空間中的上方向
    DirectX::XMFLOAT3 cameraUp;

    // 保留欄位以符合 Constant Buffer 對齊需求
    float padding;

    // 儲存粒子的 RGBA 顏色
    DirectX::XMFLOAT4 color;
};

// 編譯期間確認 Particle 大小與 HLSL StructuredBuffer 配置一致
static_assert(sizeof(Particle) == 32, "Particle must match the HLSL structured-buffer layout.");

// 編譯期間確認粒子模擬 Constant Buffer 的記憶體配置一致
static_assert(sizeof(ParticleSimulationConstants) == 32,
              "ParticleSimulationConstants must match the HLSL constant-buffer layout.");

// 編譯期間確認相機 Constant Buffer 的記憶體配置一致
static_assert(sizeof(CameraConstants) == 112, "CameraConstants must match the HLSL constant-buffer layout.");

// 建立粒子繪製使用的 Graphics Pipeline State 描述
D3D12_GRAPHICS_PIPELINE_STATE_DESC createGraphicsPipelineDescription(
    // 傳入 Graphics Pipeline 使用的 Root Signature 與已編譯 Shader
    ID3D12RootSignature* rootSignature, ID3DBlob* vertexShader, ID3DBlob* pixelShader)
{
    // 確認 Root Signature 已正確建立
    if (rootSignature == nullptr)

        // 缺少 Root Signature 時拋出參數錯誤
        throw std::invalid_argument("DayX_ComputeShader: A root signature is required.");

    // 確認 Vertex Shader 與 Pixel Shader 都已成功編譯
    if (vertexShader == nullptr || pixelShader == nullptr)

        // 缺少必要 Shader 時拋出參數錯誤
        throw std::invalid_argument("DayX_ComputeShader: Compiled graphics shaders are required.");

    // 建立並清零 Graphics Pipeline State 描述
    D3D12_GRAPHICS_PIPELINE_STATE_DESC description{};

    // 不使用傳統 Vertex Buffer Input Layout
    description.InputLayout = {nullptr, 0};

    // 指定 Graphics Pipeline 使用的 Root Signature
    description.pRootSignature = rootSignature;

    // 指定已編譯的 Vertex Shader Bytecode
    description.VS = CD3DX12_SHADER_BYTECODE(vertexShader);

    // 指定已編譯的 Pixel Shader Bytecode
    description.PS = CD3DX12_SHADER_BYTECODE(pixelShader);

    // 使用 Direct3D 12 預設 Rasterizer 設定
    description.RasterizerState = CD3DX12_RASTERIZER_DESC(D3D12_DEFAULT);

    // 關閉 Back-face Culling 讓 Billboard 正反面都能顯示
    description.RasterizerState.CullMode = D3D12_CULL_MODE_NONE;

    // 使用 Direct3D 12 預設 Blend State 作為基礎設定
    description.BlendState = CD3DX12_BLEND_DESC(D3D12_DEFAULT);

    // 取得第一個 Render Target 的 Blend 設定
    D3D12_RENDER_TARGET_BLEND_DESC& renderTarget = description.BlendState.RenderTarget[0];

    // 開啟 Alpha Blending
    renderTarget.BlendEnable = TRUE;

    // 將來源顏色乘上來源 Alpha
    renderTarget.SrcBlend = D3D12_BLEND_SRC_ALPHA;

    // 將目標顏色乘上一減來源 Alpha
    renderTarget.DestBlend = D3D12_BLEND_INV_SRC_ALPHA;

    // 將來源與目標顏色相加
    renderTarget.BlendOp = D3D12_BLEND_OP_ADD;

    // Alpha 通道的來源值保持原值
    renderTarget.SrcBlendAlpha = D3D12_BLEND_ONE;

    // Alpha 通道的目標值乘上一減來源 Alpha
    renderTarget.DestBlendAlpha = D3D12_BLEND_INV_SRC_ALPHA;

    // 將來源與目標 Alpha 相加
    renderTarget.BlendOpAlpha = D3D12_BLEND_OP_ADD;

    // 允許寫入所有 RGBA 顏色通道
    renderTarget.RenderTargetWriteMask = D3D12_COLOR_WRITE_ENABLE_ALL;

    // 使用預設 Depth Stencil 設定作為基礎
    description.DepthStencilState = CD3DX12_DEPTH_STENCIL_DESC(D3D12_DEFAULT);

    // 關閉 Depth Buffer 寫入避免半透明粒子互相遮蔽
    description.DepthStencilState.DepthWriteMask = D3D12_DEPTH_WRITE_MASK_ZERO;

    // 關閉 Stencil Test
    description.DepthStencilState.StencilEnable = FALSE;

    // 啟用所有 Sample
    description.SampleMask = UINT_MAX;

    // 指定 Pipeline 使用 Triangle 類型的 Primitive
    description.PrimitiveTopologyType = D3D12_PRIMITIVE_TOPOLOGY_TYPE_TRIANGLE;

    // 指定只使用一個 Render Target
    description.NumRenderTargets = 1;

    // 指定 Render Target 的像素格式
    description.RTVFormats[0] = DXGI_FORMAT_R8G8B8A8_UNORM;

    // 指定 Depth Stencil Buffer 使用 32-bit Float 格式
    description.DSVFormat = DXGI_FORMAT_D32_FLOAT;

    // 指定不使用 MSAA
    description.SampleDesc.Count = 1;

    // 回傳完成設定的 Graphics Pipeline 描述
    return description;
}

// 建立粒子模擬使用的 Compute Pipeline State 描述
D3D12_COMPUTE_PIPELINE_STATE_DESC createComputePipelineDescription(
    // 傳入 Compute Pipeline 使用的 Root Signature 與 Compute Shader
    ID3D12RootSignature* rootSignature, ID3DBlob* computeShader)
{
    // 確認 Root Signature 已正確建立
    if (rootSignature == nullptr)
        throw std::invalid_argument("DayX_ComputeShader: A root signature is required.");

    // 確認 Compute Shader 已成功編譯
    if (computeShader == nullptr)
        throw std::invalid_argument("DayX_ComputeShader: A compiled compute shader is required.");

    // 建立並清零 Compute Pipeline State 描述
    D3D12_COMPUTE_PIPELINE_STATE_DESC description{};

    // 指定 Compute Pipeline 使用的 Root Signature
    description.pRootSignature = rootSignature;

    // 指定已編譯的 Compute Shader Bytecode
    description.CS = CD3DX12_SHADER_BYTECODE(computeShader);

    // 回傳完成設定的 Compute Pipeline 描述
    return description;
}

// 根據 Frame Buffer 尺寸建立相機 Constant Buffer 資料
CameraConstants createCameraConstants(UINT width, UINT height)
{
    // 防止除以零以及建立無效的 Projection Matrix
    if (width == 0 || height == 0)
        throw std::invalid_argument("DayX_ComputeShader: Frame-buffer dimensions must be non-zero.");

    // 計算畫面的寬高比
    const float aspectRatio = static_cast<float>(width) / static_cast<float>(height);

    // 將相機位置設定在世界原點後方
    const DirectX::XMVECTOR eye = DirectX::XMVectorSet(0.0f, 0.0f, -22.0f, 1.0f);

    // 將相機目標設定為世界原點
    const DirectX::XMVECTOR target = DirectX::XMVectorZero();

    // 定義相機的上方向
    const DirectX::XMVECTOR up = DirectX::XMVectorSet(0.0f, 1.0f, 0.0f, 0.0f);

    // 建立 Left-handed View Matrix
    const DirectX::XMMATRIX view = DirectX::XMMatrixLookAtLH(eye, target, up);

    // 建立 45 度垂直視角的 Perspective Projection Matrix
    const DirectX::XMMATRIX projection =
        DirectX::XMMatrixPerspectiveFovLH(DirectX::XM_PIDIV4, aspectRatio, 0.1f, 100.0f);

    // 建立並清零相機 Constant Buffer 資料
    CameraConstants constants{};

    // 合併 View 與 Projection Matrix 並轉置後存入 Constant Buffer
    DirectX::XMStoreFloat4x4(&constants.viewProjection, DirectX::XMMatrixTranspose(view * projection));

    // 設定 Billboard 使用的相機右方向
    constants.cameraRight = {1.0f, 0.0f, 0.0f};

    // 設定 Billboard 使用的相機上方向
    constants.cameraUp = {0.0f, 1.0f, 0.0f};

    // 設定粒子的初始 Billboard 尺寸
    constants.particleSize = 0.06f;

    // 設定粒子的初始顏色與透明度
    constants.color = {0.2f, 0.65f, 1.0f, 0.85f};

    // 回傳完成初始化的相機參數
    return constants;
}
}

// Windows GUI 應用程式的進入點
int WINAPI wWinMain(HINSTANCE instance, HINSTANCE previous, LPWSTR commandLine, int showCommand)
{
    try
    {
        // 初始化 Skyline Debugger
        SkylineDebugger::Initialize("DayX_ComputeShader");

        // 建立應用程式視窗
        initWindow(instance, previous, commandLine, showCommand, TEXT("Compute Shader Particles"));

        // 確認視窗建立成功
        if (g_hWnd == nullptr)
            throw std::runtime_error("DayX_ComputeShader: Failed to create the application window.");

        // 建立 Graphics Engine
        GraphicsEngine graphicsEngine;

        // 初始化 Direct3D 12 與 Frame Buffer
        if (!graphicsEngine.init(g_hWnd, FRAME_BUFFER_W, FRAME_BUFFER_H))
            throw std::runtime_error("DayX_ComputeShader: Failed to initialize the graphics engine.");

        // 將目前使用的 D3D12 Device 提供給 Debugger
        SkylineDebugger::ConfigureD3D12(graphicsEngine.getD3DDevice());

        // 建立 Root Signature 管理物件
        RootSignature rootSignature;

        // 初始化 Root Signature 與預設 Sampler 設定
        if (!rootSignature.init(D3D12_FILTER_MIN_MAG_MIP_LINEAR, D3D12_TEXTURE_ADDRESS_MODE_CLAMP,
                                D3D12_TEXTURE_ADDRESS_MODE_CLAMP, D3D12_TEXTURE_ADDRESS_MODE_CLAMP))
            throw std::runtime_error("DayX_ComputeShader: Failed to initialize the root signature.");

        // 建立 Compute Shader 物件
        Shader computeShader;

        // 建立 Vertex Shader 物件
        Shader vertexShader;

        // 建立 Pixel Shader 物件
        Shader pixelShader;

        // 編譯並載入粒子模擬用 Compute Shader
        computeShader.loadCS("assets/shaders/particle_compute.hlsl", "CSMain");

        // 編譯並載入粒子渲染用 Vertex Shader
        vertexShader.loadVS("assets/shaders/particle_render.hlsl", "VSMain");

        // 編譯並載入粒子渲染用 Pixel Shader
        pixelShader.loadPS("assets/shaders/particle_render.hlsl", "PSMain");

        // 建立 Compute Pipeline State
        PipelineState computePipelineState;

        // 建立 Graphics Pipeline State
        PipelineState graphicsPipelineState;

        // 使用 Compute Shader 建立 Compute Pipeline State
        computePipelineState.init(
            createComputePipelineDescription(rootSignature.get(), computeShader.getCompiledBlob()));

        // 使用 Vertex Shader 與 Pixel Shader 建立 Graphics Pipeline State
        graphicsPipelineState.init(createGraphicsPipelineDescription(
            rootSignature.get(), vertexShader.getCompiledBlob(), pixelShader.getCompiledBlob()));

        // 建立並清零粒子模擬參數
        ParticleSimulationConstants simulationConstants{};

        // 設定初始粒子數量為一萬
        simulationConstants.particleCount = 10000;

        // 設定粒子 Buffer 最大容量
        simulationConstants.particleCapacity = ParticleCapacity;

        // 設定粒子活動空間邊界
        simulationConstants.boundarySize = 7.0f;

        // 設定粒子移動速度
        simulationConstants.speed = 2.0f;

        // 設定粒子的基礎生命週期
        simulationConstants.lifetime = 8.0f;

        // 要求第一次執行時初始化所有粒子
        simulationConstants.reset = 1;

        // 設定初始隨機 Seed
        simulationConstants.randomSeed = 1337;

        // 根據目前 Frame Buffer 尺寸建立相機參數
        CameraConstants cameraConstants = createCameraConstants(
            graphicsEngine.getFrameBufferWidth(), graphicsEngine.GetFrameBufferHeight());

        // 建立粒子模擬使用的 Constant Buffer
        ConstantBuffer simulationConstantBuffer;

        // 建立相機與粒子渲染使用的 Constant Buffer
        ConstantBuffer cameraConstantBuffer;

        // 初始化粒子模擬 Constant Buffer
        simulationConstantBuffer.init(sizeof(simulationConstants), &simulationConstants);

        // 初始化相機 Constant Buffer
        cameraConstantBuffer.init(sizeof(cameraConstants), &cameraConstants);

        // 建立可同時作為 UAV 與 SRV 使用的 StructuredBuffer
        RWStructuredBuffer particleBuffer;

        // 配置可容納十萬個 Particle 的 GPU Buffer
        particleBuffer.Init(sizeof(Particle), ParticleCapacity, nullptr);

        // 建立負責綁定 Shader Resource 的 Render State
        RenderState renderState;

        // 使用目前 D3D12 Device 初始化 Render State
        renderState.init(graphicsEngine.getD3DDevice());

        // 將粒子 Buffer 設定到對應的 UAV 與 SRV Slot
        renderState.setRWStructuredBuffer(0, 0, particleBuffer);

        // 取得 Graphics Engine 使用的 Render Context
        RenderContext& renderContext = graphicsEngine.getRenderContext();

        // 將目前 Command List 設定給 Render Context
        renderContext.SetCommandList(graphicsEngine.getCommandList());

        // 建立 ImGui 系統
        Skyline::UI::ImGuiSystem imguiSystem;

        // 使用目前視窗與 Graphics Engine 初始化 ImGui
        imguiSystem.initialize(g_hWnd, graphicsEngine);

        // 控制是否暫停粒子模擬
        bool paused = false;

        // 讓每個 Frame Buffer 都至少執行一次粒子 Reset
        int resetFramesRemaining = GraphicsEngine::FRAME_BUFFER_COUNT;

        // 分別保存每個 Back Buffer 上一次更新的時間
        std::array<std::chrono::steady_clock::time_point, GraphicsEngine::FRAME_BUFFER_COUNT> previousTimes{};

        // 取得應用程式開始時的時間點
        const auto initialTime = std::chrono::steady_clock::now();

        // 將所有 Back Buffer 的初始時間設定為相同值
        previousTimes.fill(initialTime);

        // 持續處理 Windows Message 直到應用程式關閉
        while (dispatchWindowMessage())
        {
            // 開始記錄目前 Frame 的 Rendering Command
            graphicsEngine.beginRender();

            // 開始建立目前 Frame 的 ImGui UI
            imguiSystem.beginFrame();

            // 將 UINT 粒子數量轉成 ImGui SliderInt 可使用的 int
            int displayedParticleCount = static_cast<int>(simulationConstants.particleCount);

            // 建立粒子控制用 ImGui 視窗
            if (imguiSystem.beginWindow("Compute shader particles"))
            {
                // 顯示粒子完全由 GPU 模擬的說明文字
                ImGui::TextUnformatted("Particle motion is simulated entirely on the GPU.");

                // 插入 UI 分隔線
                ImGui::Separator();

                // 建立使用對數刻度的粒子數量 Slider
                ImGui::SliderInt("Particle count", &displayedParticleCount, 1,
                                 static_cast<int>(ParticleCapacity), "%d", ImGuiSliderFlags_Logarithmic);

                // 建立調整粒子活動範圍的 Slider
                ImGui::SliderFloat("Spread range", &simulationConstants.boundarySize, 1.0f, 12.0f, "%.1f");

                // 建立調整粒子移動速度的 Slider
                ImGui::SliderFloat("Movement speed", &simulationConstants.speed, 0.0f, 8.0f, "%.2f");

                // 建立調整粒子生命週期的 Slider
                ImGui::SliderFloat("Lifetime", &simulationConstants.lifetime, 1.0f, 20.0f, "%.1f s");

                // 建立調整粒子 Billboard 尺寸的 Slider
                ImGui::SliderFloat("Particle size", &cameraConstants.particleSize, 0.01f, 0.25f, "%.3f");

                // 建立調整粒子 RGBA 顏色的 Color Picker
                ImGui::ColorEdit4("Particle color", &cameraConstants.color.x);

                // 建立暫停或恢復模擬的 Checkbox
                ImGui::Checkbox("Pause simulation", &paused);

                // 建立重新產生所有粒子的按鈕
                if (ImGui::Button("Reset particles"))
                {
                    // 改變 Seed 讓重新產生的粒子分布不同
                    ++simulationConstants.randomSeed;

                    // 要求所有 Frame Buffer 接下來都執行一次 Reset
                    resetFramesRemaining = GraphicsEngine::FRAME_BUFFER_COUNT;
                }

                // 將下一個 ImGui 元件放在同一行
                ImGui::SameLine();

                // 顯示目前 Compute Shader 需要 Dispatch 的 Thread Group 數量
                ImGui::Text("Dispatch groups: %u",
                            (simulationConstants.particleCount + ComputeThreadCount - 1) / ComputeThreadCount);

                // 顯示 ImGui 計算出的目前 Frame Rate
                ImGui::Text("Frame rate: %.1f FPS", ImGui::GetIO().Framerate);
            }

            // 結束目前 ImGui 視窗
            imguiSystem.endWindow();

            // 將 UI 修改後的粒子數量寫回模擬參數
            simulationConstants.particleCount = static_cast<UINT>(displayedParticleCount);

            // 取得目前正在使用的 Back Buffer 索引
            const UINT frameIndex = graphicsEngine.getBackBufferIndex();

            // 取得目前時間
            const auto currentTime = std::chrono::steady_clock::now();

            // 計算此 Back Buffer 距離上次使用時經過的秒數
            const float elapsed = std::chrono::duration<float>(currentTime - previousTimes[frameIndex]).count();

            // 更新目前 Back Buffer 的上一個時間點
            previousTimes[frameIndex] = currentTime;

            // 暫停時將 Delta Time 設為零否則限制最大值為 0.05 秒
            simulationConstants.deltaTime = paused ? 0.0f : (std::min)(elapsed, 0.05f);

            // 根據剩餘 Reset Frame 數量決定是否初始化粒子
            simulationConstants.reset = resetFramesRemaining > 0 ? 1u : 0u;

            // 將最新粒子模擬參數複製到 GPU Constant Buffer
            simulationConstantBuffer.copyToVRAM(simulationConstants);

            // 將最新相機與渲染參數複製到 GPU Constant Buffer
            cameraConstantBuffer.copyToVRAM(cameraConstants);

            // 設定 Compute Shader 使用的 Root Signature
            renderContext.setComputeRootSignature(rootSignature);

            // 切換至 Compute Pipeline State
            renderContext.setPipelineState(computePipelineState);

            // 將粒子模擬 Constant Buffer 綁定至 Compute Shader 的 b0
            renderState.setConstantBuffer(renderContext, ShaderStage::Compute, 0, simulationConstantBuffer);

            // 將目前 Frame 所需的 Compute Shader Resource 綁定至 Command List
            renderState.applyCompute(renderContext, frameIndex);

            // Reset 時處理整個 Buffer 否則只處理目前有效粒子
            const UINT dispatchedParticles = simulationConstants.reset != 0
                                                 ? simulationConstants.particleCapacity
                                                 : simulationConstants.particleCount;

            // 根據粒子數量計算 Thread Group 數量並執行 Compute Shader
            renderContext.dispatch((dispatchedParticles + ComputeThreadCount - 1) / ComputeThreadCount, 1, 1);

            // 取得粒子 StructuredBuffer 對應的 D3D12 Resource
            ID3D12Resource* particleResource = particleBuffer.getD3DResource();

            // 建立 UAV Barrier 描述
            D3D12_RESOURCE_BARRIER uavBarrier{};

            // 指定此 Barrier 為 UAV Barrier
            uavBarrier.Type = D3D12_RESOURCE_BARRIER_TYPE_UAV;

            // 指定需要同步 Compute Shader UAV 寫入的粒子 Resource
            uavBarrier.UAV.pResource = particleResource;

            // 確保之前的 UAV 寫入完成後才執行後續操作
            renderContext.resourceBarrier(uavBarrier);

            // 建立將粒子 Buffer 從 UAV 切換成 Shader Resource 的 Transition Barrier
            D3D12_RESOURCE_BARRIER toShaderResource{};

            // 指定此 Barrier 為 Resource State Transition
            toShaderResource.Type = D3D12_RESOURCE_BARRIER_TYPE_TRANSITION;

            // 指定需要切換狀態的粒子 Resource
            toShaderResource.Transition.pResource = particleResource;

            // 指定切換前為 Compute Shader 可寫入的 UAV 狀態
            toShaderResource.Transition.StateBefore = D3D12_RESOURCE_STATE_UNORDERED_ACCESS;

            // 指定切換後允許 Vertex 與 Pixel Shader 讀取
            toShaderResource.Transition.StateAfter =
                D3D12_RESOURCE_STATE_NON_PIXEL_SHADER_RESOURCE | D3D12_RESOURCE_STATE_PIXEL_SHADER_RESOURCE;

            // 對 Resource 的所有 Subresource 套用狀態切換
            toShaderResource.Transition.Subresource = D3D12_RESOURCE_BARRIER_ALL_SUBRESOURCES;

            // 執行 UAV 到 Shader Resource 的狀態切換
            renderContext.resourceBarrier(toShaderResource);

            // 設定 Graphics Pipeline 使用的 Root Signature
            renderContext.setRootSignature(rootSignature);

            // 切換至粒子渲染用 Graphics Pipeline State
            renderContext.setPipelineState(graphicsPipelineState);

            // 指定使用 Triangle List 繪製粒子 Billboard
            renderContext.setPrimitiveTopology(D3D_PRIMITIVE_TOPOLOGY_TRIANGLELIST);

            // 將相機 Constant Buffer 綁定至 Graphics Shader 的 b0
            renderState.setConstantBuffer(renderContext, ShaderStage::Graphics, 0, cameraConstantBuffer);

            // 將目前 Frame 所需的 Graphics Shader Resource 綁定至 Command List
            renderState.applyGraphics(renderContext, frameIndex);

            // 每個粒子以六個頂點繪製兩個三角形並透過 Instance 數量一次繪製所有粒子
            graphicsEngine.getCommandList()->DrawInstanced(6, simulationConstants.particleCount, 0, 0);

            // 建立將粒子 Buffer 切回 UAV 狀態的 Transition Barrier
            D3D12_RESOURCE_BARRIER toUnorderedAccess{};

            // 指定此 Barrier 為 Resource State Transition
            toUnorderedAccess.Type = D3D12_RESOURCE_BARRIER_TYPE_TRANSITION;

            // 指定要切換狀態的粒子 Resource
            toUnorderedAccess.Transition.pResource = particleResource;

            // 指定切換前為 Graphics Shader 可讀取狀態
            toUnorderedAccess.Transition.StateBefore =
                D3D12_RESOURCE_STATE_NON_PIXEL_SHADER_RESOURCE | D3D12_RESOURCE_STATE_PIXEL_SHADER_RESOURCE;

            // 指定切換後回到 Compute Shader 可寫入的 UAV 狀態
            toUnorderedAccess.Transition.StateAfter = D3D12_RESOURCE_STATE_UNORDERED_ACCESS;

            // 對 Resource 的所有 Subresource 套用狀態切換
            toUnorderedAccess.Transition.Subresource = D3D12_RESOURCE_BARRIER_ALL_SUBRESOURCES;

            // 執行 Shader Resource 到 UAV 的狀態切換
            renderContext.resourceBarrier(toUnorderedAccess);

            // 檢查是否仍需要在其他 Frame Buffer 執行 Reset
            if (resetFramesRemaining > 0)

                // 完成一個 Frame 的 Reset 後減少剩餘次數
                --resetFramesRemaining;

            // 將目前 Frame 的 ImGui Draw Data 記錄到 Command List
            imguiSystem.render();

            // 完成目前 Frame 並提交 Rendering Command
            graphicsEngine.endRender();

            // 將 D3D12 Debug Layer 訊息輸出至 Skyline Debugger
            SkylineDebugger::LogD3D12Messages(graphicsEngine.getD3DDevice());
        }

        // 等待 GPU 完成所有尚未執行完畢的 Rendering Command
        graphicsEngine.waitDraw();

        // 關閉 ImGui 並釋放相關 Resource
        imguiSystem.shutdown();

        // 關閉 Skyline Debugger
        SkylineDebugger::Shutdown();

        // 正常結束程式
        return EXIT_SUCCESS;
    }

    // 捕捉標準例外並輸出錯誤資訊
    catch (const std::exception& error)
    {
        // 顯示包含例外內容的致命錯誤視窗
        SkylineDebugger::ShowFatalError("DayX_ComputeShader initialization failed", error);

        // 關閉 Skyline Debugger
        SkylineDebugger::Shutdown();

        // 回傳程式執行失敗
        return EXIT_FAILURE;
    }

    // 捕捉無法識別類型的其他例外
    catch (...)
    {
        // 顯示未知致命錯誤訊息
        SkylineDebugger::ShowFatalError(
            "DayX_ComputeShader initialization failed", "An unknown fatal error occurred.");

        // 關閉 Skyline Debugger
        SkylineDebugger::Shutdown();

        // 回傳程式執行失敗
        return EXIT_FAILURE;
    }
}
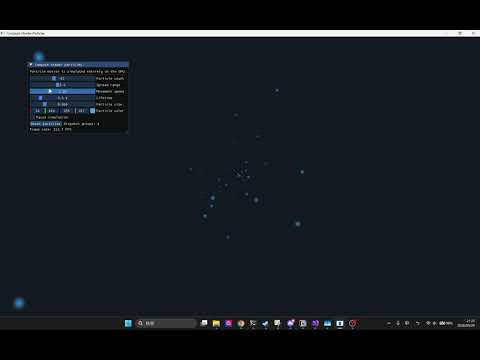


 iThome鐵人賽
 看影片追技術