

ATT&CK TA0040 的防禦面——限制資源、保護服務可用性、確保災難復原。
所有指令都在 koad 專案目錄下執行。如果還沒 clone,請先參考 Day 1 的 Step 0。
開始前請確認以下環境就緒。
# 主機終端
kubectl get pods -n koad -l 'koad-scenario in (S31,S32,S33,S34,S35)'
Day 20 的 Impact 攻擊 Pod 需要存在,用來驗證 ResourceQuota 等防禦是否生效。
# 主機終端
kubectl get resourcequota -n koad
應該顯示
No resources found。我們將在本日實作中建立 ResourceQuota。
完成本日實作後,你將能夠:
Day 20 展示了 5 種 Impact 攻擊,今天一一對應防禦措施。核心思路是「分層防禦」:即使攻擊者繞過了第一層,還有第二、第三層在等著。
| 攻擊 | 防禦措施 | 層級 | 效果 |
|---|---|---|---|
| S31 資料破壞 | RBAC + PDB + Velero 備份 | RBAC / Ops | 阻止 + 可復原 |
| S32 Resource Bomb | ResourceQuota + LimitRange | Resource | 限制資源消耗 |
| S33 阻止恢復 | 異地備份 + RBAC 保護 | Ops / RBAC | 備份不可刪 |
| S34 網路 DoS | NetworkPolicy + Pod 限額 | Network | 限制流量 + Pod 數 |
| S35 挖礦劫持 | 映像白名單 + CPU 監控 | Admission / Monitor | 阻擋 + 偵測 |
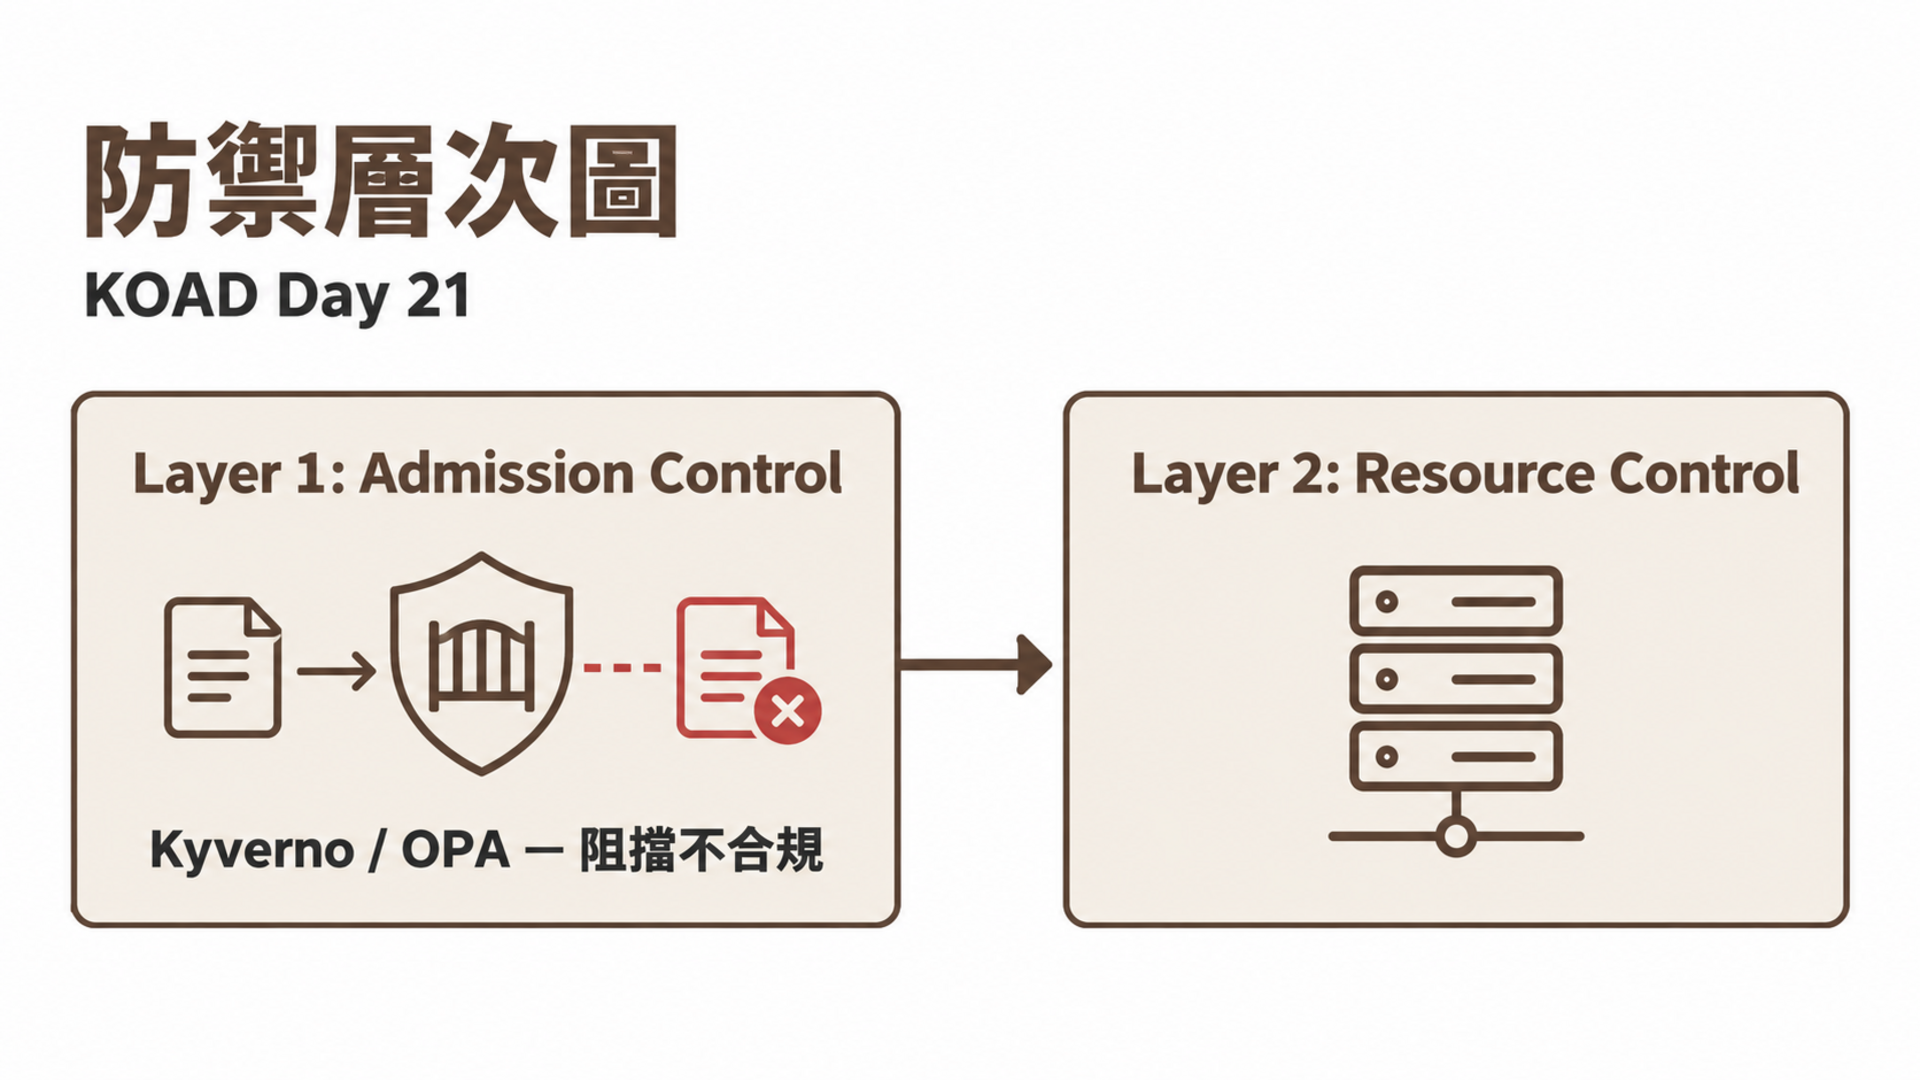
S32 Resource Bomb 之所以有效,是因為沒有限制 Namespace 的總資源使用量。ResourceQuota 設定上限後,超過限額的 Pod 無法排程。
這就像公寓大樓的總電力容量——每戶可以用多少電有上限,整棟大樓也有總容量限制。超過任何一個限制,新的電器就開不了。
# defense/resource-quota.yaml
apiVersion: v1
kind: ResourceQuota
metadata:
  name: compute-quota
  namespace: production
spec:
  hard:
    # === 運算資源 ===
    requests.cpu: "4"           # 所有 Pod 的 CPU request 總和上限
    requests.memory: "8Gi"      # 所有 Pod 的 Memory request 總和上限
    limits.cpu: "8"             # 所有 Pod 的 CPU limit 總和上限
    limits.memory: "16Gi"       # 所有 Pod 的 Memory limit 總和上限

    # === 物件數量 ===
    pods: "20"                  # 最多 20 個 Pod
    services: "10"              # 最多 10 個 Service
    persistentvolumeclaims: "5" # 最多 5 個 PVC
    configmaps: "20"
    secrets: "20"

    # === 防止特定資源濫用 ===
    count/cronjobs.batch: "5"   # 最多 5 個 CronJob
    count/jobs.batch: "10"      # 最多 10 個 Job
    replicationcontrollers: "0" # 禁止使用舊版 RC
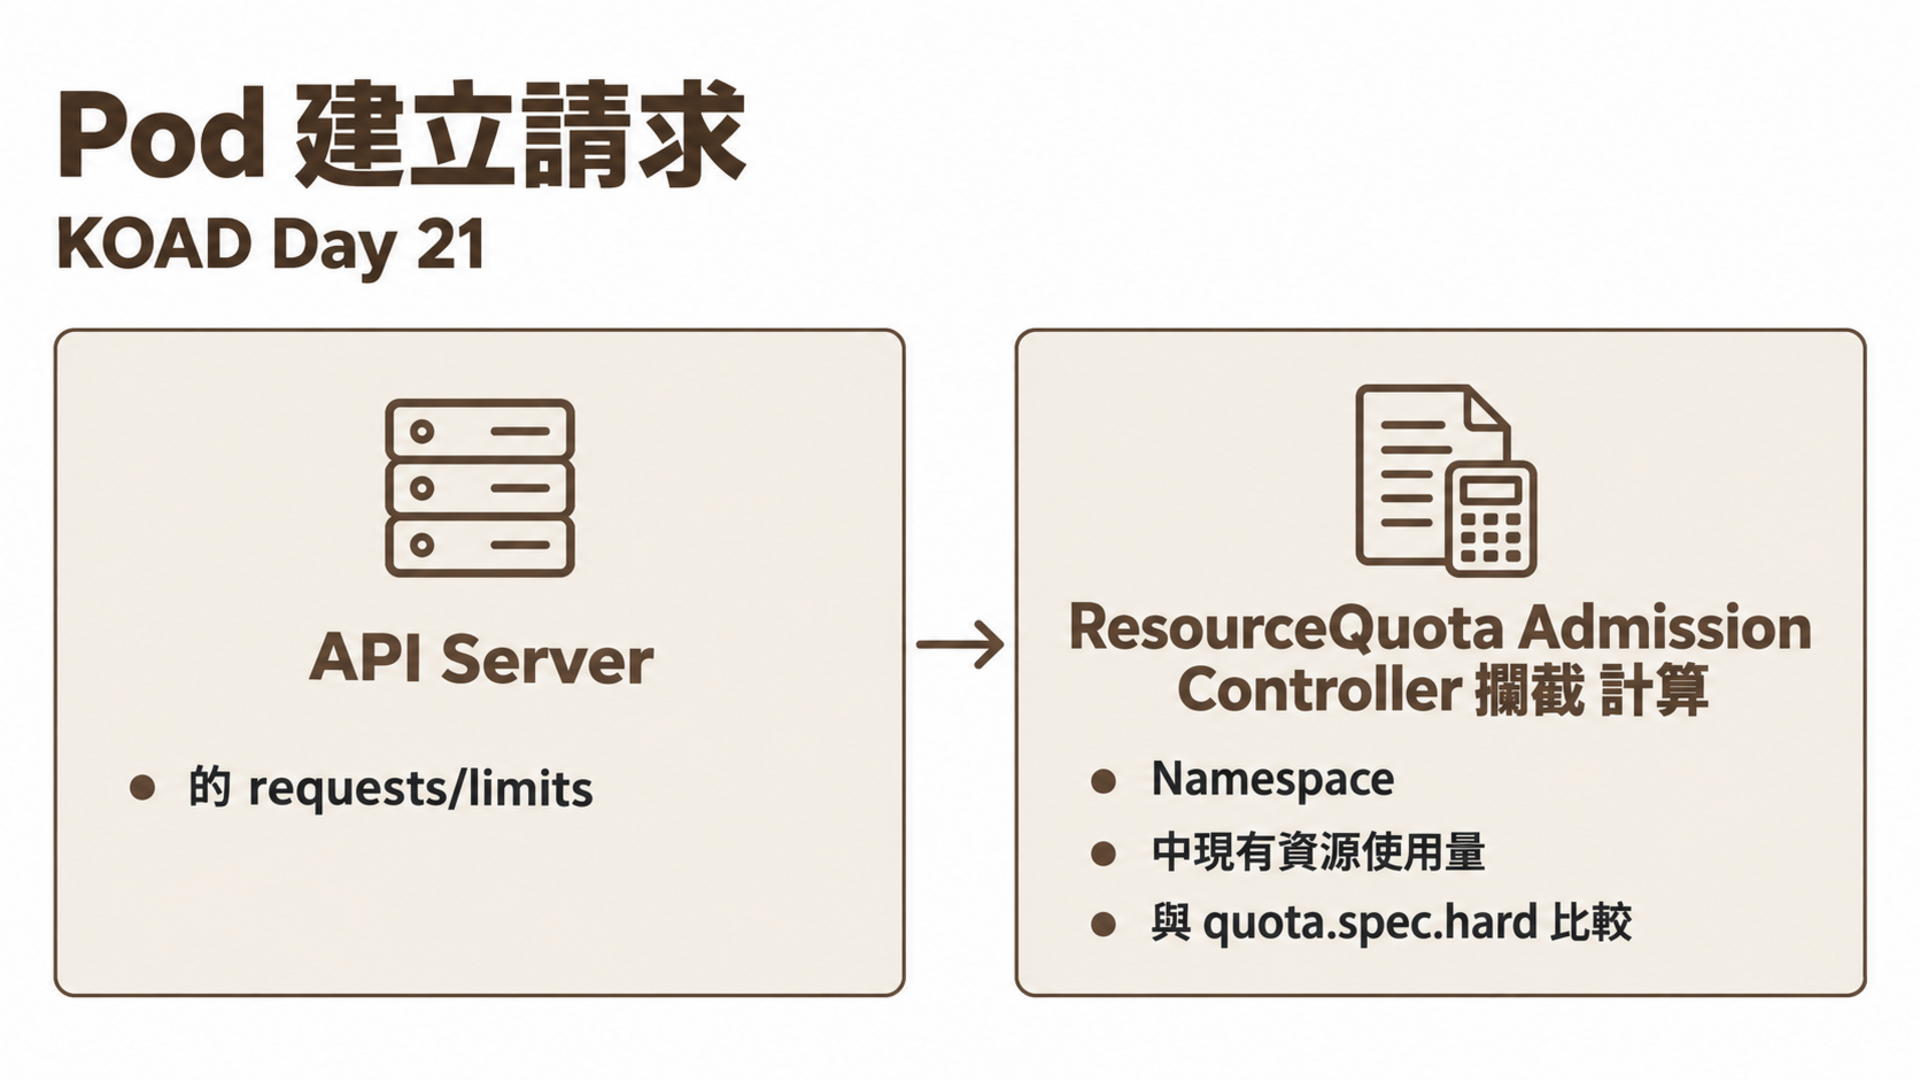
重要:一旦啟用 ResourceQuota,Namespace 中的所有 Pod 都必須設定 requests 和 limits。沒有設定的 Pod 無法建立(除非有 LimitRange 提供預設值)。
# 建立 ResourceQuota
$ kubectl apply -f defense/resource-quota.yaml

# 查看使用量
$ kubectl describe resourcequota compute-quota -n production
Name:                   compute-quota
Namespace:              production
Resource                Used    Hard
--------                ----    ----
limits.cpu              2       8
limits.memory           1Gi     16Gi
pods                    3       20
requests.cpu            500m    4
requests.memory         256Mi   8Gi
configmaps              2       20
secrets                 3       20
persistentvolumeclaims  1       5

# 嘗試部署 Resource Bomb — 被拒
$ kubectl apply -f resource-bomb.yaml -n production
Error from server (Forbidden): pods "resource-bomb-xxx" is forbidden:
  exceeded quota: compute-quota,
  requested: requests.cpu=2, limits.cpu=4,
  used: requests.cpu=500m, limits.cpu=2,
  limited: requests.cpu=4, limits.cpu=8
| 原則 | 說明 |
|---|---|
| 每個 Namespace 都要有 | 不設 quota 的 Namespace 是漏洞 |
| requests ≠ limits | requests 影響排程,limits 影響 OOM 行為 |
| 預留 buffer | 不要設到 Node 的 100%,留 20% 給系統 |
| 搭配 LimitRange | 提供預設值,避免 Pod 因沒設 resources 被拒 |
ResourceQuota 控制 Namespace 的「總量」,但不控制「單一 Pod」的大小。一個 Pod 可以在限額內要走所有資源,其他 Pod 就排不上了。LimitRange 設定「單一 Pod/Container」的上下限和預設值。
# defense/limit-range.yaml
apiVersion: v1
kind: LimitRange
metadata:
  name: default-limits
  namespace: production
spec:
  limits:
    # === Container 層級 ===
    - type: Container
      default:              # 沒有設定 limits 時的預設值
        cpu: "500m"
        memory: "256Mi"
      defaultRequest:       # 沒有設定 requests 時的預設值
        cpu: "100m"
        memory: "64Mi"
      max:                  # 上限
        cpu: "2"
        memory: "2Gi"
      min:                  # 下限
        cpu: "50m"
        memory: "32Mi"

    # === Pod 層級(所有 Container 加總)===
    - type: Pod
      max:
        cpu: "4"
        memory: "4Gi"

    # === PVC 層級 ===
    - type: PersistentVolumeClaim
      max:
        storage: "10Gi"
      min:
        storage: "1Gi"
# 部署一個沒有設定 resources 的 Pod
$ kubectl run test --image=nginx -n production

# 查看 Pod 的 YAML——LimitRange 自動注入了預設值
$ kubectl get pod test -n production -o yaml | grep -A 6 resources
    resources:
      limits:
        cpu: 500m           # ← LimitRange 自動注入
        memory: 256Mi       # ← LimitRange 自動注入
      requests:
        cpu: 100m           # ← LimitRange 自動注入
        memory: 64Mi        # ← LimitRange 自動注入
| 項目 | LimitRange | ResourceQuota |
|---|---|---|
| 作用範圍 | 單一 Pod/Container | 整個 Namespace |
| 功能 | 設定預設值 + 上下限 | 設定總量限額 |
| 何時生效 | Pod 建立時注入預設值 | Pod 建立時檢查總量 |
| 使用場景 | 防止單一 Pod 過大 | 防止 Namespace 資源耗盡 |
| 組合使用 | 建議兩者搭配 | 建議兩者搭配 |
$ kubectl run big-pod --image=nginx -n production \
    --overrides='{"spec":{"containers":[{"name":"big","image":"nginx",
    "resources":{"limits":{"cpu":"10","memory":"100Gi"}}}]}}'
Error from server (Forbidden): pods "big-pod" is forbidden:
  [maximum cpu usage per Container is 2, but limit is 10,
   maximum memory usage per Container is 2Gi, but limit is 100Gi]
PDB 確保服務在維護或攻擊期間保持最低可用副本數。它主要防禦兩種情況:
kubectl drain 驅逐 Pod:PDB 會阻擋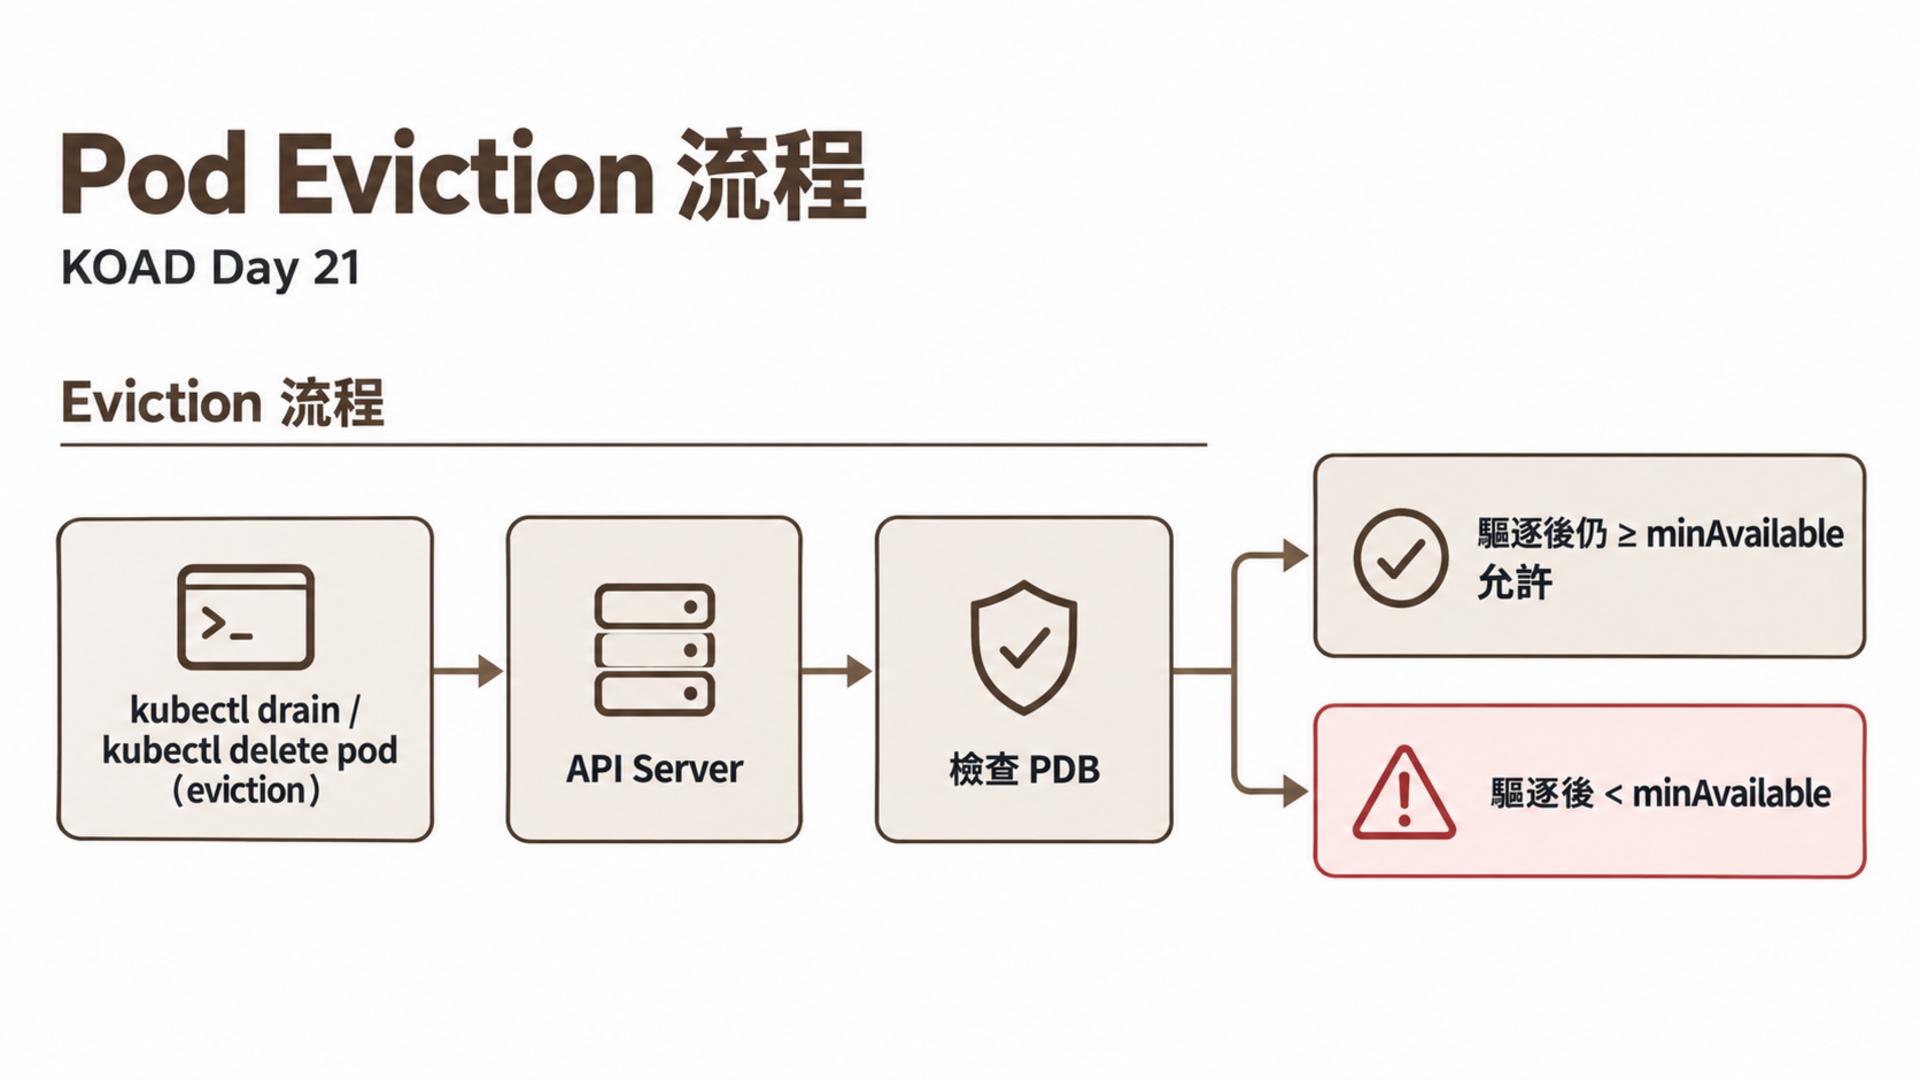
# defense/pdb.yaml

# 方式一:minAvailable
apiVersion: policy/v1
kind: PodDisruptionBudget
metadata:
  name: critical-app-pdb
  namespace: production
spec:
  minAvailable: 2
  selector:
    matchLabels:
      app: critical-app
---
# 方式二:maxUnavailable
apiVersion: policy/v1
kind: PodDisruptionBudget
metadata:
  name: web-frontend-pdb
  namespace: production
spec:
  maxUnavailable: 1
  selector:
    matchLabels:
      app: web-frontend
---
# 方式三:使用百分比
apiVersion: policy/v1
kind: PodDisruptionBudget
metadata:
  name: worker-pdb
  namespace: production
spec:
  maxUnavailable: "25%"
  selector:
    matchLabels:
      app: worker
$ kubectl get pdb -n production
NAME               MIN AVAILABLE   MAX UNAVAILABLE   ALLOWED DISRUPTIONS   AGE
critical-app-pdb   2               N/A               1                     10s

# 驅逐第一個 Pod → 成功
$ kubectl delete pod critical-app-xxx -n production
pod "critical-app-xxx" deleted

# 驅逐第二個 Pod → 被阻擋
$ kubectl delete pod critical-app-yyy -n production
error: Cannot evict pod as it would violate the pod's disruption budget.
The disruption budget critical-app-pdb needs 2 healthy pods and has 2 currently
| 能防禦 | 不能防禦 |
|---|---|
kubectl drain |
kubectl delete pod --force |
| Cluster Autoscaler 縮容 | 直接刪除 Deployment |
| Node 維護驅逐 | Node 故障(硬體死機) |
| 滾動更新 | Namespace 刪除 |
關鍵:PDB 只防禦 eviction(驅逐 API),不防禦 delete --force。必須搭配 RBAC 限制 delete 權限。
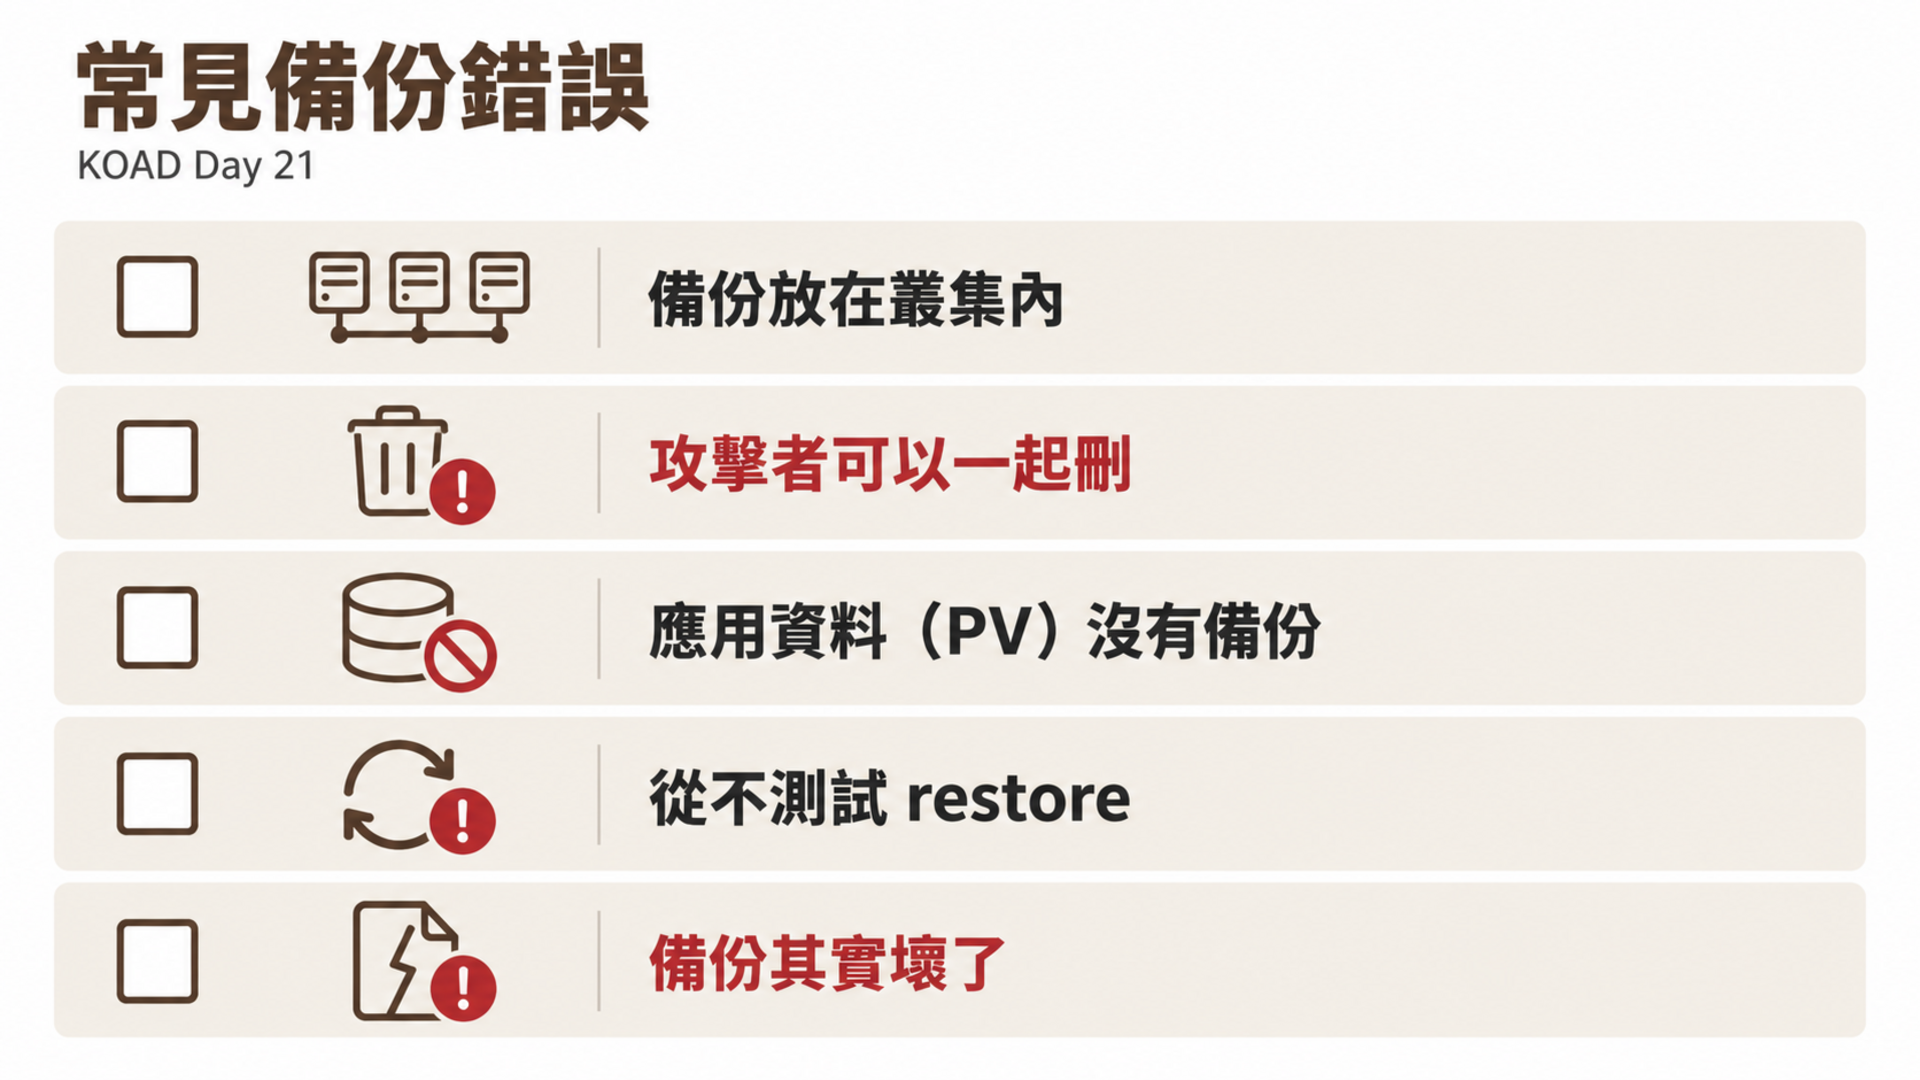
S33「阻止恢復」之所以致命,是因為很多團隊的備份策略有致命缺陷:
etcd 是 K8s 的「大腦」——所有叢集狀態(Pod、Service、Secret、RBAC)都存在 etcd 中。
# === 手動備份 etcd ===
$ ETCDCTL_API=3 etcdctl snapshot save /backup/etcd-$(date +%Y%m%d-%H%M).db \
    --endpoints=https://127.0.0.1:2379 \
    --cacert=/etc/kubernetes/pki/etcd/ca.crt \
    --cert=/etc/kubernetes/pki/etcd/server.crt \
    --key=/etc/kubernetes/pki/etcd/server.key

Snapshot saved at /backup/etcd-20260819-1430.db

# 驗證 snapshot
$ ETCDCTL_API=3 etcdctl snapshot status /backup/etcd-20260819-1430.db --write-table
+---------+----------+------------+------------+
|  HASH   | REVISION | TOTAL KEYS | TOTAL SIZE |
+---------+----------+------------+------------+
| 4e27585 |   142365 |       1287 |     5.2 MB |
+---------+----------+------------+------------+
# defense/etcd-backup-cronjob.yaml
apiVersion: batch/v1
kind: CronJob
metadata:
  name: etcd-backup
  namespace: kube-system
spec:
  schedule: "0 */6 * * *"
  concurrencyPolicy: Forbid
  successfulJobsHistoryLimit: 3
  failedJobsHistoryLimit: 3
  jobTemplate:
    spec:
      template:
        spec:
          hostNetwork: true
          containers:
            - name: backup
              image: bitnami/etcd:3.5
              command: ["/bin/sh", "-c"]
              args:
                - |
                  ETCDCTL_API=3 etcdctl snapshot save \
                    /backup/etcd-$(date +%Y%m%d-%H%M).db \
                    --endpoints=https://127.0.0.1:2379 \
                    --cacert=/etc/kubernetes/pki/etcd/ca.crt \
                    --cert=/etc/kubernetes/pki/etcd/server.crt \
                    --key=/etc/kubernetes/pki/etcd/server.key
                  find /backup -name "etcd-*.db" -mtime +7 -delete
              volumeMounts:
                - name: etcd-certs
                  mountPath: /etc/kubernetes/pki/etcd
                  readOnly: true
                - name: backup-dir
                  mountPath: /backup
          volumes:
            - name: etcd-certs
              hostPath:
                path: /etc/kubernetes/pki/etcd
            - name: backup-dir
              hostPath:
                path: /var/lib/etcd-backup
          restartPolicy: OnFailure
          nodeSelector:
            node-role.kubernetes.io/control-plane: ""
          tolerations:
            - key: node-role.kubernetes.io/control-plane
              effect: NoSchedule
# 1. 停止 API Server
$ mv /etc/kubernetes/manifests/kube-apiserver.yaml /tmp/

# 2. 停止 etcd
$ mv /etc/kubernetes/manifests/etcd.yaml /tmp/

# 3. 從 snapshot 恢復
$ ETCDCTL_API=3 etcdctl snapshot restore /backup/etcd-20260819-1430.db \
    --data-dir=/var/lib/etcd-restored \
    --initial-cluster=master=https://127.0.0.1:2380 \
    --initial-advertise-peer-urls=https://127.0.0.1:2380 \
    --name=master

# 4. 替換 etcd 資料目錄
$ mv /var/lib/etcd /var/lib/etcd-old
$ mv /var/lib/etcd-restored /var/lib/etcd

# 5. 恢復 etcd 和 API Server
$ mv /tmp/etcd.yaml /etc/kubernetes/manifests/
$ mv /tmp/kube-apiserver.yaml /etc/kubernetes/manifests/

# 6. 等待叢集恢復
$ kubectl get nodes
NAME     STATUS   ROLES           AGE   VERSION
master   Ready    control-plane   30d   v1.30.0
三個必記路徑:
/etc/kubernetes/pki/etcd/     # etcd 憑證目錄
/var/lib/etcd/                # etcd 資料目錄
/etc/kubernetes/manifests/    # static pod manifests
# 安裝 Velero(以 MinIO 為 backend)
$ velero install \
    --provider aws \
    --plugins velero/velero-plugin-for-aws:v1.9.0 \
    --bucket velero-backup \
    --secret-file ./credentials \
    --backup-location-config \
      region=minio,s3ForcePathStyle=true,s3Url=http://minio.velero:9000

# 立即備份
$ velero backup create production-backup \
    --include-namespaces production \
    --include-resources deployments,services,configmaps,secrets,pvc

# 定期排程備份
$ velero schedule create daily-backup \
    --schedule="0 2 * * *" \
    --include-namespaces production \
    --ttl 720h

# 查看備份狀態
$ velero backup get
NAME                 STATUS      ERRORS   WARNINGS   CREATED
production-backup    Completed   0        0          2026-08-19 14:30:00

# 從備份恢復
$ velero restore create --from-backup production-backup
Restore request "production-backup-20260819143500" submitted successfully.
| 原則 | 說明 | 實作 |
|---|---|---|
| 3-2-1 原則 | 3 份副本、2 種媒介、1 份異地 | etcd local + S3 + 異地 S3 |
| 異地儲存 | 備份放在叢集外 | MinIO/S3 |
| 不可變備份 | 使用 S3 Object Lock | 鎖定期內無法刪除 |
| 定期驗證 | 定期測試 restore 流程 | 每月做一次 restore drill |
| RBAC 保護 | 限制對 backup 資源的 delete 權限 | 只有 break-glass 帳號能刪備份 |
| 加密備份 | etcd snapshot 加密 | --encryption-provider-config |
| 監控備份 | Prometheus 監控 CronJob | kube_cronjob_status_last_successful_time |
# defense/prometheus-rules.yaml
apiVersion: monitoring.coreos.com/v1
kind: PrometheusRule
metadata:
  name: impact-defense-alerts
  namespace: monitoring
spec:
  groups:
    - name: resource-abuse
      rules:
        - alert: HighCPUUsage
          expr: |
            sum(rate(container_cpu_usage_seconds_total{namespace="production"}[5m]))
            / sum(kube_pod_container_resource_limits{resource="cpu",namespace="production"})
            > 0.8
          for: 5m
          labels:
            severity: warning
          annotations:
            summary: "High CPU usage in production namespace"

        - alert: PossibleCryptominer
          expr: |
            rate(container_cpu_usage_seconds_total{container!="POD"}[5m]) > 0.95
          for: 10m
          labels:
            severity: critical
          annotations:
            summary: "Container at >95% CPU for 10+ minutes — possible cryptominer"

        - alert: BackupStale
          expr: |
            time() - kube_cronjob_status_last_successful_time{
              cronjob="etcd-backup", namespace="kube-system"
            } > 86400
          for: 5m
          labels:
            severity: critical
          annotations:
            summary: "etcd backup CronJob hasn't succeeded in 24h"

    - name: network-abuse
      rules:
        - alert: PodCountSpike
          expr: |
            count(kube_pod_info{namespace="production"})
            > 1.5 * avg_over_time(count(kube_pod_info{namespace="production"})[1h:5m])
          for: 5m
          labels:
            severity: warning
          annotations:
            summary: "Pod count spiked 50% above 1h average"
| 指標 | 正常值 | 異常值 |
|---|---|---|
| CPU 使用率 | < 70% | 持續 > 95% |
| 網路出站 | 特定 port | 連線到 mining pool (3333, 45700) |
| Process name | 已知應用 | xmrig, minerd |
| DNS 查詢 | 正常域名 | pool.minergate.com 等 |
# 啟用 ResourceQuota 後,沒設 resources 的 Pod 會被拒
$ kubectl run test --image=nginx -n production
Error from server (Forbidden): failed quota: compute-quota:
  must specify limits.cpu, limits.memory

# 解法:先建 LimitRange 再建 ResourceQuota
$ kubectl apply -f defense/limit-range.yaml    # 先
$ kubectl apply -f defense/resource-quota.yaml  # 後
# 錯誤:replicas=2, minAvailable=2
# 結果:rolling update 永遠完成不了
$ kubectl rollout status deploy/critical-app -n production
Waiting for deployment "critical-app" rollout to finish: 1 old replicas are pending termination...

# 正確做法:minAvailable = replicas - 1 或使用 maxUnavailable: 1
# etcd restore 後,kubelet 可能還跑著 restore 之後建立的 Pod
# 解法:重啟 kubelet
$ systemctl restart kubelet
# 預設 Velero 只備份 K8s 資源,不備份 PV 資料
# 需要啟用 file system backup
$ velero install ... --use-node-agent
$ velero backup create my-backup --default-volumes-to-fs-backup
| 考點 | 本日內容 | 權重 | 典型考題 |
|---|---|---|---|
| ResourceQuota | Namespace 資源限額 | Minimize 20% | 配置 CPU/Memory 限額 |
| LimitRange | Pod 預設值和上下限 | Minimize 20% | 設定 Container 預設 limits |
| etcd 備份 | etcdctl snapshot save/restore | Setup 15% | 完整備份和恢復流程 |
| PDB | 服務可用性保護 | Hardening 15% | 配置 minAvailable |
# 主機終端 — 移除本日建立的資源限制
kubectl delete resourcequota -n koad --all
kubectl delete limitrange -n koad --all
kubectl delete pdb -n koad --all
移除 ResourceQuota 和 LimitRange 後,Day 20 的 Resource Bomb 場景可以重新操作。PDB 移除後,Pod 可以自由刪除。
至此,ATT&CK 10 個戰術的攻防對照全部完成(Day 2–21)。
明天 Day 22 進入供應鏈安全——映像分層藏密、Registry 滲透、CI/CD 投毒。



 iThome鐵人賽
 看影片追技術