

前幾天我們使用 NgRx SignalStore 實作購物車,透過 withState() 管理商品資料、withComputed() 計算總金額,再利用 withMethods() 與 patchState() 更新 State。
不過,在 SignalStore 出現之前,NgRx 就已經提供了另一套狀態管理方案,也就是傳統的 NgRx Store。
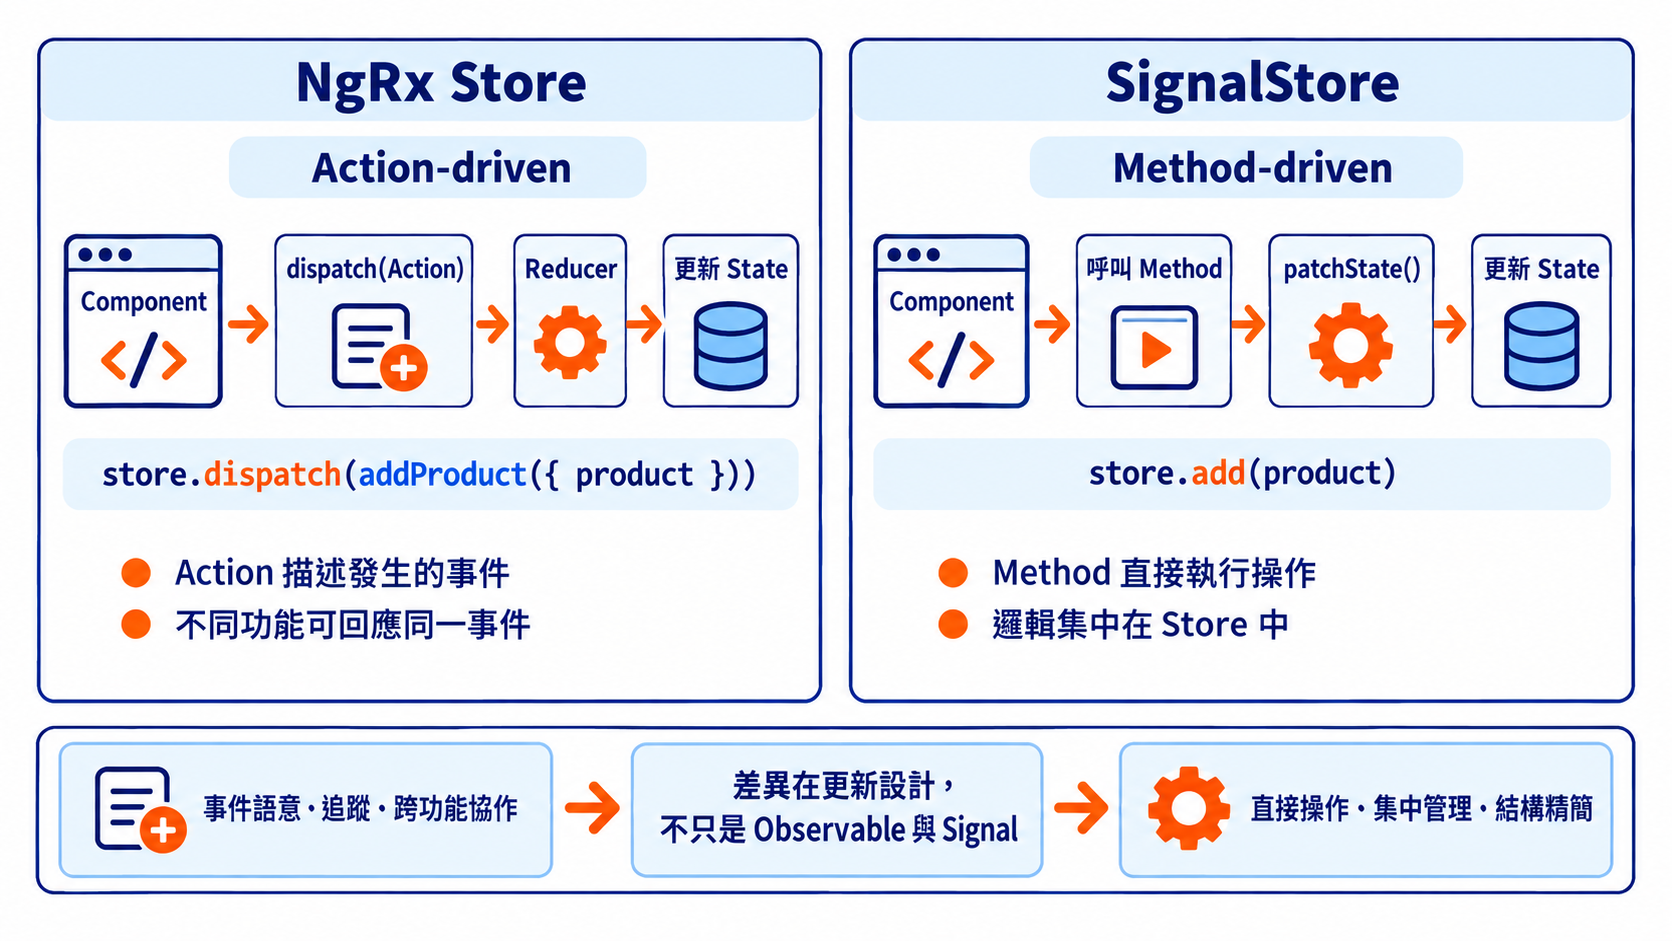
NgRx Store 採用 Redux 的設計概念,透過 Action 描述事件,再交由 Reducer 更新 State。這與 SignalStore 直接呼叫 Method 的方式不同。
今天延續購物車範例,使用傳統 NgRx Store 重新實作一次,比較兩種方式在狀態管理上的差異。
NgRx Store 主要由三個部分組成:
例如使用者點擊「加入購物車」,Component 會發送 Action,再由 Reducer 更新購物車 State,Selector 則負責取得畫面需要的資料。
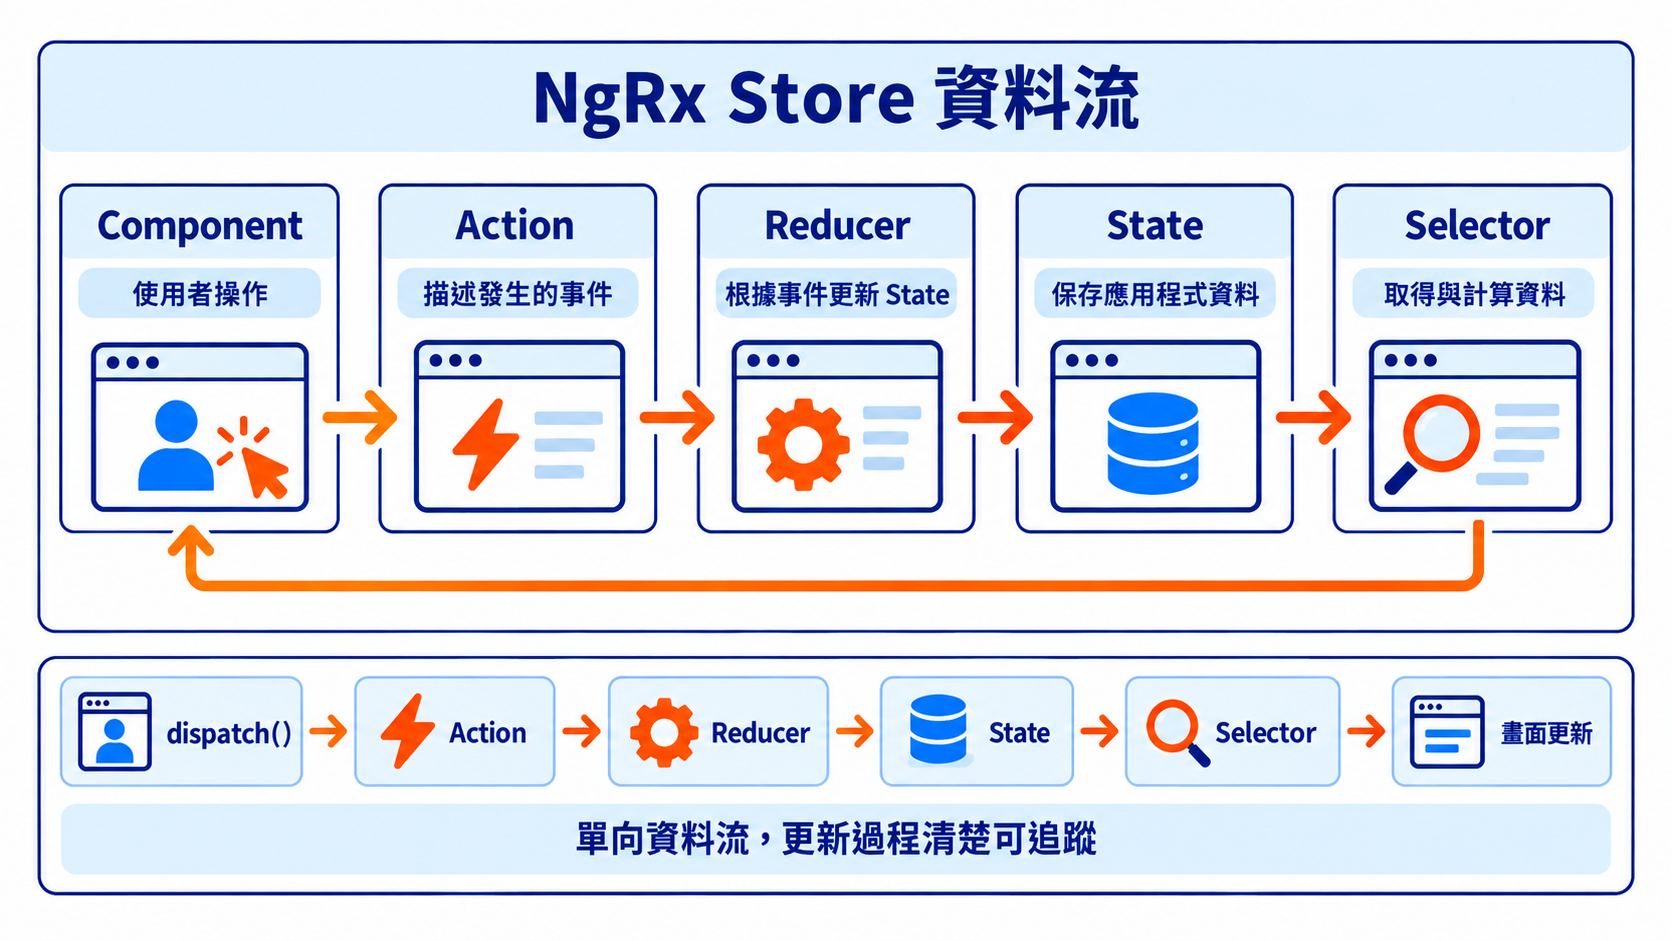
Action 用來描述 Application 中發生的事件。NgRx 提供 createAction() 定義事件名稱,以及需要攜帶的資料。
cart.actions.ts
import { createAction, props } from '@ngrx/store';
import type { Product } from './cart.types';

export const addProduct = createAction(
  '[Cart] Add Product',
  props<{ product: Product }>()
);

export const removeProduct = createAction(
  '[Cart] Remove Product',
  props<{ id: number }>()
);

export const clearCart = createAction(
  '[Cart] Clear Cart'
);
props() 用來定義 Action 需要攜帶的資料。例如 addProduct 需要提供商品,而 clearCart 不需要額外參數。
定義完成後,可以透過 dispatch() 將 Action 發送給 Store:
store.dispatch(addProduct({ product }));
這裡的 addProduct() 只負責建立 Action 物件,真正的狀態更新會交由 Reducer 處理。
Reducer 是一個 Pure Function(純函式),會根據目前的 State 與收到的 Action,回傳新的 State。
先定義購物車的資料型別。
cart.types.ts
export interface Product {
  id: number;
  name: string;
  price: number;
}

export interface CartItem extends Product {
  quantity: number;
}

export interface CartState {
  items: CartItem[];
}
接著使用 createReducer() 建立購物車 Reducer。
cart.reducer.ts
import { createReducer, on } from '@ngrx/store';

import {
  addProduct,
  removeProduct,
  clearCart
} from './cart.actions';

import type { CartState } from './cart.types';

export const initialState: CartState = {
  items: []
};

export const cartReducer = createReducer(
  initialState,

  on(addProduct, (state, { product }) => {
    const existing = state.items.find(
      item => item.id === product.id
    );

    const items = existing
      ? state.items.map(item =>
          item.id === product.id
            ? { ...item, quantity: item.quantity + 1 }
            : item
        )
      : [...state.items, { ...product, quantity: 1 }];

    return { ...state, items };
  }),

  on(removeProduct, (state, { id }) => ({
    ...state,
    items: state.items.filter(item => item.id !== id)
  })),

  on(clearCart, state => ({
    ...state,
    items: []
  }))
);
createReducer() 用來建立 Reducer,on() 則指定不同 Action 對應的更新邏輯。
以 addProduct 為例,會先檢查商品是否已經存在。如果存在就增加數量,否則加入新商品。
這裡要注意,Reducer 必須遵守不可變性(Immutability),不能直接修改原本的 State,而是要建立並回傳新的資料。
例如使用 state.items.push() 會直接修改原本的陣列,可能讓依賴參考比較的 Selector 無法正確重新計算。在 NgRx 預設啟用的開發環境 Runtime Checks 下,也可能因此拋出錯誤。
所以範例使用展開運算子、map() 與 filter() 建立新資料。Reducer 也必須保持純函式的特性,不應在裡面呼叫 API、操作 DOM 或執行其他副作用。
除了更新 State,購物車還需要計算商品數量與總金額。
NgRx 提供 createFeatureSelector() 與 createSelector(),讓我們取得指定的 State,並計算衍生資料。
cart.selectors.ts
import {
  createFeatureSelector,
  createSelector
} from '@ngrx/store';

import type { CartState } from './cart.types';

export const selectCartState =
  createFeatureSelector<CartState>('cart');

export const selectCartItems = createSelector(
  selectCartState,
  state => state.items
);

export const selectCartCount = createSelector(
  selectCartItems,
  items => items.reduce(
    (sum, item) => sum + item.quantity,
    0
  )
);

export const selectCartTotal = createSelector(
  selectCartItems,
  items => items.reduce(
    (sum, item) => sum + item.price * item.quantity,
    0
  )
);
createFeatureSelector('cart') 用來取得 Store 中 cart 這個 Key 對應的 State,而 createSelector() 可以根據其他 Selector 的結果取得或計算資料。
Selector 也具備 Memoization(記憶化)機制。當輸入沒有改變時,可以重複使用之前的計算結果,避免不必要的運算。
Action、Reducer 與 Selector 準備完成後,就可以將 Store 註冊到 Angular Application。
app.config.ts
import { ApplicationConfig } from '@angular/core';
import { provideStore } from '@ngrx/store';

import { cartReducer } from './cart/cart.reducer';

export const appConfig: ApplicationConfig = {
  providers: [
    provideStore({
      cart: cartReducer
    })
  ]
};
這裡透過 provideStore() 註冊購物車 Reducer,並使用 cart 作為 State 的 Key,與前面 createFeatureSelector('cart') 對應。
完成註冊後,就能透過 Angular DI 注入 Store。
傳統 NgRx Store 可以使用 select() 取得 Observable,也能透過 selectSignal() 取得 Signal。例如讀取購物車總金額:
// Observable
readonly total$ = this.store.select(selectCartTotal);

// Signal
readonly total = this.store.selectSignal(selectCartTotal);
如果需要搭配 RxJS 的 map()、filter() 或 combineLatest() 處理資料,可以使用 select();如果希望在 Template 直接以 Signal 讀取資料,則可以使用 selectSignal()。
這次為了與之前的 SignalStore 比較,我們使用 selectSignal()。
cart.ts
import { Component, inject } from '@angular/core';
import { Store } from '@ngrx/store';

import {
  addProduct,
  removeProduct,
  clearCart
} from './cart.actions';

import {
  selectCartItems,
  selectCartCount,
  selectCartTotal
} from './cart.selectors';

import type { Product } from './cart.types';

@Component({
  selector: 'app-root',
  template: `
    <main>
      <h2>商品列表</h2>

      <button (click)="add({
        id: 1,
        name: '鍵盤',
        price: 1200
      })">
        加入鍵盤
      </button>

      <button (click)="add({
        id: 2,
        name: '滑鼠',
        price: 800
      })">
        加入滑鼠
      </button>

      <hr />

      <h2>購物車</h2>

      @for (item of items(); track item.id) {
        <p>
          {{ item.name }} × {{ item.quantity }}

          <button (click)="remove(item.id)">
            移除
          </button>
        </p>
      } @empty {
        <p>購物車目前沒有商品</p>
      }

      <p>商品數量:{{ count() }}</p>
      <p>總金額:{{ total() }} 元</p>

      <button (click)="clear()">
        清空購物車
      </button>
    </main>
  `
})
export class CartComponent {
  private readonly store = inject(Store);

  readonly items = this.store.selectSignal(selectCartItems);
  readonly count = this.store.selectSignal(selectCartCount);
  readonly total = this.store.selectSignal(selectCartTotal);

  add(product: Product) {
    this.store.dispatch(addProduct({ product }));
  }

  remove(id: number) {
    this.store.dispatch(removeProduct({ id }));
  }

  clear() {
    this.store.dispatch(clearCart());
  }
}
Component 透過 dispatch() 發送 Action,由 Reducer 更新 State,再利用 selectSignal() 取得 Selector 的結果。當資料改變時,畫面也會跟著更新。
Angular NgRx Store vs SignalStore,從 Action、Reducer 到直接更新 State - StackBlitz
回頭看之前的 SignalStore,我們不需要另外建立 Action、Reducer 與 Selector,而是透過 withState()、withComputed() 與 withMethods() 管理相關功能。
傳統 NgRx Store 透過 dispatch() 發送 Action:
store.dispatch(addProduct({ product }));
SignalStore 則直接呼叫 withMethods() 定義的方法:
store.add(product);
Action 描述發生了什麼事件,而 Method 則代表呼叫 Store 提供的某個操作。
同一個 Action 可以由不同 Reducer 處理,分別更新各自的 State,也能讓 Effect 監聽並處理非同步操作。
SignalStore 則將操作邏輯封裝在 Method 中。如果需要跨功能協作,可以再透過 Service、RxJS 或其他方式協調。
傳統 NgRx Store 透過 Reducer 更新 State:
on(clearCart, state => ({
  ...state,
  items: []
}))
SignalStore 則可以在 Method 中使用 patchState():
withMethods(store => ({
  clear() {
    patchState(store, { items: [] });
  }
}))
Reducer 需要根據 Action 決定如何更新 State;SignalStore 則可以直接在 Method 中呼叫 patchState()。
另外,patchState() 只需要指定要更新的屬性,不必手動展開整個 State。不過,更新陣列或物件時,仍然需要注意不可變性。
傳統 NgRx Store 使用 createSelector() 計算衍生資料:
export const selectCartTotal = createSelector(
  selectCartItems,
  items => items.reduce(
    (sum, item) => sum + item.price * item.quantity,
    0
  )
);
SignalStore 則可以在 withComputed() 中使用 computed():
withComputed(({ items }) => ({
  total: computed(() =>
    items().reduce(
      (sum, item) => sum + item.price * item.quantity,
      0
    )
  )
}))
兩者都有快取機制,但依賴追蹤方式不同。
createSelector() 會根據輸入 Selector 的結果判斷是否需要重新計算,而 computed() 則會追蹤計算過程中實際讀取的 Signal。當依賴改變時,Computed 會將快取標記為失效,並在下次讀取時重新計算。
整理前面的差異:
| 比較項目 | NgRx Store | SignalStore |
|---|---|---|
| 狀態定義 | Initial State | withState() |
| 更新入口 | dispatch() |
withMethods() |
| 更新方式 | Reducer | patchState() |
| 衍生資料 | createSelector() |
withComputed() |
| 資料讀取 | Observable / Signal | Signal |
| 非同步操作 | Effects | rxMethod() / async Method |
| 設計重點 | Action-driven | Method-driven |
如果只是管理購物車、頁面資料或其他相對獨立的功能,SignalStore 可以將 State、Computed 與 Methods 集中管理,減少額外的程式結構。
傳統 NgRx Store 則適合需要明確事件語意,或讓不同功能針對相同事件做出反應的情境。
例如訂單建立成功後,可以發送一個 checkoutSuccess Action。購物車 Reducer 收到後清空商品,訂單 Reducer 則更新訂單狀態;如果還需要發送通知,也能交由 Effect 處理。
這些功能仍然需要知道共同的 Action,但不必直接呼叫彼此的方法。不過,如果業務操作需要嚴格的執行順序,就必須透過 Effect 或不同階段的 Action 明確安排,而不能只依賴多個功能監聽同一個事件。
SignalStore 同樣能處理跨功能協作,只是通常需要透過 Service、RxJS 或其他架構協調。因此,實際選擇時還是要考慮功能複雜度、事件追蹤需求與團隊現有架構。
今天透過購物車範例,認識傳統 NgRx Store 的 Action、Reducer 與 Selector。Action 負責描述事件,Reducer 根據事件產生新的 State,而 Selector 則負責取得與計算資料。
相較之下,SignalStore 使用 withState()、withComputed() 與 withMethods() 集中管理狀態與操作,並透過 patchState() 更新資料,不需要額外定義 Action 與 Reducer。
兩者的差異不只是 Observable 與 Signal,而是狀態更新的設計方式。NgRx Store 以 Action 為核心,讓不同功能可以回應相同事件;SignalStore 則透過 Method 封裝操作,讓相關邏輯集中在 Store 中。
實際開發時不一定要擇一使用。如果功能相對獨立,可以考慮 SignalStore;如果系統需要明確的事件追蹤,或已經採用 NgRx Store 架構,傳統 Store 仍然是合適的選擇。
withMethods() 與 patchState() 的使用方式

 iThome鐵人賽
 看影片追技術