

平常在 Angular 中使用 Component,通常會直接在 Template 裡面宣告:
<app-counter />
Angular 會根據 Template 建立 Component。不過,有些情況下,我們沒辦法事先決定畫面要顯示什麼,例如根據使用者選擇切換內容、動態新增表單欄位,或是在儀表板中加入 Widget。
這時可以透過 Angular 提供的兩種方式,在執行時建立 Component:
NgComponentOutlet:直接在 Template 中指定要顯示的 Component,適合切換不同內容。ViewContainerRef.createComponent():透過 TypeScript 建立 Component,也能自行控制新增、移除與插入位置。接下來會用同一個 Counter 範例,看看兩種方式有什麼差別。
先建立一個 Counter,提供標題與計數功能,接下來會使用不同方式載入它。
counter.component.ts
import { Component, input, signal } from '@angular/core';

@Component({
  selector: 'app-counter',
  template: `
    <div>
      <p>{{ label() }}:{{ count() }}</p>
      <button (click)="increment()">+1</button>
    </div>
  `,
})
export class CounterComponent {
  label = input('Counter');
  count = signal(0);

  increment() {
    this.count.update(value => value + 1);
  }
}
這個 Component 使用 input() 接收標題,並透過 Signal 記錄計數。每次呼叫 increment(),數字就會增加 1。
NgComponentOutlet 是 Angular 內建的 Structural Directive,可以在 Template 中指定要建立哪個 Component。
例如,希望使用者點擊按鈕時才顯示 Counter,也能透過外部按鈕增加計數:
app.component.ts
import { Component, signal } from '@angular/core';
import { NgComponentOutlet } from '@angular/common';
import { CounterComponent } from './counter.component';

@Component({
  selector: 'app-root',
  imports: [NgComponentOutlet],
  template: `
    <button (click)="toggle()">
      {{ visible() ? '隱藏 Counter' : '顯示 Counter' }}
    </button>

    <button
      [disabled]="!visible()"
      (click)="outlet.componentInstance?.increment()"
    >
      外部增加 +1
    </button>

    <ng-container
      [ngComponentOutlet]="visible() ? counterComponent : null"
      [ngComponentOutletInputs]="{ label: '動態 Counter' }"
      #outlet="ngComponentOutlet"
    />
  `,
})
export class AppComponent {
  visible = signal(false);
  counterComponent = CounterComponent;

  toggle() {
    this.visible.update(value => !value);
  }
}
counterComponent 保存的是 CounterComponent 這個 Class,而不是已經建立好的實例。當 visible() 為 true 時,Angular 會建立 Counter;切換為 null 時,則會銷毀原本的 Component。
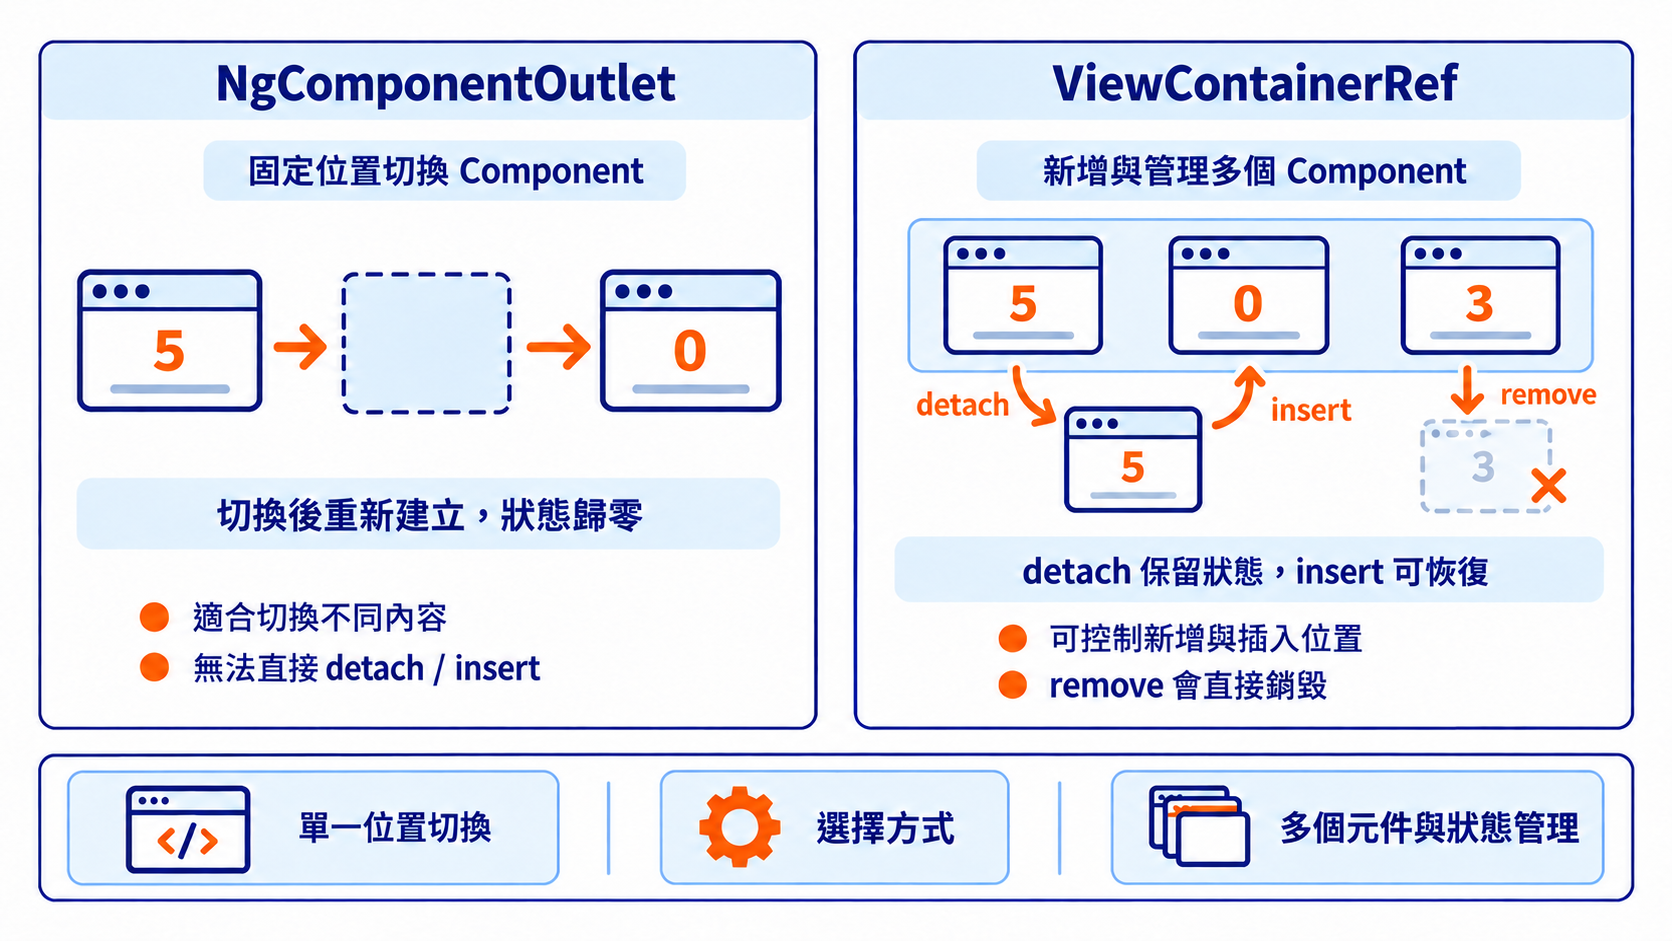
所以當我們先把計數加到 5,再隱藏、重新顯示,計數就會回到 0,因為這次建立的是新的實例。
範例中的 ngComponentOutletInputs 可以將資料傳入 Counter,就像平常使用 [label] 一樣。如果傳入的資料改變,Angular 也會更新對應的 Input。
除了傳遞資料,我們也能透過 componentInstance 取得動態建立的 Component,直接呼叫它的方法。
關鍵在這行:
#outlet="ngComponentOutlet"
這是 Directive 提供的 exportAs 功能。左邊的 outlet 是自己取的模板參考變數名稱,可以自由修改;右邊的 ngComponentOutlet 則是 Angular 已經定義好的名稱。
取得 Directive 實例後,就能透過 outlet.componentInstance?.increment() 呼叫 Counter 的方法。這裡使用 ?.,是因為 Component 尚未建立時,componentInstance 可能是 null。
NgComponentOutlet 適合在固定位置切換不同的 Component,也可以搭配 @for 建立多個實例。不過,它沒有直接提供 detach() 或 insert(),當傳入的 Component 變成 null 時,Angular 就會銷毀原本的實例。如果希望暫時移除 Component、保留狀態,或自行調整插入位置,就可以使用接下來的 ViewContainerRef。
假設現在不只是切換 Counter,而是希望每次點擊「新增 Counter」,畫面上就會多出一個新的計數器。
這時可以使用 ViewContainerRef.createComponent(),直接在 TypeScript 中建立 Component。
我們先在 Template 中放一個 ng-container,作為動態 Component 的插入位置,再透過 viewChild() 取得對應的 ViewContainerRef。
app.component.ts
import {
  Component,
  ViewContainerRef,
  viewChild,
  inputBinding,
} from '@angular/core';

import { CounterComponent } from './counter.component';

@Component({
  selector: 'app-root',
  template: `
    <button (click)="addCounter()">新增 Counter</button>
    <button (click)="clear()">全部清除</button>

    <ng-container #container />
  `,
})
export class AppComponent {
  container = viewChild('container', {
    read: ViewContainerRef,
  });

  private nextId = 0;

  addCounter() {
    const container = this.container();
    if (!container) return;

    const id = ++this.nextId;

    container.createComponent(CounterComponent, {
      bindings: [
        inputBinding('label', () => `Counter ${id}`),
      ],
    });
  }

  clear() {
    this.container()?.clear();
  }
}
這裡的 viewChild() 透過 read: ViewContainerRef 取得 View 容器,而不是一般的 DOM 元素。每次執行 createComponent(),Angular 都會建立新的 Counter,並放進容器。
因此連續點擊三次「新增 Counter」,就會出現三個獨立的計數器,各自管理自己的計數狀態。
建立 Component 時,也可以透過 bindings 傳入資料。範例中的 inputBinding('label', () => `Counter ${id}`),第一個參數是 Input 名稱,第二個參數則是用來提供資料的函式。
這跟平常在 Template 中使用 [label] 很接近,而且支援響應式更新。如果函式中讀取 Signal,當 Signal 改變時,Angular 也會更新對應的 Input。
Angular 另外提供 outputBinding() 來監聽 Output,以及 twoWayBinding() 設定雙向綁定,讓動態建立的 Component 也能使用原本的資料綁定方式。
createComponent() 會回傳 ComponentRef,可以透過 instance 取得建立後的 Component:
const componentRef = container.createComponent(
  CounterComponent
);

componentRef.instance.increment();
這樣就能從外部呼叫 Counter 的 increment()。如果不再需要這個 Component,也可以透過 componentRef.destroy() 銷毀。
除了建立與銷毀,ViewContainerRef 還提供幾個常用方法:
| 方法 | 用途 |
|---|---|
clear() |
清空並銷毀容器內所有 View |
remove(index) |
移除並銷毀指定 View |
detach(index) |
將 View 暫時分離,但不銷毀 |
insert(view) |
將 View 插入容器 |
其中比較特別的是 detach()。假設目前有三個 Counter,我們想暫時把第一個從畫面移除,但之後還要恢復原本的計數,就可以這樣寫:
const view = container.detach(0);
這時 Counter 會從容器中消失,但 Component 沒有被銷毀,原本的 Signal 狀態也會保留。之後再透過 insert() 放回去:
if (view) {
  container.insert(view);
}
Counter 就會重新出現,而且計數不會歸零。如果沒有指定位置,insert() 會將 View 放在容器最後面。
如果改成 remove(0),則會直接銷毀第一個 View,無法再恢復原本的 Component 實例。
實際管理多個 Component 時,可以保存各自的 ComponentRef 與 ViewRef,再透過 indexOf() 找到對應的 View。當我們使用 detach() 分離 View 時,記得保留回傳的 ViewRef,之後才能透過 insert() 將它放回容器。如果需要反覆操作,也應同步更新保存的 View 參考。
另外,detach() 只是暫時分離,並不代表 Component 已經銷毀。如果確定不會再使用,仍然需要自行銷毀,避免留下不必要的資源。
前面的範例雖然都是等到需要時才建立 Component,但使用的是一般 Import:
import { CounterComponent } from './counter.component';
這代表程式仍然有靜態依賴,所以即使 Counter 尚未建立,它的 JavaScript 也可能已經包含在初始載入的檔案中。
如果希望使用者點擊按鈕後才載入 Counter,可以改用 Dynamic Import:
async addCounter() {
  const container = this.container();
  if (!container) return;

  const { CounterComponent } = await import(
    './counter.component'
  );

  container.createComponent(CounterComponent);
}
透過 import(),Bundler 通常會將 Component 的程式碼拆成獨立 Chunk,等到執行 addCounter() 時才載入。如果之前已經下載過,則可能直接使用快取,不需要重複下載。
如果其他地方只需要使用 Counter 的 TypeScript 型別,則可以搭配:
import type { CounterComponent } from './counter.component';
import type 只會在編譯階段使用,不會產生 JavaScript 的 Import,因此不會因為型別引用而提前載入 Component。
不過,import type 本身不會實現 Lazy Loading,真正負責延遲載入的是 Dynamic Import。 如果不需要額外引用型別,也不一定要使用 import type。
這個做法同樣適用於 NgComponentOutlet,只要透過 import() 取得 Component Class,再交給 Directive 建立即可。
另外,如果同一個 Component 在其他地方已經使用一般 Import,就可能提前載入,影響原本的 Lazy Loading 效果。如果只是希望 Template 中的部分內容延遲載入,也可以使用 Angular 提供的 @defer。
| 比較 | NgComponentOutlet |
ViewContainerRef |
|---|---|---|
| 操作方式 | Template | TypeScript |
| 傳遞 Input | ngComponentOutletInputs |
inputBinding() |
| 取得實例 | componentInstance |
ComponentRef.instance |
| 建立多個 Component | 搭配 @for |
重複呼叫 createComponent() |
| 銷毀 Component | Angular 根據綁定處理 | 透過 ViewContainerRef 或 ComponentRef |
| Detach / Insert | 沒有直接提供 | 支援 |
| Lazy Loading | Dynamic Import | Dynamic Import |
| 適用情境 | 切換不同內容 | 動態新增與管理 Component |
如果只是希望在固定位置切換 Component,例如根據使用者選擇顯示不同內容,使用 NgComponentOutlet 就很方便,不需要自己管理建立與銷毀。
但如果需要不斷新增 Component,或是想暫時移除後再插回去,ViewContainerRef 就比較適合,也能更自由地控制 Component 的位置。
Angular 提供了 NgComponentOutlet 與 ViewContainerRef.createComponent() 兩種動態建立 Component 的方式。如果只是切換畫面中的內容,可以優先考慮 NgComponentOutlet;如果需要新增多個 Component,或自行管理 View 的位置與生命週期,就可以使用 ViewContainerRef。
兩種方式都能傳遞 Input,也可以取得建立後的 Component 實例。平常傳遞資料還是建議優先使用 Input 與 Output,需要直接呼叫方法時,再透過 componentInstance 或 ComponentRef.instance 操作。使用 ViewContainerRef 時,也要記得 detach() 只是暫時分離,與真正銷毀 Component 的 remove() 不同。
最後,動態建立 Component 不代表程式碼也會延遲下載。如果希望減少初始載入的 JavaScript,可以搭配 Dynamic Import,並在只需要型別的地方使用 import type,避免產生不必要的靜態依賴。
NgComponentOutlet 與 ViewContainerRef 兩種動態建立方式。ngComponentOutletInputs、componentInstance 與 exportAs 的定義。detach() 不銷毀 View,insert() 預設放最後。inputBinding()、outputBinding()、twoWayBinding() 的定義。ComponentRef 的 instance 與 destroy()。import type 不會產生 JavaScript 的 Import。

 iThome鐵人賽
 看影片追技術