規劃Wireframe
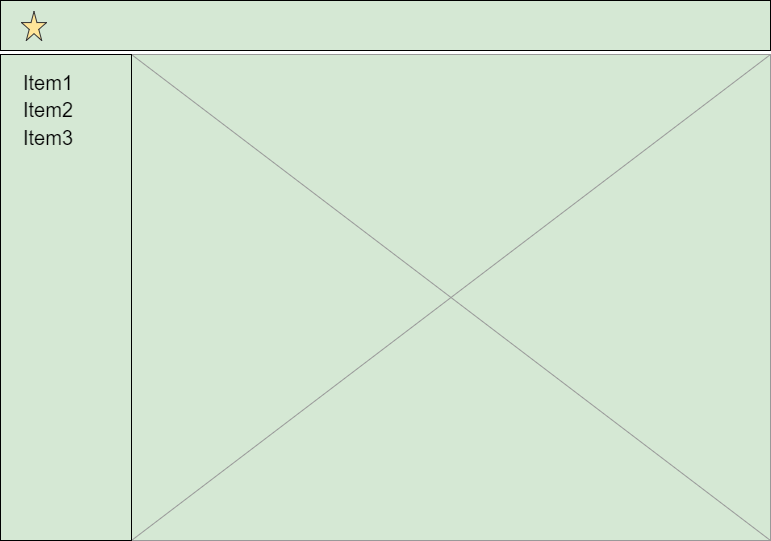
初步規劃Wireframe,大致分為3塊上面的header,左邊的sidebar和右邊的content。為了實作的簡單性,先把這3塊實作成layout component,當使用者點選左邊的sidebar再替換右邊的content內容。元件資料內容使用線上fake api,直接拿線上users當測試資料使用。
JSONPlaceholder
Fake Online REST API for Testing and Prototyping powered by JSON Server and lowdb
https://jsonplaceholder.typicode.com/
components
實作layout component第一個碰到的問題,我們先從react-bootstrap來看看sidebar的UI範例。Nav UI主要是key值來切換NavItem再對到href,來達到頁面的切換。
Navs
https://react-bootstrap.github.io/components/navs/
react-bootstrap Nav
<Nav bsStyle="pills" activeKey={1} onSelect={handleSelect}>
   <NavItem eventKey={1} href="/home">
      NavItem 1 content
   </NavItem>
   <NavItem eventKey={2} title="Item">
      NavItem 2 content
   </NavItem>
   <NavItem eventKey={3} disabled>
      NavItem 3 content
   </NavItem>
</Nav>
react-router主要是靠Link to url對應到Route path,再進行components的切換。主要問題,當我們bootstrap的UI對到router要如何嵌入,NavItem href與Link to都需指到對應路徑,該如何結合在一起?
Basic
https://reacttraining.com/react-router/web/example/basic
react-router basic
<Router>
   <div>
      <ul>
         <li>
            <Link to="/">Home</Link>
         </li>
         <li>
            <Link to="/about">About</Link>
         </li>
         <li>
            <Link to="/topics">Topics</Link>
         </li>
      </ul>
      <hr/>
      <Route exact path="/" component={Home}/>
      <Route path="/about" component={About}/>
      <Route path="/topics" component={Topics}/>
   </div>
</Router>
react-bootstrp & react-router = react-router-bootstrap
我們的救星就是react-router-bootstrap,它整合React Router v4和React Bootstrap,我們可以直接利用這套件把bootstrap和router直接串起來。LinkContainer等於Nav Link,可以把bootstrap嵌在裡面解決問題。
react-router-bootstrap
https://github.com/react-bootstrap/react-router-bootstrap
React Bootstrap component
<Button href="/foo/bar">Foo</Button>

becomes
<LinkContainer to="/foo/bar">
  <Button>Foo</Button>
</LinkContainer>
react-bootstrp & react-router & react-router-bootstrap = Layout.js
src/components/Layout.js

import React, { Component } from 'react';
import {Navbar, Nav, NavItem, Grid, Row, Col} from 'react-bootstrap'
import {BrowserRouter as Router, Route, Link} from 'react-router-dom'
import {LinkContainer} from 'react-router-bootstrap';
import Notices from './Notices';
import UserInfo from './UserInfo';
import PhoneInfo from './PhoneInfo';

class Layout extends React.Component {
  constructor(props) {
    super(props);
    this.state = { active: 1 };
    this.handleSelect = this.handleSelect.bind(this);
  }

  handleSelect(selectedKey) {
    this.setState({active: selectedKey});
  }

  render() {
    const sidebar = {
      position: 'fixed',
      top: '51px',
      bottom: '0',
      left: '0',
      zIndex: '1000',
      display: 'block',
      padding: '20px',
      overflowX: 'hidden',
      overflowY: 'auto',
      backgroundColor: '#f5f5f5',
      borderRight: '1px solid #eee'
    };
    return (
      <Router>
        <div>
          <Navbar fluid={true}>
            <Navbar.Header>
              <Navbar.Brand>
                <a href="/">React-Bootstrap</a>
              </Navbar.Brand>
            </Navbar.Header>
          </Navbar>
          <Grid fluid={true}>
            <Row className="show-grid">
              <Col xs={2} style={sidebar}>
                <Nav stacked activeKey={this.state.active} onSelect={this.handleSelect}>
                  <LinkContainer to="/userinfo">
                    <NavItem eventKey={1}>使用者清單</NavItem>
                  </LinkContainer>
                  <LinkContainer to="/phoneinfo">
                    <NavItem eventKey={2}>電話清單</NavItem>
                  </LinkContainer>
                  <LinkContainer to="/remakeinfo">
                    <NavItem eventKey={3} disabled>備註清單</NavItem>
                  </LinkContainer>
                </Nav>
              </Col>
              <Col xs={10} xsOffset={2}>
                <Route exact path="/" component={Notices}/>
                <Route path="/userinfo" component={UserInfo}/>
                <Route path="/phoneinfo" component={PhoneInfo}/>
              </Col>
            </Row>
          </Grid>
        </div>
      </Router>
    );
  }
}

export default Layout;
今天我們先把主要layout實作出來,明天再繼續實作剩下的components,到時再把所有程式放到git供大家參考。大家應該有發現Layout.js有個小問題,style是直接當成物件傳入假設今天有很多客製style呢?以往我們會把css寫成檔案再導入使用,因為我們目前webpack沒有使用css-loader所以無法處理,待其它components完成再進行調整。
