跟前面在講解「Messenger 的事件處理基礎」時提到的一樣,第三天在「快速學會 Bottender 基礎概念」的文章中有講到關於 Event 以及 Context 的一些架構跟原理,忘記的人歡迎回去複習一下,可以更方便加快對這篇的理解。
當把前面 Messenger 的內容跟這邊的 LINE 的內容都吸收後,我接下來過幾篇講到跨平台策略時才能更容易有感覺、了解多平台架構設計的方式。
所有的平台都會支援訊息跟文字訊息,所以這跟 Messenger 一樣,你可以用這樣的方式來判斷發生事件是否是訊息或甚至是文字訊息:
context.event.isMessage // true or false
context.event.isText // true or false
至於其他的訊息種類也跟 Messenger 很類似,不過 LINE 沒有檔案(File)訊息:
context.event.isImage // true or false
context.event.isVideo // true or false
context.event.isAudio // true or false
context.event.isLocation // true or false
context.event.isSticker // true or false
而判斷 Payload 的方法也跟 Messenger 如出一徹,如果不知道 Payload 是幹嘛用的讀者可以參考「Day 08:按鈕、快速回覆的使用方法與重要性」文中的介紹:
context.event.isPayload
另外兩個重要的 LINE Event 則是加好友時會收到的 follow Event:
context.event.isFollow // true or false
以及被封鎖時會收到的 unfollow Event:
context.event.isUnfollow // true or false
這兩個 Event 可以用來實作歡迎訊息,以及在封鎖後清掉一些相關的資料:
module.exports = async function App(context) {
  if (context.event.isFollow) {
    await context.sendText('真正高興能見到你,滿心歡喜的歡迎你~');
  } else if (context.event.isUnfollow) {
    // 清掉一些東西,這邊就不講話了,因為封鎖後也無法發話
  }
}
這邊先知道這樣就夠用囉!
首先我們要先了解 LINE 有兩種發送訊息的方式,其一是 reply(回覆),另外則是 push (推送)。
reply 是回覆訊息給使用者,只能發生在使用者跟機器人互動後,而且只能一次回覆五則以內的訊息。
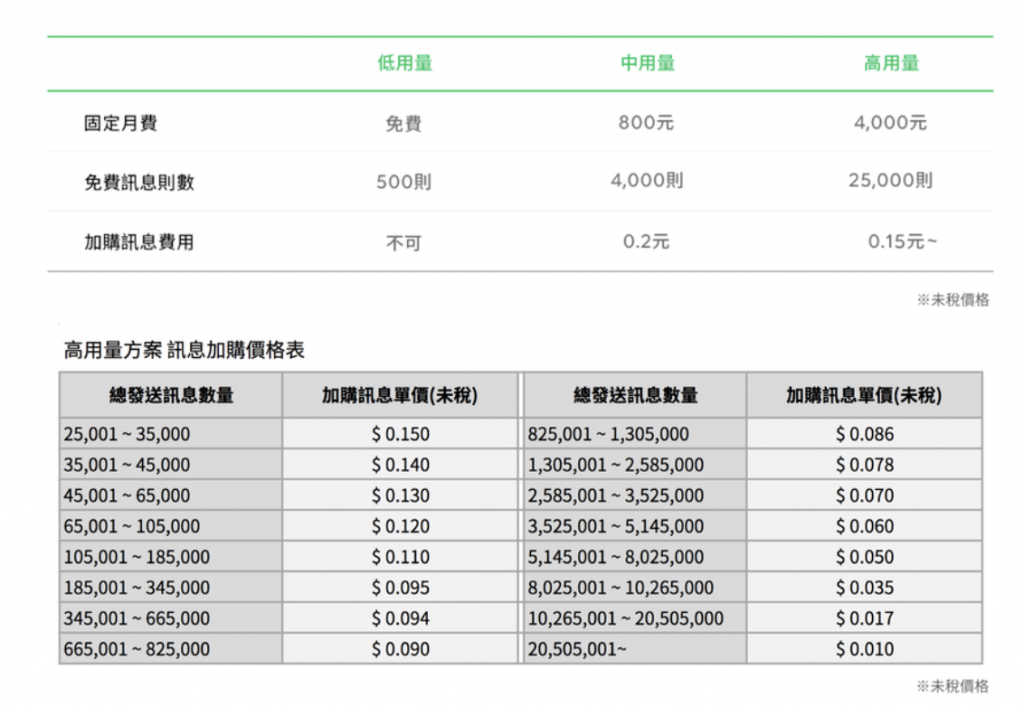
push 則是推送訊息給指定使用者,因此就不受訊息數量限制,但會受預算限制,請看官方計費表:
我們可以在 bottender.config.js 設定 sendMethod(使用 reply 還是 push)以及 shouldBatch(是否五則一起發):
module.exports = {
  // ...其他省略
  channels: {
    line: {
      enabled: true,
      path: '/webhooks/line',
      accessToken: process.env.LINE_ACCESS_TOKEN,
      channelSecret: process.env.LINE_CHANNEL_SECRET,
      sendMethod: 'reply',
      shouldBatch: true,
    },
  },
};
搞清楚 reply 跟 push 後,我們來看看 context 上可以進行哪些操作。
首先當然還是百年不變的 context.sendText,每個平台都支援這個:
await context.sendText('...');
但要注意一下快速回覆(Quick Replies)的用法有小小的差異:
await context.sendText('...', {
  quickReply: {
    items: [
      {
        type: 'action',
        imageUrl: 'https://example.com/sushi.png',
        action: {
          type: 'message',
          label: 'Sushi',
          text: 'Sushi',
        },
      },
    ],
  }
});
再來就是跟 Messenger 很類似但參數有一點點不同的圖片、影片、音檔、地點訊息:
await context.sendImage({
  originalContentUrl: 'https://example.com/original.jpg',
  previewImageUrl: 'https://example.com/preview.jpg',
});
await context.sendVideo({
  originalContentUrl: 'https://example.com/original.mp4',
  previewImageUrl: 'https://example.com/preview.jpg',
});
await context.sendAudio({
  originalContentUrl: 'https://example.com/original.m4a',
  duration: 240000,
});
await context.sendLocation({
  title: 'my location',
  address: '〒150-0002 東京都渋谷区渋谷2丁目21−1',
  latitude: 35.65910807942215,
  longitude: 139.70372892916203,
});
另一個很值得介紹的就是貼圖,貼圖也是 LINE 一個很大的特色吧,尤其是大家熟悉的「熊大」等等:
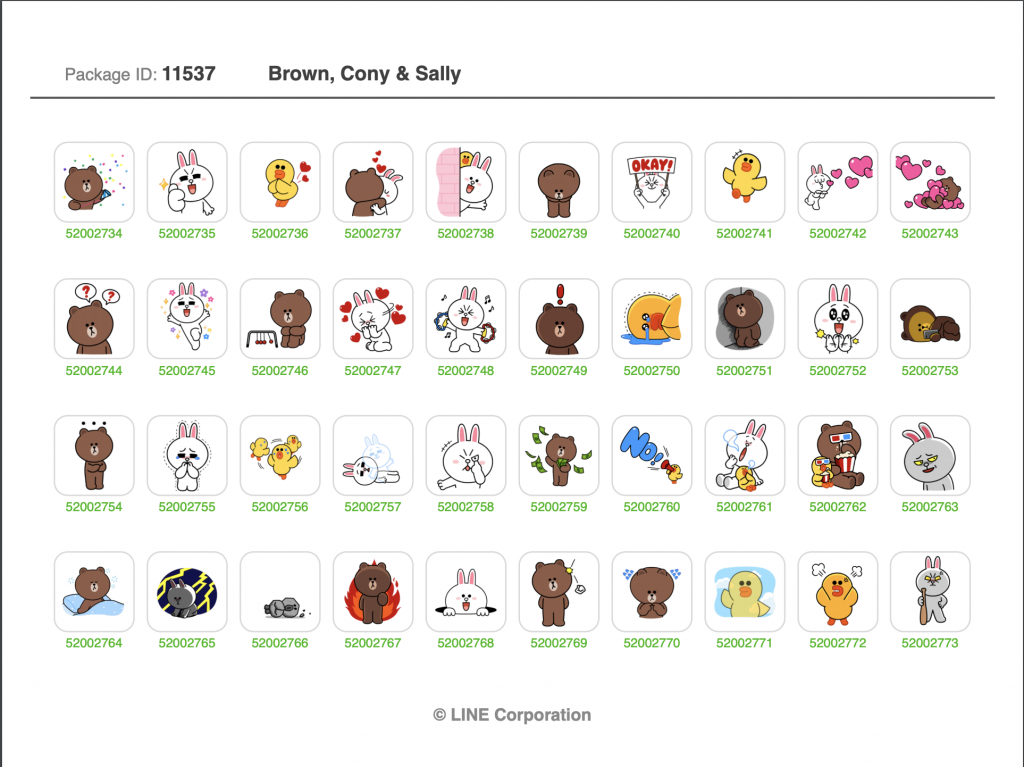
這個連結有列出所有機器人能使用的貼圖。
從上面找出貼圖的 packageId 跟 stickerId,就可以這樣送出:
await context.sendSticker({
  packageId: '1',
  stickerId: '1',
});
在 LINE 上面,一樣有提供數種不同的 Template,來把相關資料整理起來顯示。
在這邊,範本中最重要的兩個就是 Buttons Template(按鈕範本)跟 Carousel Template(輪播範本)。
按鈕範本可以把文字、圖片、按鈕整合在一起,像一張卡片一樣,按鈕至多可以放到 4 個:
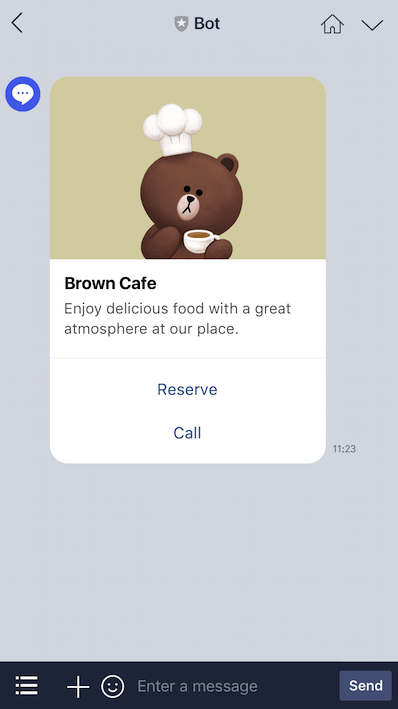
用法類似這樣:
context.sendButtonsTemplate('this is a buttons template', {
  thumbnailImageUrl: 'https://example.com/bot/images/image.jpg',
  title: 'Menu',
  text: 'Please select',
  actions: [
    {
      type: 'postback',
      label: 'Add to cart',
      data: 'action=add&itemid=123',
    },
    {
      type: 'uri',
      label: 'View detail',
      uri: 'http://example.com/page/123',
    },
  ],
});
輪播範本有點像很多個按鈕範本排在一起,最多可以從左到右放 10 個項目。
用法類似這樣:
context.sendCarouselTemplate('this is a carousel template', [
  {
    thumbnailImageUrl: 'https://example.com/bot/images/item1.jpg',
    title: 'this is menu',
    text: 'description',
    actions: [
      {
        type: 'postback',
        label: 'Add to cart',
        data: 'action=add&itemid=111',
      },
      {
        type: 'uri',
        label: 'View detail',
        uri: 'http://example.com/page/111',
      },
    ],
  },
  {
    thumbnailImageUrl: 'https://example.com/bot/images/item2.jpg',
    title: 'this is menu',
    text: 'description',
    actions: [
      {
        type: 'postback',
        label: 'Add to cart',
        data: 'action=add&itemid=222',
      },
      {
        type: 'uri',
        label: 'View detail',
        uri: 'http://example.com/page/222',
      },
    ],
  },
]);
從今天我們可以看到,其實學過 Messenger 後,要再學 LINE 的東西有非常多相似之處,但仔細一看卻又有很多的不同,這就是我們為什麼要學習 Bottender 的架構並體會運用「Learn Once, Write Anywhere」的精神。


 iThome鐵人賽