昨天我們已經建立完地圖了,今天要來加一些每個WebGIS都會有的基本小功能,像是:底圖切換、導航工具、滑鼠坐標、比例尺、鷹眼圖,還有一些比較不常用但也可以加的,如:地圖全螢幕展示。
另外有一個比較特殊的是去擴充Openlayers的原始功能,因為Openlayer提供的函式庫有時候不敷使用,像是只能一次撈出所有layer,每次都要去寫迴圈或是filter去撈特定id的圖層,與其每次都這樣寫,倒不如直接擴充map的功能便於後續的開發工作。
從今天開始就會進入複雜的程式撰寫世界了!
今天先來講解這些功能要如何撰寫,熟悉一下Openlayers的語法,由於這邊不會教基本的程式語言,可以自行上網學完基本的html、css、javascript、jquery、ajax等,再來看這些程式碼才會比較熟悉噢。
今天要寫的功能有:
基本系列會有三天,熟悉寫程式囉
下面列出底圖載入與切換顯示的順序
這部分我覺得需要講詳細一點,因為我至今帶過的新人不少都以為只要加到圖層內畫面上就會顯示這個底圖的切換功能 ,我也不是很明白為什麼他們會有這種奇怪的想法,明明兩個東西就是不一樣啊,當然如果用原生的系統功能就是例外了。
1-1. 建立底圖清單
1-2. 依據清單載入底圖並加入地圖 (頁面上看不到)
1-3. 建立切換底圖功能靜態頁面架構
1-4. 依據清單顯示切換底圖html畫面
1-5. 撰寫切換底圖功能
1-6. 將切換底圖功能綁定在底圖onclick事件上
開一個變數config_basemap,本次底圖清單包含:
參數如下,這部分也可自定義:
id:自訂Layer的IDname:畫面上預計顯示的名稱image:地圖切換畫面上顯示的縮圖示例type:類型opacity:透明度initVisible:是否預設要顯示在地圖上urls:圖層資訊
name:Openlayers載入方式parm:圖層載入參數
url:介接網址wrapX:是否要在X方向重複顯示var config_basemap = [
{
id: "OSM", name: "OpenStreetMap", image: "OSM_MAP.png", type: "ol", opacity: 1, initVisible: true, urls: [
{
name: "OSM", parm: { }
}]
}, {
id: "EMap", name: "通用版電子地圖", image: "EMap_MAP.png", type: "ol", opacity: 1, initVisible: false, urls: [
{
name: "XYZ", parm: {
url: "https://wmts.nlsc.gov.tw/wmts/EMAP/default/GoogleMapsCompatible/{z}/{y}/{x}",
wrapX: false
}
}]
}, {
id: "OrthoPhoto", name: "正射影像圖(通用版)", image: "OrthoPhoto_MAP.png", type: "ol", opacity: 1, initVisible: false, urls: [
{
name: "XYZ", parm: {
url: "https://wmts.nlsc.gov.tw/wmts/PHOTO2/default/GoogleMapsCompatible/{z}/{y}/{x}",
wrapX: false
}
}]
}, {
id: "CartoDB", name: "CartoDB地圖", image: "CartoDB_MAP.png", type: "ol", opacity: 1, initVisible: false, urls: [
{
name: "XYZ", parm: {
url: "https://{1-4}.basemaps.cartocdn.com/rastertiles/voyager_labels_under/{z}/{x}/{y}.png",
wrapX: false
}
}]
}, {
id: "CartoDB_Dark", name: "CartoDB地圖(深色)", image: "CartoDB_Dark_MAP.png", type: "ol", opacity: 1, initVisible: false, urls: [
{
name: "XYZ", parm: {
url: "https://{1-4}.basemaps.cartocdn.com/rastertiles/dark_all/{z}/{x}/{y}.png",
wrapX: false
}
}]
}, {
id: "CartoDB_Antique", name: "CartoDB地圖(仿古)", image: "CartoDB_Antique_MAP.png", type: "ol", opacity: 1, initVisible: false, urls: [
{
name: "XYZ", parm: {
url: "https://cartocdn_{a-d}.global.ssl.fastly.net/base-antique/{z}/{x}/{y}.png",
wrapX: false
}
}]
}
];
建立載入底圖function名為loadBasemap,讀入前一步驟建立的圖層清單後,以迴圈的方式一個個將圖層加入到現有地圖當中,並依據圖層清單內的透明度、是否顯示進行設置。最後,將所有底圖的layer存在basemapArray內。
後面一段則是將昨天的地圖載入程式碼修正,layers取basemapArray裡面的所有圖層進行載入,並設置後續各個小工具都是可以縮小視窗的 (collapsible: true)。
這邊補充說明一下eval的寫法,其實平常我不太使用eval的寫法來寫程式,通常會寫一堆判斷式進行判斷,但這邊會這樣寫是為了減少篇幅,不然就會有一長串的程式碼放上來了。
var basemapArray = [];
function loadBasemap() {
    //迴圈載入圖層
    $.each(config_basemap, function (index, item) {
        var basemap_parm = item.urls[0];
        var layer = eval("new ol.layer.Tile({ \
                source: new ol.source."+ basemap_parm.name + "(" +
                JSON.stringify(basemap_parm.parm) + ") \
            })");
        layer.setOpacity(item.opacity);
        layer.setVisible(item.initVisible);
        layer.id = item.id;
        basemapArray.push(layer);
    });
    //修正昨天的寫法
    map = new ol.Map({
        view: new ol.View({
            center: [13450000, 2700000],
            zoom: 8
        }),
        layers: basemapArray,
        target: 'map',
        //加載圖磚動畫效果
        loadTilesWhileAnimating: true,
        pixelRatio: window.devicePixelRatio,
        //地圖小工具可以縮小視窗
        controls: new ol.control.defaults({
            attributionOptions: {
                collapsible: true
            }
        })
    });
}
<!DOCTYPE html>
<html>
<head>
    <meta charset="utf-8" />
    <title>Document</title>
    <style>
        #basemaplist{
            text-align: center;
        }
        #basemaplist img.selected {
            border: 2px red solid;
        }
    </style>
</head>
<body>
    <h2>切換底圖</h2>
    <div>
        <table id="basemaplist" style="width: 100%">
        </table>
    </div>
    <script type="text/javascript" src="map_module/widget/BasicTool/jBasemap.js"></script>
    <script>
        initBasemapPage();
    </script>
</body>
</html>
底圖切換頁面功能,jBasemap.js
function initBasemapPage() {
    var tablestring = "";
    $.each(config_basemap, function (index, item) {
        if (item.initVisible === true) {
            tablestring += "<tr onclick='changeBasemap(\"" + item.id + "\")'><td><div><img id='img_" + item.id + "' class='selected' src='images/BasicTool/Basemap/" + item.image + "' width='60%'></div><div>" + item.name + "</div></td></tr>";
        } else {
            tablestring += "<tr onclick='changeBasemap(\"" + item.id + "\")'><td><div><img id='img_" + item.id + "' src='images/BasicTool/Basemap/" + item.image + "' width='60%'></div><div>" + item.name + "</div></td></tr>";
        }
    });
    $("#basemaplist").html(tablestring);
}
function changeBasemap(id) {
    $("#basemaplist img").removeClass("selected");
    $("#basemaplist #img_" + id).addClass("selected");
    $.each(config_basemap, function (index, item) {
        map.getLayers().forEach(function (layer) {
            if (layer.id === item.id) {
                if (layer.id === id) {
                    layer.setVisible(true);
                    config_basemap[index].initVisible = true;
                } else {
                    layer.setVisible(false);
                    config_basemap[index].initVisible = false;
                }
            }
        });
    });
}
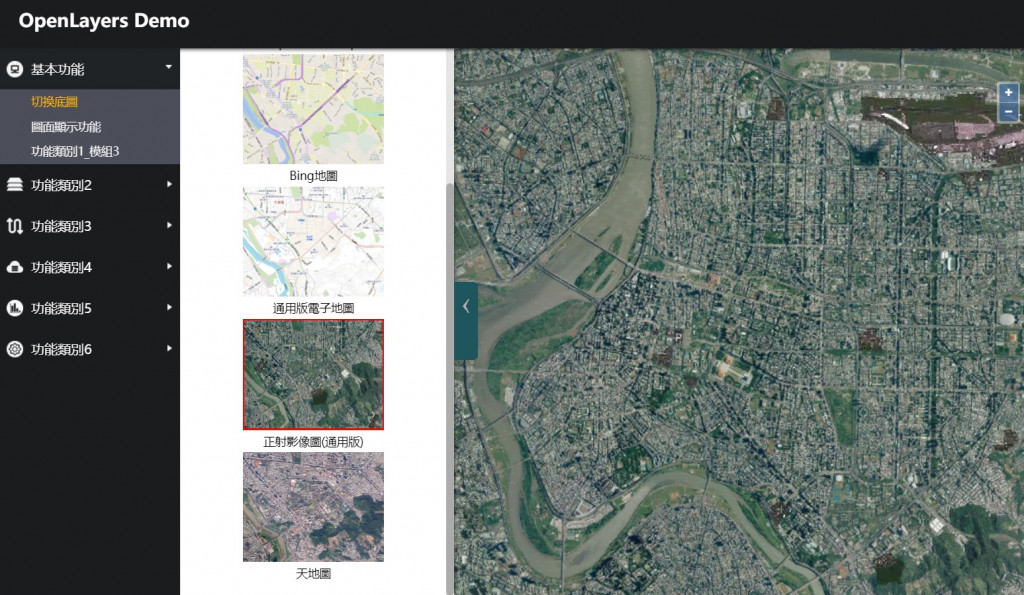
畫面 (項目可能會與上面的程式碼略為不同,我有拿掉一些資料)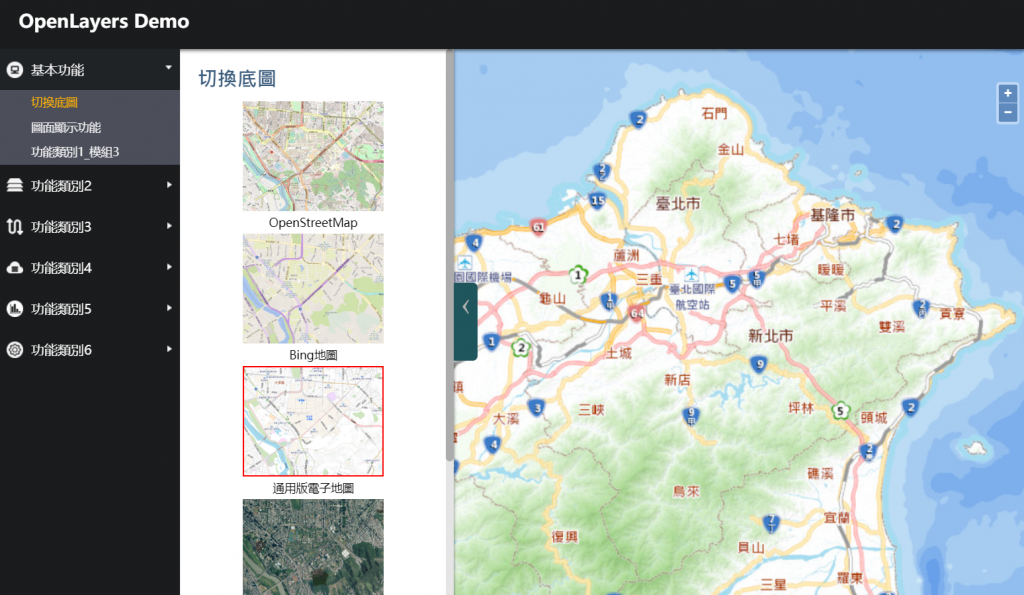
新增基本的導航小工具
var zoomsliderControl= new ol.control.ZoomSlider();
map.addControl(zoomsliderControl);
在map.aspx的header添加坐標要顯示的位置mouse-position
<div id="header">
    <a class="logo">
        <span>OpenLayers Demo</span>
    </a>
    <div id="mouse-position" style="color: white; position: absolute; right: 20px; bottom: 2px;"></div>
</div>
新增css樣式.custom-mouse-position
.custom-mouse-position {
    color: rgb(255, 255, 255);
    font-size: 12px;
    font-family: "Microsoft JhengHei";
}
建立顯示滑鼠位置之function mousePositionControl,並加到地圖內
var mousePositionControl = new ol.control.MousePosition({
    //坐標格式
    coordinateFormat: new ol.coordinate.createStringXY(4),
    //坐標系統
    projection: 'EPSG:4326',
    //坐標資訊顯示樣式名稱
    className: 'custom-mouse-position',
    //顯示坐標的容器
    target: container,
    //未定義坐標的標記
    undefinedHTML: ' '
});
map.addControl(mousePositionControl);
使用ol.control.ScaleLine功能,設置單位為公尺(metric),並加入地圖當中。
var scaleLineControl = new ol.control.ScaleLine({
        units: "metric"
    });
map.addControl(scaleLineControl);
使用ol.control.OverviewMap功能,底圖使用正射影像圖(通用版),其載入方式跟前述底圖載入方式一樣,並加入地圖當中。
var overviewMapControl = new ol.control.OverviewMap({
    className: 'ol-overviewmap ol-custom-overviewmap',
    layers: [
        new ol.layer.Tile({
            source: new ol.source.XYZ({
                url: "https://wmts.nlsc.gov.tw/wmts/PHOTO2/default/GoogleMapsCompatible/{z}/{y}/{x}",
                wrapX: false
            })
        })
    ],
    collapseLabel: '\u00BB',
    label: '\u00AB',
    collapsed: false
});
map.addControl(overviewMapControl);
此功能可以將地圖以全螢幕來顯示 ,雖然我覺得蠻沒用的
使用ol.control.FullScreen功能,並加入地圖當中。
var fullscreenControl = new ol.control.FullScreen();
map.addControl(fullscreenControl);
就如同前言提到的,Openlayers的函式庫雖然提供了不少的功能,但是還有一些常常需要用到卻沒有直接對應的函式,每次要用都還需要寫長串的功能去呼叫
為了解決這個問題,我選擇的方法是擴充ol.Map的prototype,因為一個網頁可能有不只一個地圖,因此擴充prototype是比較方便的寫法
為了避免混淆,我將擴充的功能前面加e_便於識別,代表不是Openlayers的原生功能 (當然若你不會搞混的話,不用加也可以)
以下為本次擴充的功能:
e_getLayer:利用layer的id去抓取特定的圖層e_getLayerIndex:利用layer的id去抓取特定的圖層的套疊順序e_changeBasemap:輸入底圖id去切換底圖e_getBasemap:獲得現在底圖的id$(function () {
if (ol.Map.prototype.e_getLayer === undefined) {
ol.Map.prototype.e_getLayer = function (id) {
var layer;
this.getLayers().forEach(function (lyr) {
if (id === lyr.id) {
layer = lyr;
}
});
return layer;
};
}
if (ol.Map.prototype.e_getLayerIndex === undefined) {
ol.Map.prototype.e_getLayerIndex = function (id) {
var index;
this.getLayers().forEach(function (lyr, idx) {
if (id === lyr.id) {
index = idx;
}
});
return index;
};
}
if (ol.Map.prototype.e_changeBasemap === undefined) {
ol.Map.prototype.e_changeBasemap = function (id) {
var thismap = this;
$.each(config_basemap, function (index, item) {
if (id === item.id) {
thismap.e_getLayer(item.id).setVisible(true);
thismap.e_getLayer(item.id).setZIndex(0);
config_basemap[index].initVisible = true;
} else {
thismap.e_getLayer(item.id).setVisible(false);
config_basemap[index].initVisible = false;
}
});
};
}
if (ol.Map.prototype.e_getBasemap === undefined) {
ol.Map.prototype.e_getBasemap = function () {
var thismap = this;
var basemap;
$.each(config_basemap, function (index, item) {
if (item.initVisible === true) {
basemap = {
"index": thismap.e_getLayerIndex(item.id),
"id": item.id
};
}
});
return basemap;
};
}
});
先前程式碼就可以改為下面這種方式,是不是每次要呼叫切換底圖功能就簡潔多了呢
function changeBasemap(id) {
    $("#basemaplist img").removeClass("selected");
    $("#basemaplist #img_" + id).addClass("selected");
    //移除掉原本的寫法,改為擴充寫法
    //$.each(config_basemap, function (index, item) {
    //    map.getLayers().forEach(function (layer) {
    //        if (layer.id === item.id) {
    //            if (layer.id === id) {
    //                layer.setVisible(true);
    //                layer.setZIndex(0);
    //                config_basemap[index].initVisible = true;
    //            } else {
    //                layer.setVisible(false);
    //                config_basemap[index].initVisible = false;
    //            }
    //        }
    //    });
    //});
    map.e_changeBasemap(id);
}
統整切換底圖順序與參數對應
config_basemap
loadBasemap()
initBasemapPage()
changeBasemap(id)
加入了導航工具、滑鼠位置、比例尺、鷹眼圖、地圖全螢幕展示等5個地圖小工具
最後學會擴充Prototype
到現在為止,基本該有的地圖功能都會寫了,明天我們把這些工具統整後變成一個頁面內的功能,可以自由開關,並新增圖層探查功能。