之前我們都是自建模型,事實上 Keras 引進很多預先訓練好的模型(Keras Applications),他們都是屬於影像辨識的模型,大都是各屆影像辨識大賽(ILSVRC)的冠/亞軍,每個模型層數/參數都很多,均使用超強的伺服器訓練而成的(對我而言),讓一般人可以直接套用這些模型進行辨識。
套用的方式包括:
我們就來看看以上方式如何實踐。
幾個月沒看官網,與三年前比較,Keras 提供的的模型又增加許多個,以下是目前【官網】 的表列:
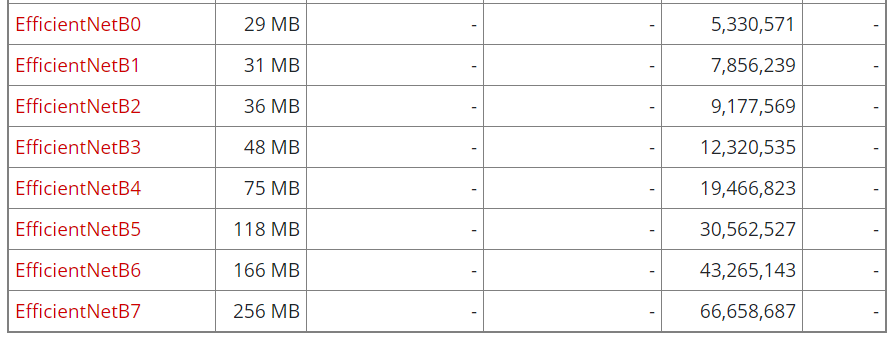
表格欄位說明如下:
先測一段官網的程式如下,檔案名稱為 14_01_Keras_applications1.ipynb。
from tensorflow.keras.applications.resnet50 import ResNet50
from tensorflow.keras.preprocessing import image
from tensorflow.keras.applications.resnet50 import preprocess_input, decode_predictions
import numpy as np

# 預先訓練好的模型 -- ResNet50
model = ResNet50(weights='imagenet')

# 任意一張圖片,例如大象
img_path = './images/elephant.jpg'
# 載入圖檔,並縮放寬高為 (224, 224)
img = image.load_img(img_path, target_size=(224, 224))
# 加一維,變成 (1, 224, 224, 3),最後一維是色彩
x = image.img_to_array(img)
x = np.expand_dims(x, axis=0)
# 特徵縮放,每個特徵減掉該特徵的平均數
x = preprocess_input(x)

# 預測
preds = model.predict(x)
# decode the results into a list of tuples (class, description, probability)
# 顯示預測前3名的答案
print('Predicted:', decode_predictions(preds, top=3)[0])
執行程式時會下載ResNet50模型,預設會存在使用者目錄(C:\Users<login_user>)下的 .keras/models/ 次目錄。程式執行結果如下,預測前3名的答案為:
上一張是側面照,這次換正面照,預測前3名的答案為:
厲害,連大象的種類都分辨的出來。
也可以採用部分模型,只擷取特徵,程式如下,檔案名稱為 14_02_Keras_applications2.ipynb:
from tensorflow.keras.applications.vgg16 import VGG16
from tensorflow.keras.preprocessing import image
from tensorflow.keras.applications.vgg16 import preprocess_input
import numpy as np

# 預先訓練好的模型 -- VGG16, 不含後三層(辨識層)
model = VGG16(weights='imagenet', include_top=False)

# 任意一張圖片,例如大象
img_path = './images/elephant.jpg'
# 載入圖檔,並縮放寬高為 (224, 224)
img = image.load_img(img_path, target_size=(224, 224))
# 加一維,變成 (1, 224, 224, 3),最後一維是色彩
x = image.img_to_array(img)
x = np.expand_dims(x, axis=0)
# 特徵縮放,每個特徵減掉該特徵的平均數
x = preprocess_input(x)

features = model.predict(x)
print(features)
補充說明如下:
進一步使用上述得到的特徵向量,比較各圖檔的相似性,程序如下:
from os import listdir
from os.path import isfile, join

# 讀取目錄下所有圖檔
img_path = './images/'
image_files = np.array([f for f in listdir(img_path) if isfile(join(img_path, f)) and f[-3:] == 'jpg'])
image_files
import numpy as np

X = np.array([])
# 合併每個圖檔的像素
for f in image_files:
    image_file = join(img_path, f)
    # 載入圖檔,並縮放寬高為 (224, 224)
    img = image.load_img(image_file, target_size=(224, 224))
    # 加一維,變成 (1, 224, 224, 3),最後一維是色彩
    img2 = image.img_to_array(img)
    img2 = np.expand_dims(img2, axis=0)
    if len(X.shape) == 1:
        X = img2
    else:
        X = np.concatenate((X, img2), axis=0)

X = preprocess_input(X)

# 預測
features = model.predict(X)

features.shape, X.shape
# 使用 cosine_similarity 比較特徵向量
from sklearn.metrics.pairwise import cosine_similarity

features2 = features.reshape((features.shape[0], -1))

# 比較對象:Tiger3.jpg
no=-2
print(image_files[no])
similar_list = cosine_similarity(features2[no:no+1], features2[:no], dense_output=False)
image_files[:no][np.argsort(similar_list[0])[::-1]]
Tiger3.jpg 與其他圖檔的特徵向量比較,依相似度高低排列如下,結果正確。
'Tiger.jpg', 'Tiger2.jpg', 'style.jpg', 'elephant.jpg', 'elephant2.jpg', 'input.jpg', 'bird01.jpg'
再比另一個圖檔 elephant.jpg,依相似度高低排列如下,結果也正確。
'elephant2.jpg', 'Tiger2.jpg', 'Tiger.jpg', 'Tiger3.jpg', 'style.jpg', '太陽花.jpg', 'input.jpg'
我們可以完全接納這些預先訓練好的模型,作1000種事物的圖像辨識,也可以部分採用,擷取特徵,這不限於1000種事物,可以擷取其他事物的特徵向量,再以 Cosine Similarity 比較其相似性。
本篇範例包括 14_01_Keras_applications_1.ipynb、14_02_Keras_applications2.ipynb,可自【這裡】下載。


 iThome鐵人賽