近年來,深度偽造(DeepFake)已經造成假影片氾濫,從剛開始的美國總統Obama的談話影片,到最近明星臉全部被套到各式的影片當中,真偽難辨,它根源的技術就是【生成式對抗網路】(Generative Adversarial Network, GAN),相關的介紹可以參照【Day 28:小學生談『生成對抗網路』(Generative Adversarial Network,GAN)】一文,本篇不再贅述,將主題放在如何使用Keras實作GAN。
根據【GAN Zoo】統計,2014~2018年 GAN 各式的演算法就有 502 個,比較炫的演算法可以參閱【Some cool applications of GAN】,摘要部分如下:
動漫人物創作(Create Anime characters)。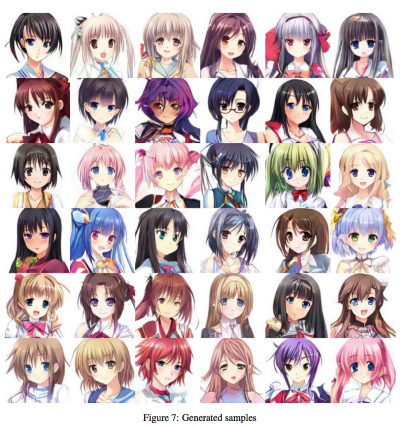
各種姿勢生成(Pose Guided Person Image Generation):加上各種姿勢的關鍵點,GAN可以生成模特兒的各種站姿。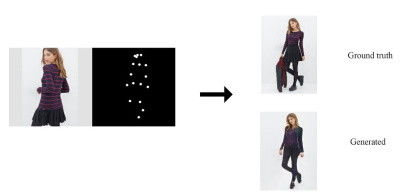
跨領域變換(Cross-domain transfer):類似風格轉換,但只換目標物,例如下圖,將一般的馬加上斑馬紋,也能作相反的變換。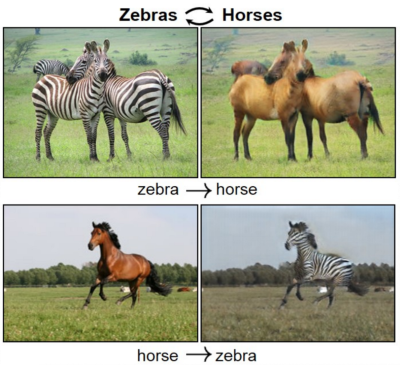
提升解析度(Super resolution)。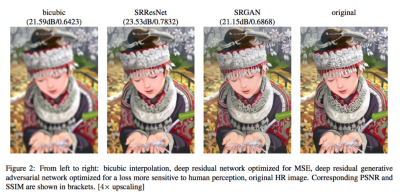
換臉(Progressive growing of GANs)
由影像分割(image segmentation)產生真實影像,右半圖變換為左半圖。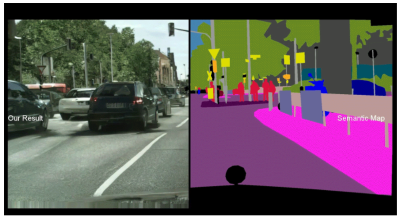
類似生成影像的應用,不勝枚舉,請參閱【Some cool applications of GAN】完整說明。
GAN主要分為兩個網路,一個是偽造者(counterfeiter)就稱為『生成模型』(generative model),另一個稱為『判别模型』(discriminative model),簡單架構如下圖: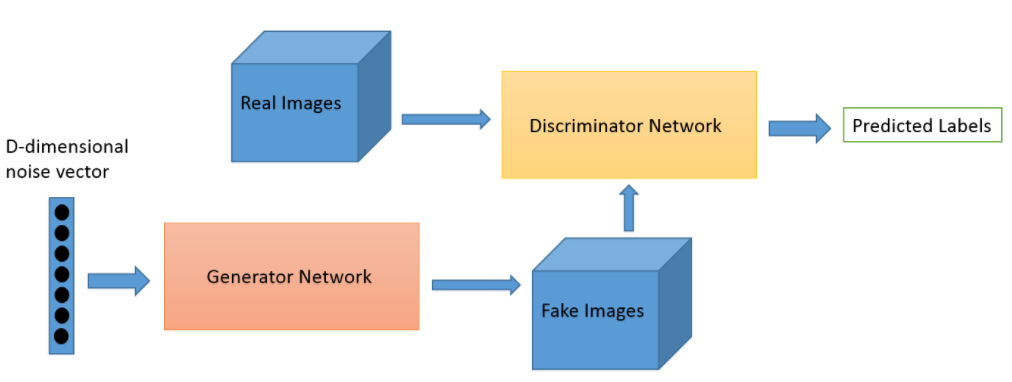
圖. GAN Architecture,圖片來源:generative-adversarial-networks
兩個網路分別定義不同的損失函數,把它合成起來,透過最大概似法(MLE),優化求解,特別的是在『生成模型』求解的過程中,將影像不斷的擷取出來,就構成GAN最大的亮點。各種演算法定義不同的損失函數,就會產生不同的效果,如下表: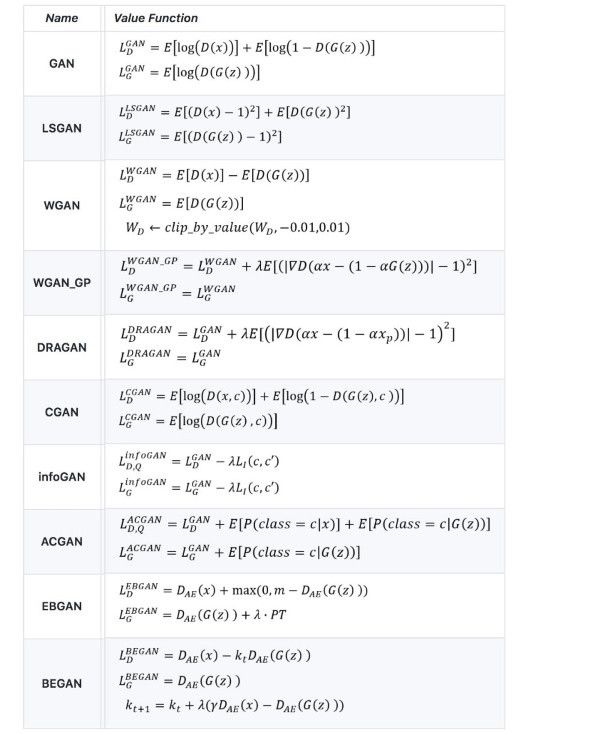
接著我們就來實作CycleGAN演算法,將一般的馬加上斑馬紋,看看效果如何。此程式修改自【Keras 官網】,程式碼較長,只說明重要的區塊,完整程式請直接參考 27_01_CycleGAN.ipynb:
dataset, metadata = tfds.load('cycle_gan/horse2zebra',
                              with_info=True, as_supervised=True)

train_horses, train_zebras = dataset['trainA'], dataset['trainB']
test_horses, test_zebras = dataset['testA'], dataset['testB']
buffer_size = 256
batch_size = 1

# Define the standard image size.
orig_img_size = (286, 286)
# Size of the random crops to be used during training.
input_img_size = (256, 256, 3)
# Weights initializer for the layers.
kernel_init = keras.initializers.RandomNormal(mean=0.0, stddev=0.02)
# Gamma initializer for instance normalization.
gamma_init = keras.initializers.RandomNormal(mean=0.0, stddev=0.02)


def normalize_img(img):
    img = tf.cast(img, dtype=tf.float32)
    # Map values in the range [-1, 1]
    return (img / 127.5) - 1.0


def preprocess_train_image(img, label):
    # Random flip
    img = tf.image.random_flip_left_right(img)
    # Resize to the original size first
    img = tf.image.resize(img, [*orig_img_size])
    # Random crop to 256X256
    img = tf.image.random_crop(img, size=[*input_img_size])
    # Normalize the pixel values in the range [-1, 1]
    img = normalize_img(img)
    return img


def preprocess_test_image(img, label):
    # Only resizing and normalization for the test images.
    img = tf.image.resize(img, [input_img_size[0], input_img_size[1]])
    img = normalize_img(img)
    return img
# Apply the preprocessing operations to the training data
train_horses = (
    train_horses.map(preprocess_train_image, num_parallel_calls=autotune)
    .cache()
    .shuffle(buffer_size)
    .batch(batch_size)
)
train_zebras = (
    train_zebras.map(preprocess_train_image, num_parallel_calls=autotune)
    .cache()
    .shuffle(buffer_size)
    .batch(batch_size)
)

# Apply the preprocessing operations to the test data
test_horses = (
    test_horses.map(preprocess_test_image, num_parallel_calls=autotune)
    .cache()
    .shuffle(buffer_size)
    .batch(batch_size)
)
test_zebras = (
    test_zebras.map(preprocess_test_image, num_parallel_calls=autotune)
    .cache()
    .shuffle(buffer_size)
    .batch(batch_size)
)
class ReflectionPadding2D(layers.Layer):
    """Implements Reflection Padding as a layer.

    Args:
        padding(tuple): Amount of padding for the
        spatial dimensions.

    Returns:
        A padded tensor with the same type as the input tensor.
    """

    def __init__(self, padding=(1, 1), **kwargs):
        self.padding = tuple(padding)
        super(ReflectionPadding2D, self).__init__(**kwargs)

    def call(self, input_tensor, mask=None):
        padding_width, padding_height = self.padding
        padding_tensor = [
            [0, 0],
            [padding_height, padding_height],
            [padding_width, padding_width],
            [0, 0],
        ]
        return tf.pad(input_tensor, padding_tensor, mode="REFLECT")

# 殘差區塊
def residual_block(
    x,
    activation,
    kernel_initializer=kernel_init,
    kernel_size=(3, 3),
    strides=(1, 1),
    padding="valid",
    gamma_initializer=gamma_init,
    use_bias=False,
):
    dim = x.shape[-1]
    input_tensor = x

    x = ReflectionPadding2D()(input_tensor)
    x = layers.Conv2D(
        dim,
        kernel_size,
        strides=strides,
        kernel_initializer=kernel_initializer,
        padding=padding,
        use_bias=use_bias,
    )(x)
    x = tfa.layers.InstanceNormalization(gamma_initializer=gamma_initializer)(x)
    x = activation(x)

    x = ReflectionPadding2D()(x)
    x = layers.Conv2D(
        dim,
        kernel_size,
        strides=strides,
        kernel_initializer=kernel_initializer,
        padding=padding,
        use_bias=use_bias,
    )(x)
    x = tfa.layers.InstanceNormalization(gamma_initializer=gamma_initializer)(x)
    x = layers.add([input_tensor, x])
    return x


# 下採樣
def downsample(
    x,
    filters,
    activation,
    kernel_initializer=kernel_init,
    kernel_size=(3, 3),
    strides=(2, 2),
    padding="same",
    gamma_initializer=gamma_init,
    use_bias=False,
):
    x = layers.Conv2D(
        filters,
        kernel_size,
        strides=strides,
        kernel_initializer=kernel_initializer,
        padding=padding,
        use_bias=use_bias,
    )(x)
    x = tfa.layers.InstanceNormalization(gamma_initializer=gamma_initializer)(x)
    if activation:
        x = activation(x)
    return x


# 上採樣
def upsample(
    x,
    filters,
    activation,
    kernel_size=(3, 3),
    strides=(2, 2),
    padding="same",
    kernel_initializer=kernel_init,
    gamma_initializer=gamma_init,
    use_bias=False,
):
    x = layers.Conv2DTranspose(
        filters,
        kernel_size,
        strides=strides,
        padding=padding,
        kernel_initializer=kernel_initializer,
        use_bias=use_bias,
    )(x)
    x = tfa.layers.InstanceNormalization(gamma_initializer=gamma_initializer)(x)
    if activation:
        x = activation(x)
    return x
建立生成模型(generators)結構如下,程式請參考 27_01_CycleGAN.ipynb:
建立判別模型(discriminators),程式請參考 27_01_CycleGAN.ipynb。
連接生成模型與判別模型,建立CycleGAN 模型。
建立 callback,在每一執行週期結束將生成的影像存檔。
訓練模型,同時產生影像。
結果如下,真的把馬加上紋路了。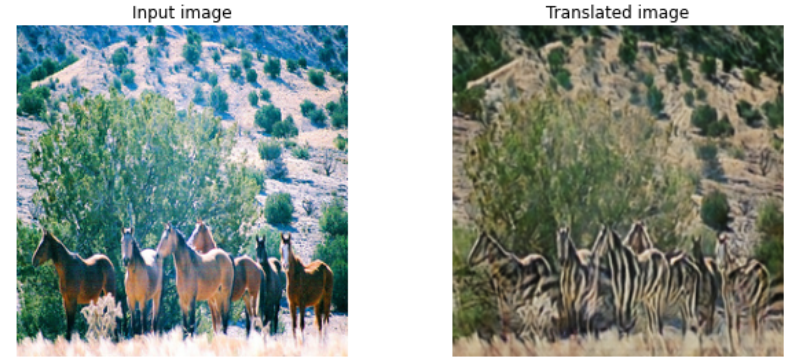
除了GAN以外,還有許多演算法可以生成影像,例如:
GAN 除了有娛樂效果外,還可以生成訓練資料(類似資料增補)、醫療影像等較正規的用途,它是一個很迷人的領域,不過,要深入研究,恐怕要投資一張不錯的獨立顯卡,否則光訓練時間,就可以等到變化石了。
本篇範例包括 27_01_CycleGAN.ipynb,可自【這裡】下載。