自然語言處理主要是指文字(Text)相關的應用,例如:
之前自然語言的處理主要是使用【循環神經網路】(Recurrent Neural Network, RNN),這幾年在演算法有長足的進展,從簡單的RNN、LSTM、GRU開始,後來有【注意力】(Attention)的補強,之後又有 Transformer 出現,相繼有 BERT、ELMO、XLNet、GPT ...等,甚至 BERT 也支援中文,光要了解這些演算法的原理,就一個頭兩個大了。
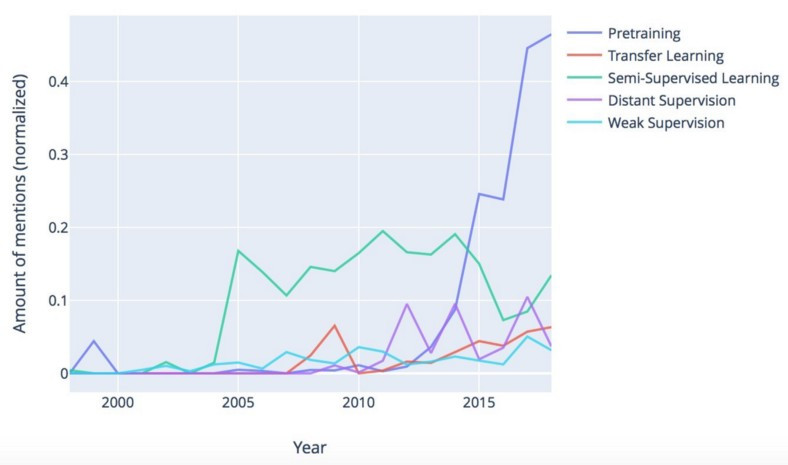
圖一. NLP 演算法討論熱度,圖片來源:Major trends in NLP: a review of 20 years of ACL research
本系列文章主要是介紹 Keras 撰寫,相關演算法原理就請各位讀者自行google了,也可以參考筆者之前寫了一些文章。
本篇先從簡單入門,看看能走到哪裡。
RNN 主要用於時間序列型的資料,如股價、氣候資料,或者上下文相關(Context Sensitive)的資料,例如文章字句有前後關聯,我們需要以較早期發生的資料作為訓練資料,預測當期或未來。
因與上下文相關,RNN 的輸入除了特徵(X)外,還會餵入上一筆隱藏層的輸出,如下圖: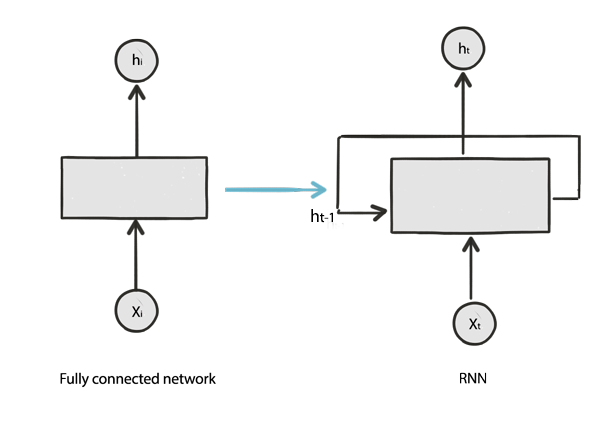
圖二. RNN vs. Dense,圖片來源:RNN Simplified- A beginner’s guide
另外,當前資料會受到上一筆的影響,上一筆又受到【上上一筆】的影響,類似遞迴的概念,因此,稱為【循環神經網路】(Recurrent Neural Network, RNN),捲起來就如下圖左方。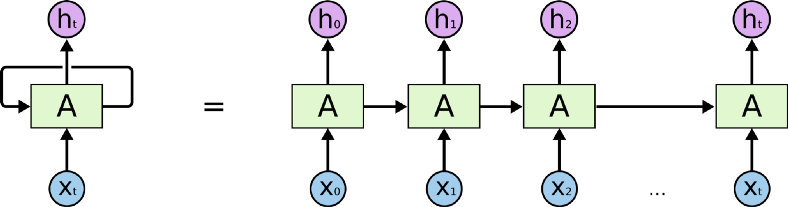
圖三. RNN,圖片來源:RNN Simplified- A beginner’s guide
RNN 基於共享權值(Shared Weights)的假設,遞迴的結果使權值(W)連乘,W>1時,會造成【梯度爆炸】(exploding gradient),反之,W<1時,則會造成【梯度消失】(vanishing gradient),故有改良的的演算法如 LSTM(Long Short Term Memory)、GRU(Gated Recurrent Unit)...等,多維護一條【記憶】處理流程。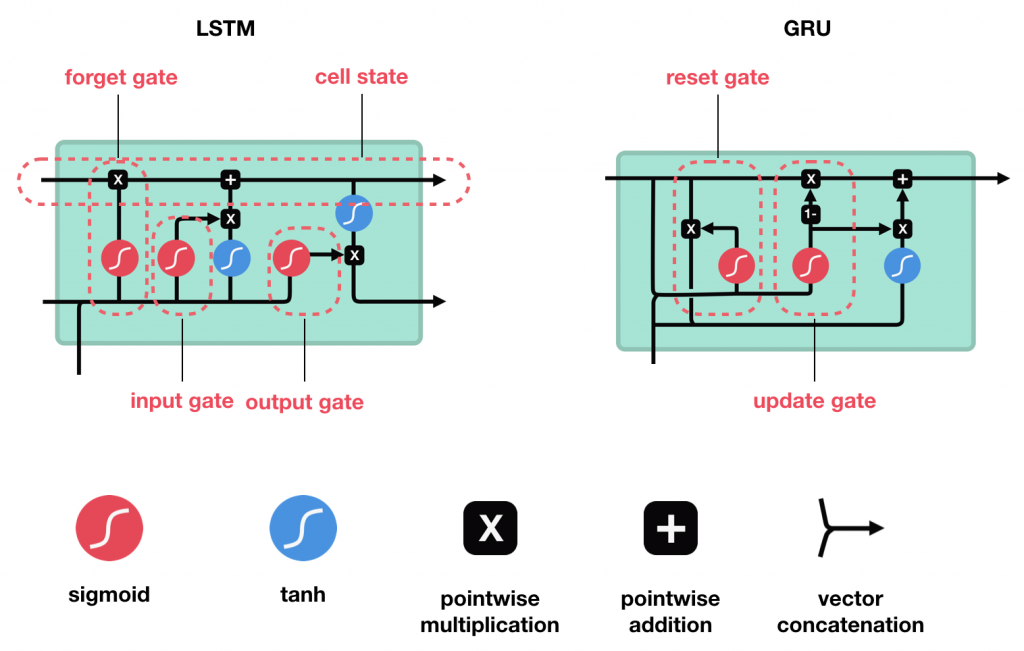
圖四. LSTM及GRU,圖片來源:RNN Simplified- A beginner’s guide
如果要徹底了解RNN/LSTM/GRU,可參閱經典文章【Understanding LSTM Networks】,也可以找到很多中文翻譯。
Keras 實作RNN/LSTM/GRU神經層,分別為SimpleRNN/LSTM/GRU,命名空間(Namespace)為 tensorflow.keras.layers,模型結構的第一層必須為嵌入層(Embedding layer),它將文字轉為緊密的實數空間,使輸入變為向量,才能進行後續的運算。
嵌入層(Embedding layer)的重要參數說明如下:
import numpy as np
import tensorflow as tf
from tensorflow import keras
from tensorflow.keras import layers

model = tf.keras.Sequential()

# 字彙表最大為1000,輸出維度為 64,輸入的字數為 10
model.add(layers.Embedding(input_dim=1000, output_dim=64))

# 產生亂數資料,32筆資料,每筆 10 個數字
input_array = np.random.randint(1000, size=(32, 10))

# 指定損失函數
model.compile('rmsprop', 'mse')

# 預測
output_array = model.predict(input_array)
print(output_array.shape)
output_array[0]
Embedding輸出維度設為64,而輸入為10個數字,故每個數字被轉成64個實數,最後結果的維度 = (32, 10, 64)。
import tensorflow as tf
from tensorflow.keras import layers
from numpy import array
from tensorflow.keras.preprocessing.text import one_hot
from tensorflow.keras.preprocessing.sequence import pad_sequences

# 測試資料
docs = ['Well done!',
		'Good work',
		'Great effort',
		'nice work',
		'Excellent!',
		'Weak',
		'Poor effort!',
		'not good',
		'poor work',
		'Could have done better.']


vocab_size = 50
maxlen = 4

# 先轉成 one-hot encoding
encoded_docs = [one_hot(d, vocab_size) for d in docs]

# 轉成固定長度,長度不足則後面補空白
padded_docs = pad_sequences(encoded_docs, maxlen=maxlen, padding='post')

# 模型只有 Embedding
model = tf.keras.Sequential()
model.add(layers.Embedding(vocab_size, 64, input_length=maxlen))
model.compile('rmsprop', 'mse')

# 預測
output_array = model.predict(padded_docs)
output_array.shape
import tensorflow as tf
from tensorflow.keras import layers
from numpy import array
from tensorflow.keras.preprocessing.text import one_hot
from tensorflow.keras.preprocessing.sequence import pad_sequences

# define documents
docs = ['Well done!',
		'Good work',
		'Great effort',
		'nice work',
		'Excellent!',
		'Weak',
		'Poor effort!',
		'not good',
		'poor work',
		'Could have done better.']

# define class labels
labels = array([1,1,1,1,1,0,0,0,0,0])

vocab_size = 50
maxlen = 4
encoded_docs = [one_hot(d, vocab_size) for d in docs]
padded_docs = pad_sequences(encoded_docs, maxlen=maxlen, padding='post')

model = tf.keras.Sequential()
model.add(layers.Embedding(vocab_size, 8, input_length=maxlen))
model.add(layers.Flatten())
# 加上一般的完全連接層(Dense)
model.add(layers.Dense(1, activation='sigmoid'))
# compile the model
model.compile(optimizer='adam', loss='binary_crossentropy', metrics=['accuracy'])
# summarize the model
print(model.summary())
# fit the model
model.fit(padded_docs, labels, epochs=50, verbose=0)
# evaluate the model
loss, accuracy = model.evaluate(padded_docs, labels, verbose=0)
print('Accuracy: %f' % (accuracy*100))
model = tf.keras.Sequential()
model.add(layers.Embedding(vocab_size, 8, input_length=maxlen))
# Add a RNN layer with 128 internal units.
model.add(layers.SimpleRNN(128))
model.add(layers.Dense(1, activation='sigmoid'))
# load the whole embedding into memory
embeddings_index = dict()
f = open('./glove/glove.6B.100d.txt', encoding='utf8')
for line in f:
	values = line.split()
	word = values[0]
	coefs = np.array(values[1:], dtype='float32')
	embeddings_index[word] = coefs
f.close()
# prepare tokenizer
t = Tokenizer()
t.fit_on_texts(docs)
# integer encode the documents
encoded_docs = t.texts_to_sequences(docs)

padded_docs = pad_sequences(encoded_docs, maxlen=maxlen, padding='post')

# 轉換為GloVe 100維的詞向量
embedding_matrix = np.zeros((vocab_size, 100))
for word, i in t.word_index.items():
	embedding_vector = embeddings_index.get(word)
	if embedding_vector is not None:
		embedding_matrix[i] = embedding_vector
model = tf.keras.Sequential()

# trainable=False
model.add(layers.Embedding(vocab_size, 100, weights=[embedding_matrix], input_length=maxlen, trainable=False))

# Add a LSTM layer with 128 internal units.
model.add(layers.LSTM(128))
model.add(layers.Dense(1, activation='sigmoid'))
# compile the model
model.compile(optimizer='adam', loss='binary_crossentropy', metrics=['accuracy'])
以上先對嵌入層及RNN/LSTM/GRU 做簡單的實驗,幾行程式就可以進行文字分類(Text Classification),下一篇繼續深入研究。相關程式碼修改自:
本篇範例包括 25_01_RNN.ipynb,可自【這裡】下載。