上篇Day-18 Pod, ReplicaSet and deployment(上)我們講到了Pod與ReplicaSet的概念與運用,並且各帶一個範例展示,那本篇章要開始說他們的老大哥deployment了,並且在本章節的中後段會將
Day-12 Write your docker-compose中的docker-compose.yaml轉換成deployment.yaml。
希望能透過實際的例子拋磚引玉,讓大家都夠熟悉從docker-compose到deployment的思維與過程。
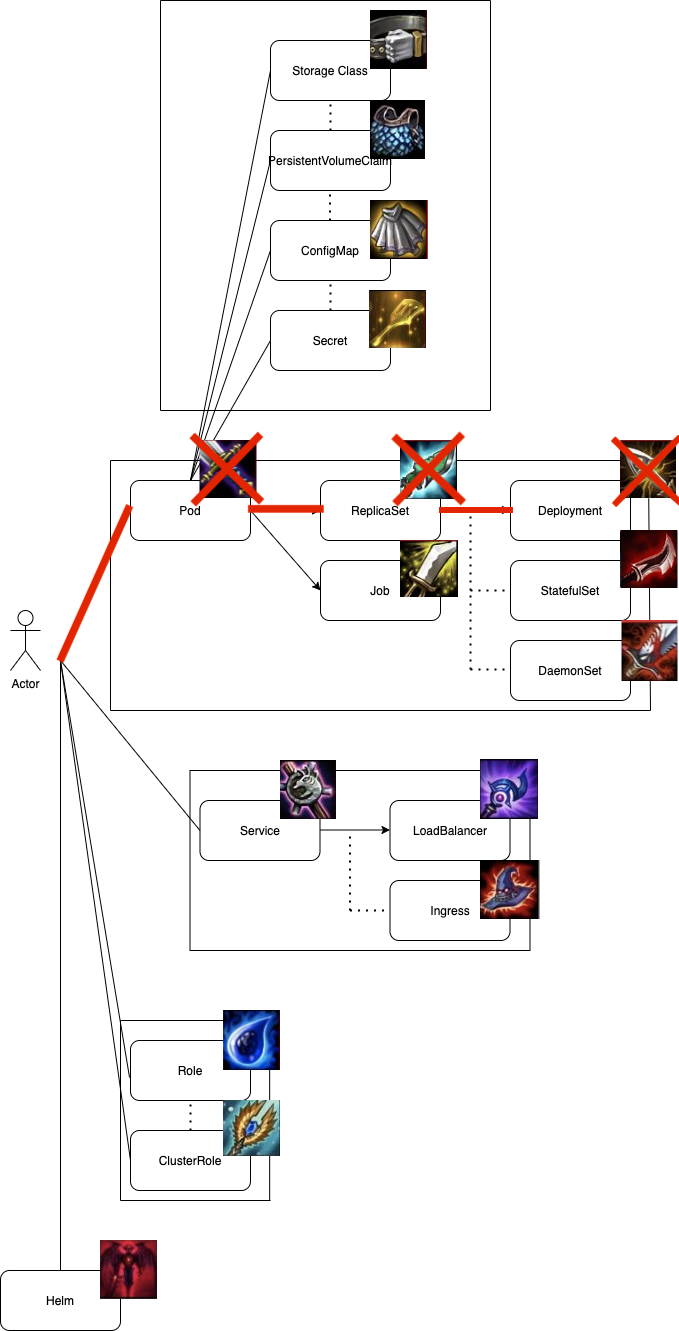
上期我們提到ReplicaSet是因為Replicas的不同(想穩定有N個相同的Pod在運行著)所以衍生出來的管理工具,那Deployment就是之於ReplicaSet上面的老大哥了,這也就是我會建議大家直接撰寫Deployment.yaml而非ReplicaSet或Pod的原因。
在下個段落會開始描述Deployment的理念及和ReplicaSet間的愛恨情仇,那我們就繼續看下去吧。
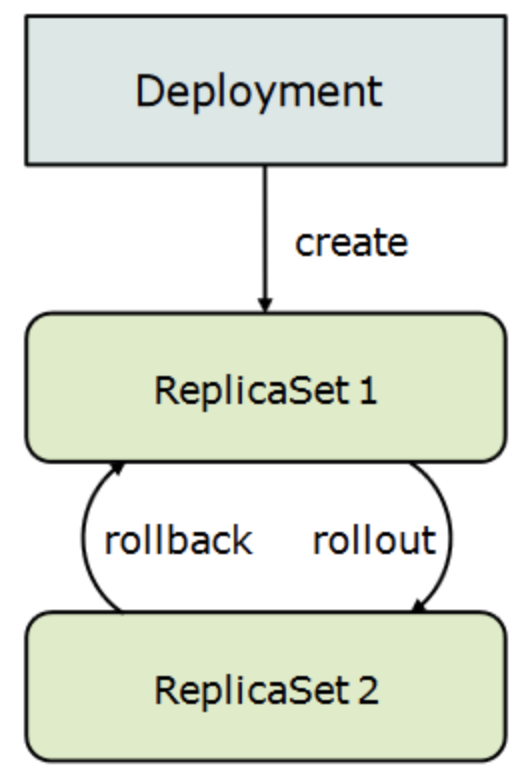
Deployment提供了一個Solution去有效的處理Pod Sets(ReplicaSet & Pod replicas)的Rolling Update / Rolling Back。
因此我們會用Depolyment來做到以下幾件事情:
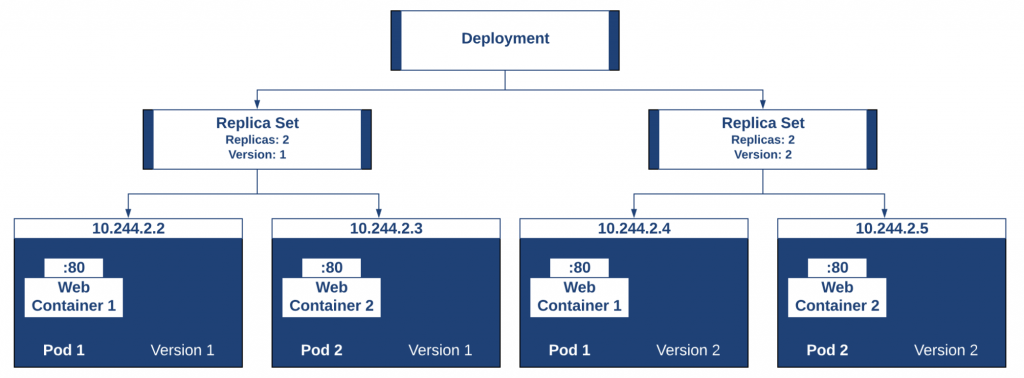
當deployment生成時會一併創立並管理著一個ReplicaSet,而ReplcaSet則管理著Pod set。
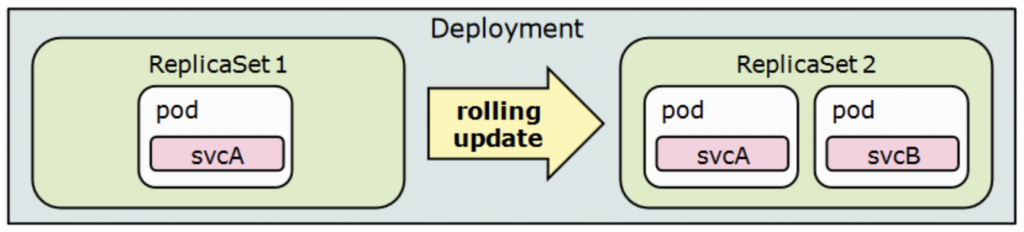
那當服務進行版本更動時,則會生成新版本的ReplicaSet。
新版本的ReplicaSet可能有著與舊版本不同的Replicas,並且兩個ReplicaSets會並存,直到新版本的ReplicSet與指定數量的Pod可以正常運作為止。
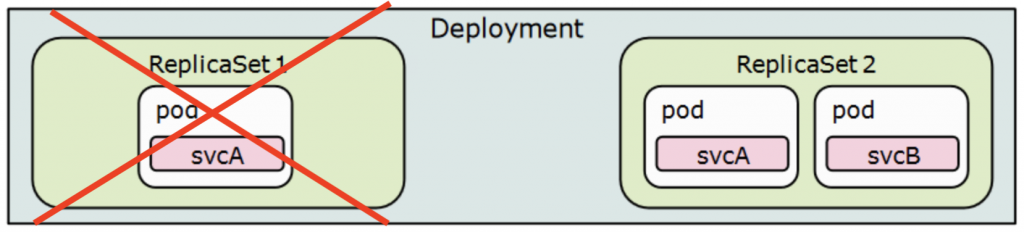
確認新版ReplicaSet與Pod能正常運作後,才會刪除舊版ReplicaSet,並宣布完成版本變更。
deployment與replicaSet的yaml差別只在rolling update相關的key-value,那這部分會在下個環節介紹,這邊主要是展示給大家deployment的運行與狀態。
nginx_deployment.yaml
apiVersion: apps/v1
kind: Deployment
metadata:
  name: nginx
  labels:
    name: nginx
    app: nginx
spec:
  replicas: 3
  selector:
    matchLabels:
      app: nginx
  template:
    metadata:
      labels:
        app: nginx
    spec:
      containers:
      - name: nginx
        image: nginx
        ports:
        - containerPort: 80
那我們開始來部署deployment
$ kubectl apply -f nginx_deployment.yaml
deployment.apps/nginx created
部署完來確認一下deployment的狀態
$ Name:                   nginx
Namespace:              default
CreationTimestamp:      Sun, 27 Sep 2020 16:37:58 +0800
Labels:                 app=nginx
                        name=nginx
Annotations:            deployment.kubernetes.io/revision: 1
                        kubectl.kubernetes.io/last-applied-configuration:
                          {"apiVersion":"apps/v1","kind":"Deployment","metadata":{"annotations":{},"labels":{"app":"nginx","name":"nginx"},"name":"nginx","namespace...
Selector:               app=nginx
Replicas:               3 desired | 3 updated | 3 total | 3 available | 0 unavailable
StrategyType:           RollingUpdate
MinReadySeconds:        0
RollingUpdateStrategy:  25% max unavailable, 25% max surge
Pod Template:
  Labels:  app=nginx
  Containers:
   nginx:
    Image:        nginx
    Port:         80/TCP
    Host Port:    0/TCP
    Environment:  <none>
    Mounts:       <none>
  Volumes:        <none>
Conditions:
  Type           Status  Reason
  ----           ------  ------
  Available      True    MinimumReplicasAvailable
  Progressing    True    NewReplicaSetAvailable
OldReplicaSets:  <none>
NewReplicaSet:   nginx-d46f5678b (3/3 replicas created)
Events:
  Type    Reason             Age    From                   Message
  ----    ------             ----   ----                   -------
  Normal  ScalingReplicaSet  9m53s  deployment-controller  Scaled up replica set nginx-d46f5678b to 3
接下來我們進行版本的更替,並來查看一下deployment的變化
$ kubectl set image deploy/nginx nginx=nginx:stable
deployment.apps/nginx image updated
$ kubectl rollout status deploy nginx
Waiting for deployment "nginx" rollout to finish: 1 out of 3 new replicas have been updated...
Waiting for deployment "nginx" rollout to finish: 1 out of 3 new replicas have been updated...
Waiting for deployment "nginx" rollout to finish: 2 out of 3 new replicas have been updated...
Waiting for deployment "nginx" rollout to finish: 2 out of 3 new replicas have been updated...
Waiting for deployment "nginx" rollout to finish: 2 out of 3 new replicas have been updated...
Waiting for deployment "nginx" rollout to finish: 2 out of 3 new replicas have been updated...
Waiting for deployment "nginx" rollout to finish: 1 old replicas are pending termination...
Waiting for deployment "nginx" rollout to finish: 1 old replicas are pending termination...
deployment "nginx" successfully rolled out
那像以往一樣,我們來寫點Code吧!
我們一樣把Day-12 Write your docker-compose 的yaml為例,試著將它轉換成deployment

我們來將這三個containers放進同個pod,並且加上replicas與rolling strategy試試吧
我們來解析一下這份yaml吧:
version: '3'
services:
    nginx:
      container_name: nginx
      image: nginx
      ports:
        - "80:80"
      volumes:
        - ./nginx/nginx.conf:/etc/nginx/nginx.conf
        - ./nginx/default.conf:/etc/nginx/conf.d/default.conf
      restart: always
      networks:
        - ironman-net
    redis:
      container_name: redis
      image: redis:4.0
      ports:
        - "6379:6379"
      restart: always
      networks:
        - ironman-net
    ironman:
      container_name: ironman
      image: ghjjhg567/ironman:latest
      volumes:
        - ./app/:/usr/src/app/app
      env_file:
        - prd.env
      restart: always
      networks:
        - ironman-net

networks:
  ironman-net:
    driver: bridge
Tips:
說完了我們的需求以及解說了些不會在這次實作的部分之後,我們來寫code吧!
我們先撰寫個deployment的template。在定義好api版本與deployment的info之後,
apiVersion: apps/v1
kind: Deployment
metadata:
  name: ironman
  labels:
    name: ironman
    app: ironman
spec:
  minReadySeconds: 5
  strategy:
    type: RollingUpdate
    rollingUpdate:
      maxSurge: 1
      maxUnavailable: 1
接下來我們補上ReplicaSet的部分吧!
這部分由於我們在Day-18 Pod, ReplicaSet and deployment(上)說過了,因此我們略過,有需要的朋友再去看一下那個章節。
apiVersion: apps/v1
kind: Deployment
metadata:
  name: ironman
  labels:
    name: ironman
    app: ironman
spec:
  minReadySeconds: 5
  strategy:
    type: RollingUpdate
    rollingUpdate:
      maxSurge: 1
      maxUnavailable: 1
	replicas: 1
  selector:
    matchLabels:
      app: ironman
最後則是三個containers的部分,我就先寫成yaml再來解說吧!
apiVersion: apps/v1
kind: Deployment
metadata:
  name: ironman
  labels:
    name: ironman
    app: ironman
spec:
  minReadySeconds: 5
  strategy:
    type: RollingUpdate
    rollingUpdate:
      maxSurge: 1
      maxUnavailable: 1
  replicas: 1
  selector:
    matchLabels:
      app: ironman
  template:
    metadata:
      labels:
        app: ironman
    spec:
      containers:
        - name: ironman
          image: ghjjhg567/ironman:latest
          imagePullPolicy: Always
          resources:
            limits:
              cpu: "1"
              memory: "2Gi"
            requests:
              cpu: 500m
              memory: 256Mi
          ports:
            - containerPort: 8100
          envFrom:
            - configMapRef:
                name: iroman-config
       - name: redis
         image: redis:4.0
         imagePullPolicy: Always
         ports:
           - containerPort: 6379
       - name: nginx
         image: nginx
         imagePullPolicy: Always
         ports:
           - containerPort: 80
         volumeMounts:
           - mountPath: /etc/nginx/nginx.conf
             name: nginx-conf-volume
             subPath: nginx.conf
             readOnly: true
           - mountPath: /etc/nginx/conf.d/default.conf
             subPath: default.conf
             name: nginx-route-volume
             readOnly: true
				 readinessProbe:
           httpGet:
             path: /v1/hc
             port: 80
           initialDelaySeconds: 5
           periodSeconds: 10
      volumes:
        - name: nginx-conf-volume
          configMap:
            name: nginx-config
        - name: nginx-route-volume
          configMap:
            name: nginx-route-volume
$ kubectl apply -f ironman_config.yaml
secret/ironman-config created
$ cd nginx
$ kubectl create configmap nginx-config --from-file=nginx.conf
configmap/nginx-config created
$ kubectl create configmap nginx-route-volume --from-file=default.conf
configmap/nginx-route-volume created
$ cd ..
$ kubectl apply -f deployment.yaml
$ kubectl get pod --watch
NAME                       READY   STATUS              RESTARTS   AGE
ironman-6d655d444d-jwf4b   0/3     ContainerCreating   0          6s
ironman-6d655d444d-rrbf6   2/3     Terminating         0          45m
ironman-6d655d444d-rrbf6   0/3     Terminating         0          45m

ironman-6d655d444d-rrbf6   0/3     Terminating         0          45m
ironman-6d655d444d-rrbf6   0/3     Terminating         0          45m
ironman-6d655d444d-jwf4b   2/3     Running             0          35s

ironman-6d655d444d-jwf4b   3/3     Running             0          46s
configMap, secrets與其他Kubernetes設定中的其他物件,會在後面章節中詳細講解。
由於從docker的bridge network —> kubernetes pod,所有的containers都能利用同個pod的資源並透過localhost溝通,因此需要修改config當中原有透過container name當作host的variables
nginx/default.conf
ironman:8100 → 127.0.0.1:8100
server {

    listen       80;
    server_name  local;

    resolver 127.0.0.11;
    resolver_timeout 5s;

    location / {
                include         uwsgi_params;

                uwsgi_pass      127.0.0.1:8100;
                uwsgi_read_timeout      900;
                client_body_timeout     900;
    }

}
ironman_config.yaml
redis → MTI3LjAuMC4x(127.0.0.1)
apiVersion: v1
kind: Secret
metadata:
  name: ironman-config
type: Opaq
data:
  REDIS_HOST: MTI3LjAuMC4x
  REDIS_PORT: NjM3OQ==
這裡的REDIS_HOST指的是127.0.0.1,但由於被encode64,因此在configmap上看到的是加密後的結果。
本篇章所有程式碼將放在下面的github project當中的branch day-19
https://github.com/Neskem/ironman_2020/tree/day-19
在這章節中,我們了解了deployment, replicaSet與Pod間的關係,並成功的將docker-compose轉化成了deployment,也透readinessProbe證實它正常運作著。 那在下個章節我們將介紹ConfigMap與Secret,讓我們把本篇章所遺漏的部分給補足!

https://kubernetes.io/docs/concepts/workloads/controllers/deployment/


 iThome鐵人賽