萬事起頭難,但在 ROS 裡可不一定。
想要在 Gazebo 當中控制機器人,我們應該先從哪個部分著手呢?首先我們必須要先決定機器人的外型,根據不同的需求可能會有車型或者人型的機器人,而這當中又牽涉到許多部件的結合與描述(.xacro),例如輪子的大小與位置、腳與身體的接合位置等等。以 waffle 機器人為例,如果想要控制前進、後退或者轉彎,還必須考慮左右輪軸的相對轉速;如果想要使用雷射獲取距離資訊,則需要考慮雷射的範圍、角度、精度等等。
簡單描述至此,筆者已經列舉了許多需要考慮的因素,若是自己從頭開始設計、編輯 code 並進行模擬分析的話,那麼就需要耗費太多時間了。幸好 ROS 的核心理念就是共享資源,讓所有人都可以藉由他人已經建立好的模型、編譯好的 code 來繼續發展自己的研究。那麼話不多說,馬上進入今天主題吧。
今天筆者所要介紹的操控 waffle 的程式碼並非筆者自己撰寫,而是參考一個由 ROS 線上教學課程當中的內容。該教學課程是由 The Construct 團隊製作,筆者在自學 Linux 語法以及 ROS 系統時受到了很大的幫助,其課程名稱為 Linux for Robotics 和 Python 3 for Robotics,而且課程是免費的,很適合無相關經驗的人自主學習,有興趣的讀者不妨試試。今天筆者則會針對部分較常用的程式碼作介紹,馬上就來看看怎麼操作吧。
首先,先在 /catkin_ws/src/ 下創建一個名為 robot_control 的 Package:
cd catkin_ws/src/
catkin_create_pkg robot_control rospy
接著在 src/ 中創建一個名為 robot_control_class.py 的 python 檔,並在裡面輸入以下程式碼:
(程式碼源自 The Construct 教學網站 Python 3 for Robotics)
#!/usr/bin/env python

import rospy
from geometry_msgs.msg import Twist
from sensor_msgs.msg import LaserScan
from nav_msgs.msg import Odometry
from tf.transformations import euler_from_quaternion, quaternion_from_euler
import time
import math


class RobotControl():

    def __init__(self):
        rospy.init_node('robot_control_node', anonymous=True)
        self.vel_publisher = rospy.Publisher('/cmd_vel', Twist, queue_size=1)
        self.summit_vel_publisher = rospy.Publisher('/summit_xl_control/cmd_vel', Twist, queue_size=1)
        self.laser_subscriber = rospy.Subscriber(
            '/kobuki/laser/scan', LaserScan, self.laser_callback)
        self.summit_laser_subscriber = rospy.Subscriber(
            '/hokuyo_base/scan', LaserScan, self.summit_laser_callback)
        self.odom_sub = rospy.Subscriber ('/odom', Odometry, self.odom_callback)
        self.cmd = Twist()
        self.laser_msg = LaserScan()
        self.summit_laser_msg = LaserScan()
        self.roll = 0.0
        self.pitch = 0.0
        self.yaw = 0.0
        self.ctrl_c = False
        self.rate = rospy.Rate(10)
        rospy.on_shutdown(self.shutdownhook)

    def publish_once_in_cmd_vel(self):
        """
        This is because publishing in topics sometimes fails the first time you publish.
        In continuos publishing systems there is no big deal but in systems that publish only
        once it IS very important.
        """
        while not self.ctrl_c:
            connections = self.vel_publisher.get_num_connections()
            summit_connections = self.summit_vel_publisher.get_num_connections()
            if connections > 0 or summit_connections > 0:
                self.vel_publisher.publish(self.cmd)
                self.summit_vel_publisher.publish(self.cmd)
                #rospy.loginfo("Cmd Published")
                break
            else:
                self.rate.sleep()

    def shutdownhook(self):
        # works better than the rospy.is_shutdown()
        self.ctrl_c = True

    def laser_callback(self, msg):
        self.laser_msg = msg

    def summit_laser_callback(self, msg):
        self.summit_laser_msg = msg

    def odom_callback(self, msg):
        orientation_q = msg.pose.pose.orientation
        orientation_list = [orientation_q.x, orientation_q.y, orientation_q.z, orientation_q.w]
        (self.roll, self.pitch, self.yaw) = euler_from_quaternion (orientation_list)

    def get_laser(self, pos):
        time.sleep(1)
        return self.laser_msg.ranges[pos]

    def get_laser_summit(self, pos):
        time.sleep(1)
        return self.summit_laser_msg.ranges[pos]

    def get_front_laser(self):
        time.sleep(1)
        return self.laser_msg.ranges[360]

    def get_laser_full(self):
        time.sleep(1)
        return self.laser_msg.ranges

    def stop_robot(self):
        #rospy.loginfo("shutdown time! Stop the robot")
        self.cmd.linear.x = 0.0
        self.cmd.angular.z = 0.0
        self.publish_once_in_cmd_vel()

    def move_straight(self):

        # Initilize velocities
        self.cmd.linear.x = 0.5
        self.cmd.linear.y = 0
        self.cmd.linear.z = 0
        self.cmd.angular.x = 0
        self.cmd.angular.y = 0
        self.cmd.angular.z = 0

        # Publish the velocity
        self.publish_once_in_cmd_vel()

    def move_straight_time(self, motion, speed, time):

        # Initilize velocities
        self.cmd.linear.y = 0
        self.cmd.linear.z = 0
        self.cmd.angular.x = 0
        self.cmd.angular.y = 0
        self.cmd.angular.z = 0

        if motion == "forward":
            self.cmd.linear.x = speed
        elif motion == "backward":
            self.cmd.linear.x = - speed

        i = 0
        # loop to publish the velocity estimate, current_distance = velocity * (t1 - t0)
        while (i <= time):

            # Publish the velocity
            self.vel_publisher.publish(self.cmd)
            self.summit_vel_publisher.publish(self.cmd)
            i += 0.1
            self.rate.sleep()

        # set velocity to zero to stop the robot
        self.stop_robot()

        s = "Moved robot " + motion + " for " + str(time) + " seconds"
        return s


    def turn(self, clockwise, speed, time):

        # Initilize velocities
        self.cmd.linear.x = 0
        self.cmd.linear.y = 0
        self.cmd.linear.z = 0
        self.cmd.angular.x = 0
        self.cmd.angular.y = 0

        if clockwise == "clockwise":
            self.cmd.angular.z = -speed
        else:
            self.cmd.angular.z = speed

        i = 0
        # loop to publish the velocity estimate, current_distance = velocity * (t1 - t0)

        while (i <= time):

            # Publish the velocity
            self.vel_publisher.publish(self.cmd)
            self.summit_vel_publisher.publish(self.cmd)
            i += 0.1
            self.rate.sleep()

        # set velocity to zero to stop the robot
        self.stop_robot()

        s = "Turned robot " + clockwise + " for " + str(time) + " seconds"
        return s

    def rotate(self, degrees):
        time.sleep(1)
        target_rad = (degrees * math.pi/180) + self.yaw

        if target_rad < (- math.pi):
            target_rad = target_rad + (2 * math.pi)

        if target_rad > (math.pi):
            target_rad = target_rad - (2 * math.pi)

        while abs(target_rad - self.yaw) > 0.01:
            self.cmd.angular.z = 0.5 * (target_rad - self.yaw)
            self.vel_publisher.publish(self.cmd)
            self.rate.sleep()

        self.stop_robot()


if __name__ == '__main__':
    #rospy.init_node('robot_control_node', anonymous=True)
    robotcontrol_object = RobotControl()
    try:
        robotcontrol_object.move_straight()

    except rospy.ROSInterruptException:
        pass
在開始介紹程式碼之前,以下這段程式碼必須先做點修改:
        self.laser_subscriber = rospy.Subscriber(
            '/kobuki/laser/scan', LaserScan, self.laser_callback)
        self.summit_laser_subscriber = rospy.Subscriber(
            '/hokuyo_base/scan', LaserScan, self.summit_laser_callback)
兩段程式碼當中的 Topic 名稱 '/kobuki/laser/scan' 與 '/hokuyo_base/scan' 都必須修改成 '/scan',這是由於教學課程當中的機器人與 waffle 不同,所以在 .xacro 當中對 Topic 的命名有所差異,有興趣的讀者可以自行到 description 中的 turtlebot3_waffle.gazebo.xacro 檔查看。
接著筆者在此介紹幾行比較重要或者常用的函式或程式碼:
    def get_laser(self, pos):
        time.sleep(1)
        return self.laser_msg.ranges[pos]
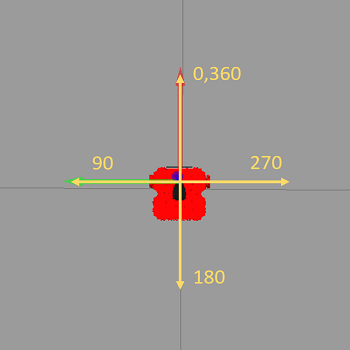
這個函式只要輸入一指定角度,就可以獲取自身至該角度障礙物之距離。waffle 之角度定義為:
若同時需要獲得多點之距離資訊時,建議使用函式 scan = get_laser_full(self),其資訊會儲存成一個名為 scan 的 list,若想得到某角度之資訊可使用 scan[index] 來取得。
同樣也是因為教學網站並不是使用 waffle 的關係,所以還有一些像是 get_front_laser(self) 當中的角度參數需要調整,這邊筆者就不做介紹,但若讀者有使用到時需要特別注意。
此外,在該函式下還有一個 get_laser_summit(self, pos),同樣也是獲取距離資訊,筆者是較常使用前者,但兩者之間感覺不出有什麼差異。
    def stop_robot(self):
        #rospy.loginfo("shutdown time! Stop the robot")
        self.cmd.linear.x = 0.0
        self.cmd.angular.z = 0.0
        self.publish_once_in_cmd_vel()
函式當中的 self.cmd.linear.x 代表了 waffle 輪軸的轉速,大於0表示前進;self.cmd.angular.z 則代表 waffle 本身旋轉的角速度,大於0為逆時針轉。
    def move_straight_time(self, motion, speed, time):

        # Initilize velocities
        self.cmd.linear.y = 0
        self.cmd.linear.z = 0
        self.cmd.angular.x = 0
        self.cmd.angular.y = 0
        self.cmd.angular.z = 0

        if motion == "forward":
            self.cmd.linear.x = speed
        elif motion == "backward":
            self.cmd.linear.x = - speed

        i = 0
        # loop to publish the velocity estimate, current_distance = velocity * (t1 - t0)
        while (i <= time):

            # Publish the velocity
            self.vel_publisher.publish(self.cmd)
            self.summit_vel_publisher.publish(self.cmd)
            i += 0.1
            self.rate.sleep()

        # set velocity to zero to stop the robot
        self.stop_robot()
這邊可以注意迴圈內執行了 i += 0.1,並且加上 self.rate.sleep(),很顯然與最上方定義的 self.rate = rospy.Rate(10) 當中的 10 有關係。若自行調整 rate 的大小,則迴圈內的值也必須做對應的更改,在使用上務必需要特別注意。
以上簡單介紹了一些函式與程式碼,其他比較相仿的函式這邊就不再介紹,相信也蠻好理解的。接著我們就可以透過這些函式來撰寫一個簡單的 Python 檔來控制機器人啦,以下簡單舉例:
同樣在 catkin_ws/src/robot_control/src/ 下建立一個名為 test.py 的檔案,並輸入以下函式:
#!/usr/bin/env python

from robot_control_class import RobotControl

robotcontrol = RobotControl()

t = 1

while t > 0:

    robotcontrol.move_straight_time("forward", 1, 2)
    robotcontrol.stop_robot()
    d = robotcontrol.get_laser(0)
    print(d)
    robotcontrol.turn("counter_clockwise", 1, 2)
    robotcontrol.stop_robot()
建置好檔案後,我們先回到 catkin_ws/ 下執行一次 catkin_make,由於剛剛建置了新的 Package 與檔案,保險起見還是先讓 catkin 重新編譯一次工作區:
cd
cd catkin/
catkin_make
接著使用 launch 開啟任意一個包含 waffle 的 Gazebo 世界:
roslaunch turtlebot3_gazebo turtlebot3_world.launch
接著進到 catkin_ws/src/robot_control/src/ 中執行 test.py 就能看到 waffle 在 Gazebo 中運行啦:
roscd robotcontrol/src/
./test.py
今天我們簡單的介紹了在 Gazebo 內有關操控 waffle 機器人的相關語法,雖然篇幅略長但相信都不會太難理解,主要還是要熟悉函式當中所運用到的參數。明天則會開始介紹筆者研究的相關主題,便是如何透過函式來引導 waffle 順利走出一個隧道,請各位敬請期待。

