在Blazor表單這篇有提到,內建的Input元件只有下列幾個:
隨著.NET 5.0 RC1版本的到來,Blazor增加3個Input元件可以使用,包括:
今天這篇我們就在Blazor WebAssembly專案,使用InputFile元件來進行上傳圖片功能。
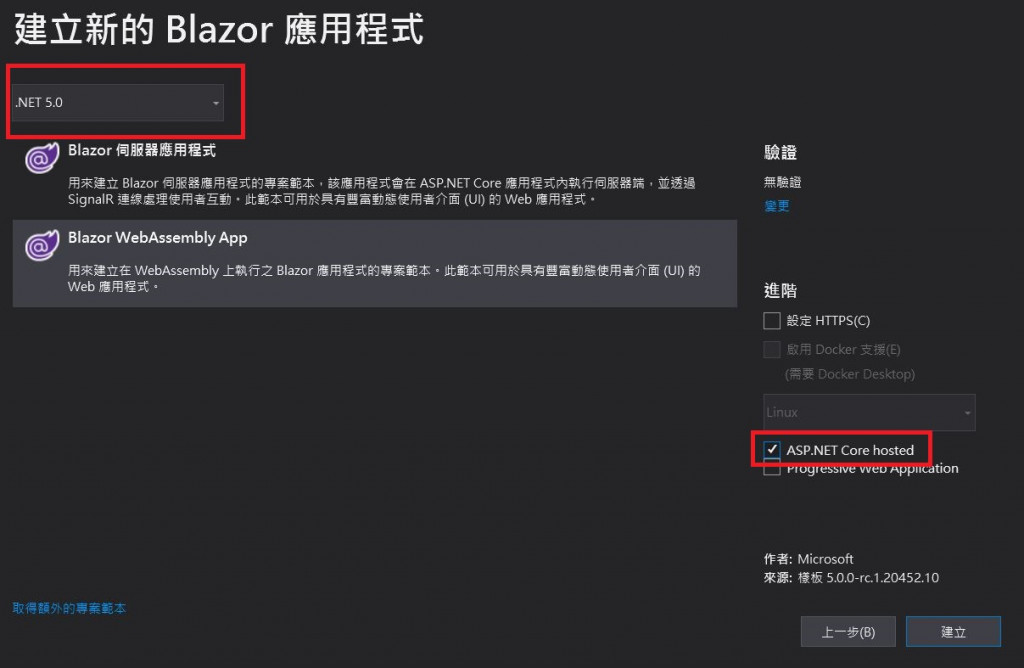
因為InputFile是NET 5.0 RC1版本才有的元件,因此要使用的話需先安裝Visual Studio 2019 16.8 Preview 3以上版本來使用.NET 5.0 RC1。安裝完之後,就開始建立我們的Blazor WebAssembly專案。
因為Blazor WebAssembly是跑在瀏覽器,無法像Blazor Server一樣,可以直接存取wwwroot資料夾,因此需要透過api將圖片傳到Server端,因此先進行Api部分。
建立UploadedFile class,因為這個UploadedFile在Client和Server都會用到,所以建立在Shared專案內
public class UploadedFile
    {
        public string FileName { get; set; }
        public byte[] FileContent { get; set; }
    }
UploadController
[Route("api/[controller]")]
    [ApiController]
    public class UploadController : ControllerBase
    {
        private readonly IWebHostEnvironment env;

        public UploadController(IWebHostEnvironment env)
        {
            this.env = env;
        }

        [HttpPost]
        public void Post(UploadedFile uploadedFile)
        {
           try
            {
                var path = $"{env.WebRootPath}\\{uploadedFile.FileName}";
                var fs = System.IO.File.Create(path);
                fs.Write(uploadedFile.FileContent, 0, uploadedFile.FileContent.Length);
                fs.Close();

                return Ok();
            }
            catch
            {
                return BadRequest("Save File Failed");
            }
        }
    }
<h1>Blazor Upload Image Demo</h1>

<div class="row">
    <div class="col-sm-6">
        <form @onsubmit="OnSubmit">
            <div class="custom-file my-3">
                <InputFile OnChange="FileChangeHandler" id="customFile" />
                <label class="custom-file-label" for="customFile">Choose file</label>
            </div>

            @if (ImgFile != null)
            {
                <img src="@imageDataUri" class="img-fluid mb-3" />
                <h5>@message</h5>
            }

            <button type="submit" class="btn btn-primary">上傳</button>
        </form>
    </div>
</div>
<img>則是在上傳圖片後,使用Data Uri方式放入base64編碼的圖片檔,讓使用者可以預覽@code程式碼
@code {

    //上傳圖片訊息
    public string message { get; set; } = string.Empty;

    //Data:Uri Base 64 圖片
    public string imageDataUri { get; set; }

    public IBrowserFile ImgFile;

    private async Task FileChangeHandler(InputFileChangeEventArgs e)
    {
        if (e.FileCount > 0)
            message = $"選擇了{e.FileCount}張圖片。(檔名:{e.File.Name})";

        var format = "image/jpeg";
        ImgFile = e.File;

        var imageFile = await ImgFile.RequestImageFileAsync(format, 640, 480);

        using var fileStream = imageFile.OpenReadStream();
        using var memoryStream = new MemoryStream();
        await fileStream.CopyToAsync(memoryStream);

        imageDataUri = $"data:{format};base64,{Convert.ToBase64String(memoryStream.ToArray())}";
    }

    private async Task OnSubmit()
    {
        if(ImgFile != null)
        {
            using Stream stream = ImgFile.OpenReadStream();
            using MemoryStream ms = new MemoryStream();
            await stream.CopyToAsync(ms);


            UploadedFile uploadedFile = new UploadedFile();
            uploadedFile.FileName = ImgFile.Name;
            uploadedFile.FileContent = ms.ToArray();

            var response = await httpClient.PostAsJsonAsync<UploadedFile>("/api/Upload", uploadedFile);

            if (response.IsSuccessStatusCode)
                await js.InvokeVoidAsync("alert", "上傳成功");
            else
                await js.InvokeVoidAsync("alert", "上傳失敗,請再試一次");

        }
    }
}
FileChangeHandler method:選擇完上傳圖檔後,顯示訊息並且將圖檔轉成DataUri base64編碼
OnSubmit method:用UploadedFile物件把檔名和轉成byte[]的content包起來傳到api,並用js alert顯示結果
上傳一張圖片
可以看到Server/wwwroot底下有這張圖片囉
專案原始碼:https://github.com/CircleLin/BlazorFileUpload