Vue:昨日,我們已將文章新增實做出來了!現在只要將文章列舉在首頁,只需要使用之前學到的v-for迴圈,即可完成!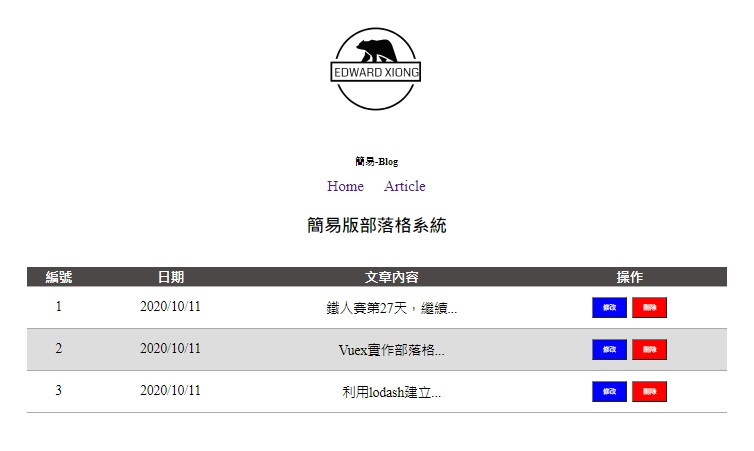
透過 v-for,將vuex中state的articles資料渲染到畫面上,其HTML如下:
 <tbody>
        <tr v-for="(item,index) in articles" :key="index">
          <td>{{index+1}}</td>
          <td>{{item.date |transferDate}}</td>
          <td class="trchange">{{item.content | transferContent}}</td>
          <td>
            <button id="fixed" @click="$router.push(`/article/${item.id}`)">修改</button><button id="delete" @click="deleteHandler(item.id)">刪除</button>
          </td>
        </tr>
</tbody>
但記得,要使用store的資料,記得要引入喔!這邊就先將mapState和mapActions一起引入吧!
import {mapState,mapActions} from "vuex";
computed:{
    ...mapState(["articles"])
},
這樣,你就可以得到上面的結果嚕!
Vue:但是文章主要是透過ID來進行辨認,昨日我們設置了假的ID為ArticleID。但如果每一篇文章都是同樣ID,是無法辨認出哪一篇需要修改或刪除。所以,這邊我們使用一個套件lodash:
在專案下,利用npm寫入指令:
npm install lodash
安裝好之後,回到store,並引入lodash:
import _ from "lodash"
並且我們修改給予的ID:
actions: {
    addArticle: ({ commit }, payload) => {
      const ID = _.random(1000)
      payload.id = "ArticleID"+ID
      commit('addArticle', payload)
    }
 }
透過vue devtool來觀察建立ID的樣子: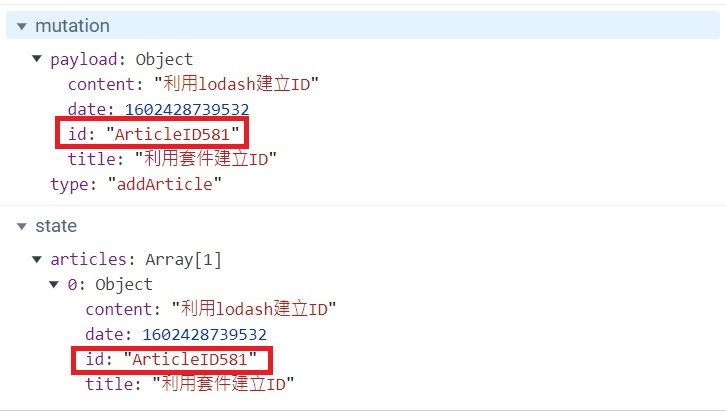
如此,我們便可以透過這個ID找到相對應的文章,進行刪除或修改喔!
HTML綁定事件:
<button id="delete" @click="deleteHandler(item.id)">刪除</button>
methods: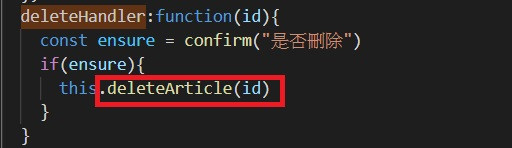
紅色框框部分,是需要在vuex邏輯中dispatch Actions: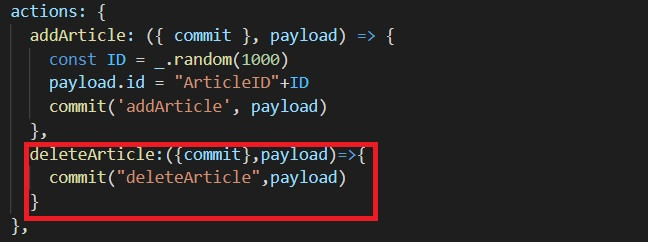
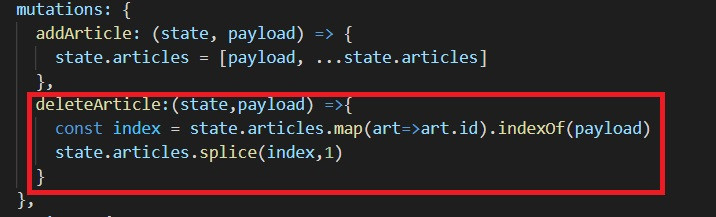
如此,便可以輕鬆刪除文章嚕~~
待續


 iThome鐵人賽