iT邦幫忙

2021 iThome 鐵人賽

DAY 3
0
Mobile Development

android studio 30天初學筆記系列 第 3

Android Studio初學筆記-Day3--RelativeLayout

  • 分享至 

  • xImage
  •  

承上一篇,今天要分享的是另一個比較常見也比較廣泛使用的佈局。

RelativeLayout(相對佈局)

跟LinerLayout比起來,RelativeLayout更有彈性,在方向上不局限於水平和垂直,基本上已經是一個能完整運用到整個螢幕空間的一個佈局了。
RelativeLayout的運作原理是透過元件之間的關聯來設定的”相對位置”。
以下是一些重要的屬性介紹:

  • android:id
    這個屬性標示了這個元件的身分,好方便其他元件用這個id呼叫進而取得連接,也就是這個元件的身分證。
  • android:layout_above
    將此元件置於指定元件(透過元件id指定)的上方.
  • android:layout_below
    將此元件置於指定元件(透過元件id指定)的下方.
  • android:layout_toLeftOf
    將此元件置於指定元件(透過元件id指定)的左方.
  • android:layout_toRightOf
    將此元件置於指定元件(透過元件id指定)的右方.
  • android:layout_alignParentTop
    將此元件對齊佈局畫面的上邊線,設定的值為true或false
  • android:layout_alignParentRight
    將此元件對齊佈局畫面的右邊線,設定的值為true或false
  • android:layout_alignParentLeft
    將此元件對齊佈局畫面的左邊線,設定的值為true或false
  • android:layout_alignParentButton
    將此元件對齊佈局畫面的下邊線,設定的值為true或false

這些屬於最基本的一些屬性,以下還有些微調的方法,我個人覺得也是最實用的屬性設定,讓文字或要顯示的元件的位置能到自己更理想的位置(補充:這些屬性LinerLayout也可以使用)。常用屬性如下:

  • android:layout_margin
    指定與元件上下左右的間距.
  • android:layout_marginBottom
    指定與下方元件的間距.
  • android:layout_marginEnd
    指定與結束的方向的間距.
  • android:layout_marginHorizontal
    指定與左右元件的間距
  • android:layout_marginLeft
    指定與左邊元件的間距
  • android:layout_marginRight
    指定與右邊元件的間距
  • android:layout_marginStart
    指定與開始方向的間距
  • android:layout_marginTop
    指定與上方元件的間距
  • android:layout_marginVertical
    指定與上下元件的間距,值的部分可以用”數字+(單位)”,常見單位包括sp、dp、px 可以試試不同單位的長度變化。
    最後我有做一個參考範例

程式碼和效果

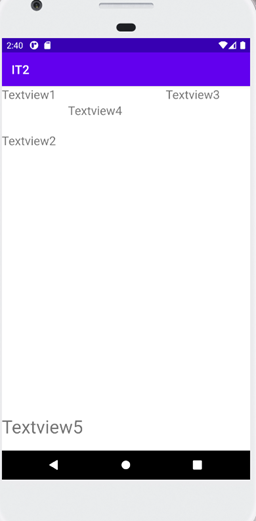
<RelativeLayout xmlns:android="http://schemas.android.com/apk/res/android"
    android:layout_width="fill_parent"
    android:layout_height="fill_parent">

    <TextView
        android:id="@+id/tx1"
        android:layout_width="wrap_content"
        android:layout_height="wrap_content"
        android:text="Textview1"
        android:textSize="20dp" />
    <TextView
        android:id="@+id/tx2"
        android:layout_width="wrap_content"
        android:layout_height="wrap_content"
        android:layout_below="@+id/tx1"
        android:layout_marginTop="50dp"
        android:textSize="20dp"
        android:text="Textview2"/>

    <TextView
        android:id="@+id/tx3"
        android:layout_width="wrap_content"
        android:layout_height="wrap_content"
        android:layout_alignParentRight="true"
        android:layout_marginRight="50dp"
        android:textSize="20dp"
        android:text="Textview3" />
    <TextView
        android:id="@+id/tx4"
        android:layout_width="wrap_content"
        android:layout_height="wrap_content"
        android:layout_toRightOf="@+id/tx2"
        android:layout_below="@+id/tx1"
        android:textSize="20dp"
        android:layout_marginHorizontal="20dp"
        android:text="Textview4" />

    <TextView
        android:id="@+id/tx5"
        android:layout_width="wrap_content"
        android:layout_height="wrap_content"
        android:text="Textview5"
        android:textSize="30dp"
        android:layout_alignParentBottom="true"
        android:layout_marginBottom="20dp"/>
</RelativeLayout>

https://ithelp.ithome.com.tw/upload/images/20210907/2013913650ymnjROLQ.png


上一篇
Android Studio初學筆記-Day2-LinearLayout介紹
下一篇
Android Studio初學筆記-Day4-ConstaintLayout
系列文
android studio 30天初學筆記30
圖片
  直播研討會
圖片
{{ item.channelVendor }} {{ item.webinarstarted }} |
{{ formatDate(item.duration) }}
直播中

尚未有邦友留言

立即登入留言