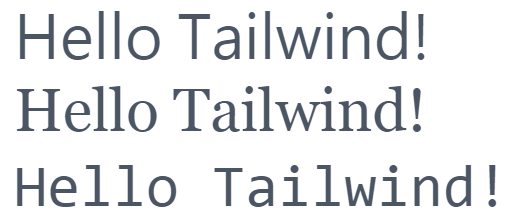
昨天講了文字使用,今天來講講字體。在默認情況下,Tailwind 提供了三種字體系列:font-sans (無襯線字體),font-serif (襯線字體) 和 font-mono (等寬字體) 供我們使用,使用方式為 class="font-sans,以此類推。 以下為預設的 font-family:
font-sans (無襯線字體): ui-sans-serif, system-ui, -apple-system, BlinkMacSystemFont, "Segoe UI", Roboto, "Helvetica Neue", Arial, "Noto Sans", sans-serif, "Apple Color Emoji", "Segoe UI Emoji", "Segoe UI Symbol", "Noto Color Emoji";
font-serif (襯線字體): ui-serif, Georgia, Cambria, "Times New Roman", Times, serif;
font-mono (等寬字體): ui-monospace, SFMono-Regular, Menlo, Monaco, Consolas, "Liberation Mono", "Courier New", monospace;
一般預設都為無襯線字體,如果想變為襯線字體,只需使用 class 為 font-serif,以此類推,範例比較如下:
 <p class="font-sans">Hello Tailwind!</p>
 <p class="font-serif">Hello Tailwind!</p>
 <p class="font-mono">Hello Tailwind!</p>

但這不是威爾豬今天要講的重點,我們要來搭配 Google Fonts 使用,很多時候,設計師為了配合項目或版型設計,好看的字體不可少,而字體不一定會使用電腦內建的字體,可能付費或線上免費字體,Google Fonts 上就有許多優秀的免費字體。
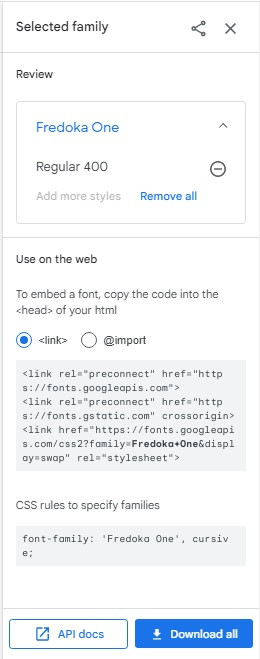
到 Google Fonts 上選擇字體,威爾豬來選個可愛的圓體字好了,跟系統預設字體差別較大,這邊使用 Fredoka One 字型,可以看到右側有 + select thus style,勇敢的把它點下去。

之後我們就會看到右側面板跳出畫面

複製 link 的代碼並放到 HTML 的 裡,如下:
// google-fonts.html

<!DOCTYPE html>
<html lang="en">
  <head>
    ...
    <link rel="preconnect" href="https://fonts.googleapis.com">
    <link rel="preconnect" href="https://fonts.gstatic.com" crossorigin>
    <link href="https://fonts.googleapis.com/css2?family=Fredoka+One&display=swap" rel="stylesheet">
    ...
  </head>
  ...
</html>
複製 Google Fonts 右側面板的 font-family,'Fredoka One', cursive,並開啟 tailwind.config.js, 在 theme 的 extend 上加入 fontFamily 並自訂名稱,如下:
// tailwind.config.js

module.exports = {
  theme: {
    ... ,
    extend: {
      fontFamily: {
        'fredoka-one': ['"Fredoka One"', 'cursive'],
      },
    },
    ... ,
  },
  ... ,
}
如果字體像這個例子一樣中間有空格,最好使用雙引號包住,確保 Google Fonts 不會出錯。
好啦,現在 Tailwind 已經認識 Fredoka One,我們可以使用它了。使用方式:font-{自訂字體名稱},威爾豬這邊的例子就是 font-fredoka-one,我們代入 class,如下:
// google-fonts.html

<!DOCTYPE html>
<html lang="en">
  ...
  <body>
    <h1 class="text-5xl text-blue-300 font-fredoka-one">Hello Tailwind!</h1>
    ...
  </body>
</html>
咱們 build 一下 (應該沒忘記怎麼 build 吧!忘記的同學們趕快到前面安裝篇複習)。

耶~看到這畫面代表你成功使用 Google Fonts 啦,給自己來點掌聲吧!那咱們明天見。
