以下介紹一個自製的簡易的半自動標籤圖片的作法,主要是因為手動標籤真的很麻煩,於是上網找了一些文章,有一篇文章 Image Segmentation With 5 Lines 0f Code 是最令人開心的,因為只要 5 行代碼就可以把一張圖片的物件分割出來。測試結果還令人蠻滿意的,如下圖所示。
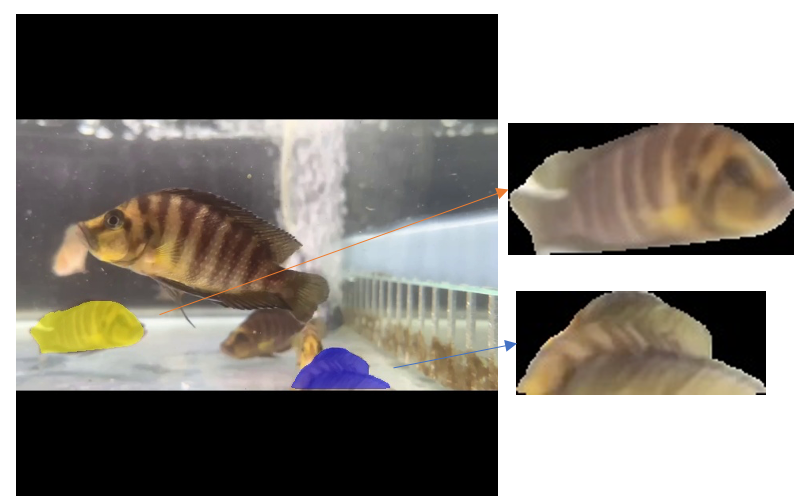
圖 1、使用 pixellib 套件分割圖片
實作步驟如下:
建立一個虛擬環境
考慮到使用某些比較複雜的套件可能會安裝一些不必要的套件,所以在測試期間最好是用虛擬環境來練習。
# 建立虛擬環境 imageSeg
python3 -m venv imageSeg
# 激活虛擬環境,這是在 Mac下的指令,在 Windows 需要執行 Activate.ps1
. imageSeg/bin/activate
安裝相關套件
這段代碼主要使用的是 pixellib 這個套件,而這個套件運用 Mask R-CNN 框架來進行影像分割,所以需要安裝 OpenCV, tensoflow 等相關相依套件。
# 先更新 pip 套件
pip3 install --upgrade pip
# 安裝所有需要的套件
pip3 install tensorflow opencv-python scikit-image pillow pixellib
下載 mask r-cnn model模型檔案
下圖裡確認是否1. 已進入虛擬環境 2. 確認已下載 mask r-cnn 模型 3. 檢查所有安裝套件,會有很多相依套件,這是正常的。
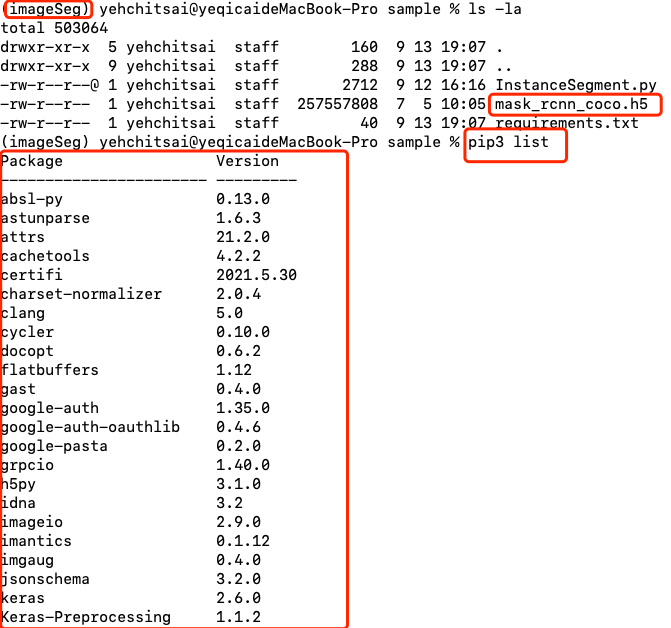
圖 2、確認工作環境
運行代碼
代碼如下,只需要 5 行,前兩行是匯入 pixellib 以及 instance_segmentation,因為它支援語意分割跟實體分割,而我們這個情況需要的是實體分割,所以就呼叫實體分割的方法,第四行是載入 mask r-cnn 的模型,第五行則是進行分割,需要指定的參數是目標圖片,結果圖片,是否取出切割出來的實體,是否把切割出來的實體單獨存檔。直接結果就如同圖 1,結果圖片 (frame-0001_seg.jpg) 會把切割出來的實體塗色,而切割出來的實體單獨存成檔案, segmented_object_1.jpg,segmented_object_2.jpg。
FishSegment.py
import pixellib
from pixellib.instance import instance_segmentation
from pixellib.semantic import semantic_segmentation

segment_image = instance_segmentation()
segment_image.load_model("mask_rcnn_coco.h5")

segmask, output = segment_image.segmentImage("../image/00-frame-608x608-0001.jpg", output_image_name = "frame-0001_seg.jpg", extract_segmented_objects=True, save_extracted_objects=True)
將分割的訊息轉成 YOLO 格式
而對我們來說,這不是我們要的,我們希望可以得到那兩個被切割出來的實體的方塊框的座標,並轉成 YOLO 格式,這樣就可以幫我們達成半自動化的目標。我們需要知道的是這兩個實體的方塊框的相關資訊。在上述程式中 segmask, output 這兩個回傳參數,一個是切割實體的資訊,另一個則是結果圖片的資訊,所以只要分析 segmask 這個回傳參數就可以得到我們所要的資訊。segmask 內有一個 rois 的陣列,內容分別為 target_ymin, target_xmin, target_ymax, target_xmax,可以透過這個變數取得左上角到右下角的資料。
FishSegment.py
strings = []
extIndex = 1
image_w, image_h, channel= output.shape

print(segmask['rois'],type(segmask['rois']))

for rois in segmask['rois']:
# rois 內容分別為左上角到右下角的資料
	target_ymin, target_xmin, target_ymax, target_xmax = rois
# 轉換成 YOLO 的格式,物件名稱為 0
	centerPoint = ( ( (target_xmin + target_xmax) * 0.5 ) / image_w, ((target_ymin + target_ymax) * 0.5 ) / image_h)
	target_w = (target_xmax - target_xmin) * 1. / image_w
	target_h = (target_ymax - target_ymin) * 1. / image_h
	extIndex += 1
	strings.append(f"0 {centerPoint[0]:.6f} {centerPoint[1]:.6f} {target_w:.6f} {target_h:.6f}")
	yolo_string = '\n'.join(strings)
# yolo格式的檔名為 label.txt
	with open('label.txt', 'w') as f:
		f.write(yolo_string)
所產生的 YOLO 格式的 label.txt 如下所示。
label.txt
0 0.145559 0.652138 0.245066 0.116776
0 0.685033 0.732730 0.245066 0.090461
針對目錄進行處理
接下來在把整個檔案改成針對目錄的,以下是運行後的標示結果,有標示到的才會產生 YOLO 文件檔,雖然不是 100% 標示出來,但已經省了很多手工標籤的結果。
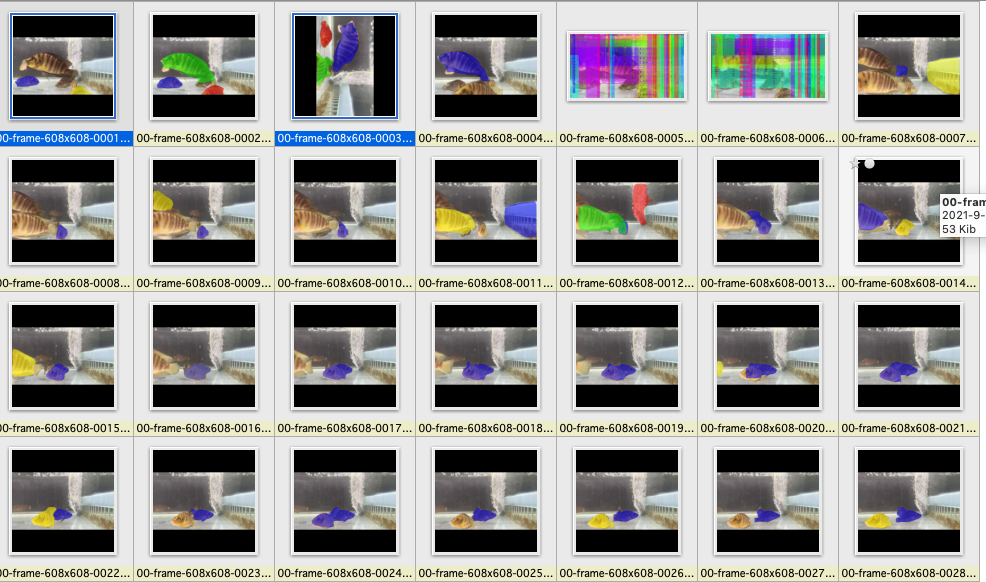
圖 3、針對目錄的運行結果
下圖是顯示生成檔案的文件夾,原則上都是一個圖片可以搭配一個文件。
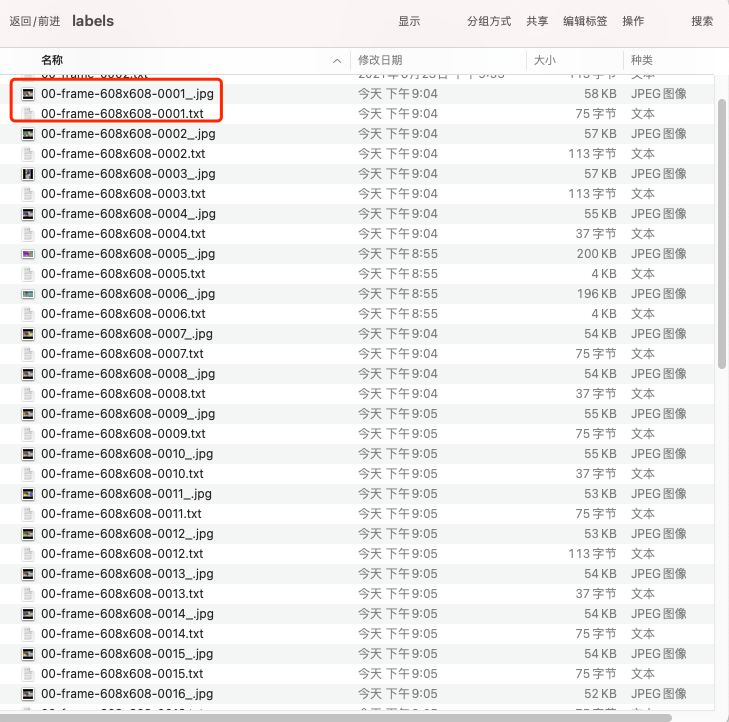
圖 4、顯示生成檔案的目錄
完整代碼如下所示:
FishSegment.py
#!/usr/bin/env python3
import argparse
import glob
import os
import numpy as np

import pixellib
from pixellib.semantic import semantic_segmentation
from pixellib.instance import instance_segmentation
import cv2

# 從命令列中取得參數
def get_arg():
	parser = argparse.ArgumentParser()

	_, all_arguments = parser.parse_known_args()
	script_args = all_arguments[0:]

	parser.add_argument("-ipath","--input_path", type=str, help="input path of image or image folder")
	parser.add_argument("-opath","--output_image_path", type=str, help="path to yolo output images")
	parser.add_argument("-tpath","--output_text_path", type=str, help="path to yolo output text files")
	parser.add_argument("-ylabel","--yolo_label", type=int, default=0, help="yolo string class number")

	parsed_script_args,_ = parser.parse_known_args(script_args)

	return parsed_script_args

# 取得 yolo 格式字串
def getYoloLabel(args, model, image_path):
# 如果沒辦法辨識就跳過
	try:
		segmask, output = model.segmentImage(image_path, show_bboxes = False , extract_segmented_objects = False, save_extracted_objects = False)
	except ValueError:
		os.remove(image_path)
		return 'Cannot segment file, remove it'

	if len(segmask['rois']) == 0 :
		os.remove(image_path)
		return 'Cannot segment file, remove it'

	strings = []
	extIndex = 1
	image_w, image_h, channel= output.shape
	for rois in segmask['rois']:
		#cv2.rectangle(img, segmask['rois'][], (290,436), (0,255,0), 4)

		target_ymin, target_xmin, target_ymax, target_xmax = rois

		centerPoint = ( ( (target_xmin + target_xmax) * 0.5 ) / image_w, ((target_ymin + target_ymax) * 0.5 ) / image_h)
		target_w = (target_xmax - target_xmin) * 1. / image_w
		target_h = (target_ymax - target_ymin) * 1. / image_h
		extIndex += 1
		strings.append(f"{args.yolo_label} {centerPoint[0]:.6f} {centerPoint[1]:.6f} {target_w:.6f} {target_h:.6f}")

	yolo_string = '\n'.join(strings)
	if args.output_text_path:
		if not os.path.isdir(args.output_text_path):
			os.makedirs(args.output_text_path)
		with open(os.path.join(args.output_text_path, f'{os.path.basename(image_path)}'.split('.')[0] + '.txt'), 'w') as f:
			f.write(yolo_string)

	if args.output_image_path:
		if not os.path.isdir(args.output_image_path):
			os.makedirs(args.output_image_path)
		cv2.imwrite(os.path.join(args.output_image_path, f'{os.path.basename(image_path)}'.split('.')[0] + '_.jpg'), output)

	return yolo_string


def main():
	args = get_arg()
	if os.path.isdir(args.input_path):
	    types = os.path.join(args.input_path,'*.jpg'), os.path.join(args.input_path,'*.jpeg'), os.path.join(args.input_path,'*.png')
	    files_grabbed = []
	    for files in types:
	        files_grabbed.extend(sorted(glob.iglob(files)))
	elif os.path.isfile(args.input_path):
	    files_grabbed = [args.input_path]
	else:
	    raise ValueError("File PATH is NOT Valid")
#	print(args.input_path,files_grabbed)

	segment_model = instance_segmentation()
	segment_model.load_model("mask_rcnn_coco.h5")
	print('files_grabbed = ',files_grabbed)
	for image_path in files_grabbed:
		yolo_string = getYoloLabel(args, segment_model, image_path)
		print(image_path, yolo_string)

if __name__ == "__main__":
	main()
在命令列執行,指定圖片所在文件夾 (input_path),辨識後的圖片存儲的文件夾 (output_image_path) ,存儲yolo標籤的文件夾(output_text_path),以及預設的物件名稱 (yolo_label)。
python3 FishSegment.py --input_path ../image/ --output_image_path ../labels --output_text_path ../labels --yolo_label 0
最後建議安裝 pipreqs 套件,用來產生執行 FishSegment.py 所需要的相關套件以及版本文件 requirements.txt,因為現在可以執行,可能過了幾個月相關套件更新後就不能執行了,所以最好的方法就是把相關套件以及版次記錄下來,這樣就能確保這個檔案可以運行。
pip3 install pipreqs
# 將 FishSegment.py 搬到一個空目錄
mkdir sample
cp FishSegment.py sample/
pipreqs sample --encoding UTF-8
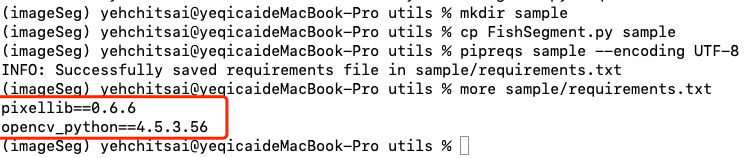
圖 5、生成 requirements.txt 作為項目移植之用