
書接上回[Day 12] tinyML開發框架(一):TensorFlow Lite Micro初體驗(上) ,在訓練完成,在最後一個輸出欄位出現一大堆數字,這就是大的那個模型經優化及INT8量化後的結果。在訓練過程中,其實有把TensorFlow, TensorFlow Lite和TensorFlow Lite for Microcontroller的模型儲在雲端硬碟暫存區中,只需點擊左側最下方那個檔案夾符號就能看到相關輸出檔案,如圖Fig. 13-1所示。其中 model.cc (C/C++語言格式)就是要給MCU使用的。要特別注意地是,由於這些檔案是存放在Google Colab臨時性的雲端檔案夾中,所以要先以滑鼠右鍵點擊檔案,下載到自己的電腦或雲端硬碟中,以免斷線後就消失了。
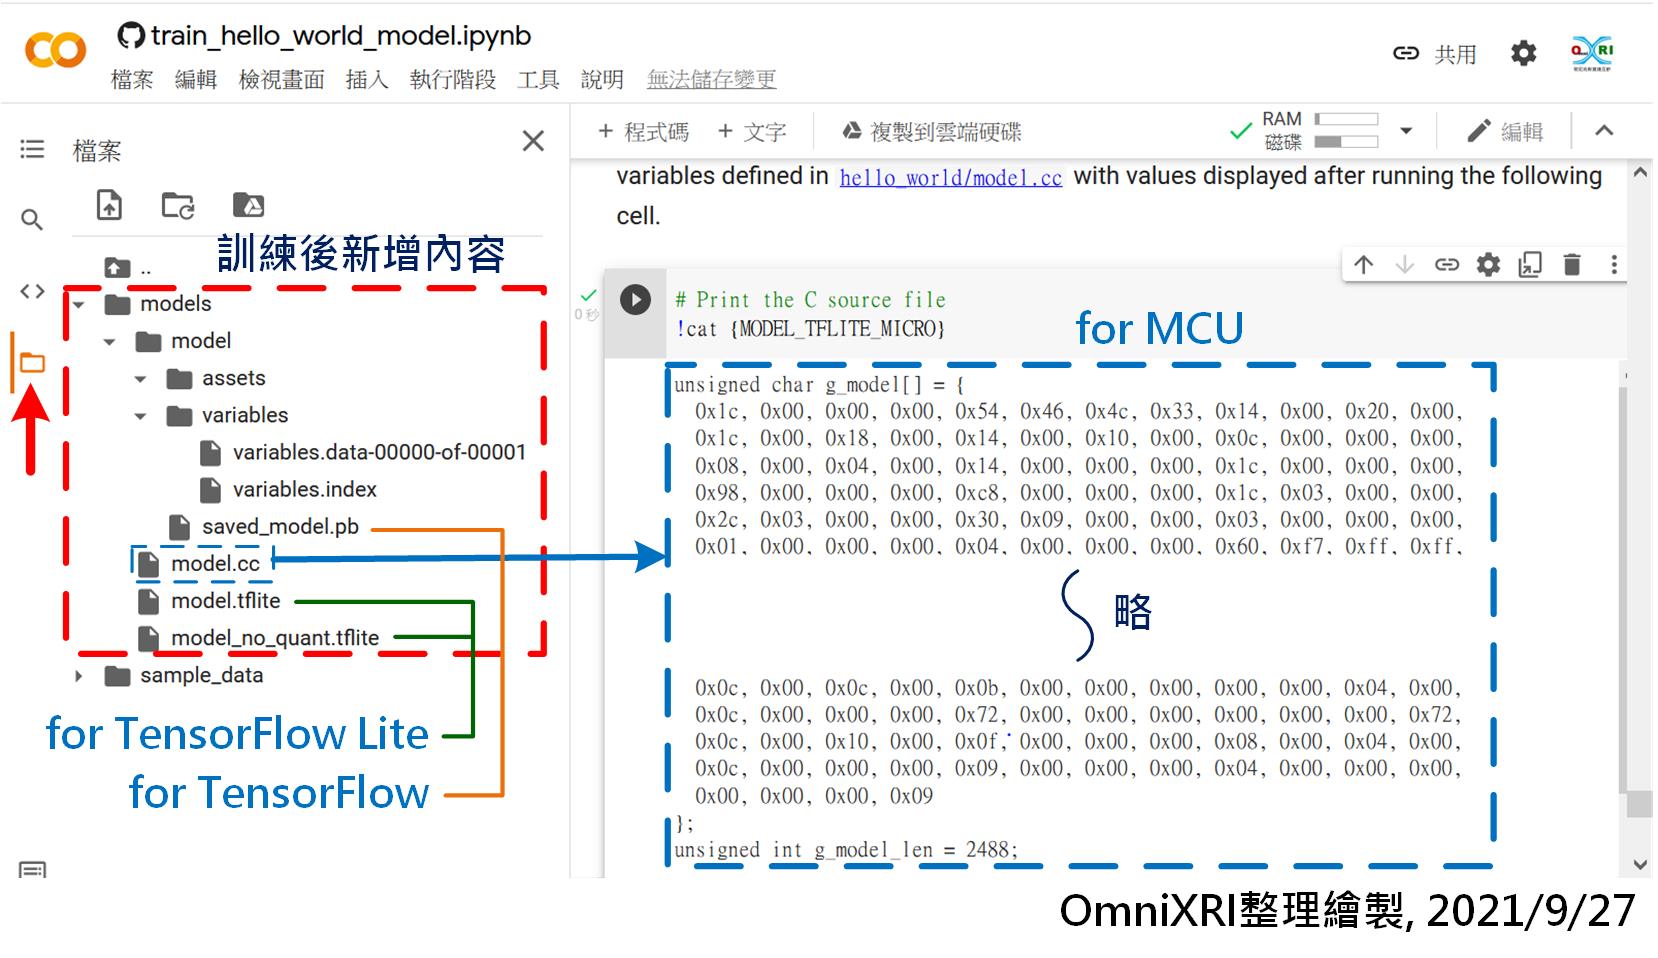
Fig. 13-1 訓練完成後新增模型參數檔案結構及內容。(OmniXRI整理繪製, 2021/9/27)
為了省去一大堆編譯及設定的指令,在MCU端最簡單的方法就是使用Arduino IDE,還沒安裝好的人,可參考「[Day 08]、[Day 09] tinyML開胃菜Arduino IDE上桌」。目前TFLM還有支援Keil, Make和Arm Mbed OS,更進一步的使用方法可參考官網「Understand the C++ library」說明,這裡就不多作介紹。
為了讓Arduino IDE能順利使用TensorFlow Lite,首先要點擊主選單的[草稿碼]─[匯入程式庫]─[管理程式庫...],然後輸入「TensorFlowLite」,此時選擇「Arduino_TensorFlowLite」,按下「安裝」即可完成。回到主畫面後,可到主選單[檔案]─[範例]下檢查一下是否已出現[Arduino_TensorFlowLite]選項,如圖Fig. 13-2所示。當點下[hello_world]就會自動產生完整範例及所需配套檔案,如下所示。
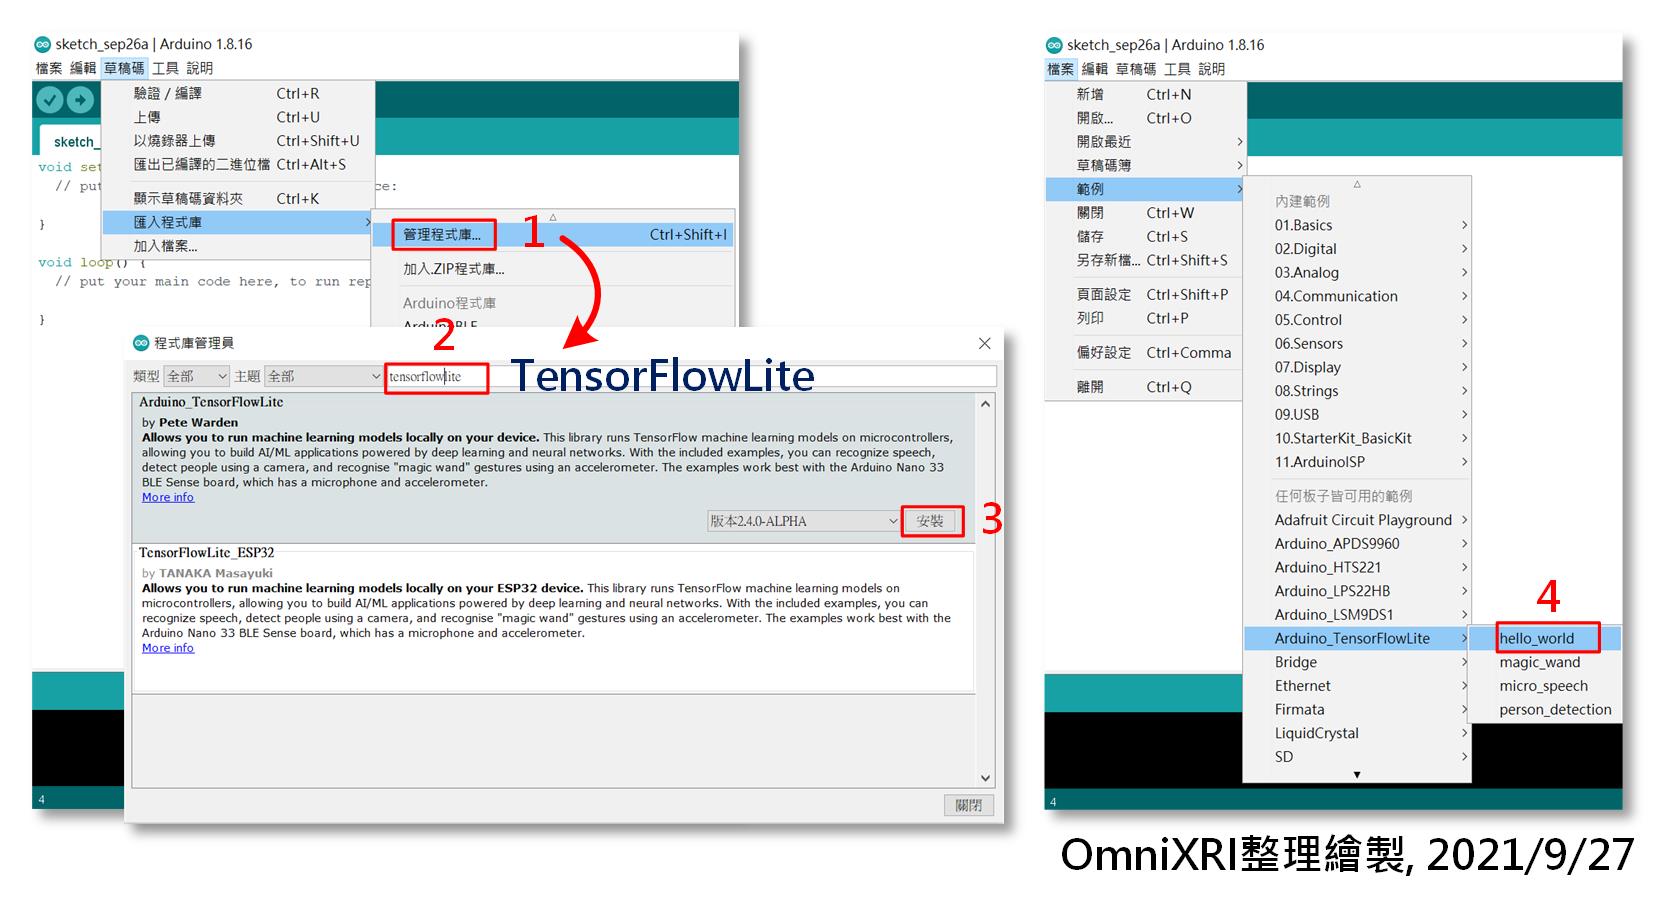
Fig. 13-2 Arduino IDE安裝TensorFlowLite程式庫步驟及開啟hello_world範例。(OmniXRI整理製作, 2021/9/27)
接著把Arduino Nano 33 BLE Sense開發板連接到電腦上,並檢查一下開發板是否都已正確設定及序列埠通訊正常,接著就可按左上角[上傳](右箭頭符號),它會自動重新編譯程式並上傳到開發板上。如果一切順利,會在下方訊息區顯示寫入大小及花費時間。板子會自動重置啟動,如果看到板上橘色LED一直閃爍,就表示程式已順利運作。 此時就可以到[工具]開啟[序列埠監控視窗]觀察板子送回電腦上的數值,或者使用[序列繪圖家]可直接看到波形圖,更方便偵錯,如圖Fig. 13-3所示。
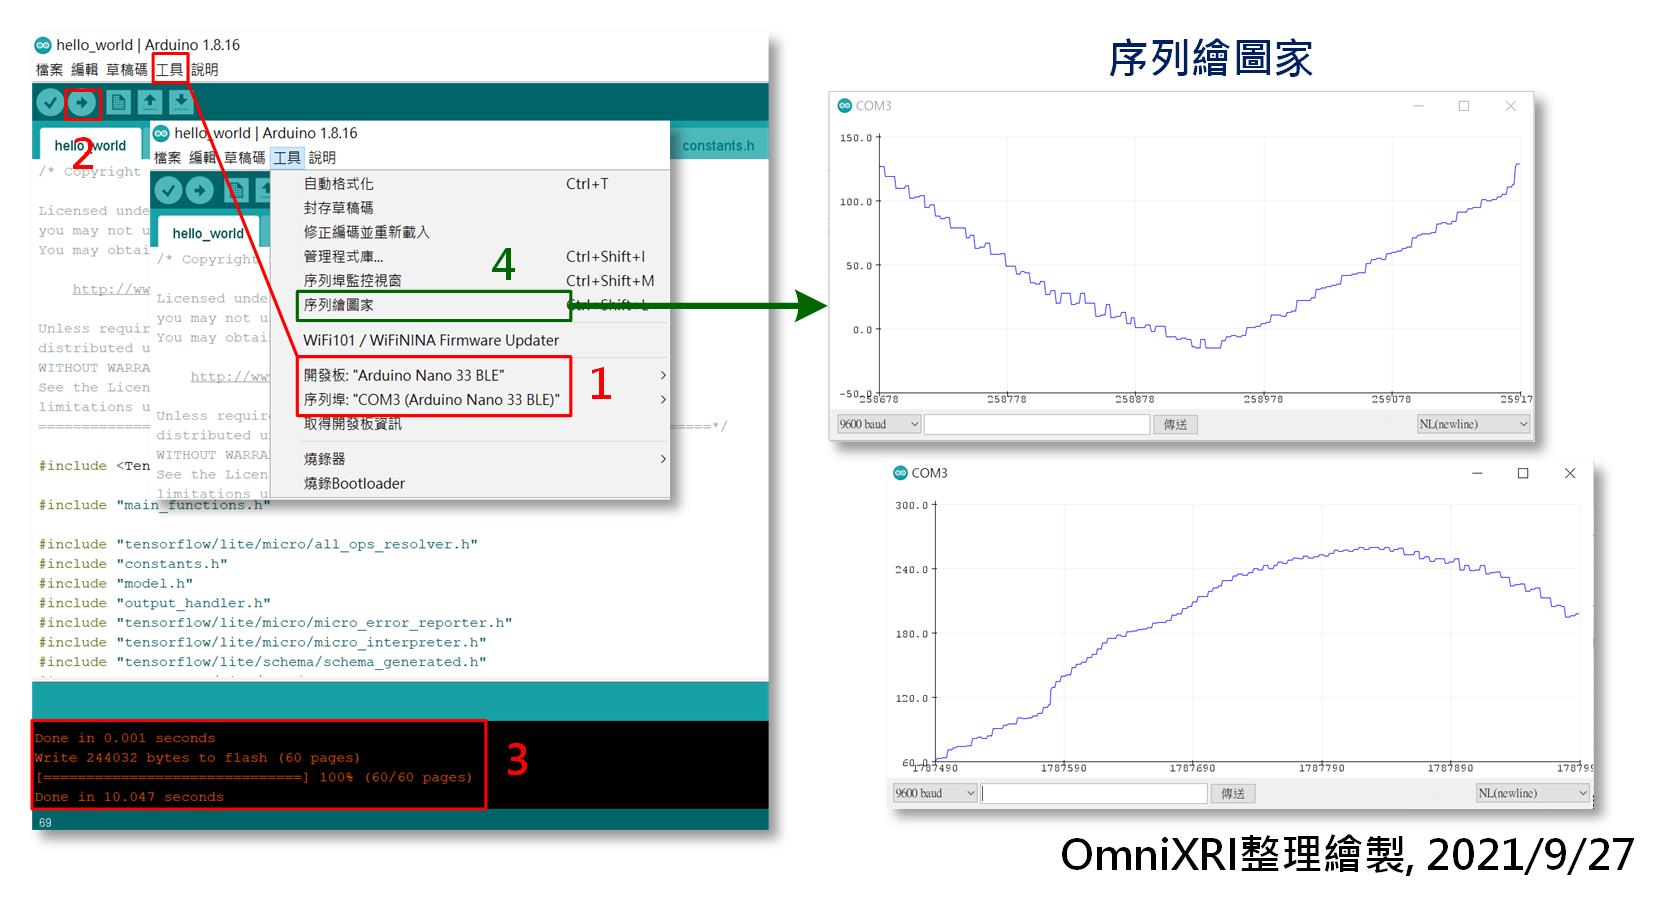
Fig. 13-3 hello_world運行於Arduino Nano 33 BLE Sense結果。(OmniXRI整理繪製, 2021/9/27)
本來作到這裡就該收工,但前先訓練了老半天的結果 model.cc 怎麼沒用到,MCU就能自己跑起來了呢?這是因為範例已自帶一個模型參數檔 model.cpp 。不過仔細比對會發現 model.cpp 和 model.cc 除了檔名不同外,數值設定方式也稍有不同,所以可以只複製 model.cc 大括號{}中間的值再貼到 model.cpp 後再重新編譯即可,如下所示。
// Google Colab訓練好的原始模型 model.cc
unsigned char g_model[] = {
  0x1c, 0x00, 0x00, 0x00, 0x54, 0x46, 0x4c, 0x33, 0x14, 0x00, 0x20, 0x00,
  ... (略) // 數值內容會隨訓練結果而有不同
  0x00, 0x00, 0x00, 0x09
};
unsigned int g_model_len = 2488;
// Arduino_TensorFlowLite hello_world範例中的預設模型 model.cpp
#include "model.h"

alignas(8) const unsigned char g_model[] = {
    0x1c, 0x00, 0x00, 0x00, 0x54, 0x46, 0x4c, 0x33, 0x14, 0x00, 0x20, 0x00,
    ... (略) // 數值內容會隨訓練結果而有不同
    0x00, 0x00, 0x00, 0x09};
const int g_model_len = 2488;
接下來就把 hello_world.ino 作一些簡單中文註解,希望能幫助大家更容易理解程式運作原理。其主要步驟可參考官網說明「Get started with microcontrollers - Run inference」。
/*
Copyright 2020 The TensorFlow Authors. All Rights Reserved.
hello_world.ino MCU端推論主程式
在Arduino IDE安裝Arduino_TensorFlowLite程式庫後,
點擊主選單的[檔案]─[範例]─[Arduino_TensorFlowLite]─[hello_world]產生。
程式會將推論結果由序列埠送回PC,同時板上橘色LED會一直閃爍代表有在通訊,
可使用工具「序列埠監看視窗」觀察數值,或使用「序列繪圖家」直接觀發波形。
*/
// 導入TensorFlowLite相關及必要之頭文件
#include <TensorFlowLite.h>
#include "main_functions.h"
#include "tensorflow/lite/micro/all_ops_resolver.h" // 提供解釋器用來運行模型的操作。
#include "constants.h" // 定義常用常數
#include "model.h" // 模型頭文件
#include "output_handler.h"
#include "tensorflow/lite/micro/micro_error_reporter.h" //輸出除錯日誌。
#include "tensorflow/lite/micro/micro_interpreter.h" // 包含加載和運行模型的代碼。
#include "tensorflow/lite/schema/schema_generated.h" 包含 TFLite FlatBuffer模型文件格式的架構。
#include "tensorflow/lite/version.h" // 為 TFLite 架構提供版本信息。
// 宣告命名空間,方便後續程式呼叫使用
namespace {
tflite::ErrorReporter* error_reporter = nullptr; // 除錯日誌指標
const tflite::Model* model = nullptr; // 模型指標
tflite::MicroInterpreter* interpreter = nullptr; // 直譯器指標
TfLiteTensor* input = nullptr; // 輸人指標
TfLiteTensor* output = nullptr; // 輸出指標
int inference_count = 0; // 推論計數器
// 宣告全域變數(配置記憶體)
constexpr int kTensorArenaSize = 2000;
uint8_t tensor_arena[kTensorArenaSize];
} // namespace
// 設定腳位用途及模組初始化(只在電源啟動或重置時執行一次)
void setup() {
// 建立除錯日誌
static tflite::MicroErrorReporter micro_error_reporter;
error_reporter = µ_error_reporter;
// 載入模型
model = tflite::GetModel(g_model);
if (model->version() != TFLITE_SCHEMA_VERSION) {
TF_LITE_REPORT_ERROR(error_reporter,
"Model provided is schema version %d not equal "
"to supported version %d.",
model->version(), TFLITE_SCHEMA_VERSION);
return;
}
// 建立解析器(resolver)和直譯器(interpreter)
static tflite::AllOpsResolver resolver;
static tflite::MicroInterpreter static_interpreter(
model, resolver, tensor_arena, kTensorArenaSize, error_reporter);
interpreter = &static_interpreter;
// 配置張量所需記憶體
TfLiteStatus allocate_status = interpreter->AllocateTensors();
if (allocate_status != kTfLiteOk) {
TF_LITE_REPORT_ERROR(error_reporter, "AllocateTensors() failed");
return;
}
// 建立輸出入
input = interpreter->input(0);
output = interpreter->output(0);
// 清除推論計數器
inference_count = 0;
}
// 設定無窮循環程式 (會一直依序重覆執行)
void loop() {
// 設定輸入值x
float position = static_cast<float>(inference_count) /
static_cast<float>(kInferencesPerCycle);
float x = position * kXrange;
int8_t x_quantized = x / input->params.scale + input->params.zero_point;
input->data.int8[0] = x_quantized;
// 運行推理
TfLiteStatus invoke_status = interpreter->Invoke();
if (invoke_status != kTfLiteOk) {
TF_LITE_REPORT_ERROR(error_reporter, "Invoke failed on x: %f\n",
static_cast<double>(x));
return;
}
// 將結果x,y值輸出到序列埠
int8_t y_quantized = output->data.int8[0];
float y = (y_quantized - output->params.zero_point) * output->params.scale;
HandleOutput(error_reporter, x, y);
// 推論計數值加1,若超過預設次數就清零
inference_count += 1;
if (inference_count >= kInferencesPerCycle) inference_count = 0;
}
參考連結
Google TensorFlow Lite for Microcontrollers 中文學習指南
Pete Warden Youtube, TinyML Book Screencasts Playlist 影片清單
TensorFlow Lite for Microcontrollers Github 開源碼
TFLM Get started with microcontrollers, The Hello World example
Experiments with Google = TensorFlow Lite for Microcontrollers 案例分享
float x = position * kXrange;
請問這裏的 kXrange是什麽意思呢?又是哪來的呢?之前沒宣告過的樣子
很抱歉,文中只有提及hello_world.ino和Model.cpp的說明,實際上你開啟這個範例時,專案會包含下列所有檔案,分別顯示在不同頁籤上。
hello_world.ino
arduino_constants.cpp
arduino_main.cpp
arduino_output_handler.cpp
constants.h
main_functions.h
model.cpp
model.h
output_handler.h
kXrange這個常數會被定義在constants.h中
const float kXrange = 2.f * 3.14159265359f;
它就是定正弦波(Sine)是要從0到2pi的範圍。
