iT邦幫忙

2021 iThome 鐵人賽

DAY 23
0
IT管理

無限手套 AWS 版:掌控一切的 5 + 1 雲端必學主題系列 第 23

Day 23 資料寶石:【Lab】RDS架構 建立自己的第一台雲端資料庫 (下)

https://ithelp.ithome.com.tw/upload/images/20210924/20100951ED1oBVei3M.jpg

今天我們來示範如何讓一台 EC2 Instance 連線使用之前創建好的 RDS Instance。

創建 Public Subnet EC2

首先,要先創建 Public Subnet EC2,使能連線進資料庫的 Instance,如下圖:
https://ithelp.ithome.com.tw/upload/images/20210905/20100951L50YWo50m1.png

先到 RDS 資料庫的詳細頁面,再來往下拉,這些都是先前所創建的 VPC Security Group 的規範(下圖),可以看到由於 RDS Instance 放在 Private Subnet,所以沒有 Publicc accessibility,也就代表使用者不能直接從 Internet 連到 RDS 資料庫。
https://ithelp.ithome.com.tw/upload/images/20210905/20100951LxsTi6vABW.png

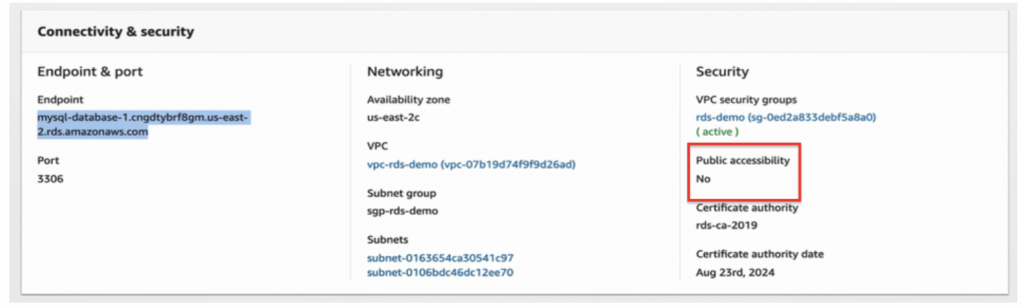
先點開 Services (下圖#1),搜尋 EC2 (下圖#2),以新分頁開啟(下圖#3)。
https://ithelp.ithome.com.tw/upload/images/20210905/20100951oZlVYgNyiD.png

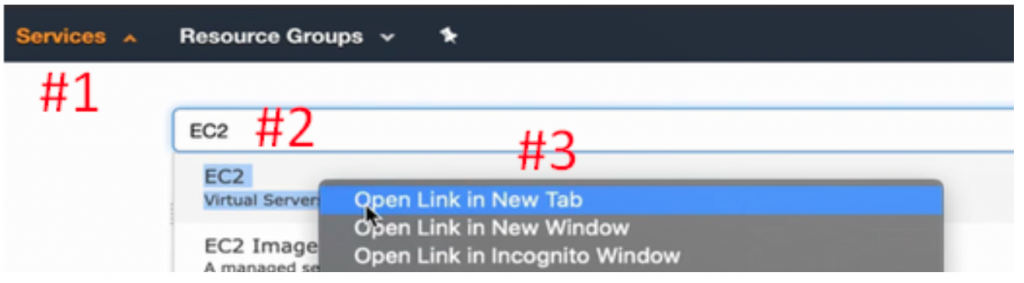
到了 EC2 頁面之後,按下左列表的 Instances 切換頁面(下圖#1),按下 Launch Instance (下圖#2)。
https://ithelp.ithome.com.tw/upload/images/20210905/20100951Q4X9ewK7oB.png

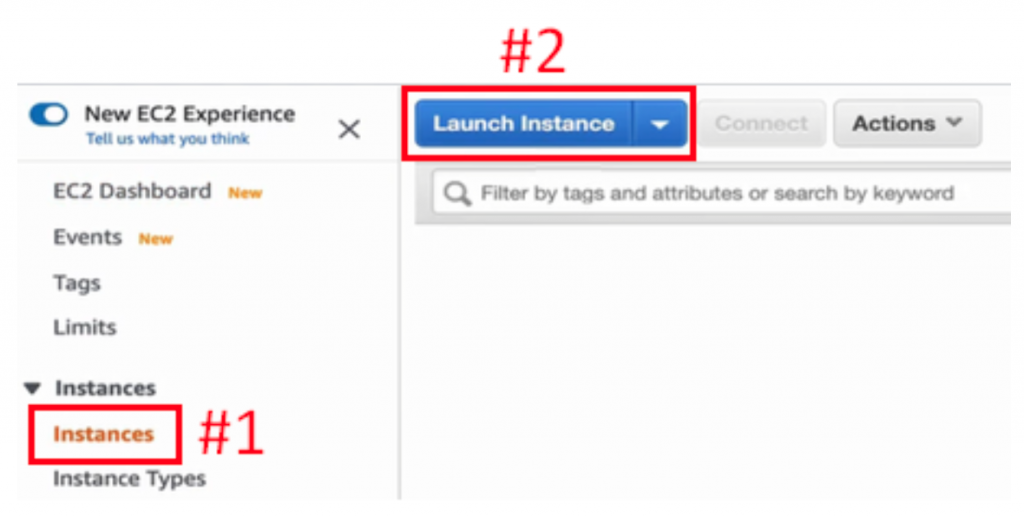
Step 1: Choose an Amazon Machine Image (AMI)
選擇第一個 Select,如下圖:
https://ithelp.ithome.com.tw/upload/images/20210905/20100951LxTB1VtQxQ.png

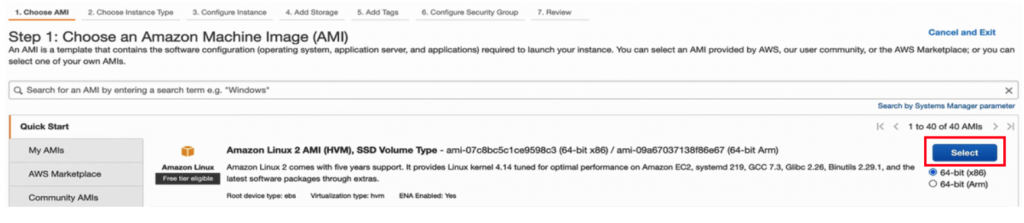
Step 2: Choose an Instance Type
預設即可,點擊右下 Next:Configure Instance Details (下圖#1)。
https://ithelp.ithome.com.tw/upload/images/20210905/20100951dunZTfhb8j.png

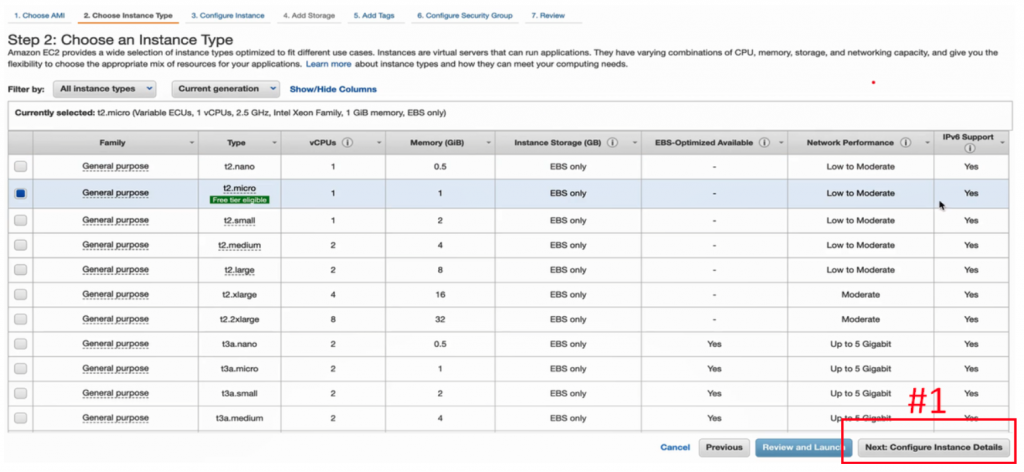
Step 3: Configure Instance Details
Network 選擇自己建立的 VPC (下圖#1),Subnet 選擇 Public subnet (下圖#2),Auto-assign Public IP 選擇 Enable(下圖#3),給予一個Public IP,設定完成後點擊右下角 Next:Add Storage (下圖#4)。
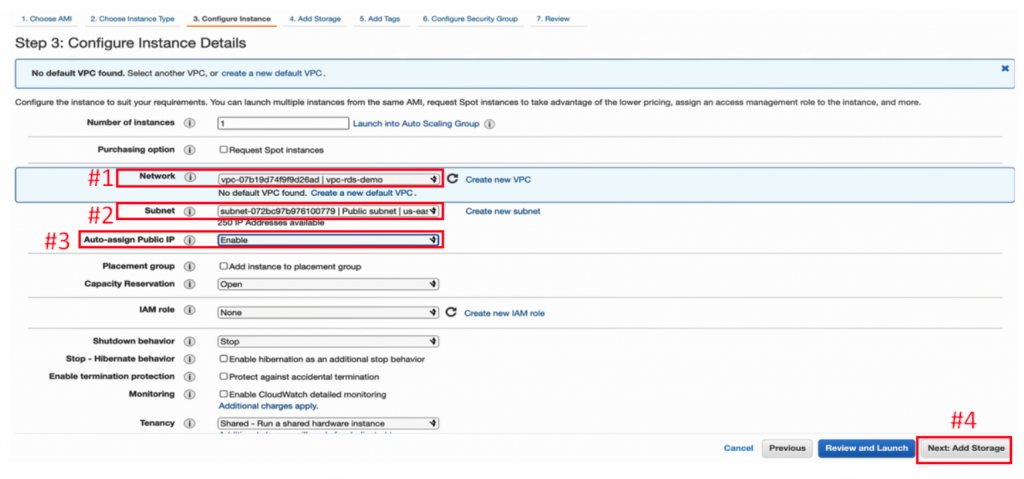
https://ithelp.ithome.com.tw/upload/images/20210905/20100951pkFbEc81qn.png

Step 4: Add Storage
預設即可,直接點擊右下角 Next:Add Tags (下圖#1)。
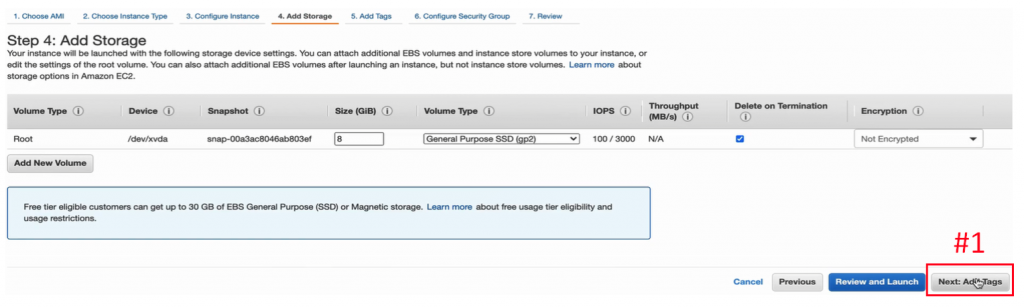
https://ithelp.ithome.com.tw/upload/images/20210905/20100951oQ9HCbGEEE.png

Step 5: Add Tags
略過,直接點擊右下角 Next:Configure Security Group (下圖#1)。
https://ithelp.ithome.com.tw/upload/images/20210905/20100951Df5WTj3QXy.png

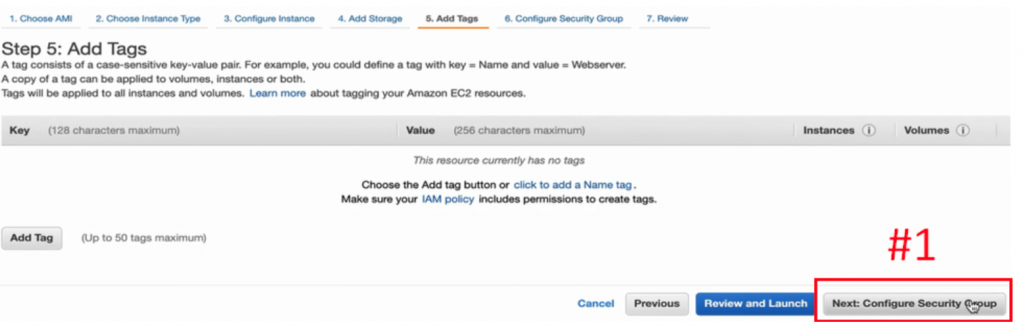
Step 6: Configure Security Group
SSH 就夠用了(下圖#1),點擊右下角 Review and Launch (下圖#2)。
https://ithelp.ithome.com.tw/upload/images/20210905/20100951b8Q0Od64xh.png

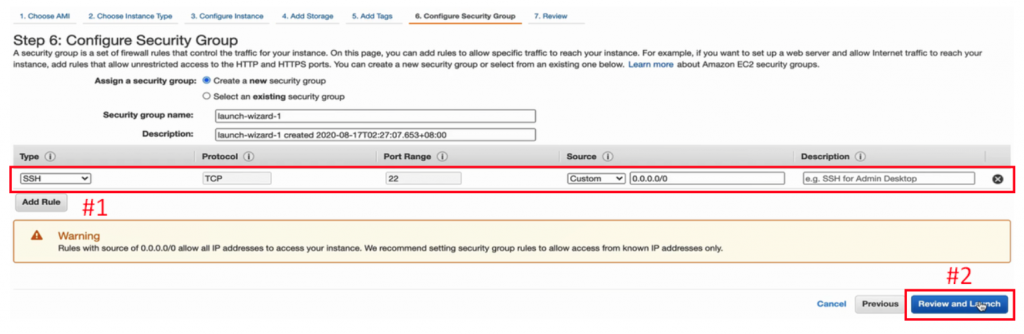
Step 7: Review and Launch
直接點右下 Launch (下圖#1)。
https://ithelp.ithome.com.tw/upload/images/20210905/20100951HE92rzXqDP.png

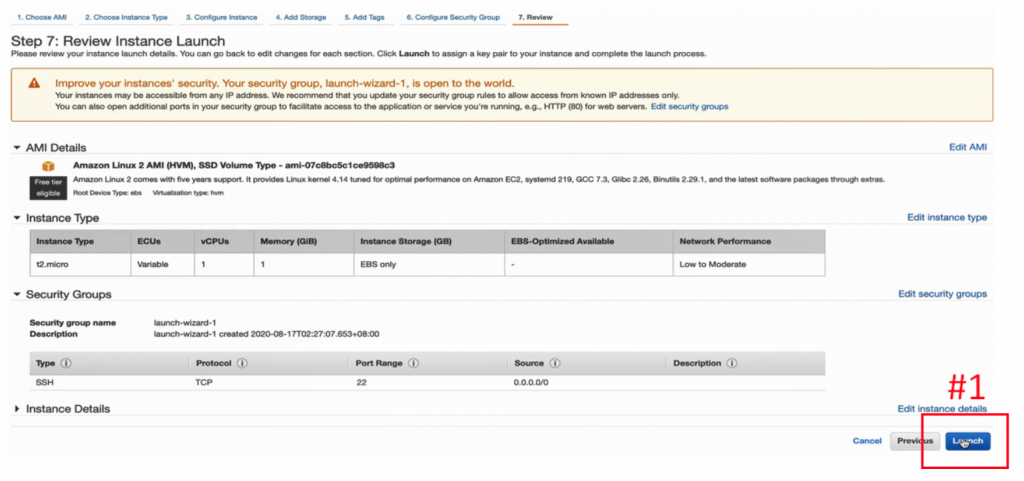
將 Choose an existing key pair 改為 Create a new key pair (下圖#1),會產生一個 Key pair name 為 rds-demo-keypair2 (下圖#2),按下 Download Key Pair (下圖#3)。
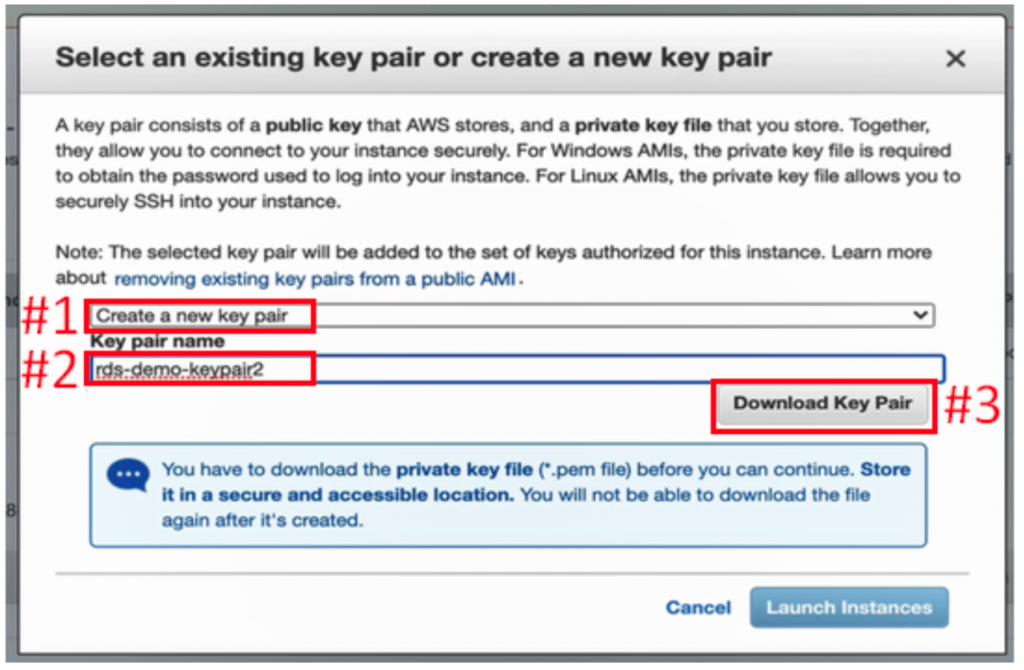
https://ithelp.ithome.com.tw/upload/images/20210905/20100951rFDdDkxUyF.png

點擊 Save,如下圖:
https://ithelp.ithome.com.tw/upload/images/20210905/20100951pi7zii0iWY.png

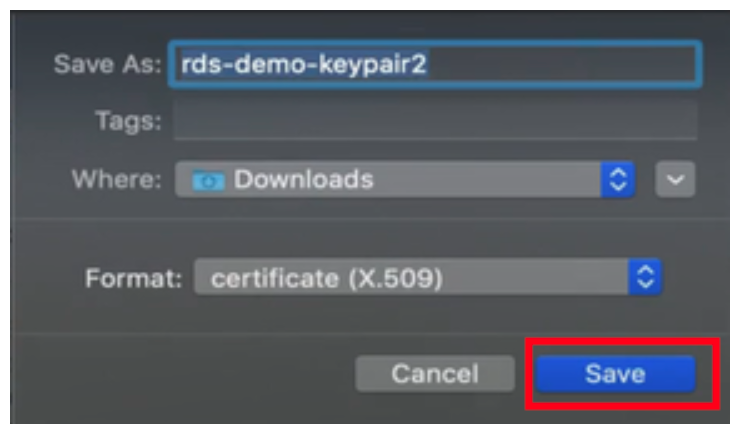
再按 Launch Instances,如下圖:
https://ithelp.ithome.com.tw/upload/images/20210905/20100951KEQ5RQp4Mi.png

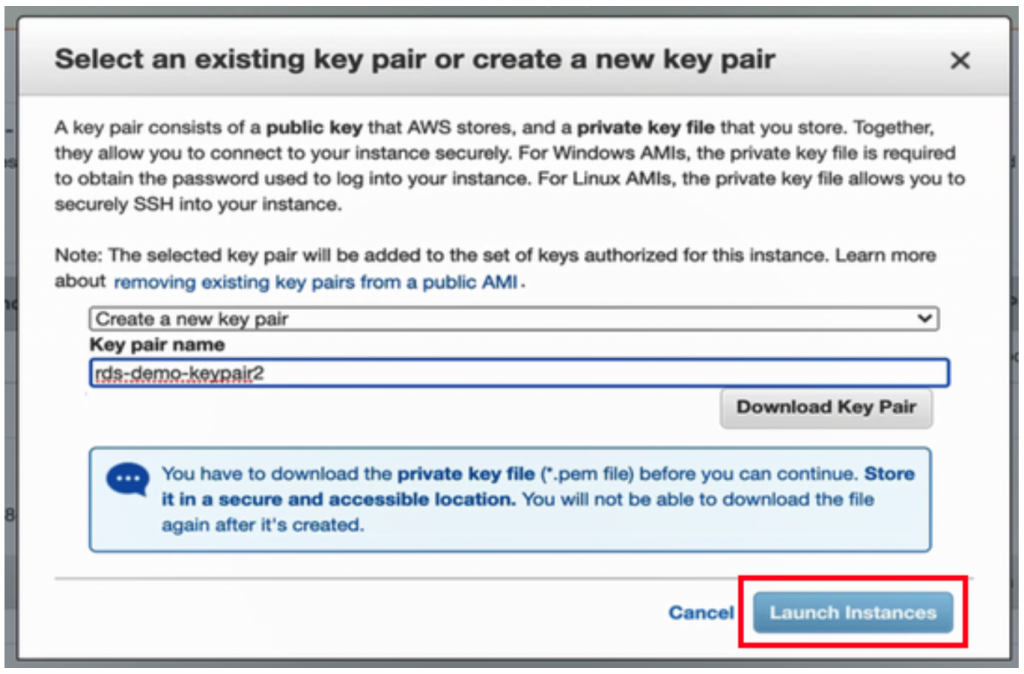
確認 Instances 被成功 Launch 之後(下圖#1),按右下角 View Instances (下圖#2),來完成 Launch Instance 這個動作。
https://ithelp.ithome.com.tw/upload/images/20210905/20100951rPnt6VOmE7.png

與 RDS Instance 進行連接

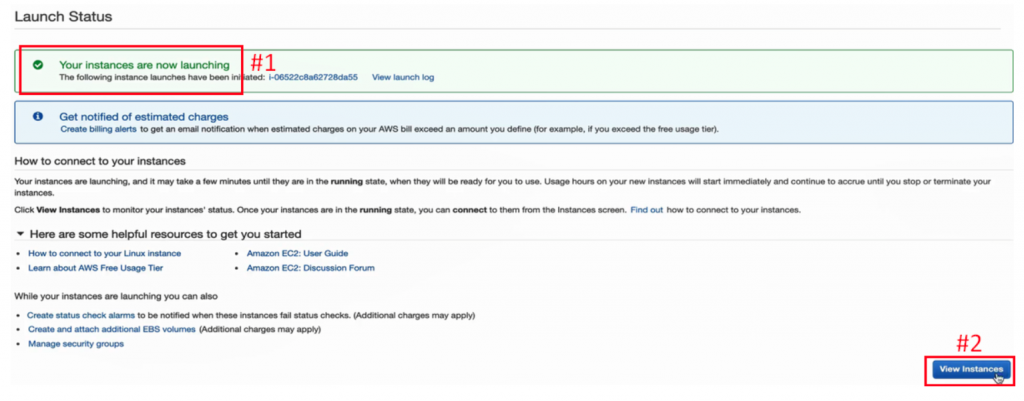
Launch Instance 動作完成後,按下 Connect (下圖#1),複製 chmod(change mode)指令(下圖#2)。
https://ithelp.ithome.com.tw/upload/images/20210905/20100951k8nsnss7hb.png

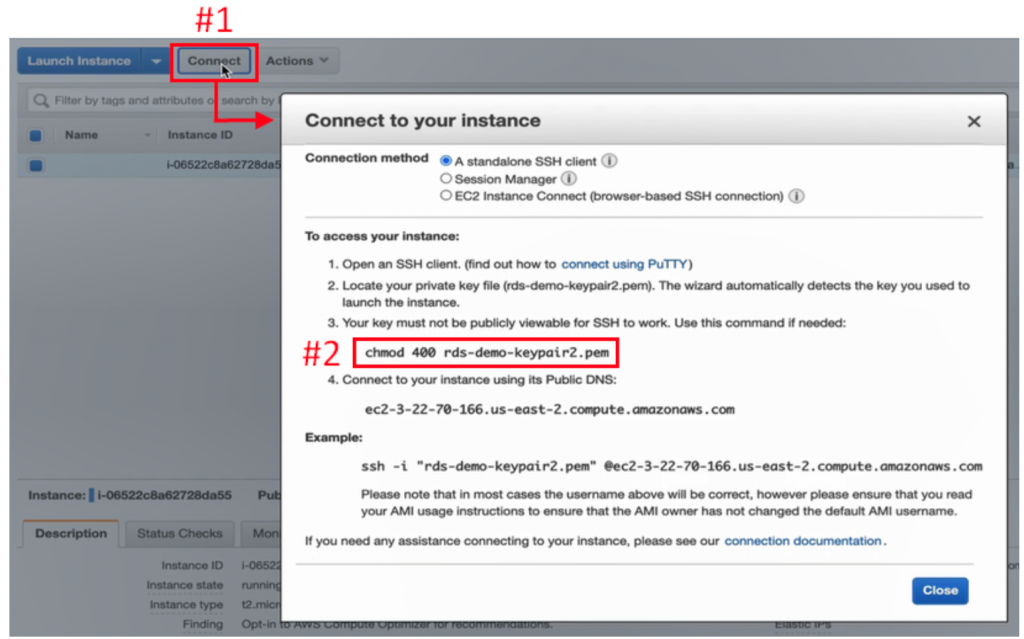
開啟 Terminal,移到 Key Pair 的位置,如下圖:
https://ithelp.ithome.com.tw/upload/images/20210905/20100951wWdjLXXtt7.png

到 Key Pair 的目錄位置後,貼上 chmod 指令,如下圖:
https://ithelp.ithome.com.tw/upload/images/20210905/20100951cC1vdUqxMC.png

回到 EC2 Console,複製 ssh 指令,如下圖:
https://ithelp.ithome.com.tw/upload/images/20210905/20100951lkCeVO8OIK.png

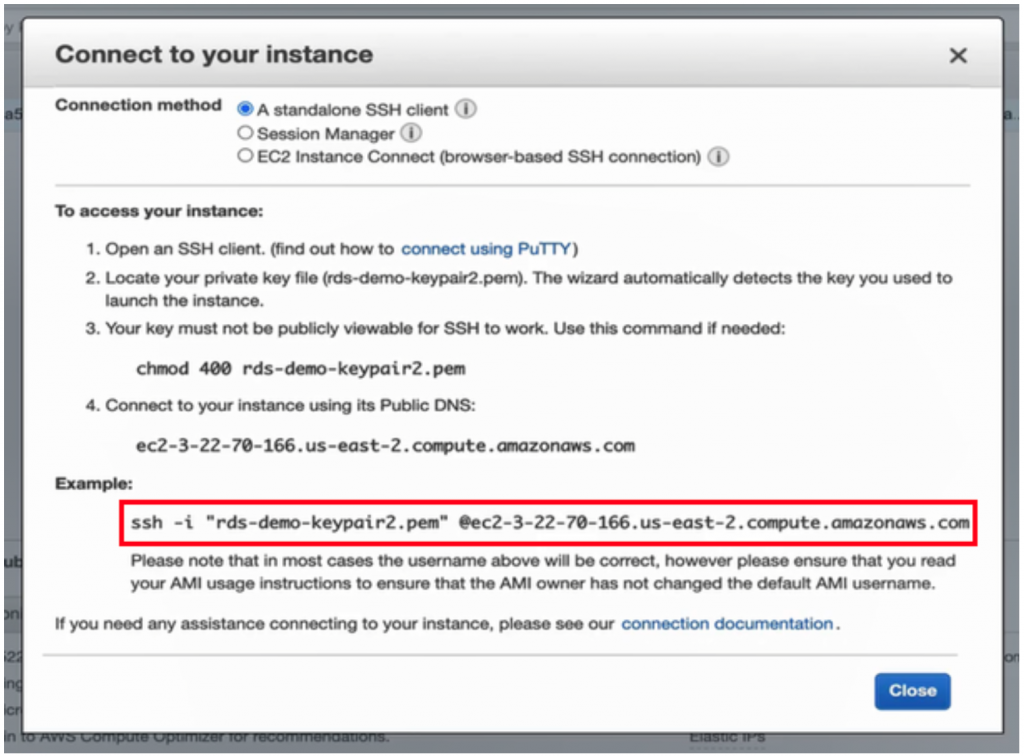
到 Terminal 貼上 ssh 指令(下圖#1),等待一段時間,下方會出現訊息向使用者確認是否要連線,輸入 yes (下圖#2),就可以連進去。
https://ithelp.ithome.com.tw/upload/images/20210905/20100951qpHytDGgIQ.png

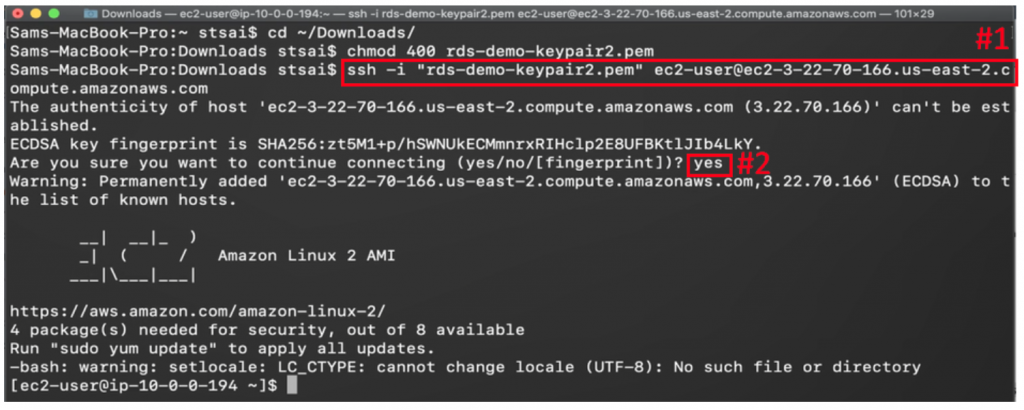
回到 RDS Console,複製 Endpoint 下方字串,如下圖:
https://ithelp.ithome.com.tw/upload/images/20210905/20100951BDGVCvx4W6.png

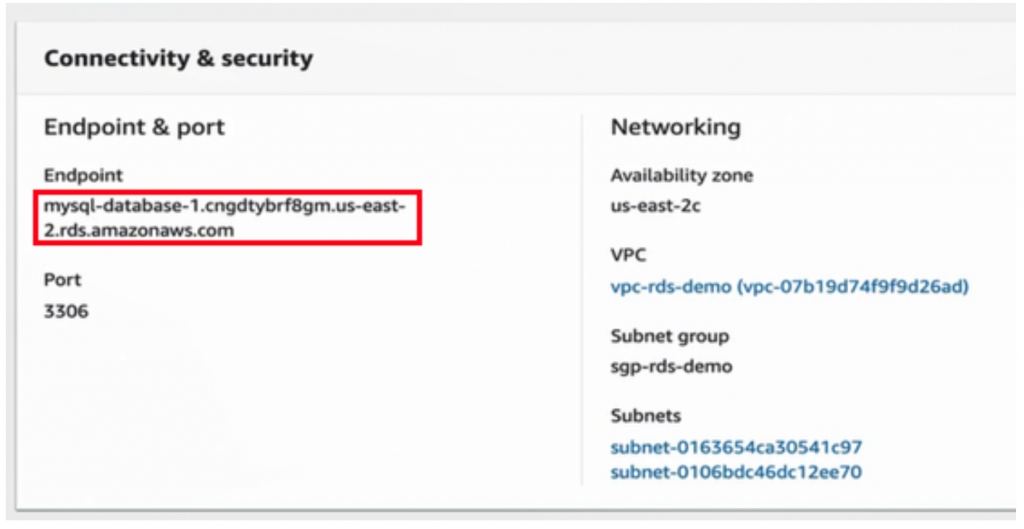
接著回到 Terminal,鍵入 sudo yum install mysql -y 來安裝 MySQL 的客戶端,如下圖:
https://ithelp.ithome.com.tw/upload/images/20210905/20100951Yh6iW0PDad.png

再來就可以連進去 RDS Primary Instance,輸入 mysql -u 後面加上 User 名稱 admin (下圖#1), -p 指用 Password 的方式進入(下圖#2),-h 進到剛才所複製的 RDS Instance 的 Endpoint (下圖#3),再配上大寫 -P 來指名 Port 3306 (下圖#4)。按 Enter 後,再輸入 Password (下圖#5),就可以連進去剛才建立的 RDS Instance。
https://ithelp.ithome.com.tw/upload/images/20210905/20100951YyPsKYnm5i.png

用 SQL 指令對資料庫進行操作

接下來要用一些 SQL 指令,來對資料庫進行一些操作。

首先,如下圖打上 show databases;,就會看到目前只有一些預設的,而現在要來創建自己要用的。
https://ithelp.ithome.com.tw/upload/images/20210905/20100951FSQvd8uw7s.png

在 RDS Instance 中建立 Database

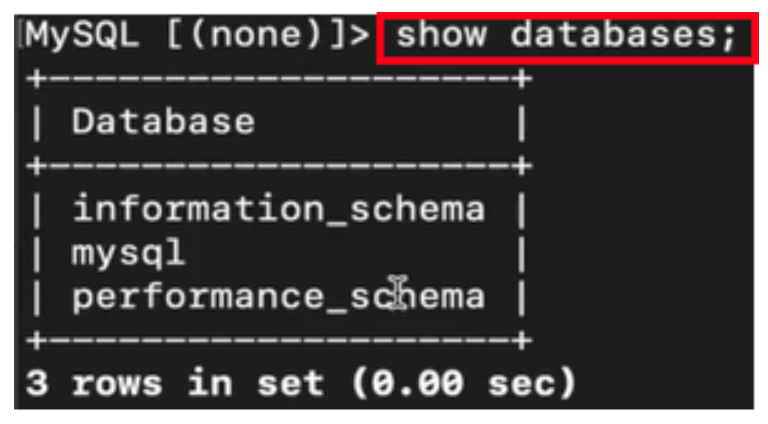
鍵入 create database mydb001; 以建立 Database,如下圖:
https://ithelp.ithome.com.tw/upload/images/20210905/20100951TM1Bjj2Us4.png

再利用 show databases; (下圖#1),就可以看到剛才創立的 Database (下圖#2)。
https://ithelp.ithome.com.tw/upload/images/20210905/20100951ZIj1452BVz.png

進入 Database

利用 use mydb001; 以進到此 Database,如下圖:
https://ithelp.ithome.com.tw/upload/images/20210905/20100951ghMR6NqNCe.png

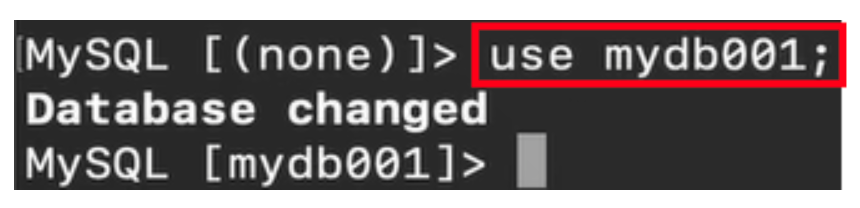
運用 show tables;,可以看到當前的 Database 是空的,如下圖:
https://ithelp.ithome.com.tw/upload/images/20210905/20100951pGLgQTi8UW.png

在 Database 中建立 Table

輸入下圖紅底處指令,欄位名稱假設為 name 與 hobby, 欄位型態為 varchar,及有 255 的空間。
https://ithelp.ithome.com.tw/upload/images/20210905/20100951Kj9wjRHYCN.png

Table 創建完成後,利用 show tables; 就可以看到創好的 Table 了,如下圖:
https://ithelp.ithome.com.tw/upload/images/20210905/20100951Vz2uE4xYb7.png

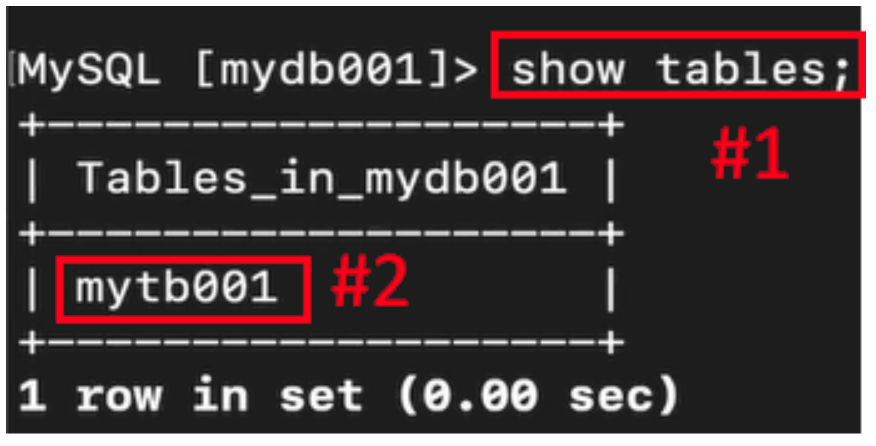
並且可以用 show columns from mytb001; (下圖#1)閱覽這個Table的結構,會看到這個Table有兩個欄位,一個是 name 一個是 hobby (下圖#2)。
https://ithelp.ithome.com.tw/upload/images/20210905/20100951Otq2jP6BtA.png

在 Table 中新增資料

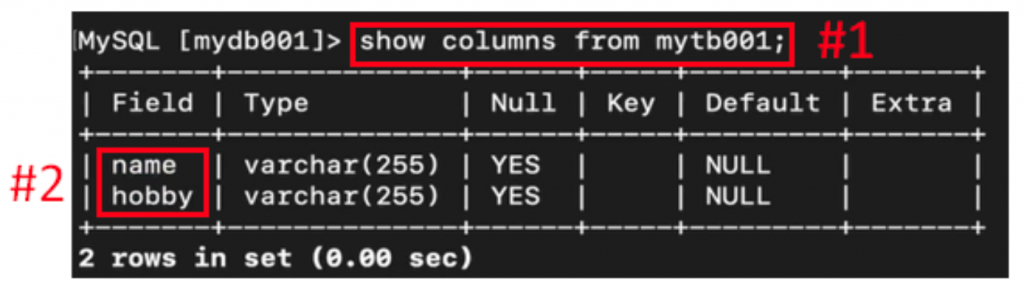
輸入 select*from mytb001; 來檢閱 Table 裡的資料,可以看到目前是空的,如下圖:
https://ithelp.ithome.com.tw/upload/images/20210905/20100951cTfcFFuJdD.png

所以現在輸入 insert into ,加上想要插入資料的 Table 名稱(下圖#1),欄位名稱之間用「,」隔開(下圖#2),VALUES 的值必須分別對應 name 與 hobby,而字串要特別用兩個「’」包覆起來(下圖#3)。
https://ithelp.ithome.com.tw/upload/images/20210905/201009512wbSCMfghC.png

插入資料成功後,再藉 select*from mytb001; 來看到 Table 裡面的資料(下圖#1),會看到裡面有一筆新的資料(下圖#2)。
https://ithelp.ithome.com.tw/upload/images/20210905/20100951r1vQylXsA5.png

為示範備份的預先準備作業

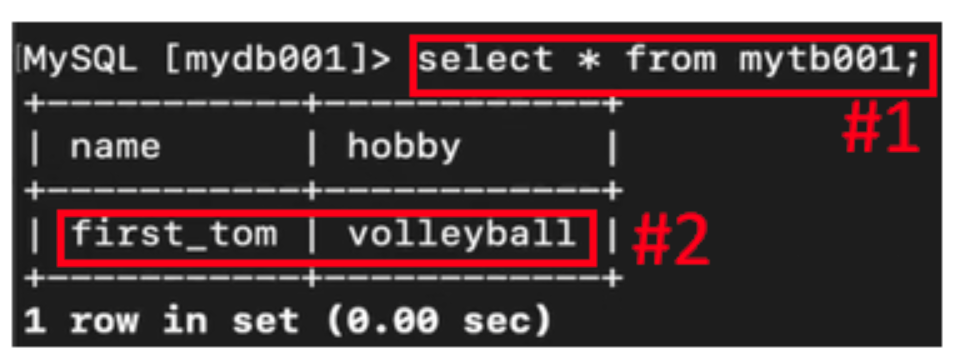
這邊特別稍微等待 10 分鐘,為了等一下做備份的示範,如下圖:
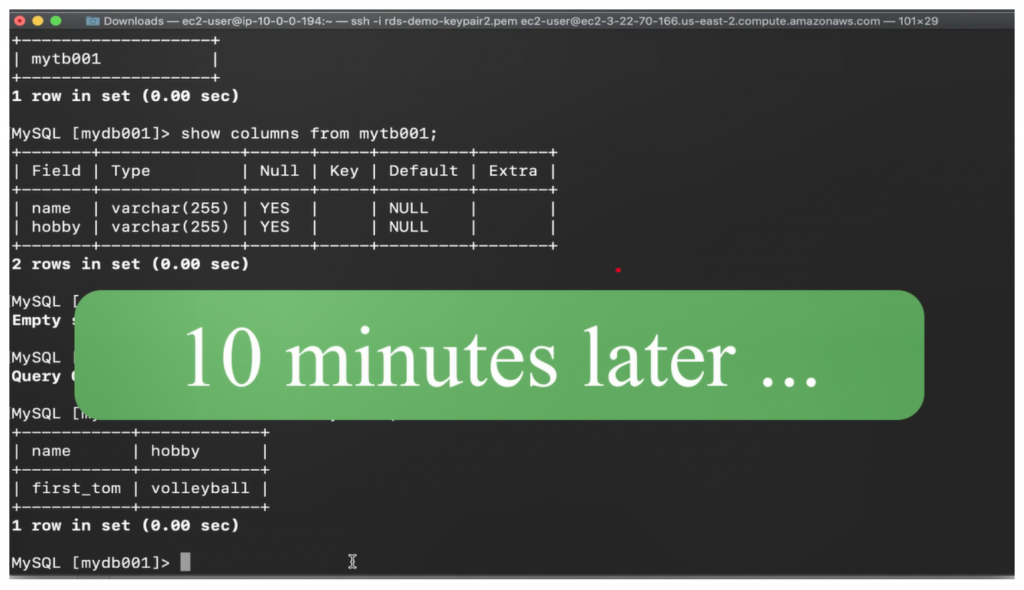
https://ithelp.ithome.com.tw/upload/images/20210905/20100951ClAHJTjya0.png

再加上幾個新的資料,如下圖:
https://ithelp.ithome.com.tw/upload/images/20210905/20100951x4uAP0WvMv.png

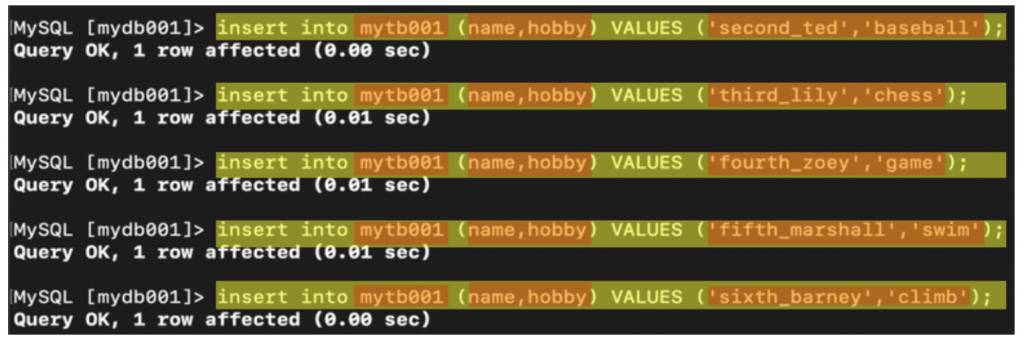
加完之後,確認一下 Table 裡面的資料,輸入 select*from mytb001; (下圖#1)可以看到現在總共有六筆資料(下圖#2)。
https://ithelp.ithome.com.tw/upload/images/20210905/20100951zSCe20xMob.png

離開連線

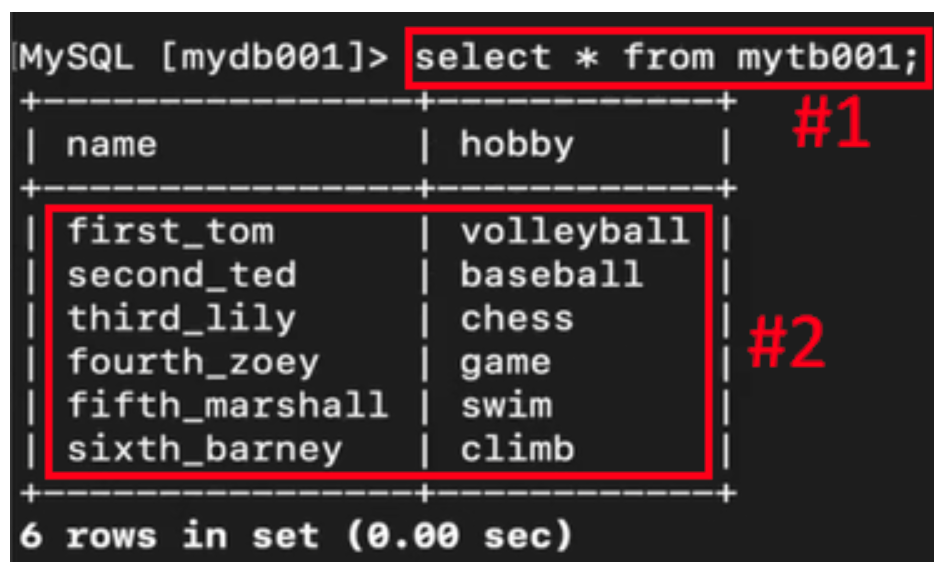
新增好資料之後,輸入 exit,離開這次的資料庫連線,如下圖:
https://ithelp.ithome.com.tw/upload/images/20210905/20100951kgzE5tlw2C.png

小結

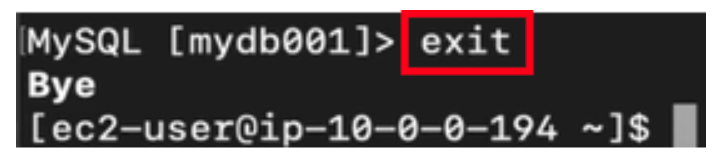
這次實際示範了如何去使用 RDS instance,從 Public Subnet EC2 的建立,與 RDS Instance 進行連接,到用 SQL 指令對資料庫進行操作,包括 Database 的建立與進入,Table 的建立與插入,為示範備份的預先準備作業,以及如何離開連線。

以上,即是 RDS 雲端資料庫的示範操作,下個單元我們將進行備份的實作演練。

What's Next?

又到了一個循環,我們再次用了 5 天入手 AWS RDS 這項服務,之後若有時間,在幫大家擴展到 backup、failover、read replica 等主題的 Lab 演練。那明天,我們來進入第五「權限寶石:IAM架構」!


上一篇
Day 22 資料寶石:【Lab】RDS架構 建立自己的第一台雲端資料庫 (中)
下一篇
Day 24 權限寶石:IAM 權限管理 架構解析
系列文
無限手套 AWS 版:掌控一切的 5 + 1 雲端必學主題30
圖片
  直播研討會
圖片
{{ item.channelVendor }} {{ item.webinarstarted }} |
{{ formatDate(item.duration) }}
直播中

尚未有邦友留言

立即登入留言