如標題,這篇想教大家如何做出一個有CRUD功能的會員管理系統
首先,要先知道CRUD分別代表什麼
Create:新增資料
Read:讀取、查詢資料
Update:更新、修改資料
Delete:刪除資料
了解CRUD分別代表什麼之後, 先看一下我們稍後會使用到的檔案有哪些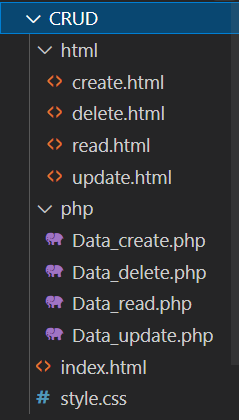
然後將CRUD這個資料夾移去C:\xampp\htdocs,並到目錄htdocs裡的index.php將斜線內的名稱改成CRUD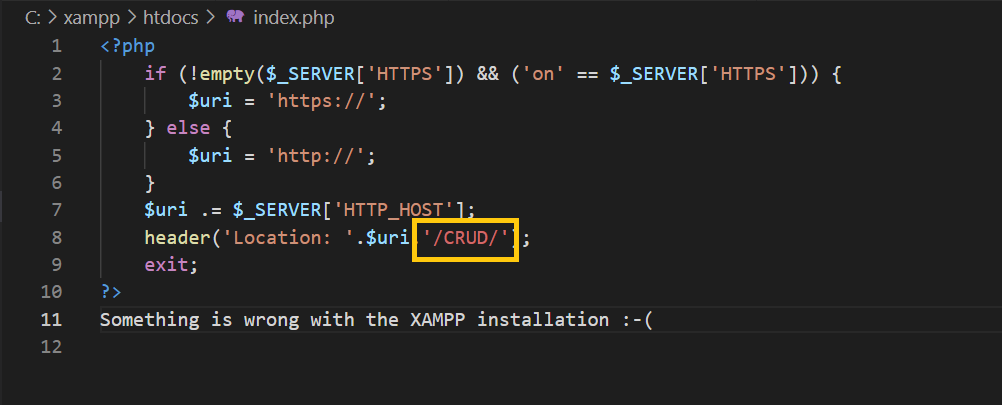
再到XAMPP將Apache和MySQL開啟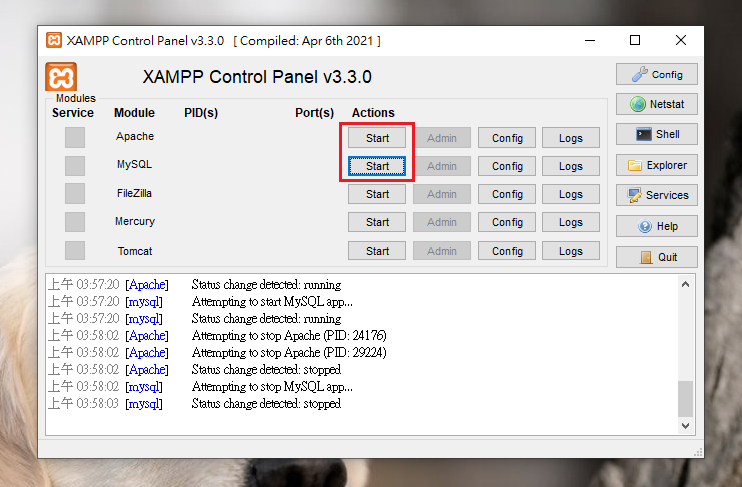
再去瀏覽器的網址那輸入127.0.0.1或localhost,就可以進入CRUD這個資料夾的畫面
現在看一定是空的,所以我們要先做一個選擇介面,方便我們選擇動作執行
我們將選擇介面放在index.html這個檔案裡:
<h1>選擇介面</h1>
    <div class="box_outside">
        <div class="box_style"><a href="./html/create.html">新增</a></div>
        <div class="box_style"><a href="./html/read.html">讀取</a></div>
        <div class="box_style"><a href="./html/update.html">修改</a></div>
        <div class="box_style"><a href="./html/delete.html">刪除</a></div>
    </div>
CSS則放在style.css裡:
/* ALL file */
body {
    background-color:rgba(243, 164, 91, 0.452);
}


/* IN index.html */
/* 調整標題大小 */
h1 {
    text-align:center;
    font-size:75px;
    color:rgb(71, 68, 68);
}

/* 用Flex將四個box排列在一起 */
.box_outside {
    display:flex;
    justify-content:center;
    margin-top:5%;
}

/* 調整box的尺寸、背景顏色、字體大小 */
.box_style {
    width:200px;
    height:150px;
    background-color:rgba(178, 231, 141, 0.657);
    margin:5px 20px 0 20px;
    font-size:35px;
    line-height:150px;
    text-align:center;
    font-weight:bolder;
}


/* IN ALL HTML file, except index.html */
/* 讓確認鍵置中 */
.tr_center {
    text-align:center;
}

/* 調整表格的背景顏色、尺寸 */
table {
    background-color:rgba(178, 231, 141, 0.657);
    width:450px;
    margin:12% auto 0 auto;
    min-height:120px;
}

/* 調整欄位的大小 */
.input {
    padding:12px 25px 12px 5px;
    font-size:20px;
}

/* 調整確認鍵的大小 */
.input_submit {
    margin-top:10px;
    padding:5px 20px 5px 20px;
    font-size:20px;
}

/* 調整表格內的字體大小 */
.font_size {
    font-size:30px;
    text-align:center;
    font-weight:bolder;
}

/* 調整興趣欄的字體大小 */
.input_select {
    padding:10px 5px 10px 4px;
    font-size:25px;
    font-weight:bolder;
}


/* IN ALL PHP file*/
/* 調整顯示結果的box尺寸、背景顏色、字體大小 */
.box_result {
    width:550px;
    background-color:rgba(178, 231, 141, 0.657);
    margin:12% auto 0 auto;
    font-size:35px;
    text-align:center;
    font-weight:bolder;
    padding:0 30px;
}


/* except create.php */
/* 調整顯示結果的box寬度 */
.box_size {
    width:700px;
}
結果如下圖所示: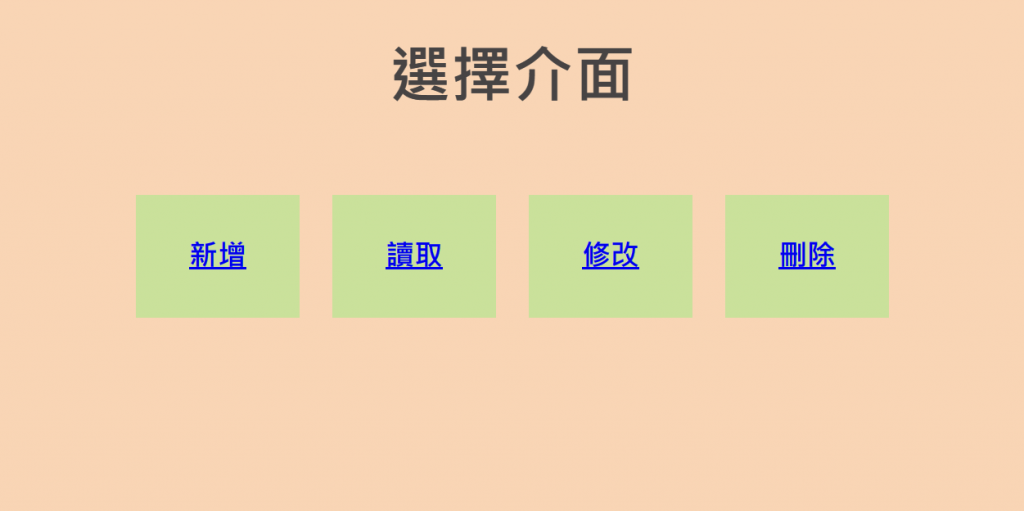
Create (新增)
這裡我們先做一個會員註冊的表單,有帳號、密碼、國籍、email等欄位需填寫
並設定form到Data_cteate.php,method用POST
create.html :
<form action="../php/Data_create.php" method="POST">
    <table class="table">
        <tr class="font_size"><td colspan="2">會員註冊</td></tr>
        <tr>
            <td class="font_size">帳號</td>
            <td><input class="input" type="text" name="account"></td>
        </tr>
        <tr>
            <td class="font_size">密碼</td>
            <td><input class="input" type="password" name="password"></td>
        </tr>
        <tr>
            <td class="font_size">國家</td>
            <td>
                <select class="input_select" name="country">
                    <option value="臺灣">臺灣</option>
                    <option value="日本">日本</option>
                    <option value="美國">美國</option>
                    <option value="土耳其">土耳其</option>
                    <option value="韓國">韓國</option>
                </select>
            </td>
        </tr>
        <tr>
            <td class="font_size">email</td>
            <td><input class="input" type="email" name="email"></td>
        </tr>
        <tr class="tr_center">
            <td colspan="2"><input class="input_submit" type="submit" name="submit" value="確認"></td>
        </tr>
    </table>
</form>
再設定Data_create.php,請注意看我在程式碼內下的註解
請注意:需在<?php ?>外套用html的基本格式,才能在php內使用css
Data_create.php :
<!DOCTYPE html>
<html lang="en">
<head>
    <meta charset="UTF-8">
    <meta http-equiv="X-UA-Compatible" content="IE=edge">
    <meta name="viewport" content="width=device-width, initial-scale=1.0">
    <title>Document</title>
    <link rel="stylesheet" href="../style.css">
</head>
<body>
<?php
//你在資料庫裡的設定
$servername = "localhost"; //你用哪個形式開啟phpMyAdmin的,用127.0.0.1則改成127.0.0.1
$username = "你在phpMyAdmin裡設定的User名稱";
$password = "你在phpMyAdmin裡設定的密碼";
$database = "你在phpMyAdmin裡新增的資料庫名稱";

//接收HTML傳來的資料
$member_account = @$_POST['account'];
$member_password = @$_POST['password'];
$member_country = @$_POST['country'];
$member_email = @$_POST['email'];

//連接資料庫
$conn = new mysqli($servername, $username, $password, $database);

//設定連線編碼,防止中文字亂碼
$conn->query("SET NAMES utf8");

echo '<div class="box_result">';
echo '<br><a href="../index.html">'."返回選擇介面".'</a><br>';
//若帳號欄位為空,則提醒輸入帳號
if(!empty($member_account)) {
    //若密碼欄位為空,則提醒輸入密碼
    if(!empty($member_password)) {
        //若eamil欄位為空,則提醒輸入email
        if(!empty($member_email)) {
            //用INSERT新增資料至資料庫
            $insertSql = "INSERT INTO `你的資料表名稱` (`account`, `password`, `country`, `email`) VALUES ('$member_account', '$member_password', '$member_country', '$member_email')";

            //讓資料庫連接到INSERT的語法
            $conn->query($insertSql);

            //用mysqli_affected_rows判斷資料庫的資料數有沒有增加,有則代表資料新增成功
            //沒增加代表此帳號已註冊過,提醒換一組新帳號
            if(mysqli_affected_rows($conn)>0) {
                echo "新會員".$member_account."註冊成功!!".'<br><br>';
            } else {
                echo "此帳號已註冊過,請換一組帳號!!".'<br><br>';
            }
        } else {
            echo "請輸入email!!".'<br><br>';
        }
    } else {
        echo "請輸入密碼!!".'<br><br>';
    }
} else {
    echo "請輸入帳號!!".'<br><br>';
}
echo '</div>';

?>
</body>
</html>
結果如下圖所示:

Read(讀取、查詢)
既然我們新增了一筆kycz5566的資料,那就要做一個查詢表單來查詢這筆資料
這裡我們設定form到Data_read.php,method用POST
read.html :
<form action="../php/Data_read.php" method="POST">
    <table>
        <tr>
            <td class="font_size" colspan="2">會員查詢</td>
        </tr>
        <tr>
            <td class="font_size">請輸入帳號</td>
            <td><input class="input" type="text" name="account"></td>
        </tr>
        <tr class="tr_center">
            <td colspan="2"><input class="input_submit" type="submit" name="submit" value="確認"></td>
        </tr>
    </table>
</form>
再設定Data_read.php,請注意看我在程式碼內下的註解
請注意:需在<?php ?>外套用html的基本格式,才能在php內使用css
Data_read.php :
<!DOCTYPE html>
<html lang="en">
<head>
    <meta charset="UTF-8">
    <meta http-equiv="X-UA-Compatible" content="IE=edge">
    <meta name="viewport" content="width=device-width, initial-scale=1.0">
    <title>Document</title>
    <link rel="stylesheet" href="../style.css">
</head>
<body>
<?php
//你在資料庫裡的設定
$servername = "localhost"; //你用哪個形式開啟phpMyAdmin的,用127.0.0.1則改成127.0.0.1
$username = "你在phpMyAdmin裡設定的User名稱";
$password = "你在phpMyAdmin裡設定的密碼";
$database = "你在phpMyAdmin裡新增的資料庫名稱";

//接收HTML傳來的帳號
$select_account = @$_POST['account'];

//連接資料庫
$conn = new mysqli($servername, $username, $password, $database);

//設定連線編碼,防止中文字亂碼
$conn->query("SET NAMES utf8");

echo '<div class="box_result box_size">';
echo '<br><a href="../index.html">'."返回選擇介面".'</a><br>';
//若帳號欄位為空,則提醒輸入帳號
if(!empty($select_account)) {
    //用SELECT查詢資料庫的資料
    $selectSql = "SELECT * FROM `你的資料表名稱` WHERE `account` = '$select_account'";

    //讓資料庫連接到SELECT的語法,並將其結果存在$memberData
    $memberData = $conn -> query($selectSql);

    //用mysqli_affected_rows判斷資料庫的資料有沒有受到影響,有則查詢會員資料,並將其印出
    //沒查到代表沒有此資料
    if(mysqli_affected_rows($conn)>0) {
        //用fetch_assoc()取得欲查詢的帳號為何
        //用while重複查詢資料庫,直到查到相符合的帳號,再將其印出
        while($row = $memberData->fetch_assoc()) {
            echo "會員查詢結果".'<br>';
            echo "帳號:".$row['account'].'<br>';
            echo "密碼:".$row['password'].'<br>';
            echo "國籍:".$row['country'].'<br>';
            echo "email:".$row['email'].'<br><br>';
        }
    } else {
        echo "查無".$select_account."的資料!!".'<br><br>';
    }
} else {
    echo "請輸入要查詢的帳號!!".'<br><br>';
}
echo '</div>';

?>
</body>
</html>
結果如下圖所示: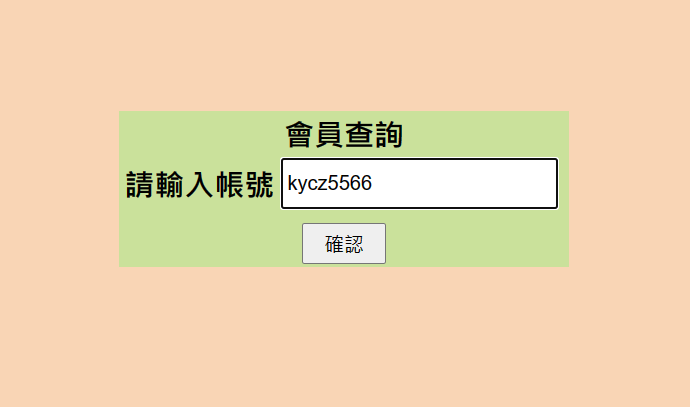

你也可以直接登入phpMyAdmin裡看,確認有沒有印錯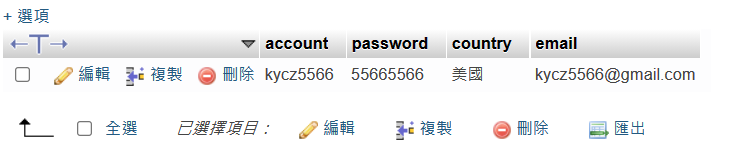
Update (更新、修改)
那如果今天我不想當美國人了,我想去當日本人可以嗎?
當然可以!你想順便改密碼和email也可以,只要做一個修改系統就可以更改資料囉
這裡我們設定form到Data_update.php,method用POST
update.html :
<form action="../php/Data_update.php" method="POST">
    <table class="table">
        <tr class="font_size"><td colspan="2">修改會員資料</td></tr>
        <tr>
            <td class="font_size">帳號</td>
            <td><input class="input" type="text" name="account"></td>
        </tr>
        <tr>
            <td class="font_size">密碼</td>
            <td><input class="input" type="password" name="password"></td>
        </tr>
        <tr>
            <td class="font_size">國家</td>
            <td>
                <select class="input_select" name="country">
                    <option value="臺灣">臺灣</option>
                    <option value="日本">日本</option>
                    <option value="美國">美國</option>
                    <option value="土耳其">土耳其</option>
                    <option value="韓國">韓國</option>
                </select>
            </td>
        </tr>
        <tr>
            <td class="font_size">email</td>
            <td><input class="input" type="email" name="email"></td>
        </tr>
        <tr class="tr_center">
            <td colspan="2"><input class="input_submit" type="submit" name="submit" value="確認"></td>
        </tr>
    </table>
</form>
再設定Data_update.php,請注意看我在程式碼內下的註解
請注意:需在<?php ?>外套用html的基本格式,才能在php內使用css
Data_update.php :
<!DOCTYPE html>
<html lang="en">
<head>
    <meta charset="UTF-8">
    <meta http-equiv="X-UA-Compatible" content="IE=edge">
    <meta name="viewport" content="width=device-width, initial-scale=1.0">
    <title>Document</title>
    <link rel="stylesheet" href="../style.css">
</head>
<body>
<?php
//你在資料庫裡的設定
$servername = "localhost"; //你用哪個形式開啟phpMyAdmin的,用127.0.0.1則改成127.0.0.1
$username = "你在phpMyAdmin裡設定的User名稱";
$password = "你在phpMyAdmin裡設定的密碼";
$database = "你在phpMyAdmin裡新增的資料庫名稱";

//接收HTML傳來的資料
$update_account = @$_POST['account'];
$update_password = @$_POST['password'];
$update_country = @$_POST['country'];
$update_email = @$_POST['email'];

//連接資料庫
$conn = new mysqli($servername, $username, $password, $database);

//設定連線編碼,防止中文字亂碼
$conn->query("SET NAMES utf8");

echo '<div class="box_result box_size">';
echo '<br><a href="../index.html">'."返回選擇介面".'</a><br>';
//若帳號欄位為空,則提醒輸入帳號
if(!empty($update_account)) {
    //用UPDATE更新資料庫的資料
    $updateSql = "UPDATE `你的資料表名稱` SET `password` = '$update_password', `country` = '$update_country', `email` = '$update_email' WHERE `account` = '$update_account'";

    //讓資料庫連接到UPDATE的語法
    $conn->query($updateSql);

    //用mysqli_affected_rows判斷資料庫的資料有沒有受到影響,有則代表資料更新成功
    //沒增加代表此帳號打錯,或尚未註冊,提醒重新輸入帳號
    if(mysqli_affected_rows($conn)>0) {
        echo "會員".$update_account."的資料已修改成功".'<br><br>';
    } else {
        echo "無法修改".$update_account."的資料,可能是帳號打錯or尚未註冊,請重新輸入帳號!!".'<br><br>';
    }
} else {
    echo "請輸入要修改的帳號".'<br><br>';
}

echo '</div>';

?>
</body>
</html>
結果如下圖所示: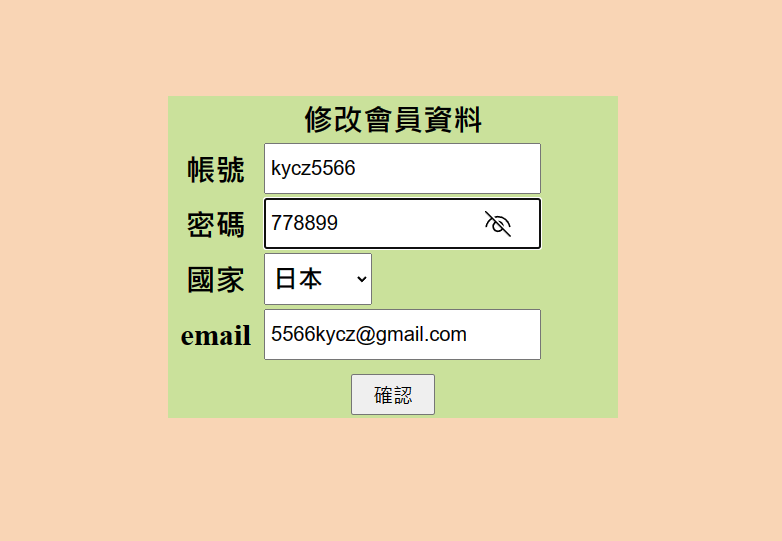

那現在kycz5566的資料修改成功了,我們去read查詢一下其資料顯示為何
結果如下圖所示:
恭喜你,成功從美國移民到日本囉!
Delete (刪除)
那如果我今天不想當會員了,我想刪除帳號可以嗎?
當然可以!儘管本公司有多麼不捨,依然會做一個刪除系統供您刪除資料 (淚
還會幫您貼心的設定form到Data_delete.php,method用POST
delete.html :
<form action="../php/Data_delete.php" method="POST">
    <table>
        <tr>
            <td class="font_size" colspan="2">刪除會員資料</td>
        </tr>
        <tr>
            <td class="font_size">請輸入帳號</td>
            <td><input class="input" type="text" name="account"></td>
        </tr>
        <tr class="tr_center">
            <td colspan="2"><input class="input_submit" type="submit" value="確認"></td>
        </tr>
    </table>
</form>
再設定Data_delete.php,請注意看我在程式碼內下的註解
請注意:需在<?php ?>外套用html的基本格式,才能在php內使用css
Date_delete.php :
<!DOCTYPE html>
<html lang="en">
<head>
    <meta charset="UTF-8">
    <meta http-equiv="X-UA-Compatible" content="IE=edge">
    <meta name="viewport" content="width=device-width, initial-scale=1.0">
    <title>Document</title>
    <link rel="stylesheet" href="../style.css">
</head>
<body>
<?php
//你在資料庫裡的設定
$servername = "localhost"; //你用哪個形式開啟phpMyAdmin的,用127.0.0.1則改成127.0.0.1
$username = "你在phpMyAdmin裡設定的User名稱";
$password = "你在phpMyAdmin裡設定的密碼";
$database = "你在phpMyAdmin裡新增的資料庫名稱";

//接收HTML傳來的帳號
$delete_account = @$_POST['account'];

//連接資料庫
$conn = new mysqli($servername, $username, $password, $database);

//設定連線編碼,防止中文字亂碼
$conn->query("SET NAMES utf8");

echo '<div class="box_result box_size">';
echo '<br><a href="../index.html">'."返回選擇介面".'</a><br>';
//若帳號欄位為空,則提醒輸入帳號
if(!empty($delete_account)) {
    //用DELETE刪除資料庫的資料
    $deleteSql = "DELETE FROM `你的資料表名稱` WHERE `account` = '$delete_account'";

    //讓資料庫連接到DELETE的語法
    $conn->query($deleteSql);

    //用mysqli_affected_rows判斷資料庫的資料有沒有受到影響,有則代表資料刪除成功
    //沒刪除則代表此帳號打錯,或尚未註冊,提醒重新輸入帳號
    if(mysqli_affected_rows($conn)>0) {
        echo "會員".$delete_account."的資料已刪除成功!!".'<br><br>';
    } else {
        echo "無法刪除".$delete_account."的資料,可能是帳號打錯or尚未註冊,請重新輸入帳號!!".'<br><br>';
    }
} else {
    echo "請輸入要刪除的帳號!!".'<br><br>';
}
echo '</div>';

?>
</body>
</html>
結果如下圖所示: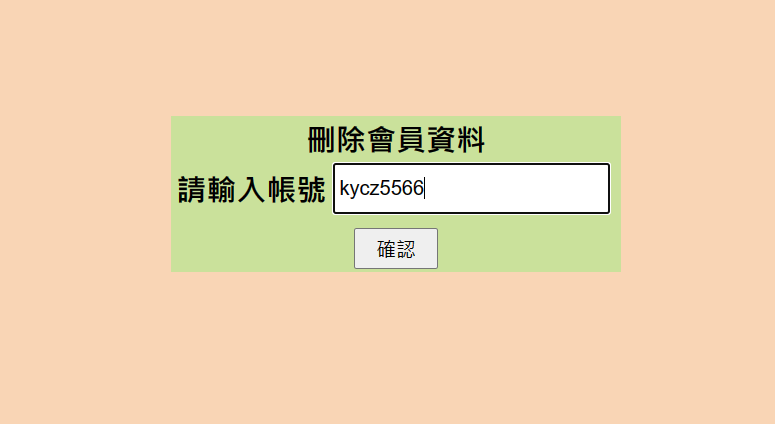

那現在kycz5566的資料刪除成功了,我們去read查詢一下其資料顯示為何
結果如下圖所示:
很遺憾您解除我們的會員,敬請期待您回心轉意 (淚
以上就是今天的介紹
只要跟著動手做,人人都能做出一個有CRUD功能的會員管理系統唷