在前兩篇學會MDC Components的Button和Text Field,所以已經可以來實作一個「登錄頁面」。

因為接下來的程式碼會全部使用ViewBinding取得對應view的 ID引用。
Kotlin 有個非常便捷的特性,無需再使用 findViewById() 對應view的 ID引用
build.gradle (Module: MDCSubject.app) 新增
但為什麼這麼方便我還要使用ViewBinding,因為官方已經對Kotlin Android Extensions 已提出棄用,通常棄用也不是不能用還是可以用到官方說不能用為止。
過去使用Kotlin Android Extensions的經驗,使用上必須注意class上面的import所引用的layout是否正確,因為有可能import到不正確的layout,這個IDE不會提示錯誤,必須靠人來檢查,所以建議使用ViewBinding。
XML layout 自動生成Binding class,對view的 ID 引用,在class 的 onCreate 時透過使用生成的class.inflate(layoutInflater),且每個binging class還包含一個 getRoot() 方法,為相應layout的root的view提供直接引用
設定啟用:build.gradle (Module: MDCSubject.app)
buildFeatures{
	viewBinding = true
}
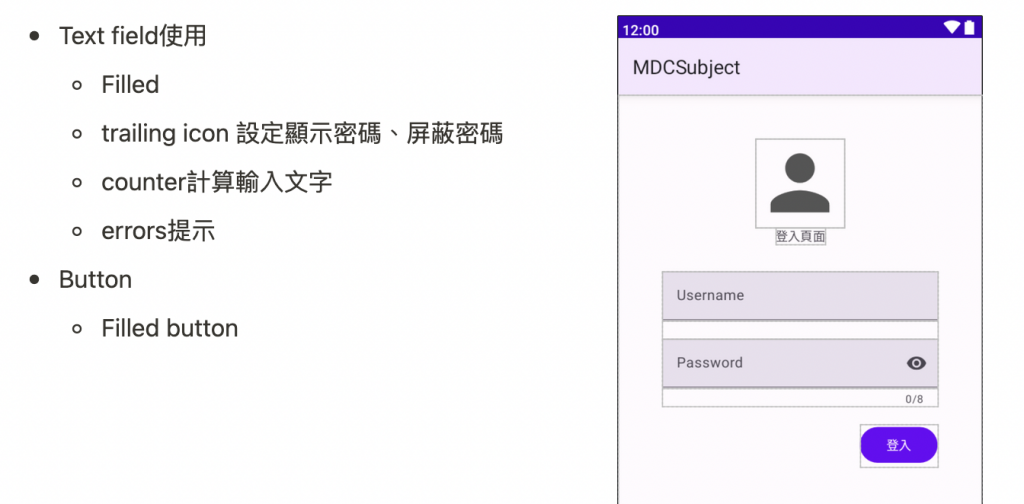
android:hint屬性中指定提示文字,提示文字是當點擊時會自動縮小往上跑。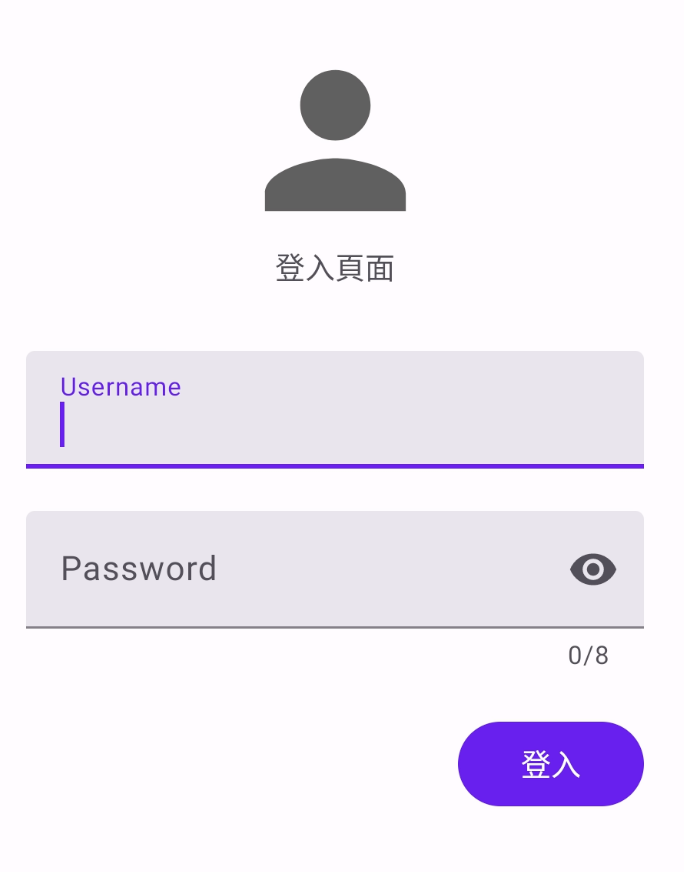
<com.google.android.material.textfield.TextInputLayout
        android:id="@+id/textInput_username"
        style="@style/Widget.Material3.TextInputLayout.FilledBox"
        android:layout_width="match_parent"
        android:layout_height="wrap_content"
        android:hint="@string/login_hint_username">

        <com.google.android.material.textfield.TextInputEditText
            android:layout_width="match_parent"
            android:layout_height="wrap_content" />

    </com.google.android.material.textfield.TextInputLayout>

		<!--password-->
    <com.google.android.material.textfield.TextInputLayout
        android:id="@+id/textInput_password"
        style="@style/Widget.Material3.TextInputLayout.FilledBox"
        android:layout_width="match_parent"
        android:layout_height="wrap_content"
        android:hint="@string/login_hint_password">

        <com.google.android.material.textfield.TextInputEditText
            android:layout_width="match_parent"
            android:layout_height="wrap_content"/>

    </com.google.android.material.textfield.TextInputLayout>
<com.google.android.material.textfield.TextInputLayout
    ...
            app:endIconMode="password_toggle"
    ...>

        <com.google.android.material.textfield.TextInputEditText
           ...
            android:inputType="textPassword" />

    </com.google.android.material.textfield.TextInputLayout>
<com.google.android.material.textfield.TextInputLayout
    ...
    app:counterEnabled="true"
    app:counterMaxLength="8">
    ...
</com.google.android.material.textfield.TextInputLayout>
在Password TextInputLayout元素上將app:errorEnabled屬性設定為true。 這將為文字欄位下方的錯誤訊息新增的錯提示。
<com.google.android.material.textfield.TextInputLayout
    ...
    app:errorEnabled="true">
    ...
</com.google.android.material.textfield.TextInputLayout>
<Button
   style="@style/Widget.Material3.Button"
   android:layout_width="wrap_content"
   android:layout_height="wrap_content"
   android:text="Filled button" />
<androidx.constraintlayout.widget.ConstraintLayout xmlns:android="http://schemas.android.com/apk/res/android"
    xmlns:app="http://schemas.android.com/apk/res-auto"
    android:layout_width="match_parent"
    android:layout_height="match_parent">

    <ImageView
        android:id="@+id/img_person"
        android:layout_width="100dp"
        android:layout_height="100dp"
        app:layout_constraintBottom_toTopOf="@id/username_input_text"
        app:layout_constraintEnd_toEndOf="parent"
        app:layout_constraintStart_toStartOf="parent"
        app:layout_constraintTop_toTopOf="parent"
        app:srcCompat="@drawable/ic_person" />

    <TextView
        android:id="@+id/tv_title"
        android:layout_width="wrap_content"
        android:layout_height="wrap_content"
        android:text="@string/login_title"
        app:layout_constraintBottom_toTopOf="@+id/username_input_text"
        app:layout_constraintEnd_toEndOf="parent"
        app:layout_constraintStart_toStartOf="parent"
        app:layout_constraintTop_toBottomOf="@+id/img_person" />

    <com.google.android.material.textfield.TextInputLayout
        android:id="@+id/username_input_text"
        style="@style/Widget.Material3.TextInputLayout.FilledBox"
        android:layout_width="match_parent"
        android:layout_height="wrap_content"
        android:layout_marginHorizontal="50dp"
        android:layout_marginVertical="30dp"
        android:hint="@string/login_hint_username"
        app:errorEnabled="true"
        app:layout_constraintBottom_toTopOf="@id/password_input_text"
        app:layout_constraintEnd_toEndOf="parent"
        app:layout_constraintStart_toStartOf="parent"
        app:layout_constraintTop_toBottomOf="@id/tv_title">

        <com.google.android.material.textfield.TextInputEditText
            android:id="@+id/username_edit_text"
            android:layout_width="match_parent"
            android:layout_height="wrap_content" />

    </com.google.android.material.textfield.TextInputLayout>

    <com.google.android.material.textfield.TextInputLayout
        android:id="@+id/password_input_text"
        style="@style/Widget.Material3.TextInputLayout.FilledBox"
        android:layout_width="match_parent"
        android:layout_height="wrap_content"
        android:layout_marginHorizontal="50dp"
        android:hint="@string/login_hint_password"
        app:counterEnabled="true"
        app:counterMaxLength="8"
        app:endIconMode="password_toggle"
        app:endIconDrawable="@mipmap/icon_closed_eye"
        app:errorEnabled="true"
        app:layout_constraintEnd_toEndOf="parent"
        app:layout_constraintStart_toStartOf="parent"
        app:layout_constraintTop_toBottomOf="@id/username_input_text">

        <com.google.android.material.textfield.TextInputEditText
            android:id="@+id/password_edit_text"
            android:layout_width="match_parent"
            android:layout_height="wrap_content"
            android:inputType="textPassword"/>

    </com.google.android.material.textfield.TextInputLayout>


    <Button
        android:id="@+id/btn_login"
        style="@style/Widget.Material3.Button"
        android:layout_width="wrap_content"
        android:layout_height="wrap_content"
        android:layout_marginVertical="20dp"
        android:text="@string/button_text_login"
        app:layout_constraintEnd_toEndOf="@id/password_input_text"
        app:layout_constraintTop_toBottomOf="@id/password_input_text" />

</androidx.constraintlayout.widget.ConstraintLayout>
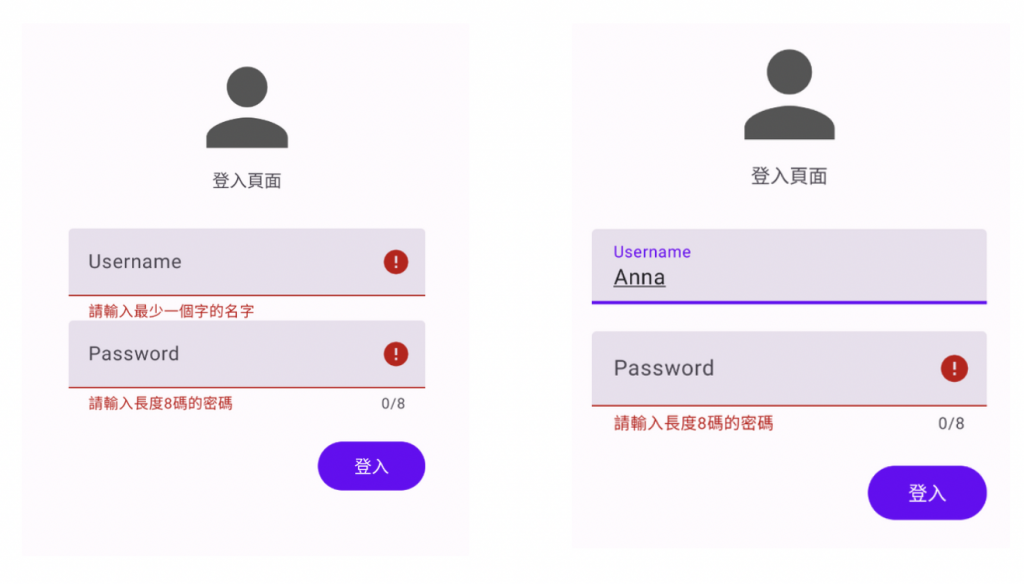
點擊按鈕判斷是否顯示Error提示情境
當用戶在未輸入時點擊登入按鈕,此時顯示Error提示訊息警示,用戶有輸入時透過doOnTextChange 動態偵測用戶輸入關閉Error警示提示。
TextInputLayout的ID.error方法設定自定義的提示訊息,清除error提示訊息時直接設定null
// Set error text
passwordInputText.error = getString(R.string.error)

// Clear error text
passwordInputText.error = null
doOnTextChange 動態偵測用戶輸入關閉error 警示提示,這個方法點進去看源碼實作其實是封裝TextWatcher的實作方法。
// Get input text
val passwordEditText = binding?.passwordEditText

passwordEditText.editText?.doOnTextChanged { text, _, _, _ ->
    // Respond to input text change
}
override fun onResume() {
        super.onResume()

        usernameEditText?.doOnTextChanged { _, _, _, count ->
            if (count > 0) {
                usernameInputText?.error = null
            }
        }

        passwordEditText?.doOnTextChanged { text, _, _, _ ->
            if ( text != null && text.length >= 8) {
                passwordInputText?.error = null
            }
        }
}

private fun inputTextValid() {
    val btnLogin = binding?.btnLogin
    val usernameEditText = binding?.usernameEditText
    val usernameInputText = binding?.usernameInputText
    val passwordEditText = binding?.passwordEditText
    val passwordInputText = binding?.passwordInputText

    btnLogin?.setOnClickListener {
           if (isUserNameValid(usernameEditText?.text) && isPasswordValid(passwordEditText?.text)) {
                // 都有輸入
                usernameInputText?.error = null
                passwordInputText?.error = null
                (activity as NavigationHost).navigateTo(ProductGridFragment(), false)
            } else {
                when {
                    isUserNameValid(usernameEditText?.text) -> {
                        // 只有輸入UserName
                        passwordInputText?.error = "請輸入長度8碼的密碼"
                    }
                    isPasswordValid(passwordEditText?.text) -> {
                        // 只有輸入Password
                        usernameInputText?.error = "請輸入最少一個字的名字"
                    }
                    else -> {
                        // 都沒有輸入
                        usernameInputText?.error = "請輸入最少一個字的名字"
                        passwordInputText?.error = "請輸入長度8碼的密碼"
                    }
                }
            }
        }
}

// 判斷Password欄位是否有輸入指定長度
private fun isPasswordValid(text: Editable?): Boolean {
    return text != null && text.length >= 8
}

// 判斷UserNamex欄位文字不為null
private fun isUserNameValid(text: Editable?): Boolean {
    return text != null && text.isNotEmpty()
}
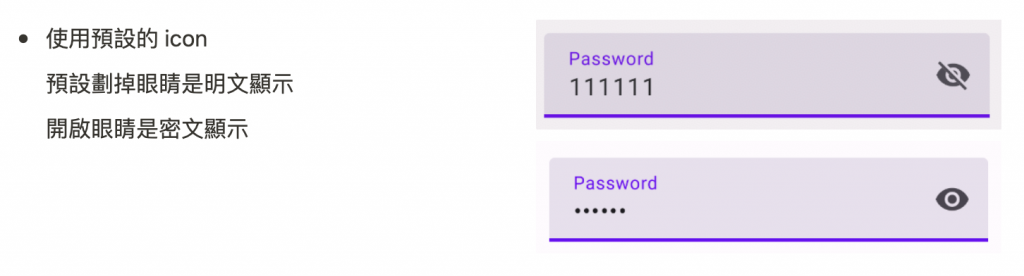
官方預設的顯示密碼、屏蔽密碼的icon切換很奇怪,所以稍微自己改一下,讓眼睛打開時密碼明文,閉起來時密碼密文顯示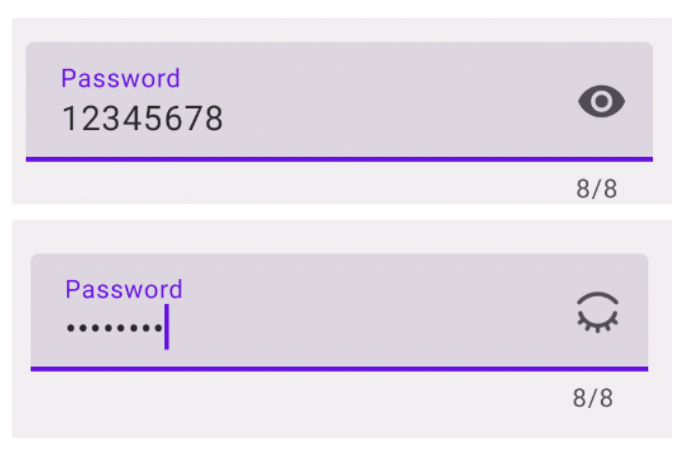
app:endIconDrawable="自定義" <com.google.android.material.textfield.TextInputLayout
...
app:endIconMode="password_toggle"
app:endIconDrawable="@mipmap/icon_closed_eye"
...>
<com.google.android.material.textfield.TextInputEditText
...
android:inputType="textPassword" />
</com.google.android.material.textfield.TextInputLayout>
InputType.TYPE_TEXT_VARIATION_VISIBLE_PASSWORD,和指定顯示密碼的icon 的設定passwordInputText?.endIconDrawable
setEndIconOnClickListener監聽點擊icon檢查PasswordTransformationMethod方法是否密文轉換,後續判斷getTransformation方法回傳明文為null張開眼睛icon,密文時閉眼icon,passwordInputText設定endIconDrawable讓icon進行切換。 private fun passwordEyeVisibility() {
// // 預設顯示密碼明文
// passwordEditText?.inputType = InputType.TYPE_TEXT_VARIATION_VISIBLE_PASSWORD
// passwordInputText?.endIconDrawable = context?.let { AppCompatResources.getDrawable(it, R.drawable.ic_open_eye) }
passwordInputText?.setEndIconOnClickListener {
// 檢查是否有 PasswordTransformationMethod 密碼轉換方法
val hasPasswordTransformation = passwordEditText?.transformationMethod is PasswordTransformationMethod
if (hasPasswordTransformation) {
passwordEditText?.transformationMethod = null
} else {
passwordEditText?.transformationMethod = PasswordTransformationMethod.getInstance()
}
// 取得密碼文字來設定字定義 endIconDrawable
setCustomizeEndIcon(passwordEditText)
}
}
private fun setCustomizeEndIcon(editText: EditText?) {
// getTransformation方法回傳明文為null張開眼睛icon,密文時閉眼icon
val passwordSource = editText?.transformationMethod?.getTransformation(editText.text, editText)
if (passwordSource == null) {
// 密碼明文
passwordInputText?.endIconDrawable = context?.let {
AppCompatResources.getDrawable(it, R.drawable.ic_open_eye)
}
} else {
// 密碼密文
passwordInputText?.endIconDrawable = context?.let {
AppCompatResources.getDrawable(it, R.mipmap.icon_closed_eye)
}
}
}
這樣就完成一般的登入頁面的檢核邏輯囉~
歡迎下載程式碼
感謝您看到這邊
明天就來介紹常用的 Icon buttons。
參考資料
官方提供練習和跟著做 MDC-101 Android:Material Components (MDC) Basics (Kotlin)